17 3D Pen Crafts for Children and Adults
A 3D pen is not just a toy for drawing with plastic and creating 3D objects. It can also be used for educational activities with children, minor household repairs, or interesting crafts.
5-Minute Crafts would like to show you 17 crafts made with a 3D pen, among which everyone will find something interesting.
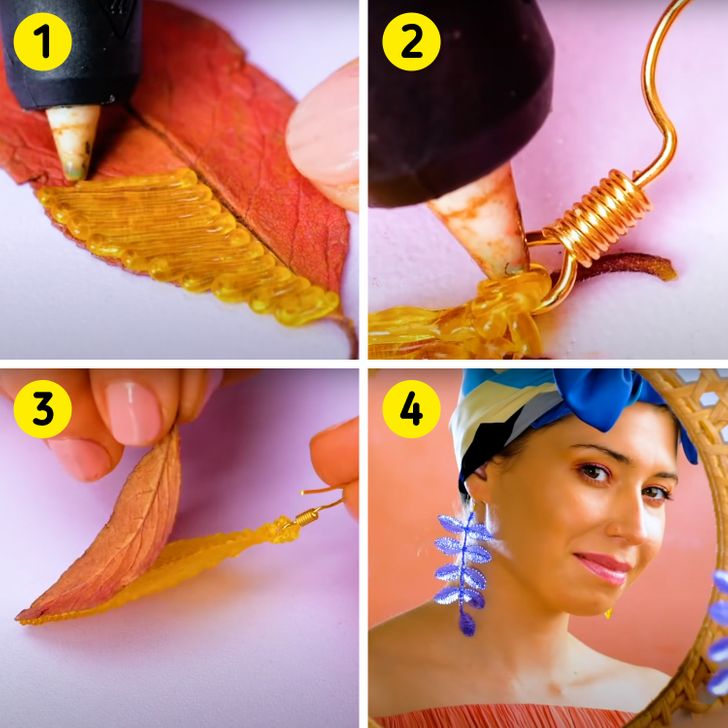
1. Earrings and pendants
- Use a dried leaf from any plant as a base. Create plastic strings using one side of it, evenly painting over the surface.
- Take open earring hooks and attach the resulted leaves to them.
- Peel off the real leaves from the craft.
- Try using the leaves of different plants as a base to create unusual earring designs.
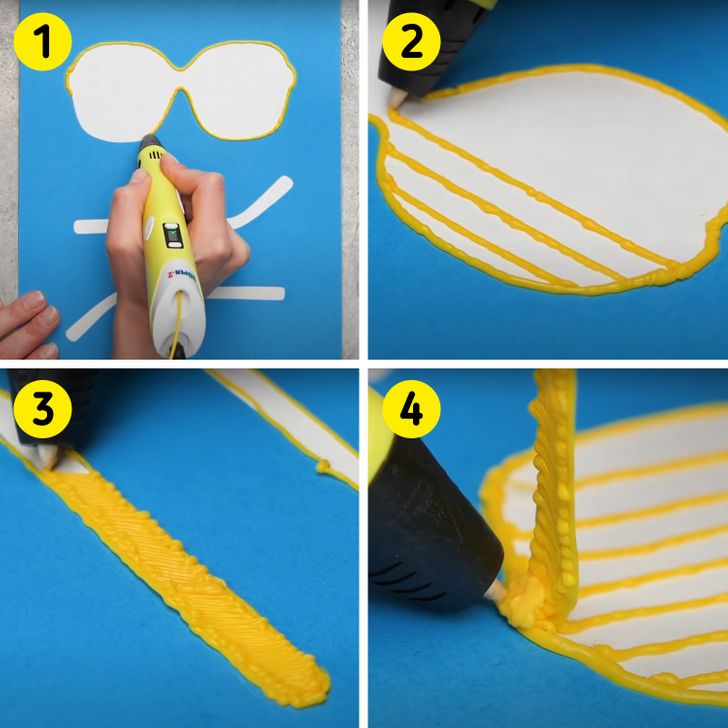
2. Eyeglasses
- Prepare stencils for glasses and 2 temples on a piece of paper. Paint over the frame of the glasses by outlining its contour.
- Make horizontal stripes where the lenses should be.
- Then outline and paint over the temples. To make them durable, put the plastic strings as tightly to each other as possible.
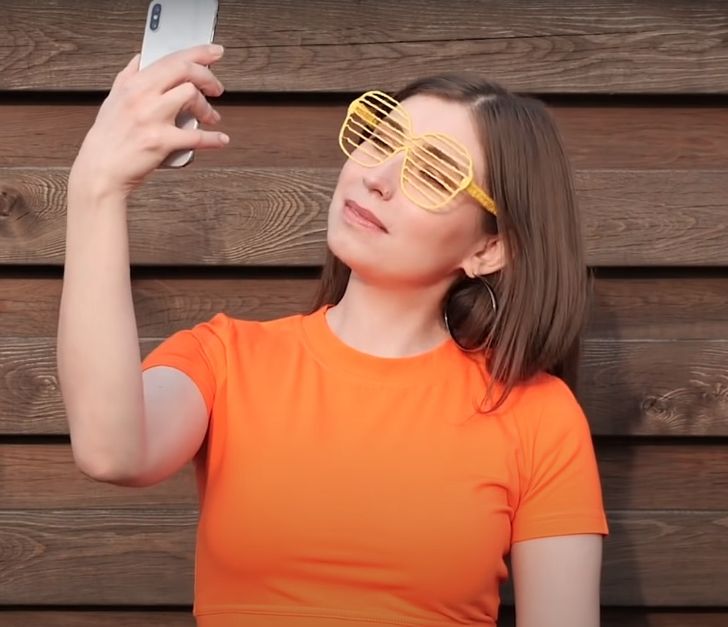
- Use the pen to attach the temples to the frame. Your glasses are ready!
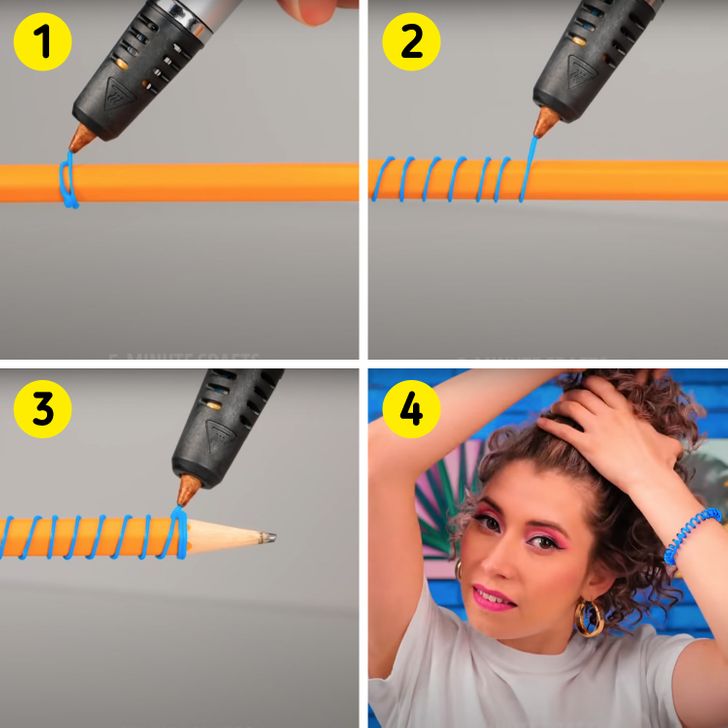
3. A spiral hair tie
- Take a pencil and wrap it with plastic strings to make a coil.
- Continue wrapping around the pencil, moving toward the opposite end.
- Make another ring there.
- Remove the craft from the pencil and fasten the ends together by gluing them with the strings of the 3D pen. The finished craft can be used as a spiral hair tie or an interesting bracelet. For a high-quality craft, use FLEXY 3D pen plastic.
4. A lampshade
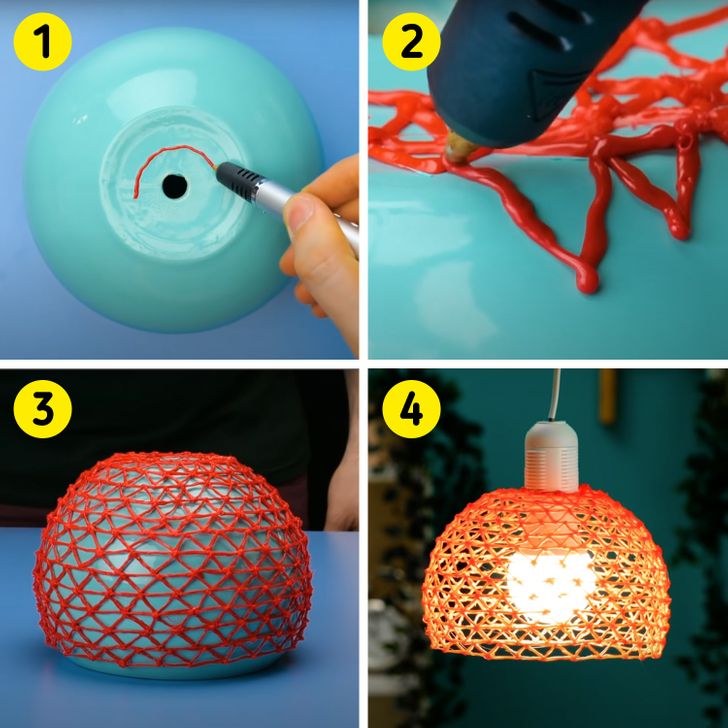
- Take an object whose shape will be the base for your lampshade. We used a flower pot. Draw a circle in the center — its diameter should be large enough for you to attach the lampshade to the lamp holder.
- Draw a row of zigzags around the circle. Then draw a circle connecting the row of zigzags, then add another row of zigzags.
- Continue until you reach the edge of the pot. If you wish, you can come up with your own grid design.
- Remove the craft from the pot and attach it to the lamp holder.
5. 3D print on a T-shirt
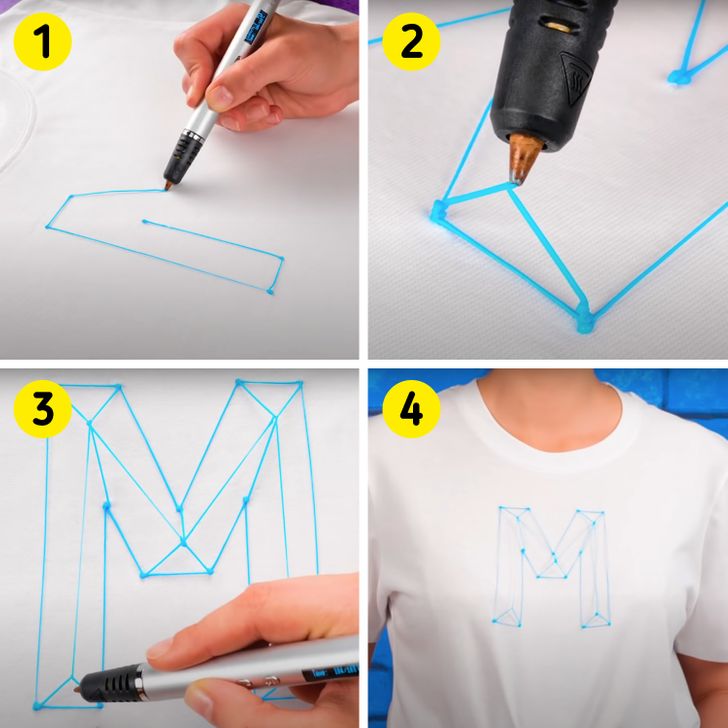
- Draw the outlines of the letter on the front of the t-shirt. To make it easier, you can mark the connection points of the lines with a pencil before you start drawing.
- Once the outline of the letter is ready, draw geometric shapes inside it, so that the lines that they are composed of intersect in the air, giving the letter a 3D look.
- Finish decorating the letter as shown in the photo above.
- The 3D print t-shirt is ready.
6. A coffee cup sleeve
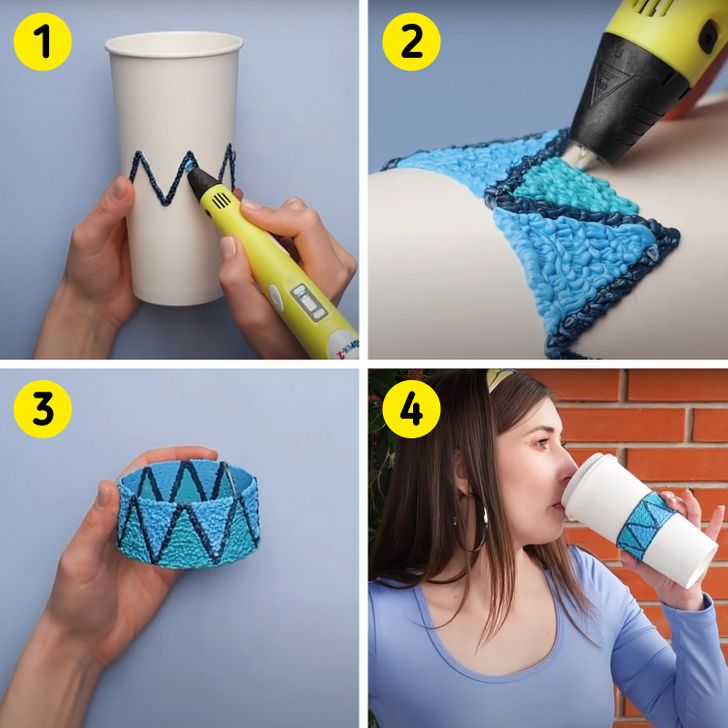
- Use a regular paper cup as the base on which you will be making a holder.
- Use the 3D pen to create a ring around the cup: try repeating the zigzag design shown in the photo above, or create your own.
- Remove the finished ring from the cup.
- Now you can use it as a sleeve for a reusable cup or paper cup with a hot drink inside.
7. Home shoes
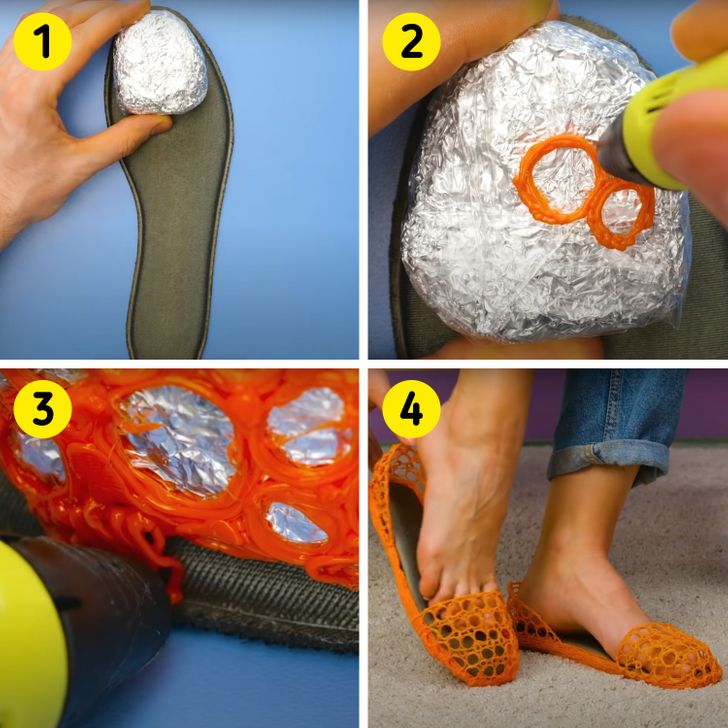
- Take a ready-made cushioned insole. Roll up a ball of foil and cover it with plastic wrap. This will be the base for the shoe’s toe. Now, you need to make it in a certain shape to make sure your feet feel comfortable. You can simply tuck this ball inside your regular sandals, shoes, or sneakers that you wear. Then place the crumpled ball on top of the insole.
- Use the pen to outline it with circles connected to each other. Continue until the toe of your shoe is ready.
- Attach the toe to the insole by making a thick connecting layer of strings between them. Before that, you can cover the parts with universal or silicone glue for better fixation.
- If you want to, you can make the heel in the same way and connect it to the insole. You can use a satin ribbon as an additional fastener: pull it through one of the holes in the heel of the shoe and tie it around your ankle.
8. A keychain
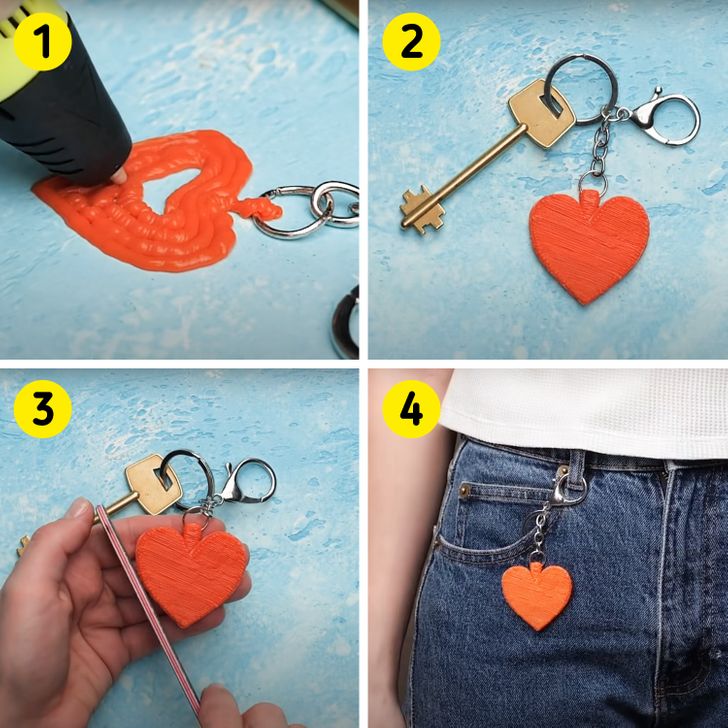
- Prepare accessories for the keychain (you can use a chain from an old similar item). Draw a heart with the pen, and connect it to the outermost link of the chain.
- Turn the heart over: on the other side, the texture will be neat and even. This side will be the front.
- File the edges of the heart with a regular nail file or sandpaper.
- The keychain is ready!
9. A hair decoration
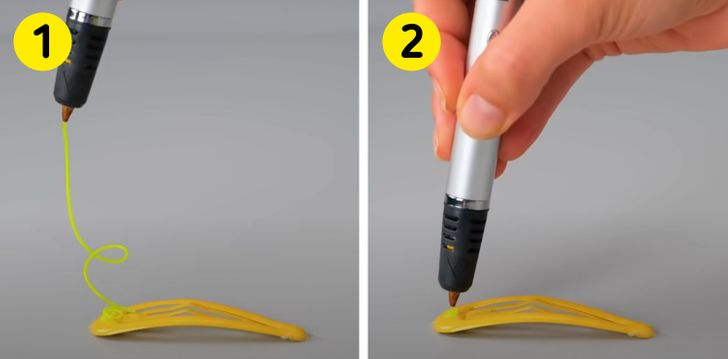
1. Take a hair clip. Use the 3D pen to make a small knot in the middle of the wide front part of the hair clip.
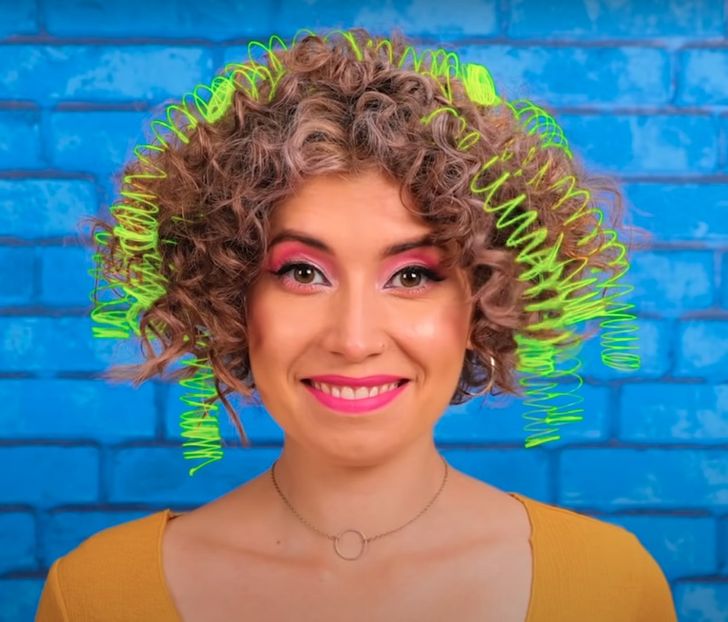
2. Pull a plastic string up from the clip, twisting it into a spiral right in the air. As a result, you will have a hair clip with a spiral that will look cool in curly hair.
10. A hat
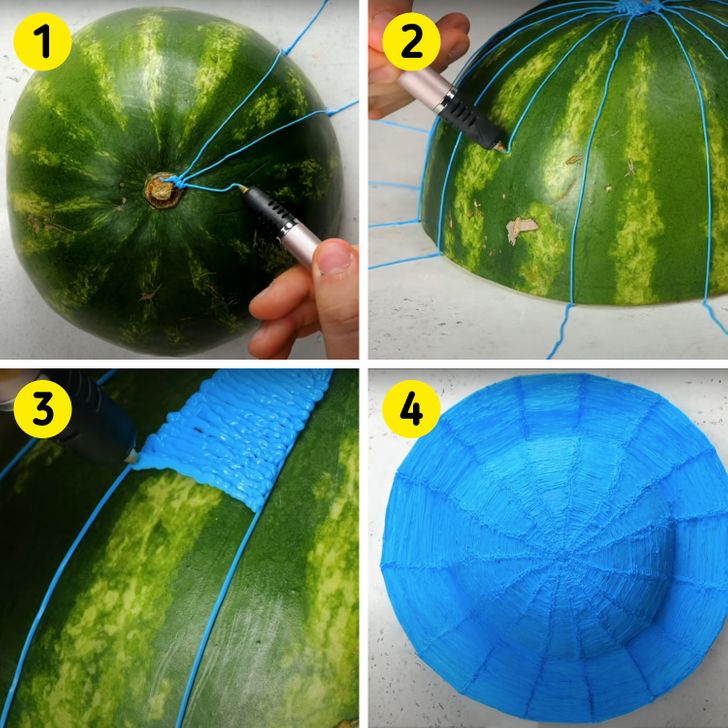
- Take any semicircular object that can become the base for the hat — like half a watermelon, for example. Pull the plastic strings from the center to the bottom.
- The farther the strings go from the edge of the watermelon, the wider the hat brim will be.
- Now paint over the strip of strings on the watermelon thoroughly.
- The hat is ready. You can also decorate it with flowers or a satin ribbon.
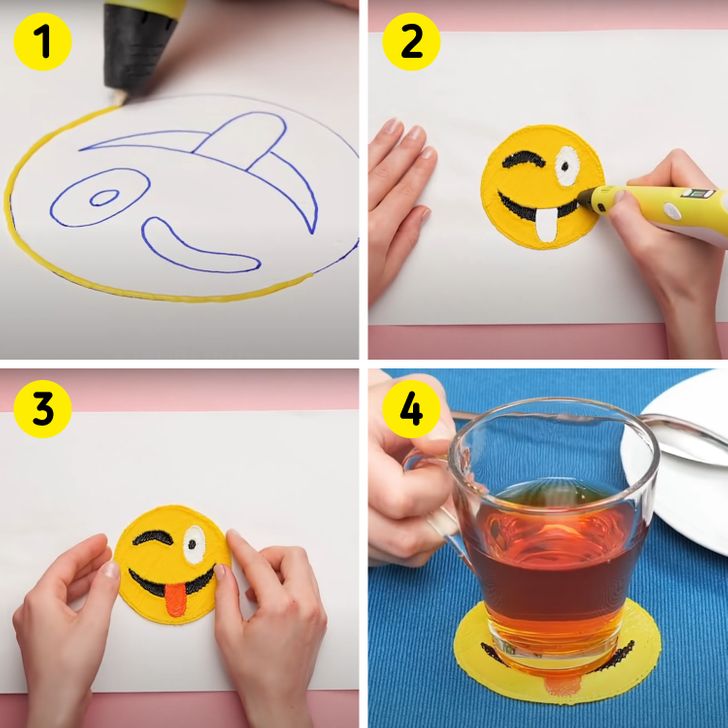
11. A glass coaster
- Draw the design of the future coaster on a sheet of paper. Fill the circle with the main color of your choice.
- Use other colors to draw the eyes and mouth of the smiling face.
- Remove the finished craft from the sheet of paper.
- Use it as a coaster for glasses or mugs.
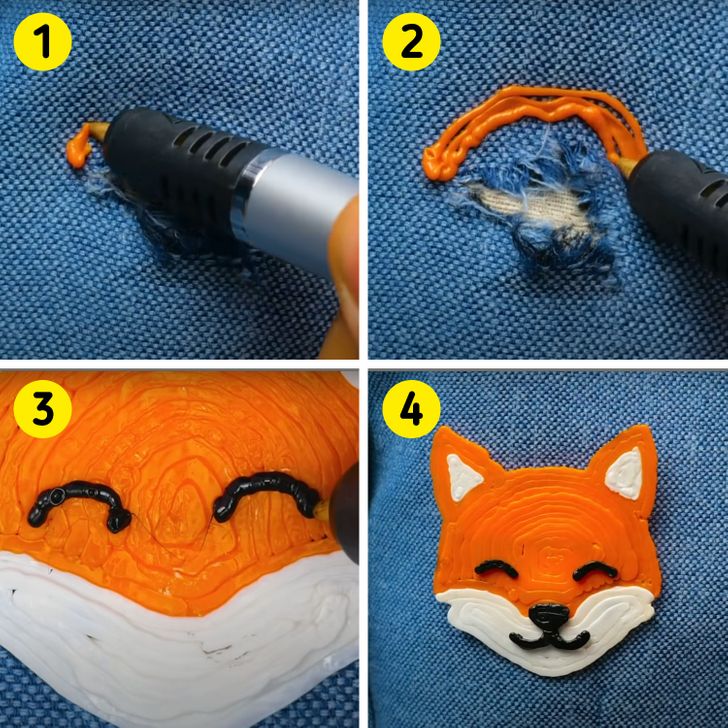
12. A patch in the shape of a brooch or a badge
- Start drawing a fox’s face about a couple of millimeters away from the hole in the item of clothing.
- Apply plastic strings close to each other so that the finished design serves as a reliable patch.
- Draw eyes, a nose, and a mouth on the fox’s face.
- The patch is ready. It’s recommended to hand wash the item of clothing in warm water, and to not iron the place where the patch is located.
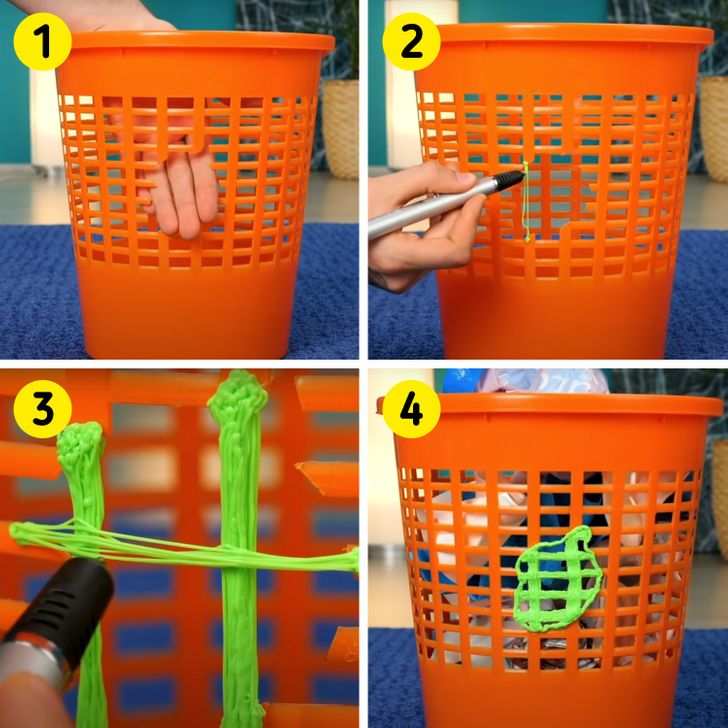
13. Repairing a bin or a basket
- Clean the hole and file off any sharp edges with a nail file or sandpaper.
- Join the edges with plastic strings to restore the original mesh.
- To make the construction durable, use many strings laid on top of each other in several rows.
- Additionally, you can circle the finished “patch.”
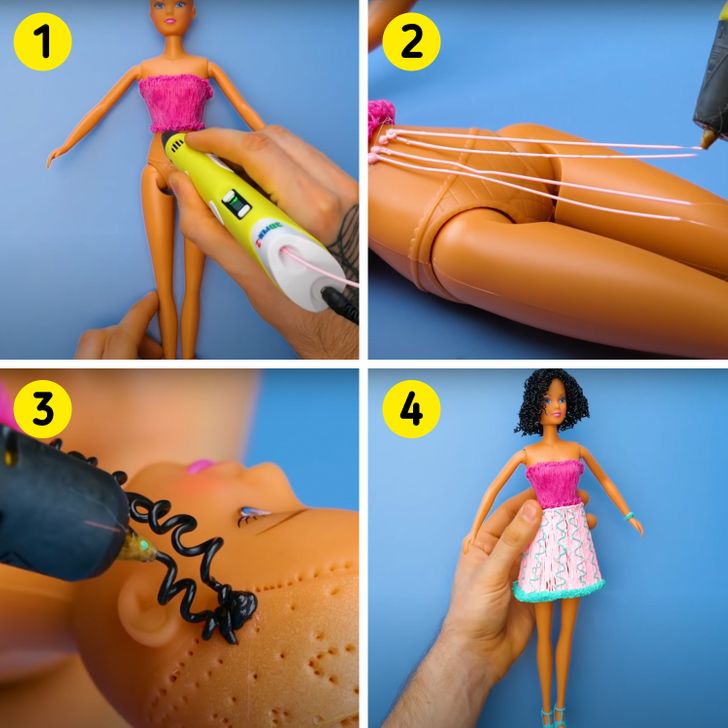
14. A doll’s hair and outfit
- Paint over the doll’s torso to make a top. Don’t be afraid to experiment with colors and shapes, the design of the finished item fully depends on your imagination.
- To make a skirt, draw knots on the doll’s waist and pull the strings from them so that they freeze in the air. Add as many strings as possible so that the skirt fully covers the doll’s body.
- Use black strings to glue the curls to the doll’s head. The more strings you add, the fuller her hairstyle will be.
- The finished crafts can be removed. But the top and skirt has to be cut on one side to be taken off. However, you can glue them again using 1 to 2 strings each time you dress the doll.
15. Handles for a chest of drawers
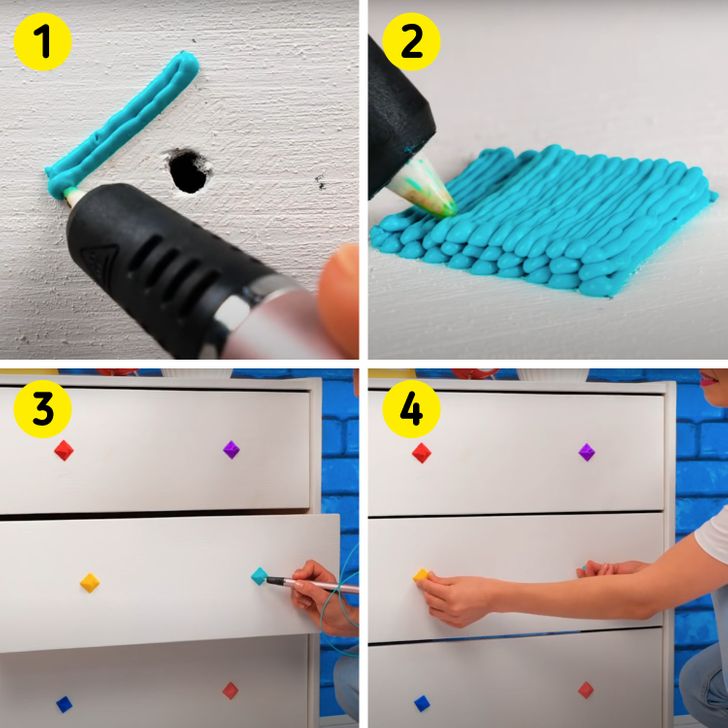
- Plastic strings stick to a rough surface best of all, so first, you need to sandpaper the places for the future handles. Mark the corners of the diamonds with a pencil. Start applying strings as shown in the photo above. Make the first row to get a diamond.
- To make the handle draw in the shape of a pyramid, make a few more rows, placing the strings of each successive row in the gaps between the strings of the previous row, gradually moving away from the edge. Continue until you get a pyramid.
- Make other handles, in the same way, using different colors.
- The handles are ready. You can use additional all-purpose glue to secure the handles tighter to the chest of drawers.
16. A phone case
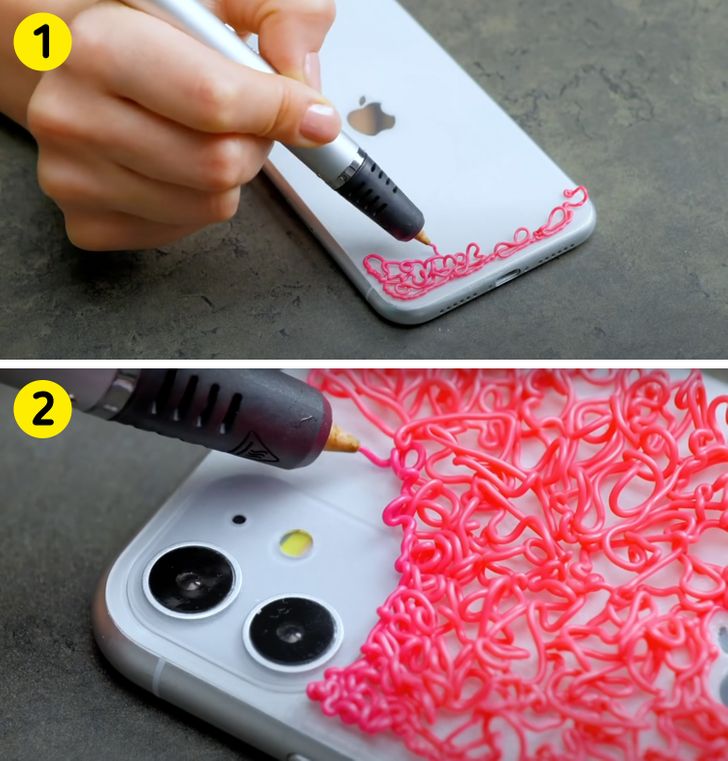
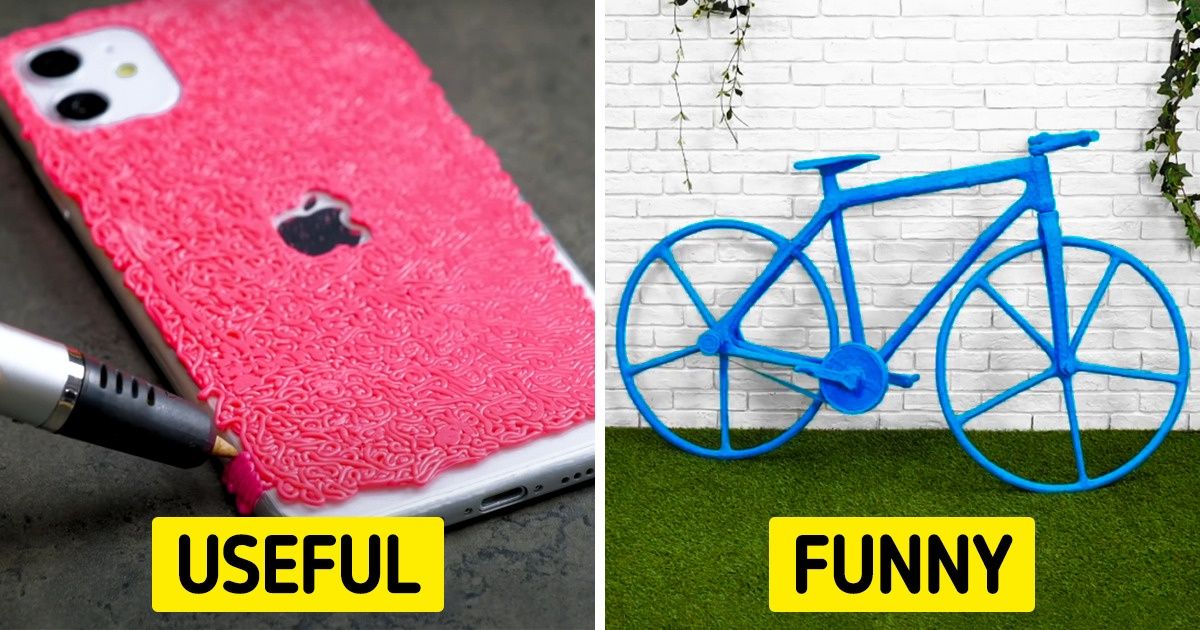
1. Apply the plastic strings of the 3D pen to the back of your phone in a random pattern. Leave the logo and camera lenses uncovered.
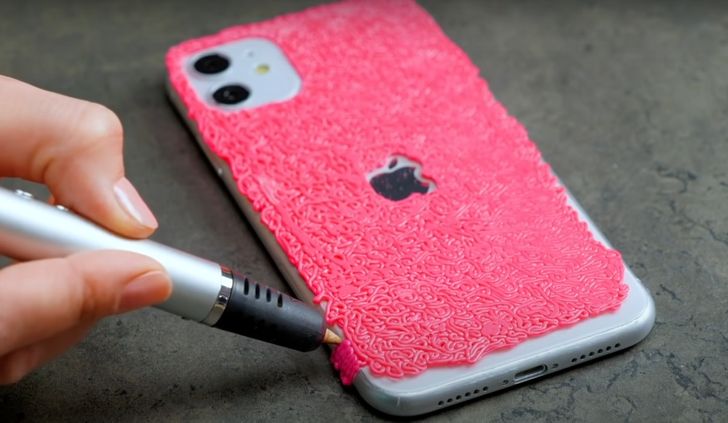
2. The more knots and curls you add, the thicker the cover will be. Remove the phone and put baking paper on top of the future case, then iron it with a hot iron to melt the strings.
Once the top panel is ready, start working on the edges. Place the strings close to each other so that the sides of the case are firmly attached to the phone. Remember to leave holes for the connectors and buttons. Let it dry. This way, you can create cases with different designs and give them to your friends. By the way, this case will also become a shockproof cover for the phone.
17. A bicycle
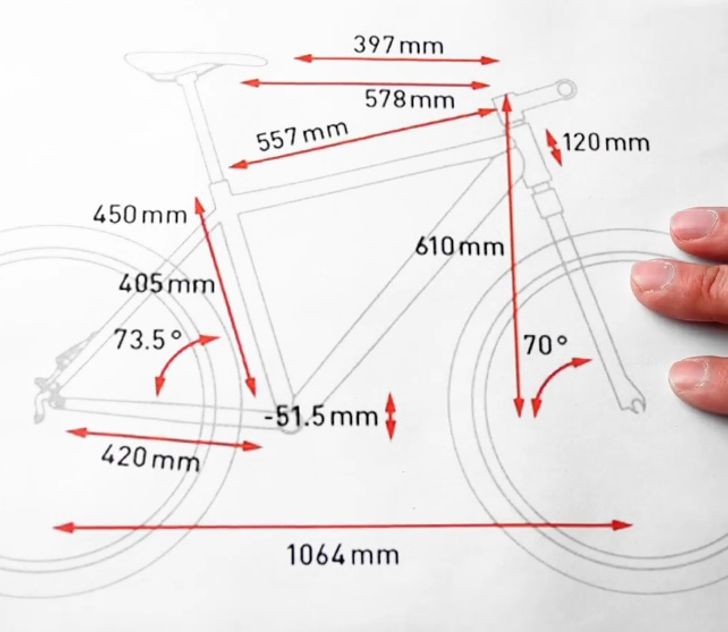
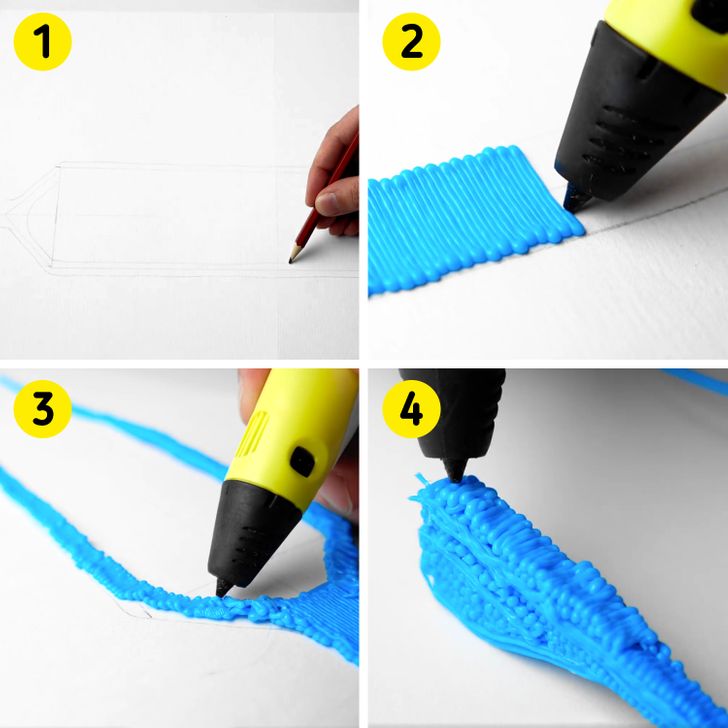
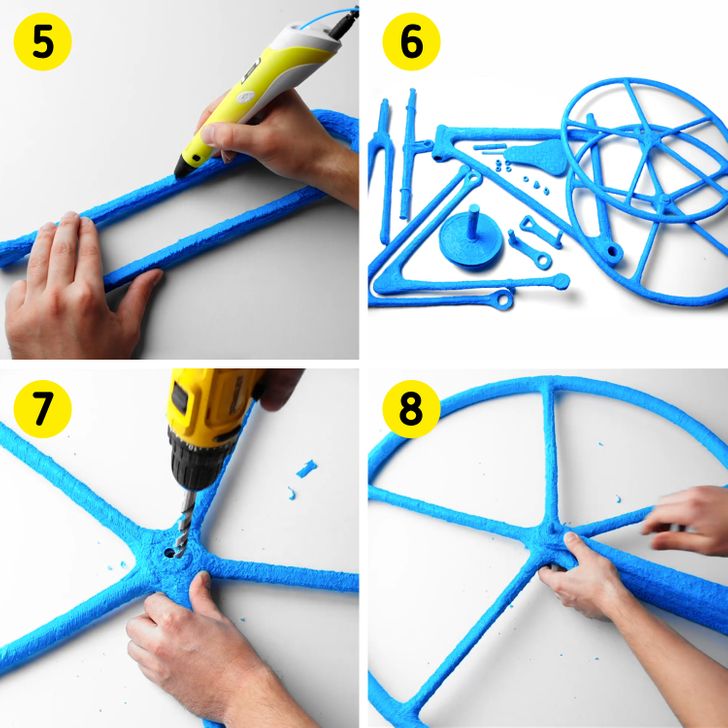
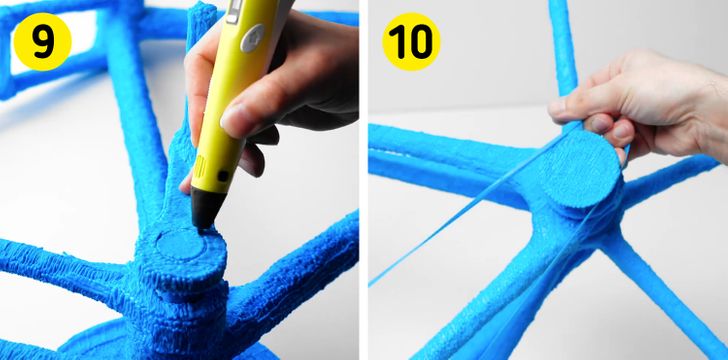
Before you start, make a diagram of the bike parts. Sizes may vary. The easiest way is to measure a real bike and write the measurements down so you can use them later for a stencil.
1. Draw the outlines of the bike parts on tracing paper, following the measurements you wrote down (in a 1:1 ratio).
2. Start painting the parts over by applying strings directly onto the tracing paper, tightly against each other.
3-4. Add new layers to give each detail the desired volume.
5. Stack the strings tightly on each other so that one part doesn’t have unnecessary hollows.
6. Make small screws and nuts to hold the parts together, in the same way.
7. Use a drill to make the desired holes in the finished parts.
8. Connect the parts together.
9. Use a 3D pen to glue parts, screws, and nuts.
10. Attach an elastic band instead of a chain. Done!
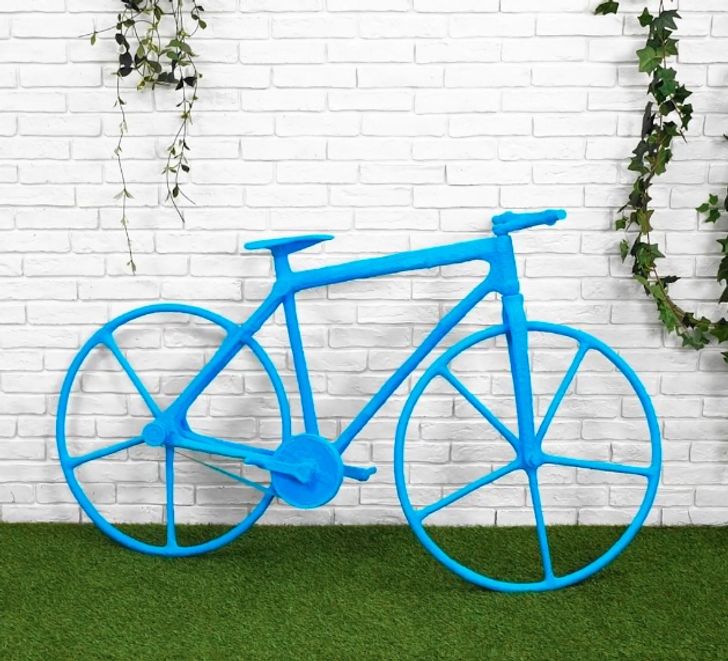
You won’t be able to use this bicycle like you would a real one, but it can become a nice decoration for your home or garden.
