5 Different Ways to Tackle Flower Embroidery for Beginners
Embroidery is a form of art that consists of decorating fabrics and other surfaces using a needle and different materials, like thread and wool. Even though it’s an old and beautiful technique, many people don’t put it into practice since they consider it to be too complex.
5-Minute Crafts wants to teach you, step by step, 5 easy and different ways to embroider flowers to decorate whatever you’d like.
Materials
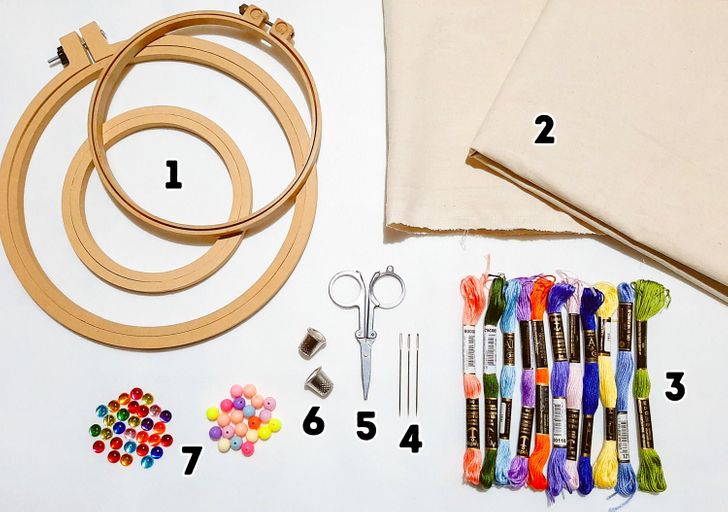
For these different forms of embroidering, you’ll need:
-
An embroidery hoop: This element will help you hold the fabric taught and secure, avoiding it from slipping while you’re working. It may be of any material of your choice, whether it be wooden, bamboo, or even plastic. Its size will depend on the surface you are working on and the dimensions of the embroidery.
-
Embroidery fabrics: You may embroider on a specific type of item such as a tablecloth, curtains, or clothing. You may also choose to embroider a piece of fabric so that you can later add this pattern to another item. In this case, you should choose natural fabrics, such as cotton and linen. If you want to embroider another type of fabric, make sure that it’s easy to pierce as well as resistant. Otherwise, it could tear due to the tension of the floss.
-
Colored thread or wool: You can pick the kind that is specifically used for embroidering (like those that you see in the picture) or yarn, ribbon, lace, or rattail cord, among others. Choose the option most suitable for your project as well as something resistant and easy to work with.
-
Needles: Unlike the normal ones, embroidery needles have bigger eyelets to make threading thicker floss easier. They come in different sizes. The best option will be the kind that allows you to embroider with the floss of your choice while leaving no visible hole around it.
-
Scissors
-
Thimble (optional): If you’re not used to sewing or handling needles or you wish to protect your fingers, you can use a thimble for safety.
-
Colored beads or gems (optional)
-
Glue (optional): It can be textile, universal, or even silicone (either hot or cold).
How to set up the fabric
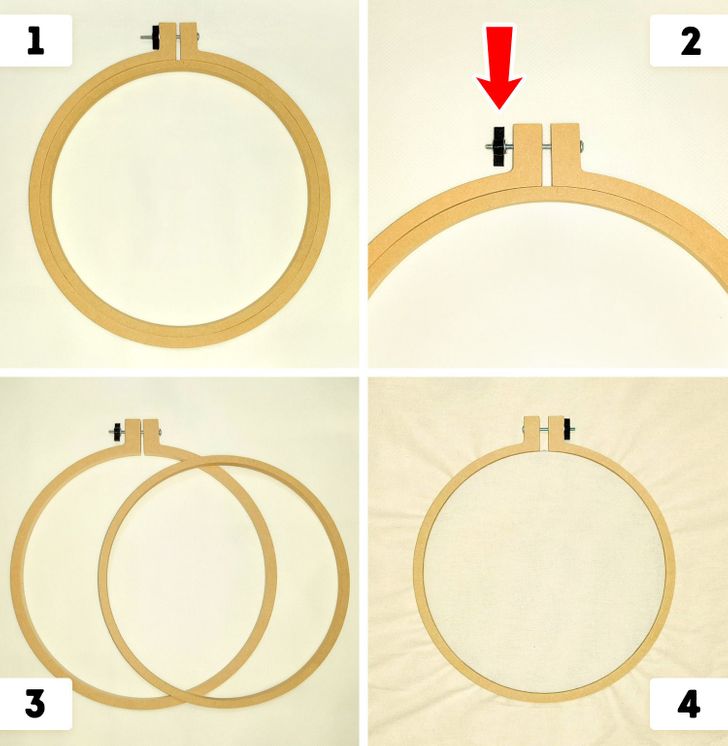
-
Get the embroidery hoop.
-
Loosen the screw or tightening system that holds together both parts of the hoop.
-
Split the 2 rings apart. Remove the bigger one (the one with the tightening system) and place the smaller one aside on your table or workstation. Lay the fabric on the small ring.
-
Pick up the big ring and mount it over the fabric so that it fits together with the small ring. Stretch the fabric and tighten the screw until it no longer turns. The fabric should be completely stretched and tight. If there are any wrinkles or it’s not tight enough, then loosen the embroidery hoop and stretch the fabric again. Tighten once more.
Pattern 1 — a 5-petal flower
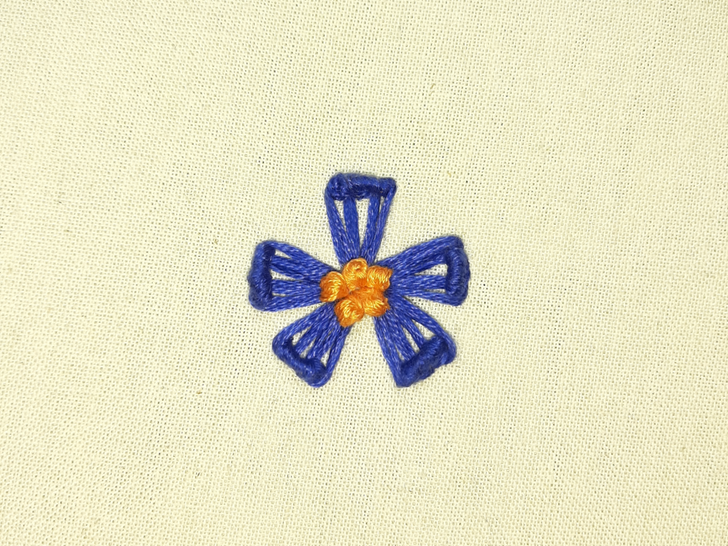
-
Thread the needle.
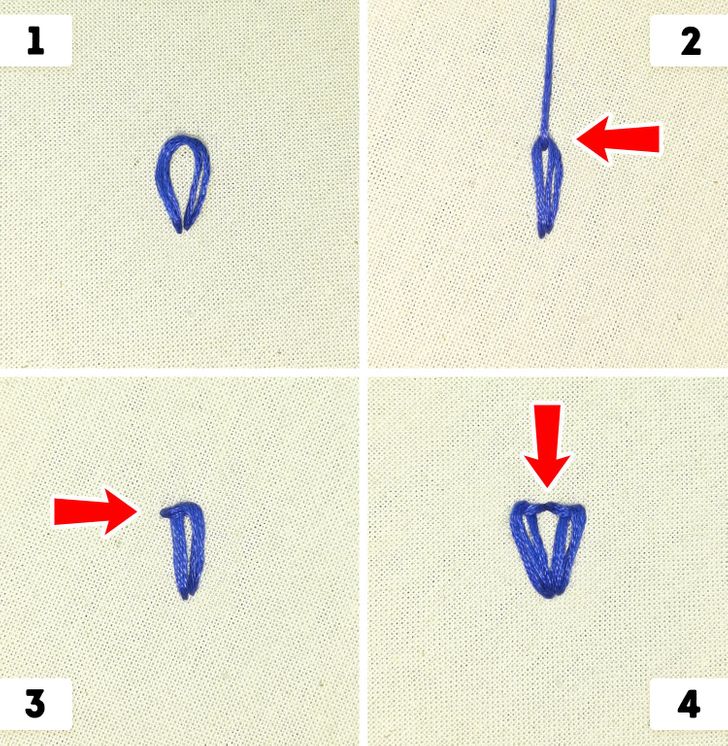
-
Bring the needle from the back of the fabric through to the front and then push it back once more, forming a loose loop. Its size will depend on the dimension you choose for each petal.
-
Push the needle from the back through to the front, but this time, do it inside of the loop, as is shown in the picture.
-
Bring the needle to the side of the loop and pierce the fabric, securing the loop.
-
Bring your needle from the back of the fabric through to the front at the same place where you did the first loop, and make another one. It should be far apart from the first loop. Secure it as shown in the picture. It’s important for both stitches to be in between the 2 loops.
-
Push the needle to the front of the fabric through the middle of the left loop.
-
Bring your needle to the back through the right loop and then push it up again through the middle of the other loop just as you did in the previous step.
-
With the needle still inserted in the fabric, wind the floss around it to make a knotted stitch. The number of times you wind it will depend on the distance you’ve left between both loops. In this case, it was wound 6 times.
-
Finish taking the needle out of the fabric and adjust the floss that you wound around it so that it looks like what you see in the picture. Follow the same steps to make the other petals.
-
For the center, you have to make 5 more knotted stitches in between the rest of the petals. In order to shape it into a ball, push the needle from the back through to the front of the fabric, wind the floss around it, and push it down through the same spot where you first inserted it.
Pattern 2 — a miniature rose
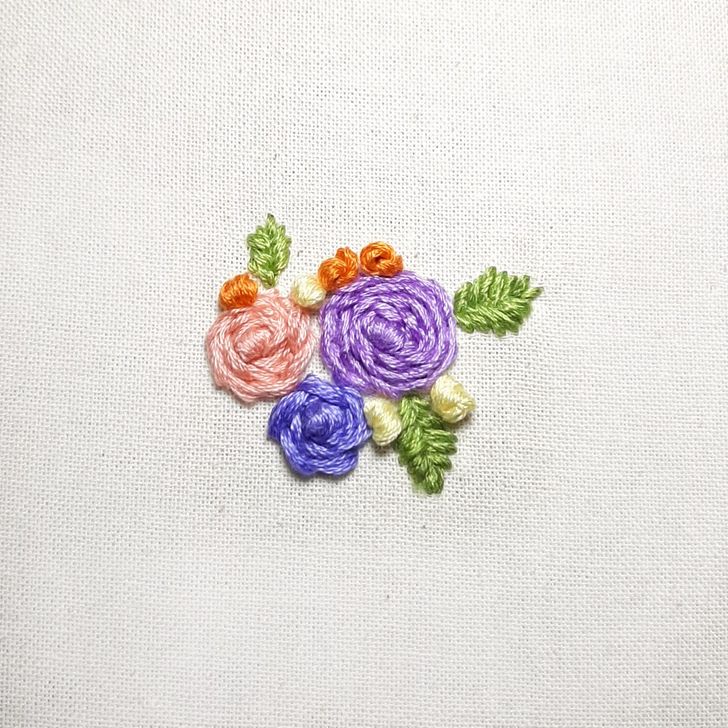
-
Thread the needle.
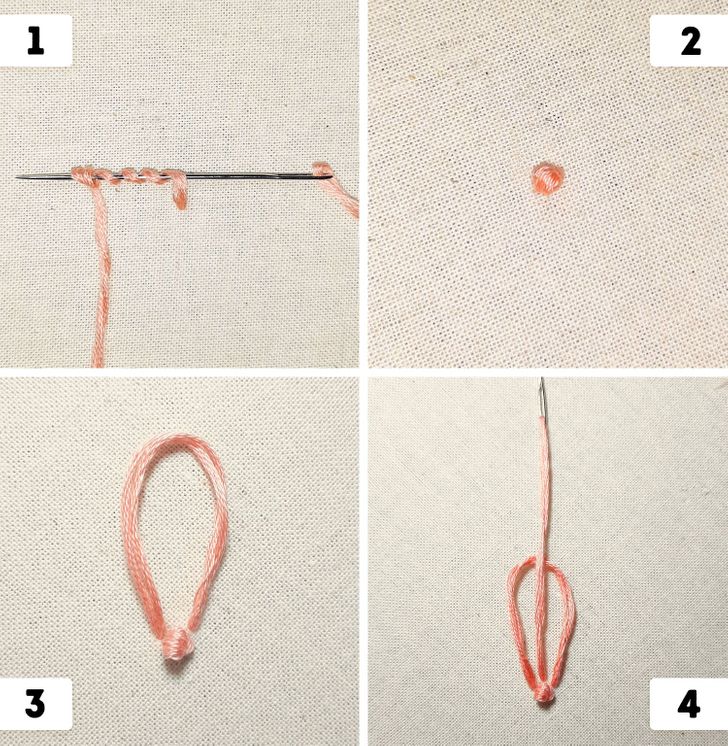
How to embroider the flower:
-
Wind the floss around the needle.
-
Make a knotted stitch. This will be the center of the flower.
-
Push the needle from the back through to the front of the fabric, forming a loose loop next to the center.
-
Bring the needle through the middle of the loop and pull to tighten it.
-
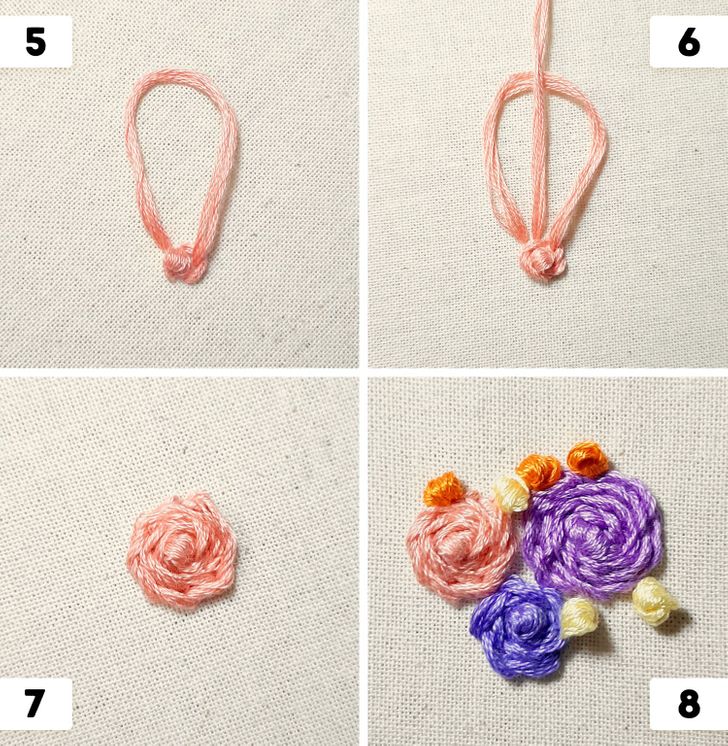
Push the needle down to the back to form another loop next to the one you’ve just fastened.
-
Get the floss through the middle of the loop and pull to tighten it.
-
Repeat steps 5 and 6 until the rose is the desired size.
-
Add more roses and some knotted stitches to simulate flower buds.
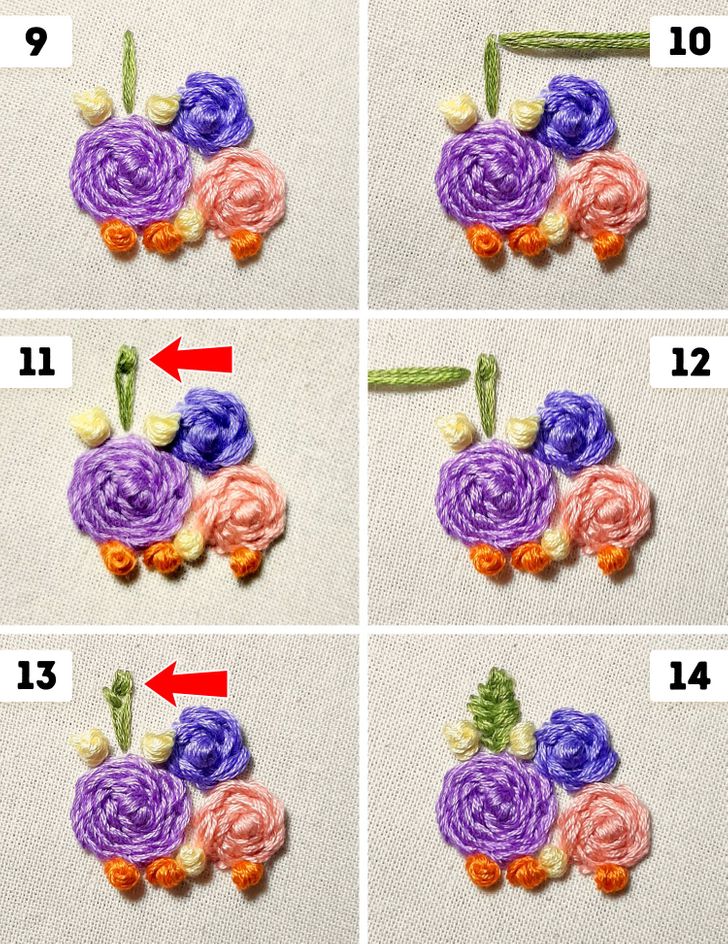
How to embroider the leaves:
-
Bring the needle from the back through to the front and then push it down again to make a long stitch. This will be the center of the leaf, and its size will depend on how large you want it to be.
-
Push the needle through to the front, right next to the upper side of the stitch, as shown in the picture.
-
Bring the needle down through the middle of the central stitch.
-
Push the needle up through the opposite side of the previous stitch, as shown in the picture.
-
Bring the needle down through the middle of the central stitch.
-
As you work your way down, increase the distance between each stitch and the center of the leaf. Once you’re halfway, shorten the distance. You’ll end up getting the perfect shape. You may add as many leaves as you’d like.
Pattern 3 — lavender
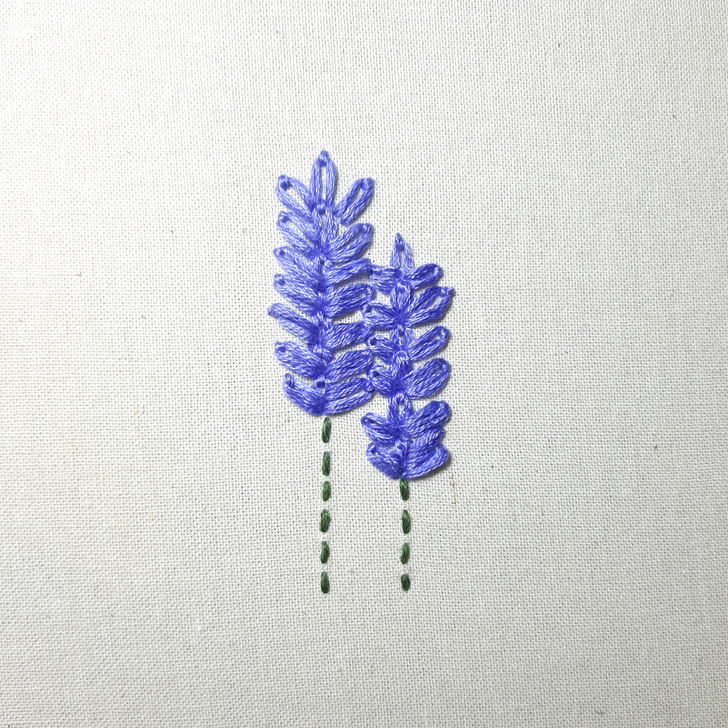
-
Thread the needle.
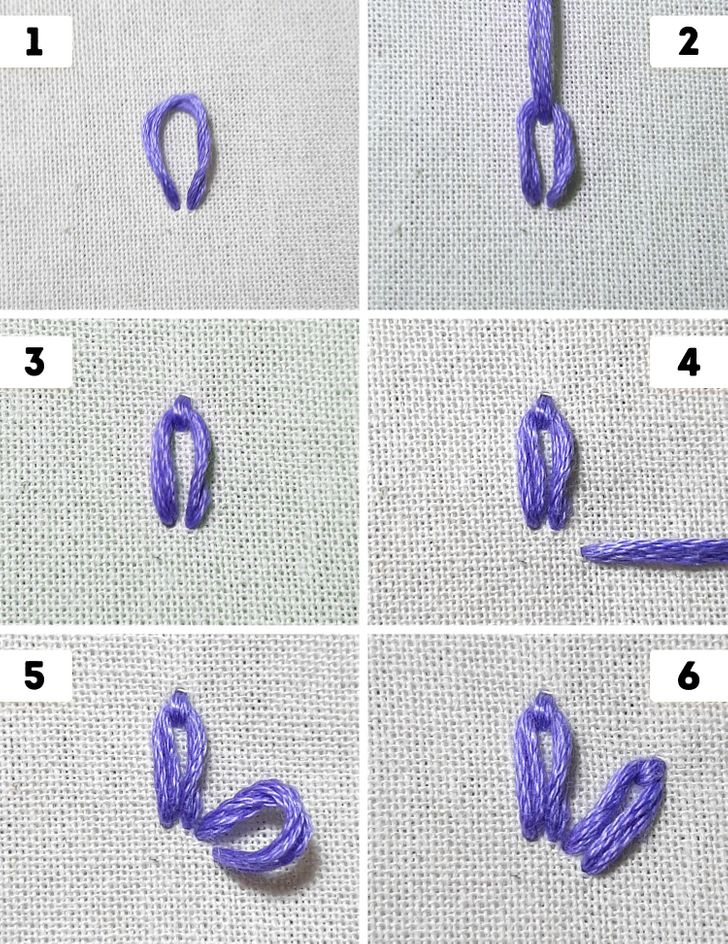
How to embroider the flower:
-
Bring the needle through to the front of the fabric and then push it back down, forming a loose loop. Its size will depend on the dimensions you wish each petal to have.
-
Push the needle to the front but inside the loop, as shown in the picture.
-
Bring the needle down and pierce the fabric, fastening the loop.
-
Push the needle to the front of the fabric, to one side, and under the first loop, as shown in the picture.
-
Bring the needle down, forming a loose loop.
-
Bring the needle up and pierce the fabric, fastening the loop.
-
Repeat steps 1, 2, and 3 to make the petals. You may choose to add as many as you want as long as the real shape of the embroidered flower doesn’t get distorted.
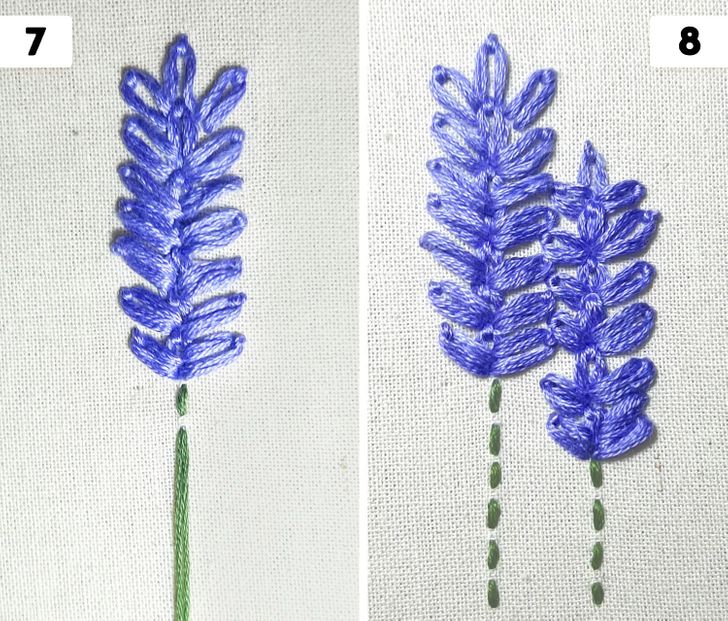
How to embroider the stem:
-
For the stem, you just need to push the needle through from the back to the front. Then, push it back down. Keep making stitches until the stem reaches the size you desire.
-
You may add some more flowers on the sides and even make a lavender bouquet.
Pattern 4 — spider lily
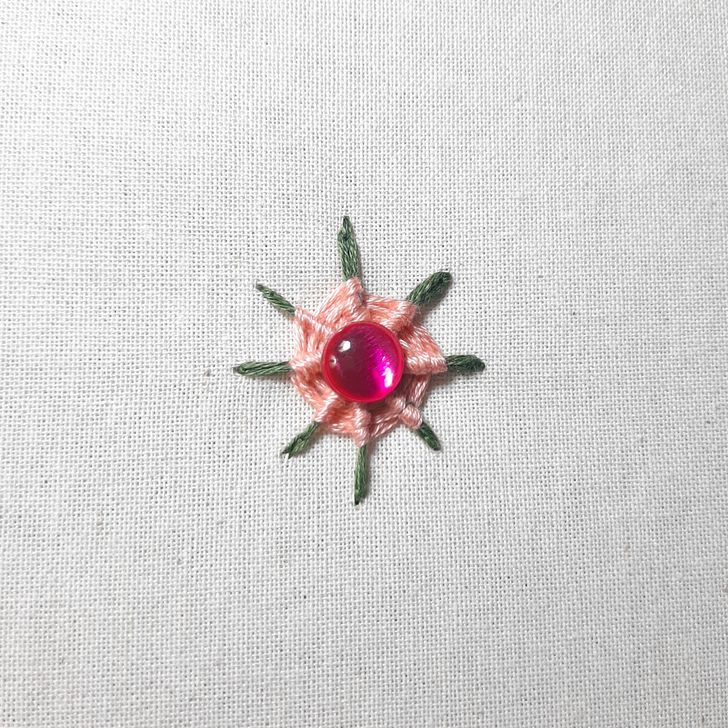
-
Thread the needle.
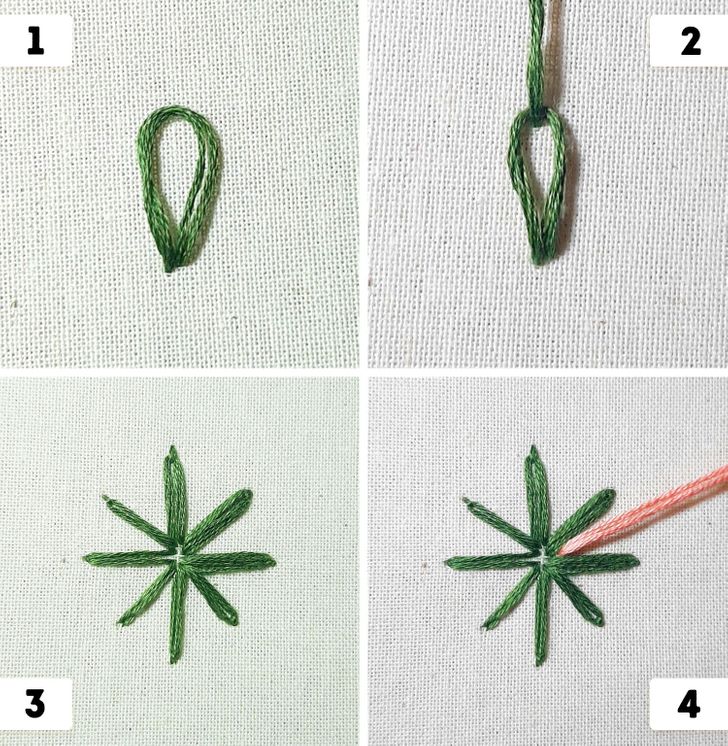
-
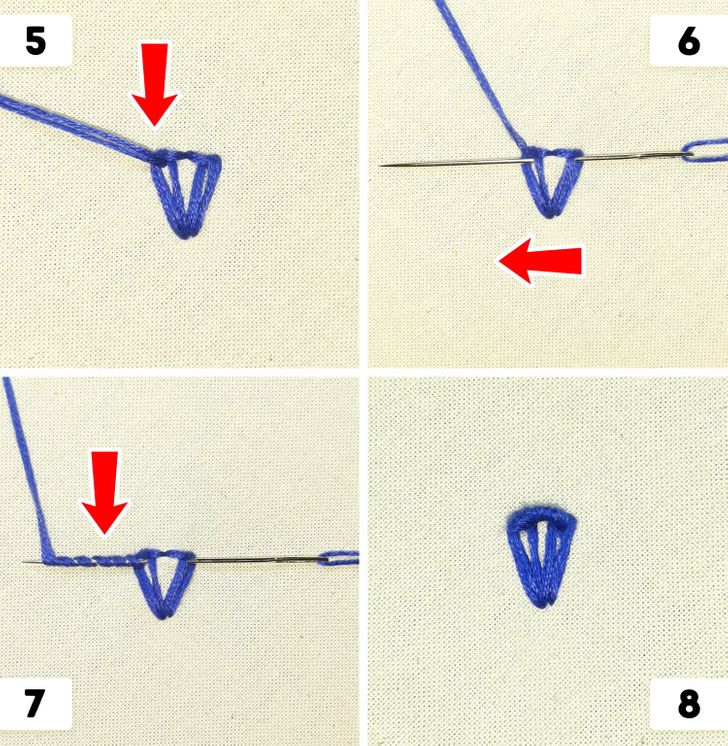
Bring your needle from the back of the fabric through to the front and then push it back down, forming a loose loop. Its size will depend on the dimensions you choose each petal to be.
-
Push the needle through to the front but inside the loop, as shown in the picture. Then bring the needle up and pierce the fabric, fastening the loop.
-
Repeat the first 2 steps until you get 8 petals.
-
Push the needle to the front but through the middle of the 2 petals, as shown in the picture.
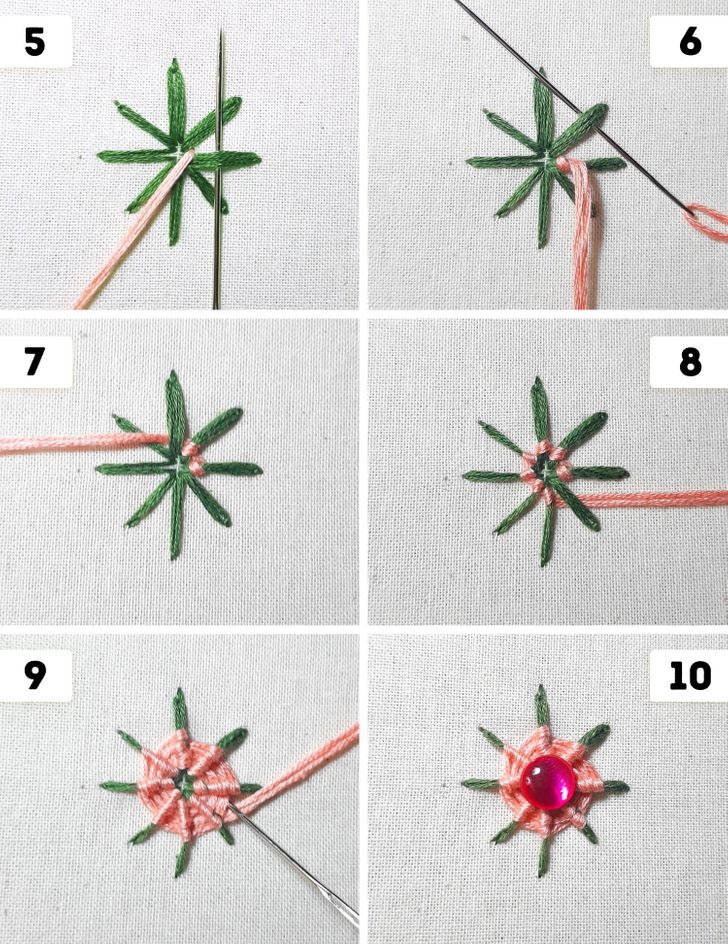
-
Bring the needle under the petal — under the floss but without piercing the fabric — to surround it.
-
Push the needle under the next petal — under the floss but without piercing the fabric.
-
Surround the petal with the floss.
-
Continue doing the same with the rest of the petals.
-
Repeat these steps until you’ve covered half of the flower. Bear in mind that the petals should be partly visible, as shown in the picture.
-
Add a gem or a colored bead in the center. Use textile glue or silicone to stick it to the fabric.
Pattern 5 — a 2-toned flower
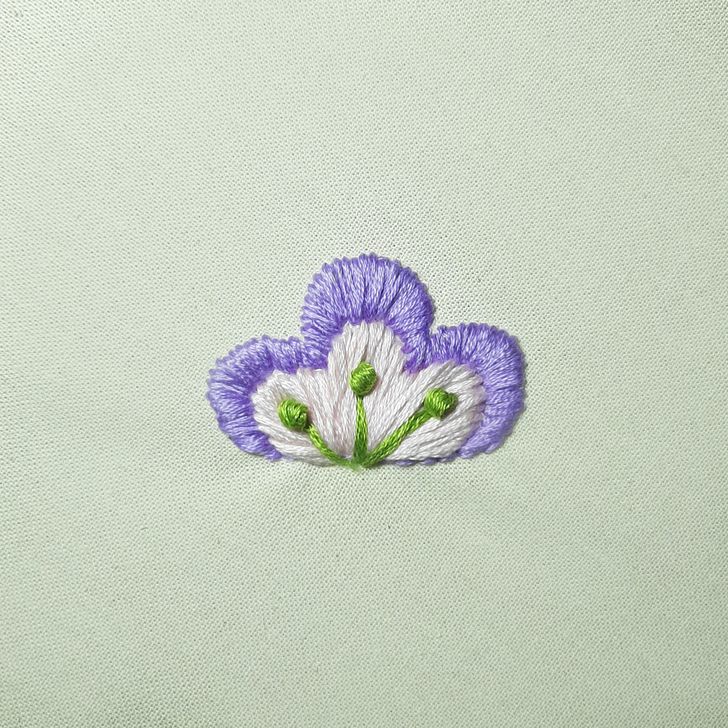
-
Thread the needle.
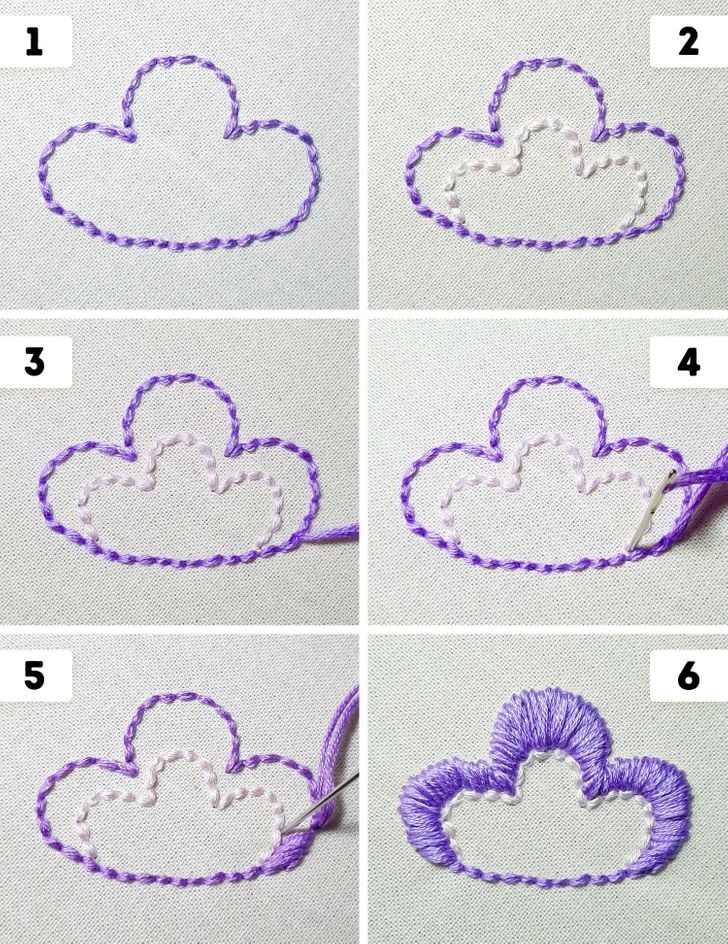
How to embroider the flower:
-
Trace a flower making simple stitches. The stitches should be one next to the other without leaving any space in between.
-
With simple stitches, trace a smaller flower inside the first one.
-
Bring the needle from the back of the fabric through to the front, as is indicated in the picture.
-
Push the needle through to the back where it’s indicated in the picture — through the external edge of the small flower.
-
Following these steps, start covering the big flower.
-
Once it’s completely covered, bring the floss to the back, tie a knot, and cut the floss.
-
Follow the same steps to cover the smaller flower.
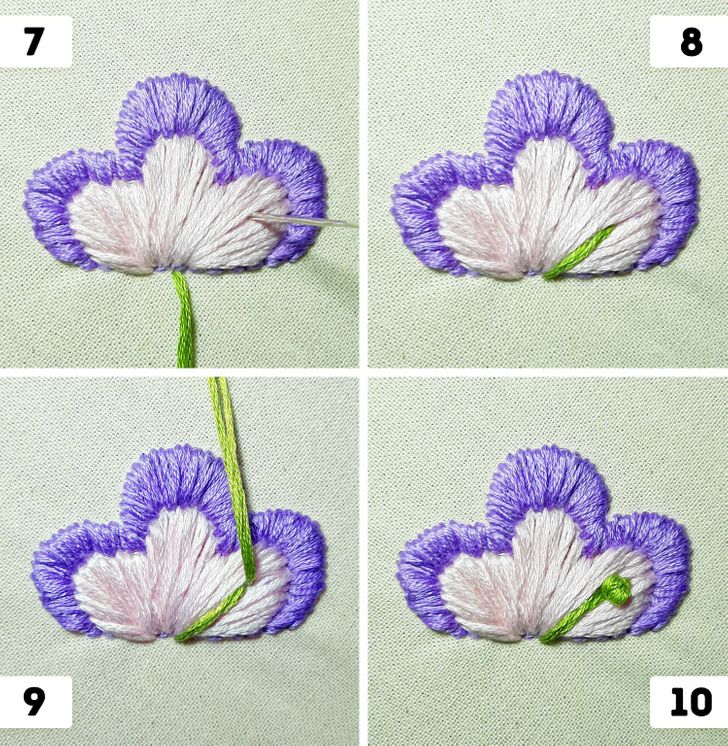
How to embroider the pistils:
-
Push the needle through to the front of the fabric, right in the middle of the lower part of the flower.
-
Bring the floss to one of the sides and push the needle down, as shown in the picture.
-
Push the needle to the front in the same spot where you had pushed it down.
-
Make a knotted stitch. Repeat these steps to make 2 more pistils.