Basic Guide to Learn How to Crochet
Crochet is a knitting technique that uses a single short needle that ends in the shape of a hook and can be made of steel, aluminum, plastic, or wood. One hand holds the wool while the other holds the needle and makes the various stitches. Once you master it, the possibilities are endless and you can make anything from a coaster to a sweater.
If you want to learn how to crochet, 5-Minute Crafts explains the basic techniques so you can do it step-by-step.
Materials
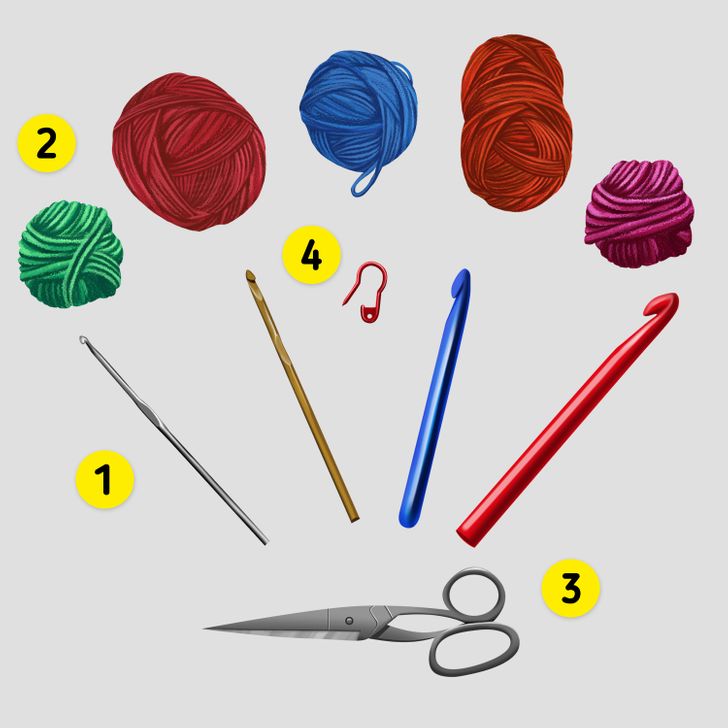
The basic materials needed for crocheting are:
- Crochet needles: Crochet needles should be chosen according to the type of yarn you are going to use. Keep in mind that the needle will influence the size and thickness of the knit stitch. The tighter you want the stitches, the finer the needle should be. Almost every label on wool or cotton yarn will tell you what size needle is the right size to work with. The size is usually measured in millimeters.
- Wool or cotton yarn: The ideal type of wool will depend on the project you want to make. If you are a beginner, it is best to start with a cotton yarn, as it is smoother and doesn’t fray. It’s also a good idea to choose a light color to start with, so you can easily see the stitches. The thickness also has an influence, the thicker the needle, the thicker the yarn will have to be. Basically, there are 3 types of wool:
- Acrylic fiber “wools”: Although they are synthetic, they are soft and don’t cause allergies. They are resistant to sunlight, fungi, and moths.
- Animal fiber wools: They come from the hair of animals, like rabbits, sheep, alpacas, etc.
- Vegetable fibers “wools”: They come from vegetable fibers like cotton, bamboo, and linen. These yarns allow air to pass through, allowing the skin to breathe.
3. Scissors
4. Stitch markers: Stitch markers are purchased at notion stores or online, but you can also replace them with safety pins or clips.
How to hold the crochet needle
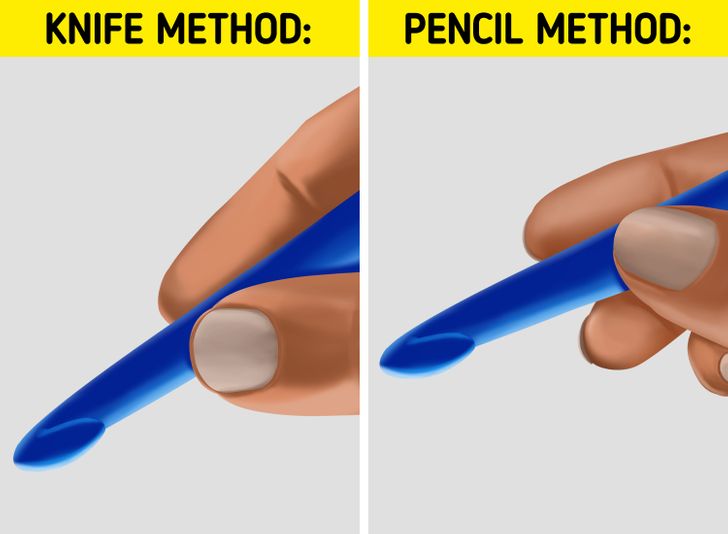
There are 2 basic techniques for holding the crochet needle. A proper grip is important to avoid pain and cramps in the hands after hours of knitting.
- Knife method: The hand appears to be holding a kitchen knife. Your hand remains on the needle with the thumb and index finger gripping the handle (an indentation in the handle). The index finger is in charge of guiding the needle’s movements.
- Pencil method: In this case, the hand appears to be grasping a pencil. It holds the needle with the thumb, the index, and the middle fingers located on the handle.
Basic stitch 1 — chain stitch
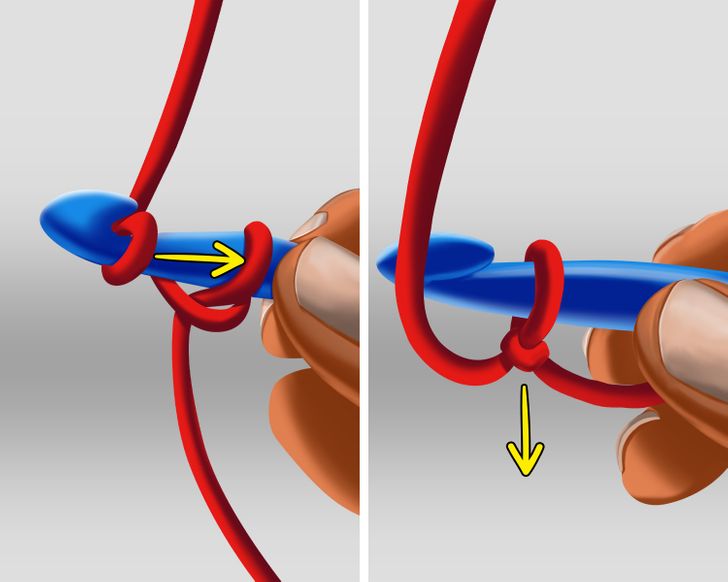
The chain stitch is the base on which the crochet fabric is formed. They are also necessary to start a new row.
1. Make a starting knot: This knot is the beginning of the base chain. Form a loop around the needle by making a hoop with the yarn so that the tail is behind the hoop and make a loop (pass the yarn over the needle to make a new stitch).
2. Pull the loop through the hoop: This forms the knot. Pull the tail down to tighten the yarn close to the needle. This is a slip knot.
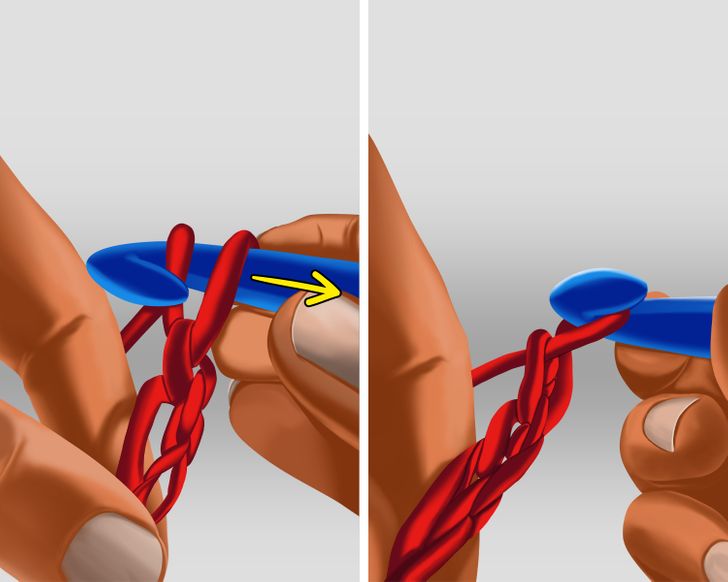
3. Take the yarn and make a loop: Wrap the yarn around the needle and make a loop. Pass it through the starting knot to form a new stitch. Always move the needle from the back to the front.
4. Repeat: Repeat this step until you have the required number of chains as indicated in the pattern. To count the stitches, start from the stitch on the needle and work backward.
Basic stitch 2 — single crochet stitch
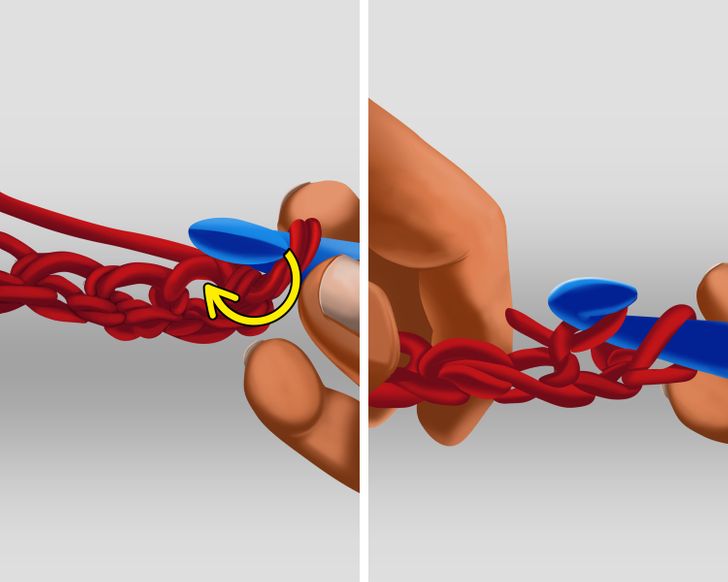
The single crochet stitch is the most basic stitch in crochet — you can knit any garment with it. It is the shortest stitch, so it is the one in which the fabric is more closed.
1. Make a chain: Make a chain stitch with the number of stitches indicated in the pattern.
2. Insert the needle in a stitch of the base chain: Insert the needle in the stitch indicated in the pattern. This is usually the second to last stitch.
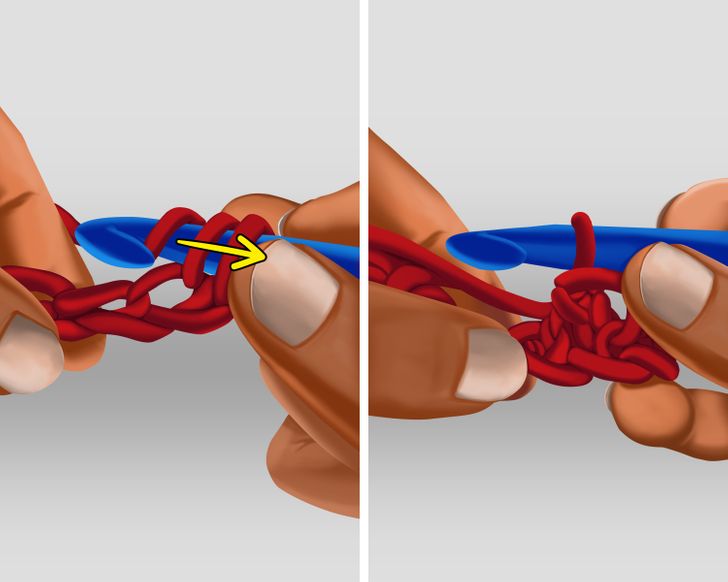
3. Make a loop: Wrap the needle around the yarn and pull it out through the stitch in step 2. Now you’ll have 2 loops on the needle.
4. Make another loop: Wrap the needle around the thread and pull it out through the 2 loops you made.
5. Repeat: Insert the needle at the next stitch on the chain and repeat steps 2, 3, and 4.
Basic stitch 3 — the increase
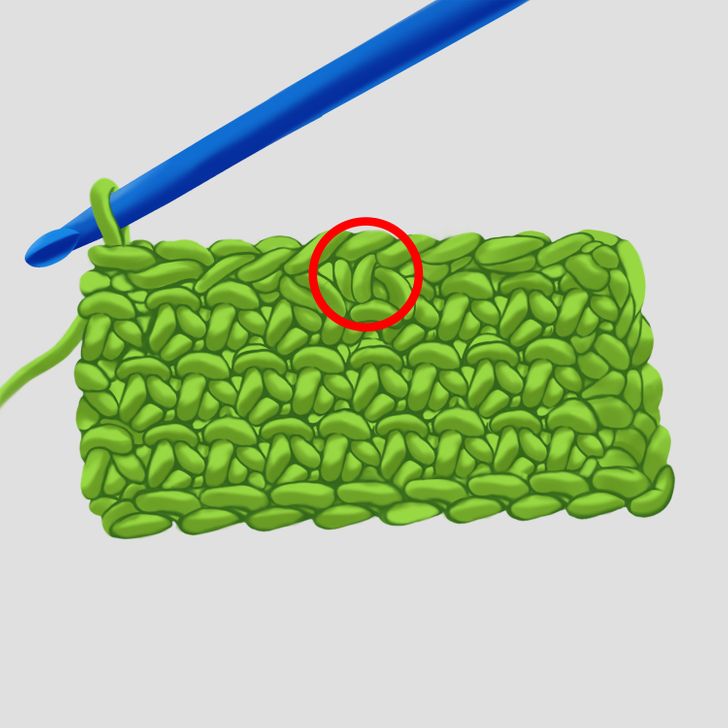
The increase is used to give shape to the fabric making it wider and also to make drawings if you alternate it with other stitches. As its name indicates, it is used to increase the size of the fabric. It can be used with any stitch, although here we show it in the single crochet stitch.
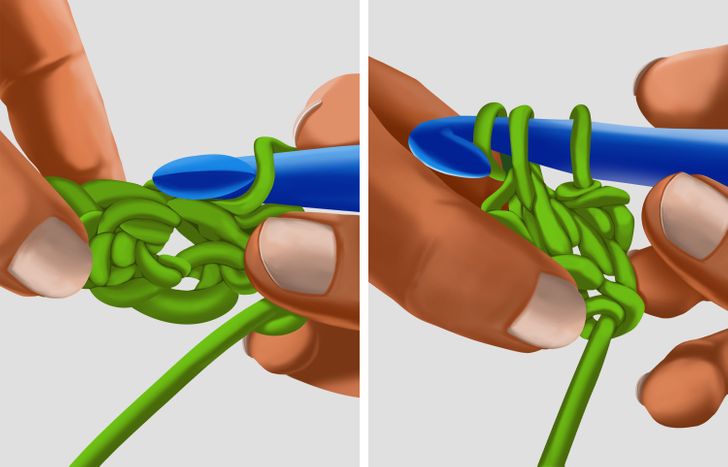
1. Knit a single crochet stitch.
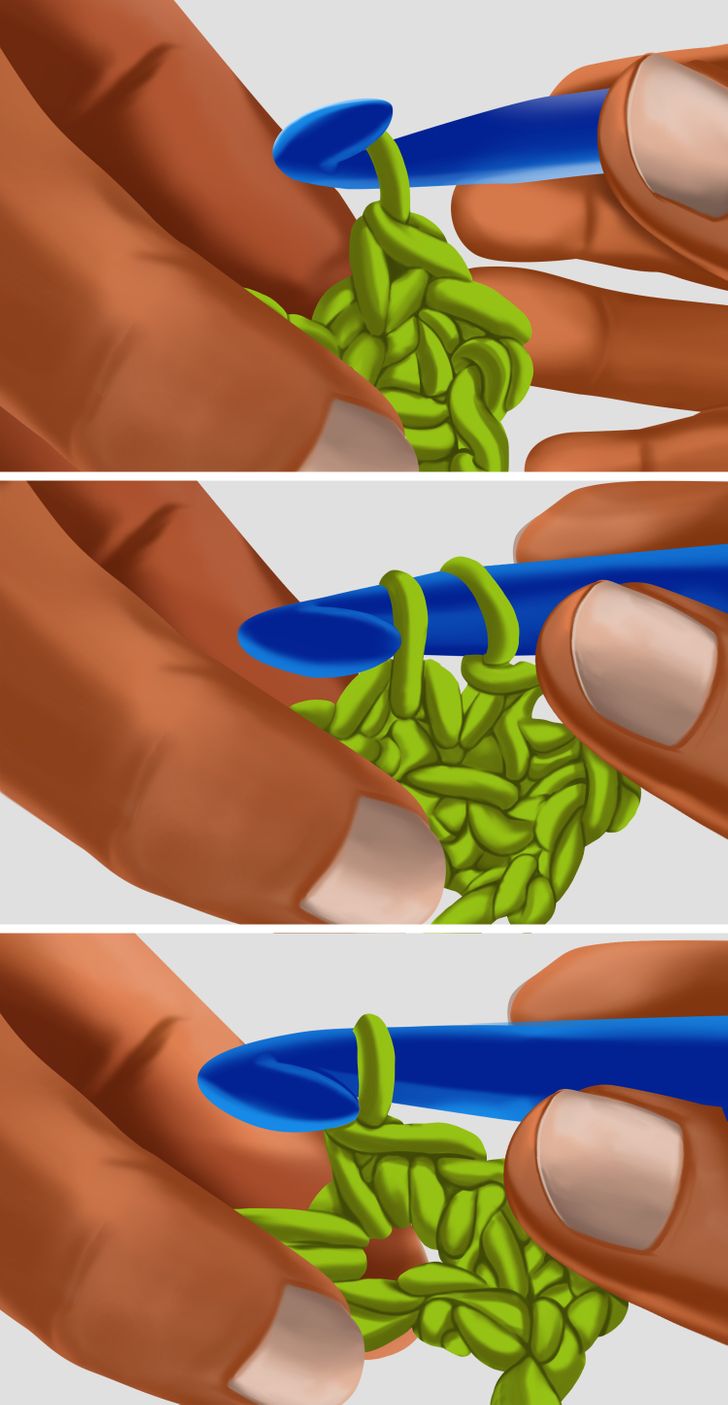
2. Knit another single crochet stitch by inserting the needle into the same base stitch.
3. You will have 2 stitches in one stitch: this way an increase becomes visible.
Basic stitch 3 — the decrease
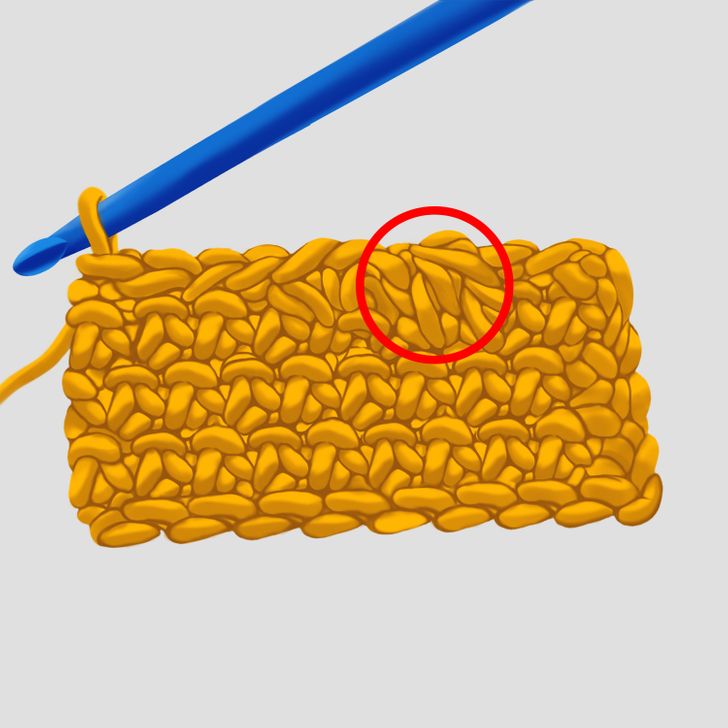
The decrease is used to make the fabric narrower and also to make openwork, buttonholes, and sleeves. Like the increase, it can be used with any stitch. Here we show you how to make a decrease in a single crochet stitch.
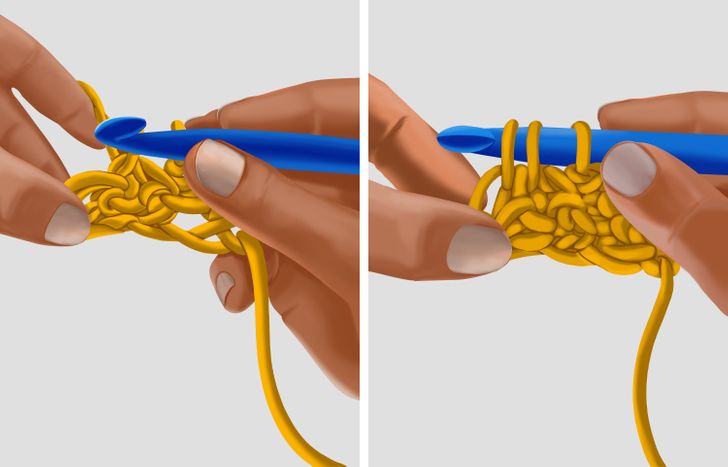
1. Knit a single crochet stitch.
2. Pull the loop out of the base stitch, without ending the stitch.
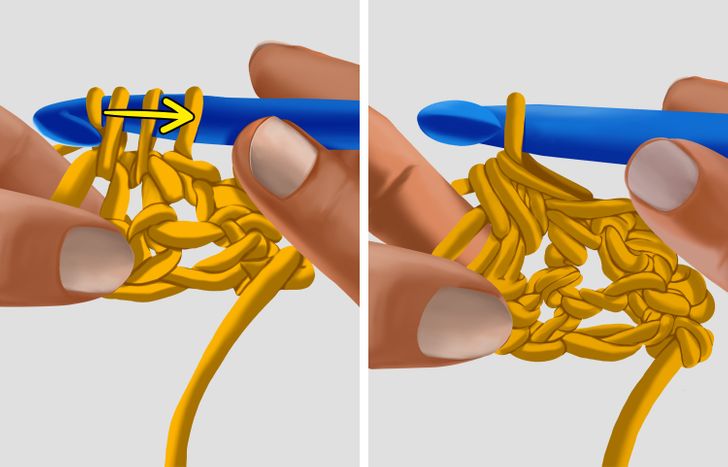
3. Insert the needle into the next stitch and repeat point number 2: you will have 3 loops on the needle.
4. Loop again and close both stitches at the same time.
How to make a magic loop to knit in the round
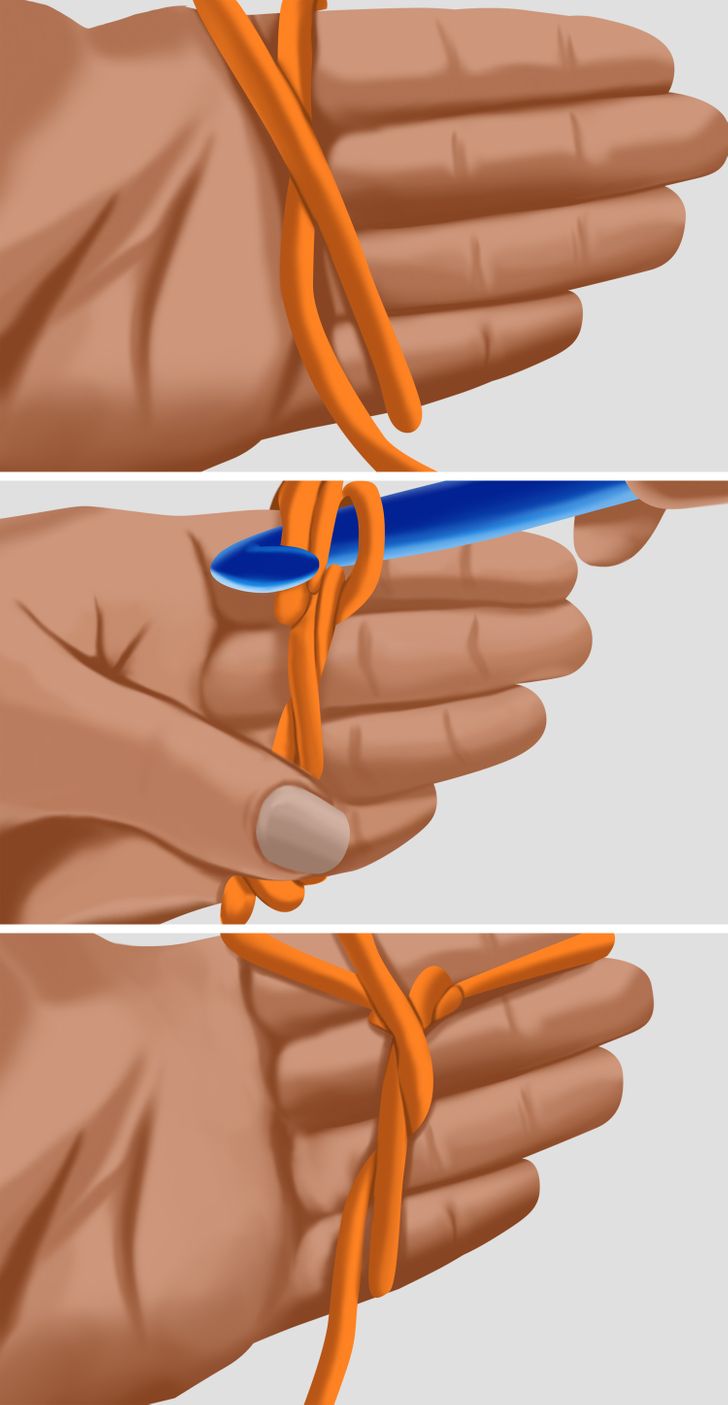
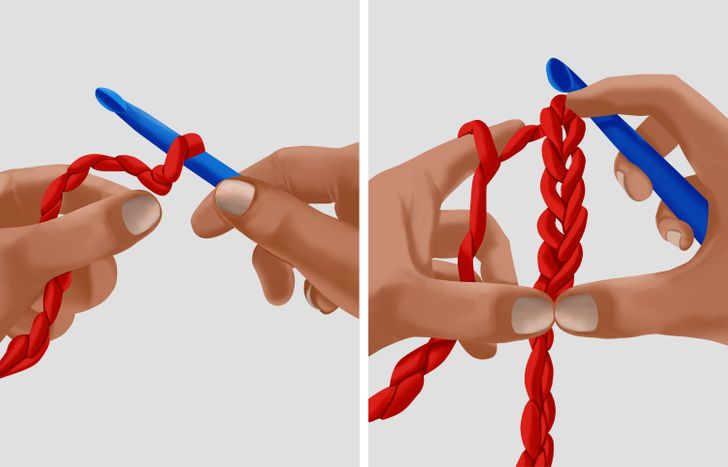
The magic ring is the way to start circular knitting. The technique is a little bit complicated at the beginning, but it is the most useful for knitting in the round.
1. Take the tail of the ball and make a loop so that the tail is underneath and the strand that goes into the ball is on top.
2. With the needle, take the strand that goes to the ball and pass it through the loop.
3. Make a chain.
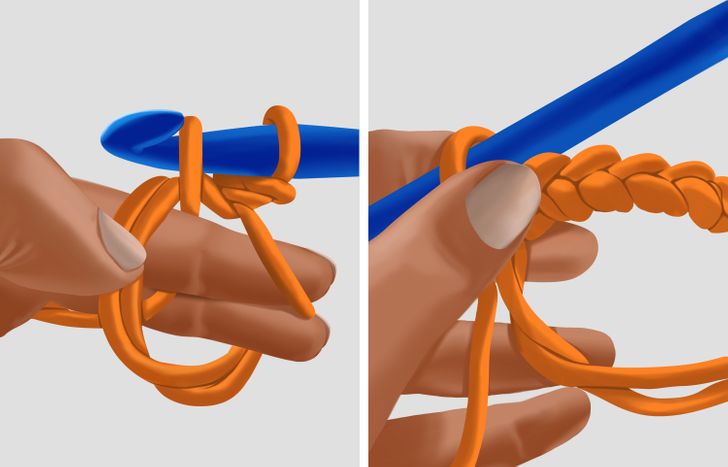
4. Knit as many single crochet stitches as the pattern requires. In this case, we made 6.
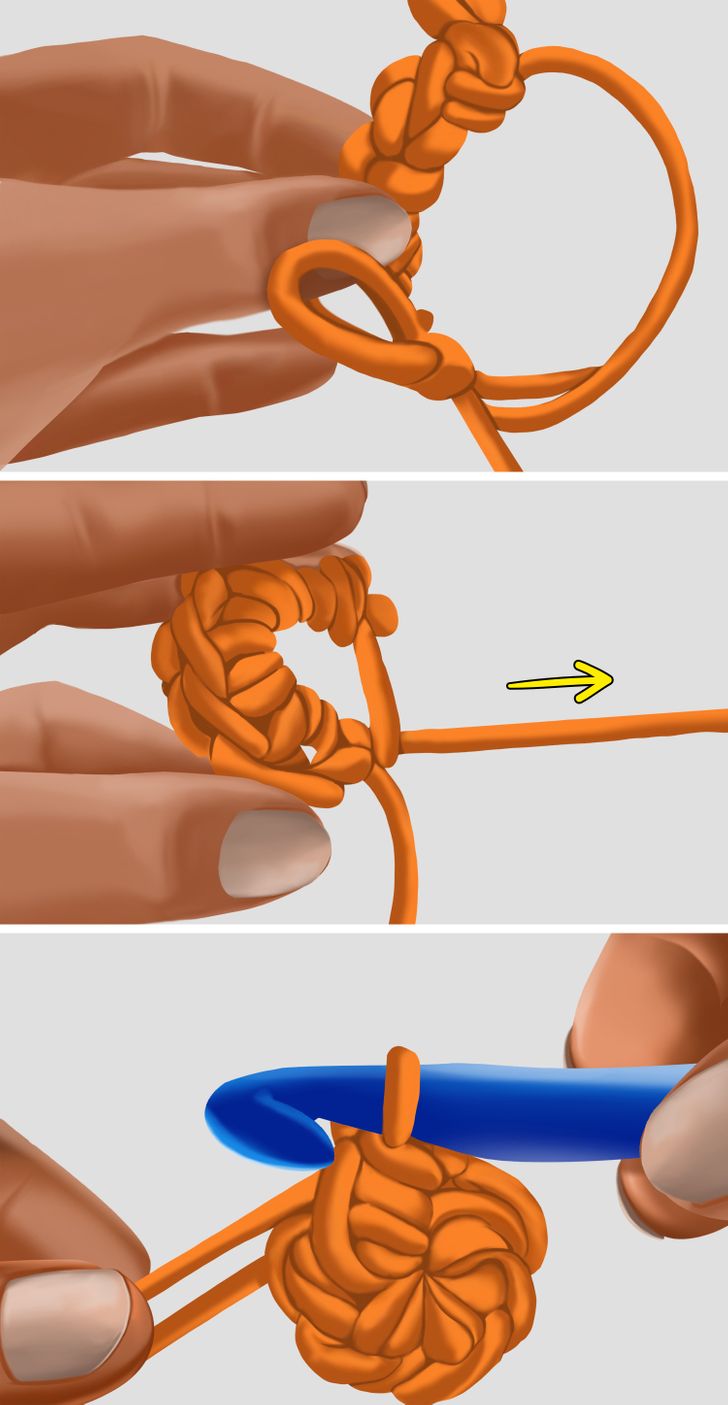
5. Pull the tail of the thread to close the ring.
6. Close the loop by inserting the needle through the next stitch and knitting a dwarf stitch.
How to knit in the round
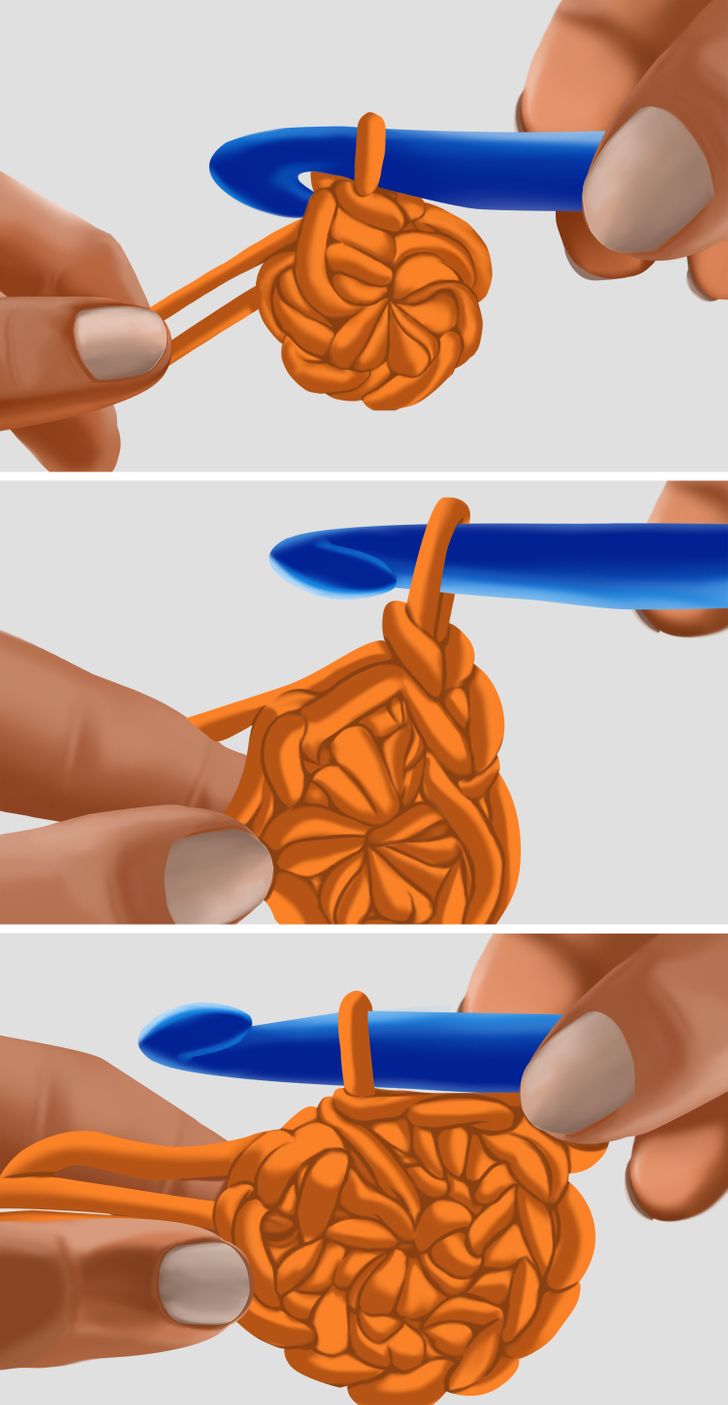
Knitting in the round allows you to create circular things, from coasters to hats to amigurumis. A new row always starts where the last one ends, so it is convenient to use a stitch marker to mark the beginning of each row. In this case, we will see how to knit in the round with the single crochet stitch and the increase.
1. Make a magic ring.
2. To begin the round, make a chain stitch. This will be counted as the first stitch.
3. Make one full row of increases.
4. Close the row with a slip stitch.
5. In the next row, interlace a single crochet stitch and one increase. In the next row, 2 single crochet stitches and one increase, and so on until the circle is the desired size.
How to knit in rows
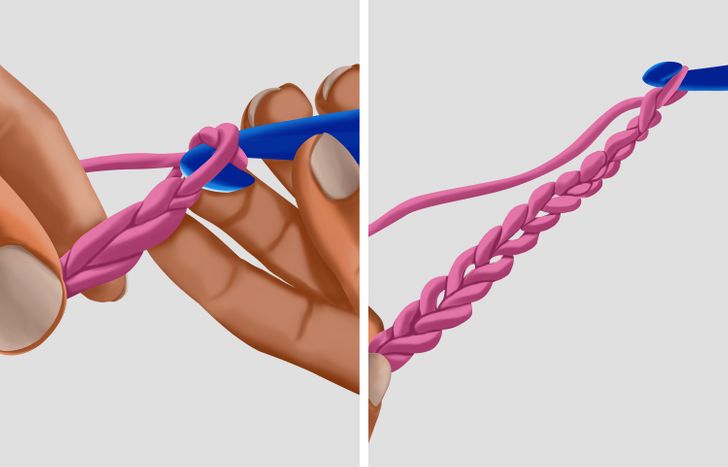
To knit in rows, the most important thing is to count the stitches. When you reach the end of the row, turn the fabric clockwise and this will be the first stitch of the next row.
1. Make a chain stitch with the number of stitches required for your knitting. In this case, we made 12.
2. Knit an extra stitch that will be used to start the next row.
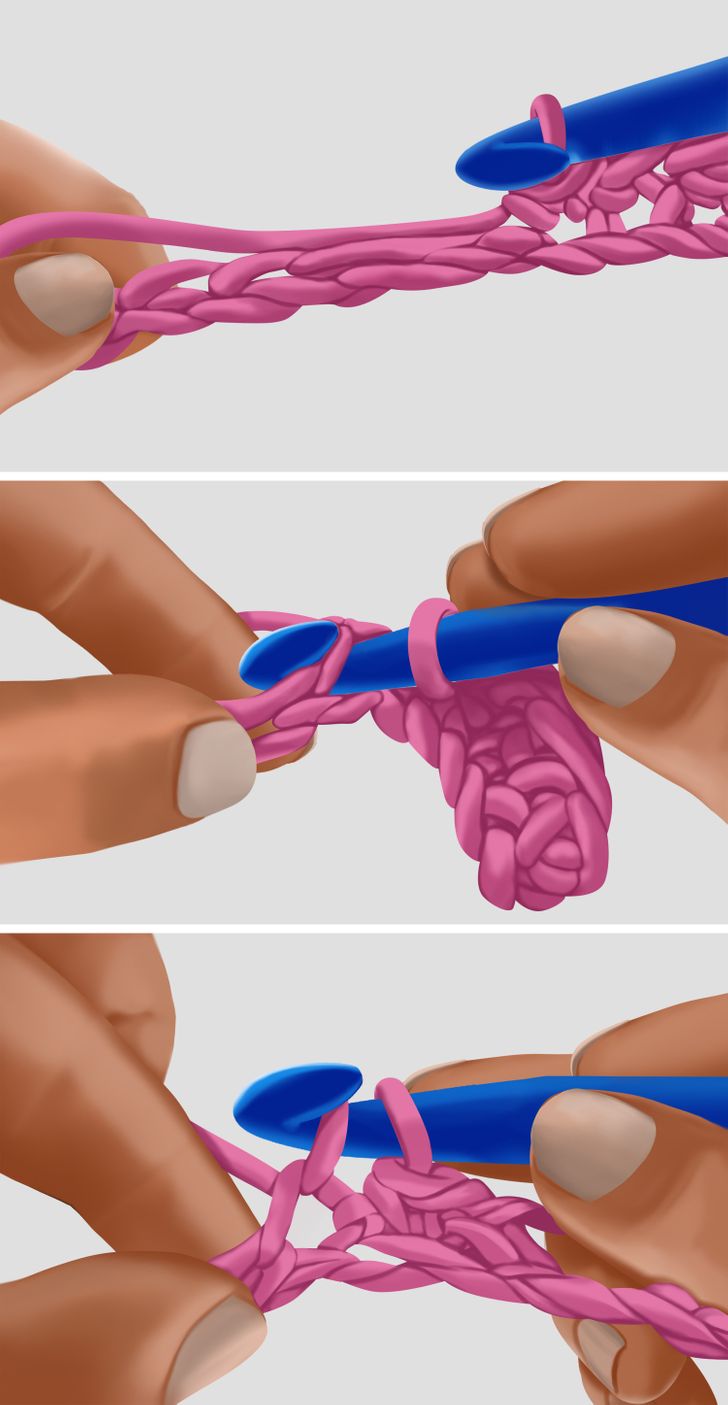
3. Knit a single crochet stitch in the penultimate stitch of the chain stitch.
4. Continue making single crochet stitches until you reach the end of the row.
5. At the end, knit a chain stitch to start the next row.
6. Turn the fabric and knit a stitch by passing the needle under the top 2 strands of the first single crochet stitch.
Bonus ─ Project: how to knit a neck warmer
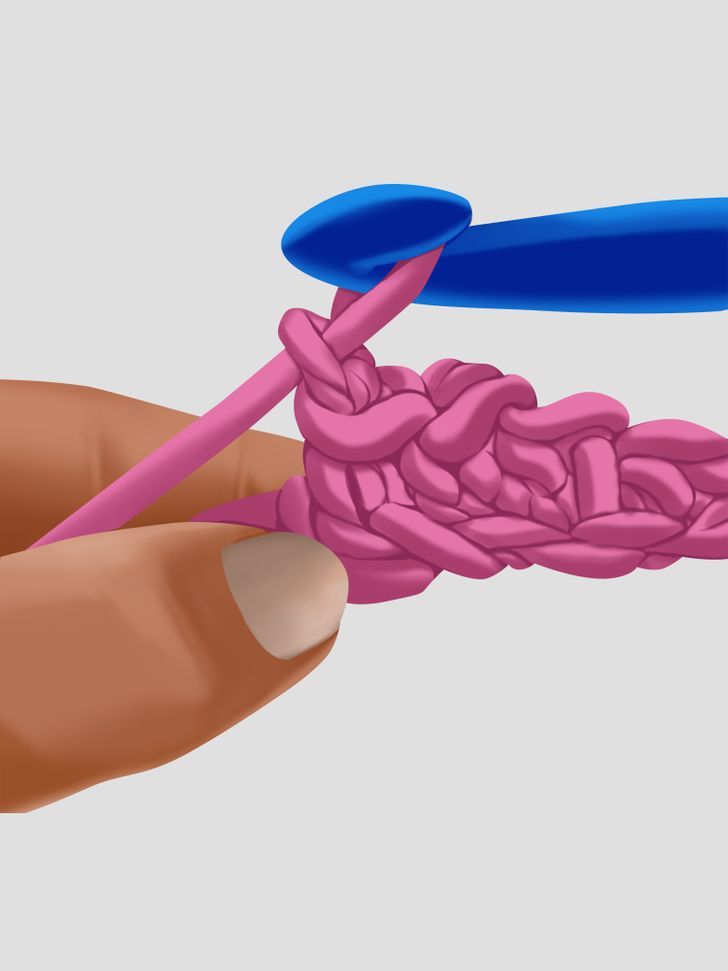
To knit this collar you will need thick wool, a 10-millimeter needle, and 2 buttons. The width of the collar will depend on whether it is for a child or an adult.
1. Tie a starter knot.
2. Make the necessary chain stitches to reach the desired width. Between 3 and 5 inches (8 and 12 cm) if it is for a child and between 5 and 6 inches (12 and 15 cm) if it is for an adult.
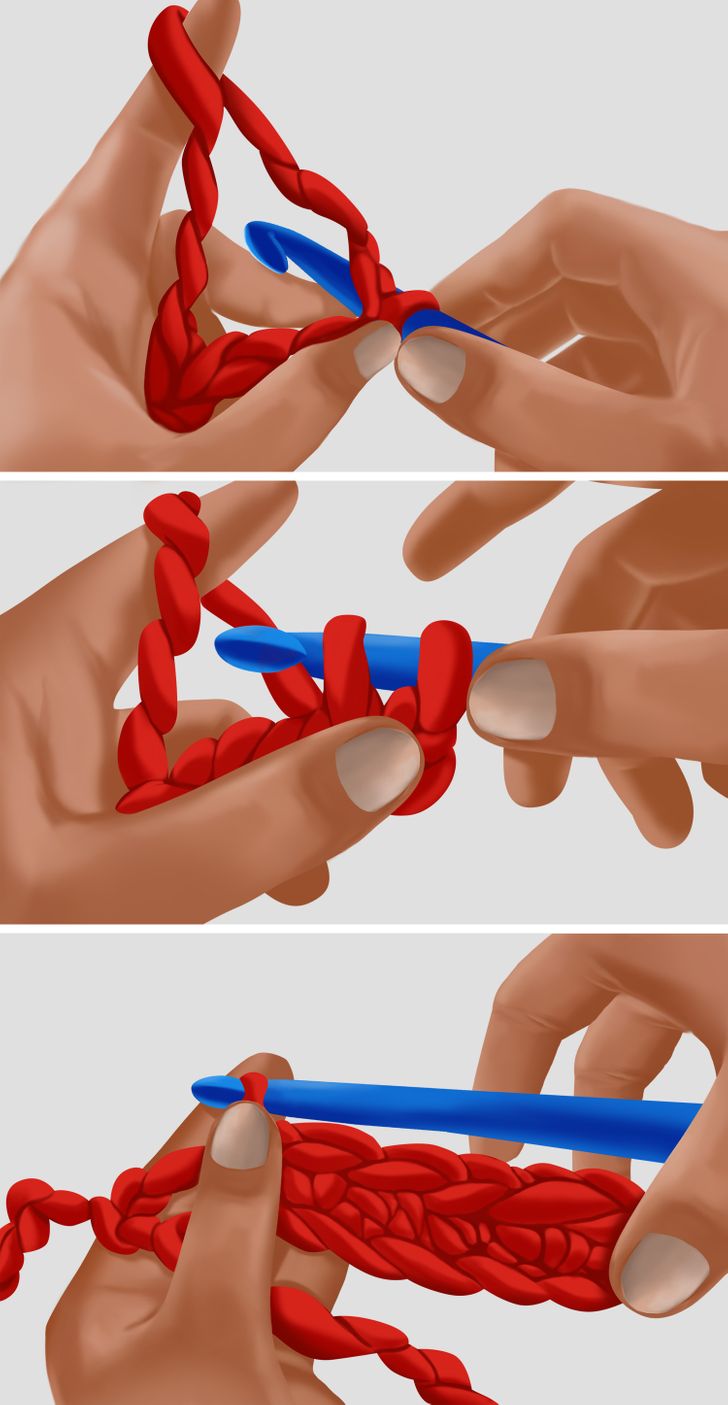
3. Make an extra chain to go up and start the second loop.
4. In the second to last chain of the first row, knit a single crochet stitch.
5. Knit a single crochet stitch in each chain until you reach the end of the row.
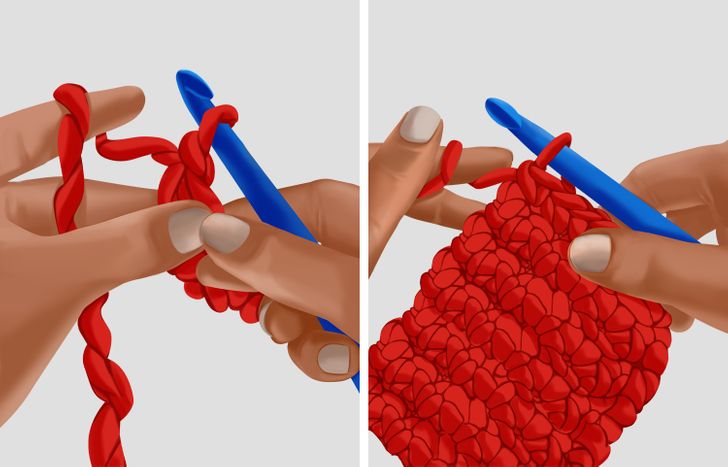
6. To change rows, make a chain again, turn the knitting and knit a single crochet stitch in each stitch.
7. Continue this procedure until you reach the width you need. Between 18 and 19 inches (45 and 47 cm) if it is for a child, or between 20 and 21 inches (50 and 53 cm) if it is for an adult.
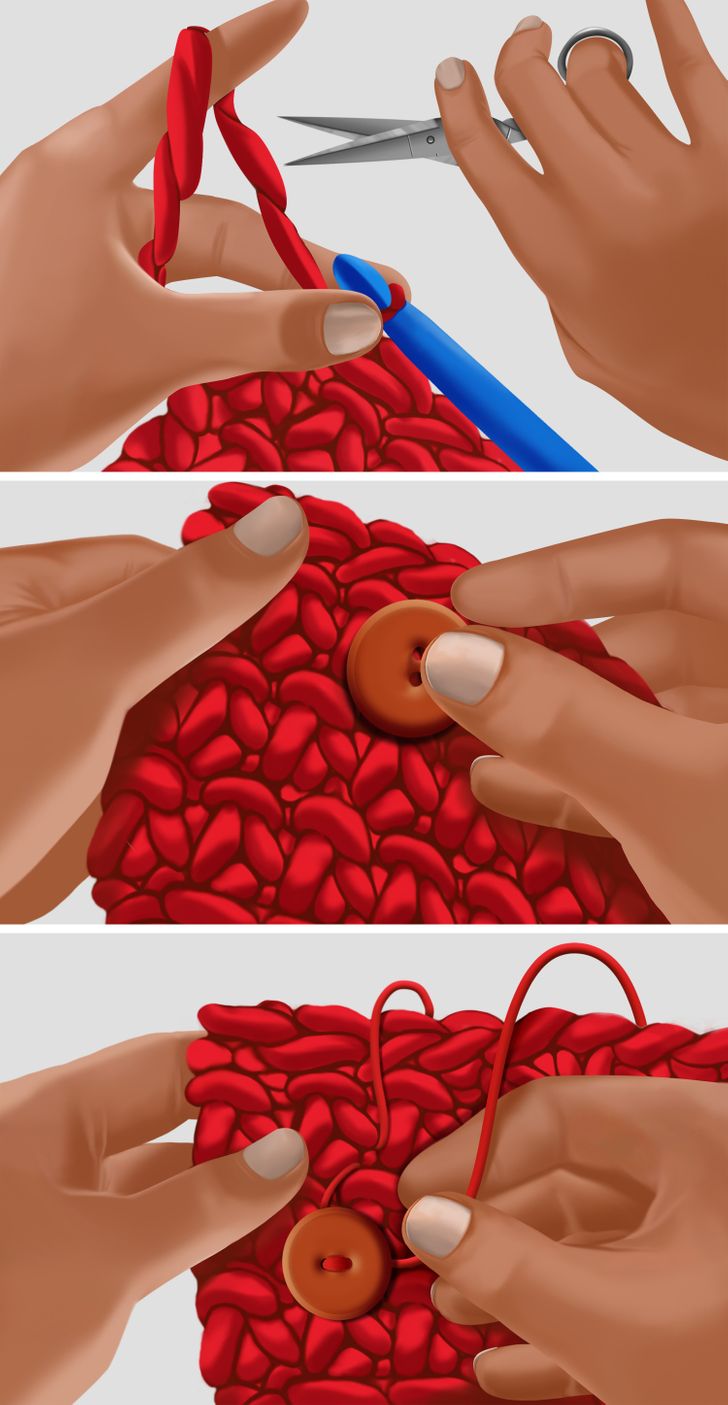
8. When you reach the last stitch, cut the yarn and hide the excess yarn with a wool needle.
9. Check that the buttons pass through the size of a stitch, which will be used as a buttonhole.
10. Thread the button with a thinner yarn and pass it through a stitch.
11. Tie it with a double knot on the other side.
12. Repeat the same operation with the second button.
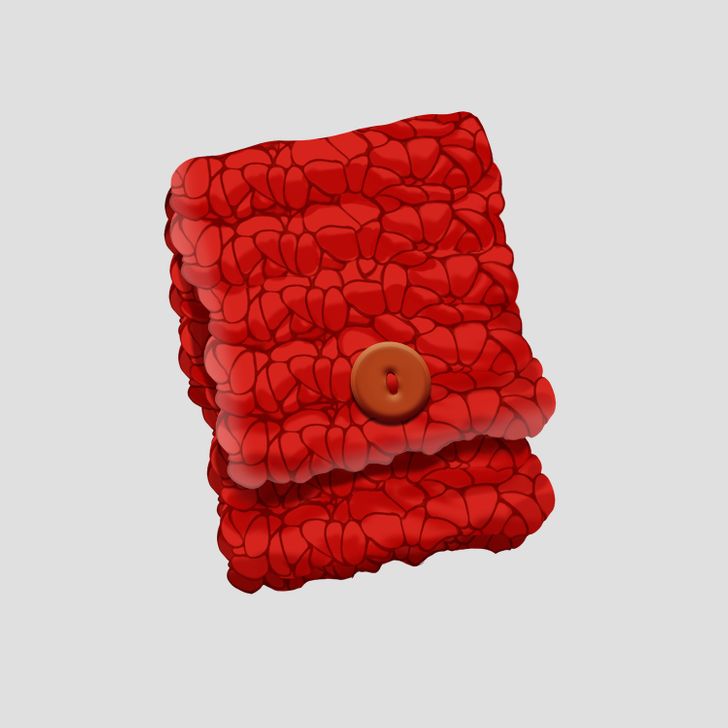
This is what the project looks like once it is finished. Now all that’s left is to simply enjoy it.