How to Decorate Your Home on a Budget
If you want to change your home’s interior but you aren’t ready to spend a lot of money on it, try to start with small details — they’re the ones that improve the overall perception of the space and set the tone for the entire room. At the same time, it’s not necessary to buy something new. Sometimes, it’s enough to look at regular things from a different angle. For example, you can turn shells you picked up on the beach into a lamp, and egg trays into a comfortable, oversized pouf.
5-Minute Crafts is sharing simple ways to decorate a house on a budget, tidy it up, and give new life to old things all at the same time.
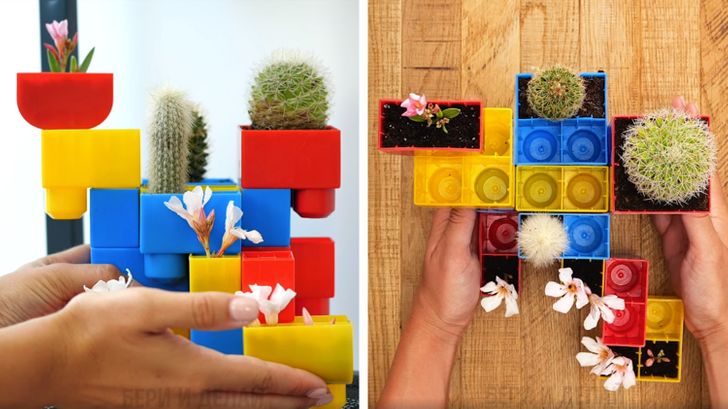
23. A dynamic planter for small plants
What you’ll need:
- A Lego construction set
- Soil for plants
- Plants
How to do it: Assemble any shape from the construction set and turn it upside down. Pour soil inside the cells of your shape and begin planting.
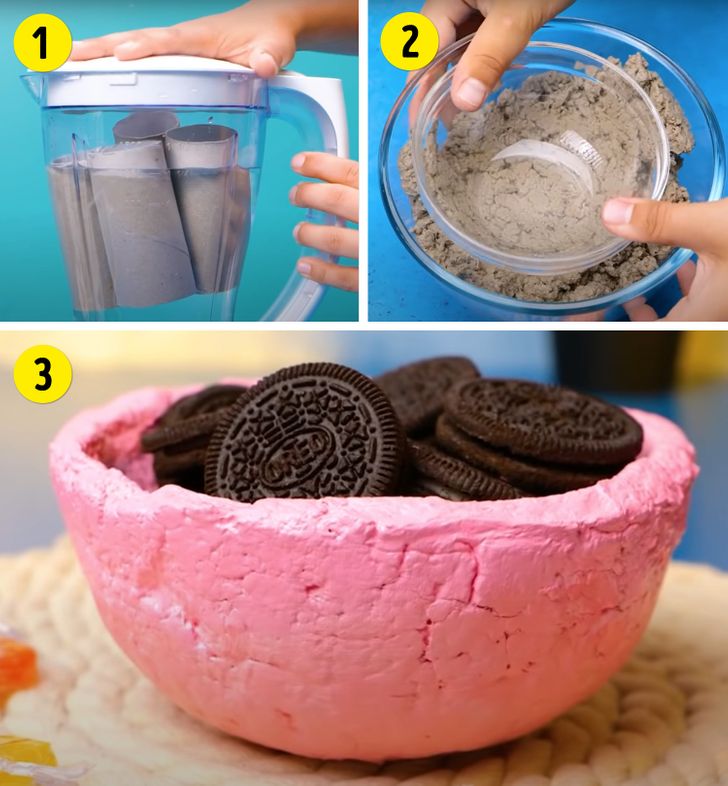
22. A dish for small things
What you’ll need:
- 4 toilet paper rolls
- Water
- A blender
- A pair of deep bowls of different sizes
- Acrylic paint
How to do it: Place the toilet paper rolls in a blender along with water. Grind everything until it becomes smooth. Place the mixture in a large bowl, press it down with a smaller bowl, and let it dry. Take out the little bowl and paint it.
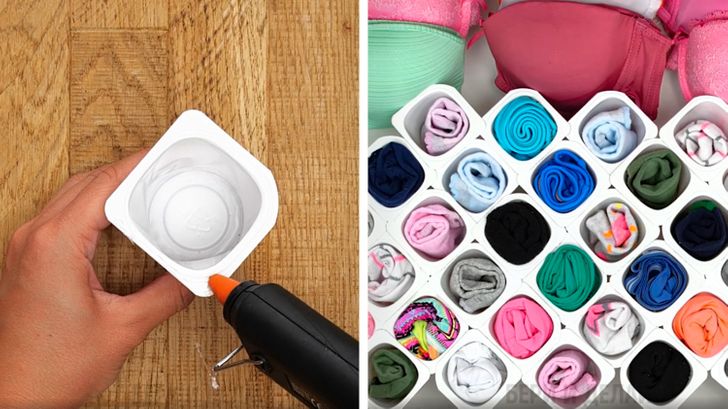
21. Sock organizer
What you’ll need:
- Plastic yogurt cups
- A glue gun
How to do it: Apply glue to the edges of the cups and glue them to each other. Connect all the yogurt cups together, as many as you need. Let them dry.
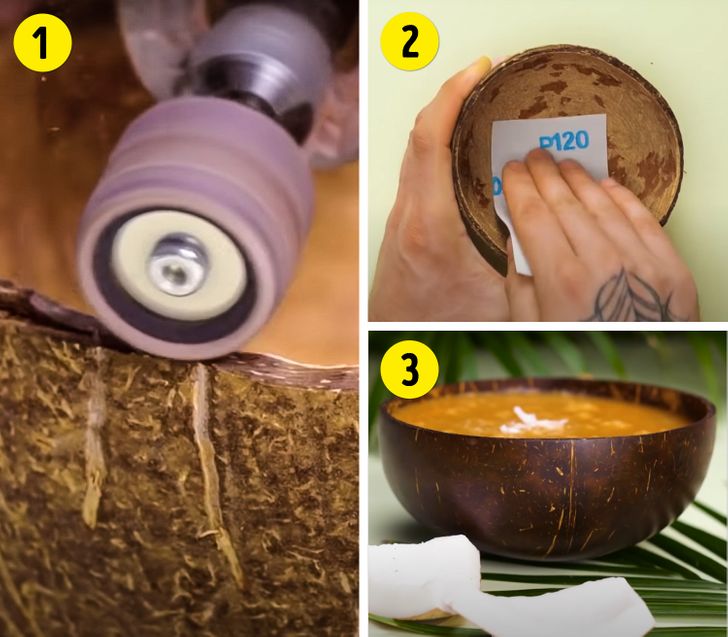
20. A deep bowl
What you’ll need:
- Half of a coconut shell
- Sandpaper
- A polishing machine
- Oil for kitchenware
How to do it: Using a polishing machine, smooth the edges of the shell, then polish the inside and outside of the shell with sandpaper. Apply oil for kitchenware.
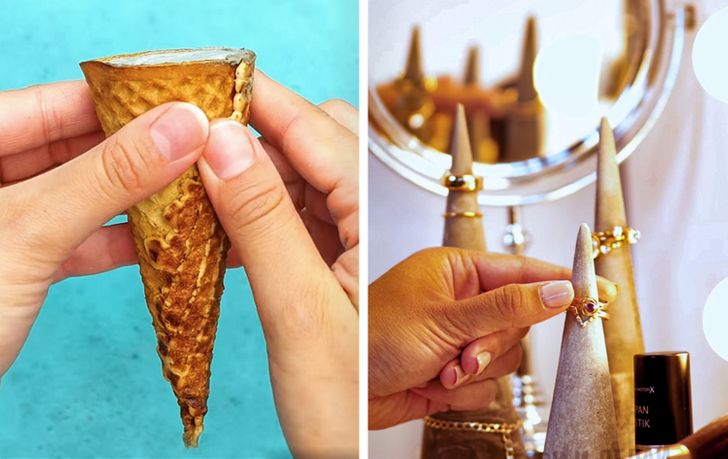
19. A jewelry stand
What you’ll need:
- Liquid cement
- A waffle cone
How to do it: Take the cone and gently pour the cement inside. Let it dry. Remove the cone.
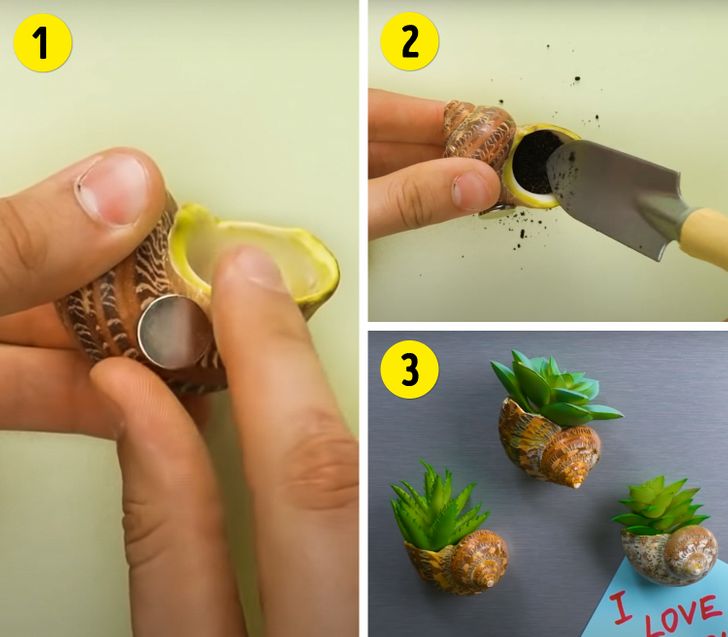
18. Mini-planter with a magnet
What you’ll need:
- Seashells
- A few small magnets
- Soil
- Small plants (succulents)
- A glue gun
How to do it: Glue the magnet to the shell. Pour soil into it and put a plant inside.
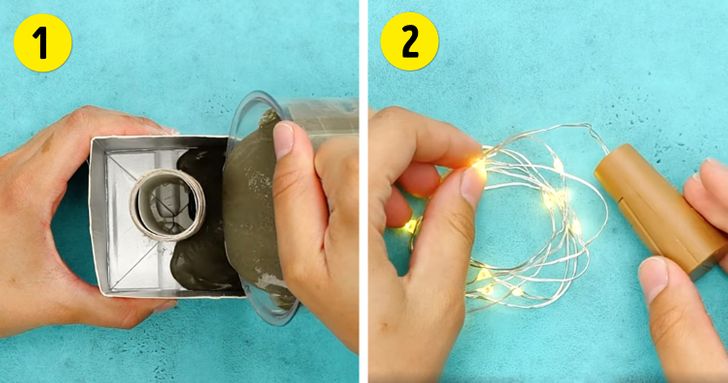
17. A small lamp
What you’ll need:
- Liquid cement
- A milk carton box
- A glue gun
- A toilet paper roll
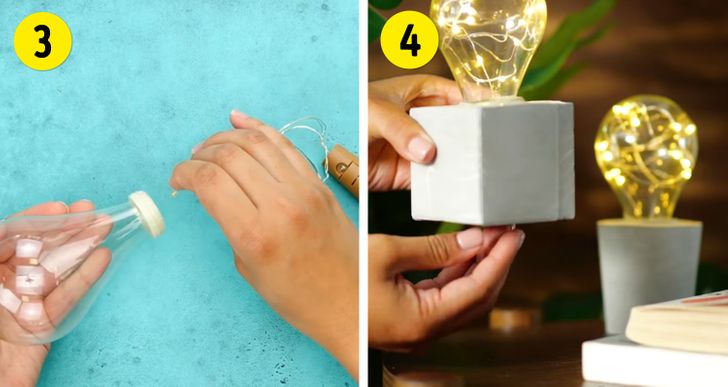
- A lamp
- Fairy lights
How to do it: Cut off the milk carton box and glue the toilet paper roll into its center, at the bottom. Pour liquid cement inside and let it dry. Unwind the fairy lights.
Take the decorative lamp and remove the light bulb. Place the fairy lights inside. Hide it inside the cement mold.
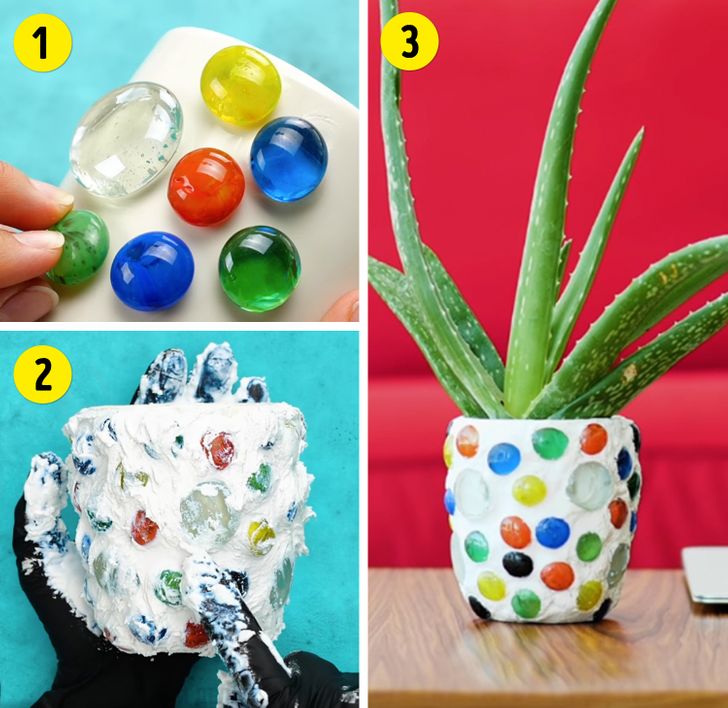
16. Multi-colored planters
What you’ll need:
- Decorative glass stones
- An old mug
- Cement putty
- A glue gun
How to do it: Glue the stones to the mug. Apply a layer of cement putty on top of them, cleaning it up where the decorative stones should be visible. Let the cement dry.
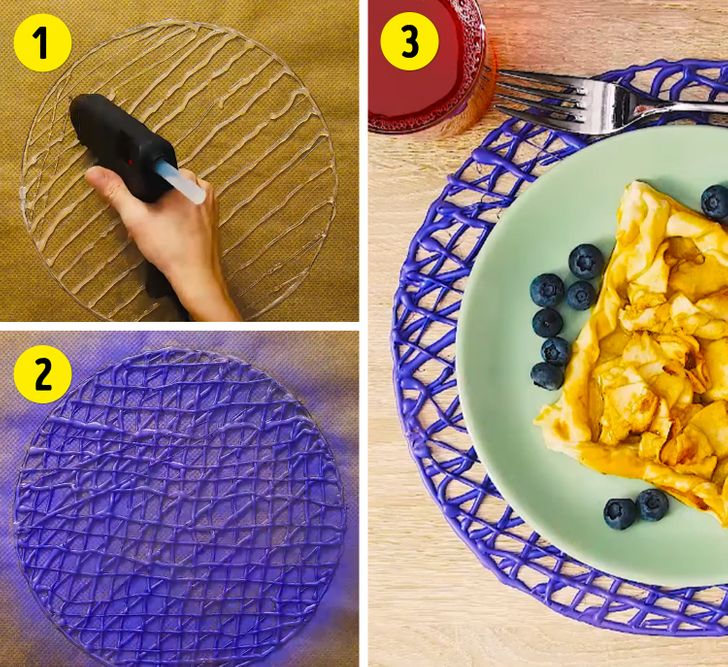
15. A charger plate
What you’ll need:
- A glue gun
- Paint (aerosol)
- Burlap (or another base)
- A plate
- A marker
How to do it: Place a plate on the burlap and circle it. Remove the plate and apply silicone inside the drawn circle to make a mesh. Let it dry and color the napkin.
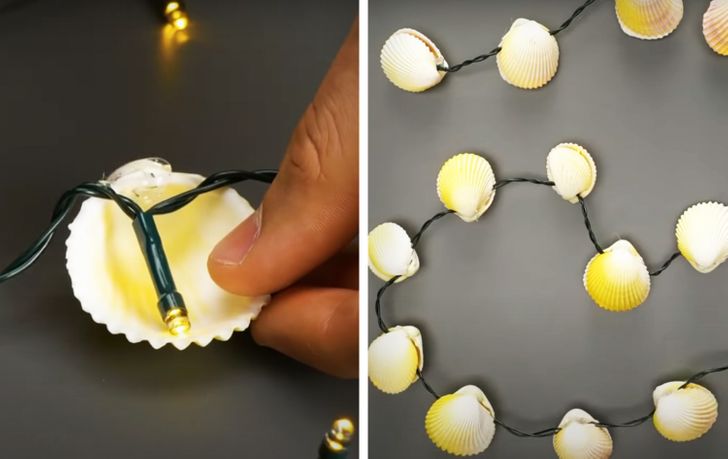
14. Fairy lights
What you’ll need:
- Fairy lights
- Seashells
- A glue gun
How to do it: Using glue, attach half a shell to each light bulb on both sides. Let it dry.
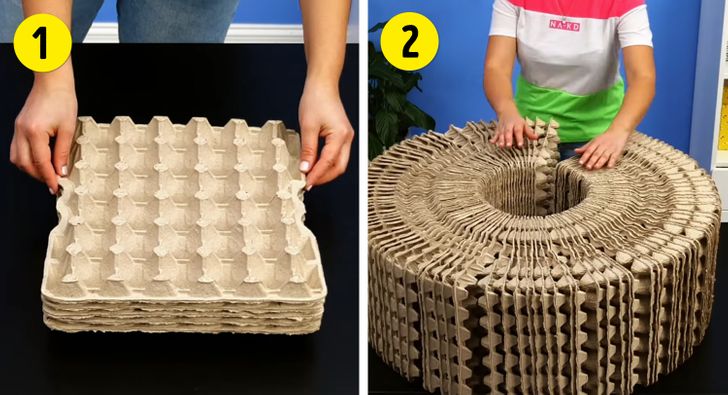
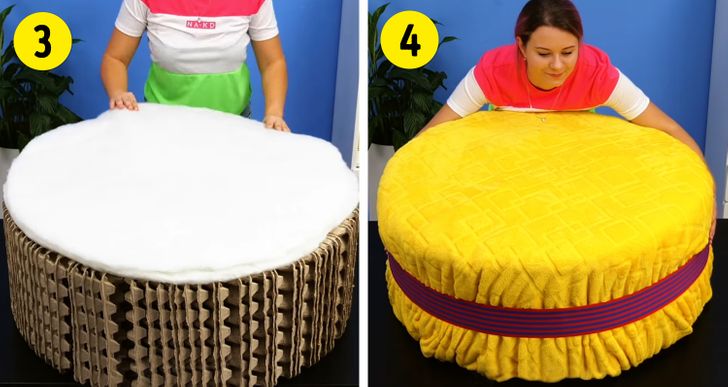
13. A pouf
What you’ll need:
- Egg trays
- Roam rubber (or another kind of filling for the seat)
- A blanket
- A stapler
- A glue gun
- Wide ribbon
How to do it: Collect the egg trays by inserting them into each other and connect them in a circle, as is shown in the photo above.
Put foam rubber on top of them and cover it with a blanket. Secure it all with a ribbon. Connect the ends of the ribbon with a stapler.
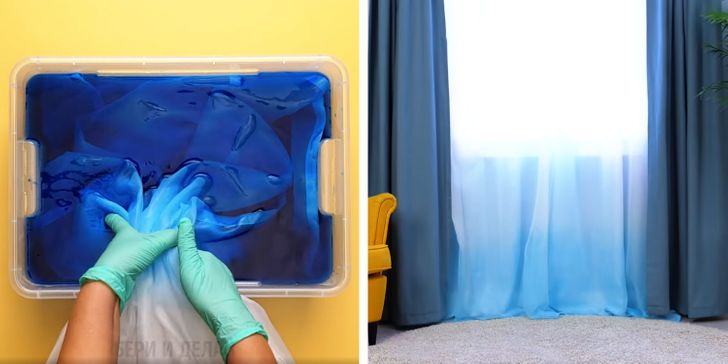
12. Multi-colored curtains
What you’ll need:
- Light tulle curtains
- Dye for fabric
- A basin
How to do it: Fill a basin with a little water and dissolve the dye in it. Place the tulle curtains in the basin completely or just halfway, depending on the desired effect. Leave it for 30 minutes and then let the curtains dry.
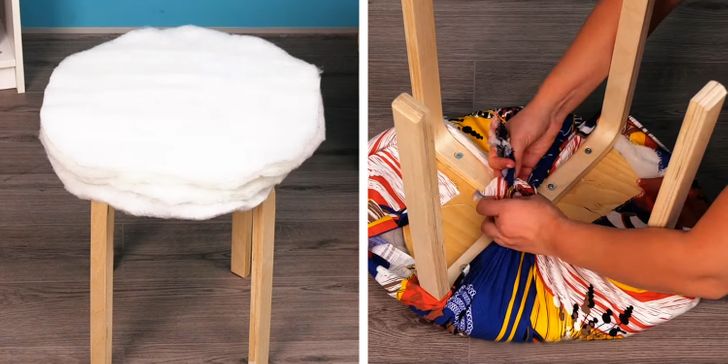
11. A stool with a padded seat
What you’ll need:
- A wooden stool
- A piece of fabric
- Foam rubber (or another kind of filling for the seat)
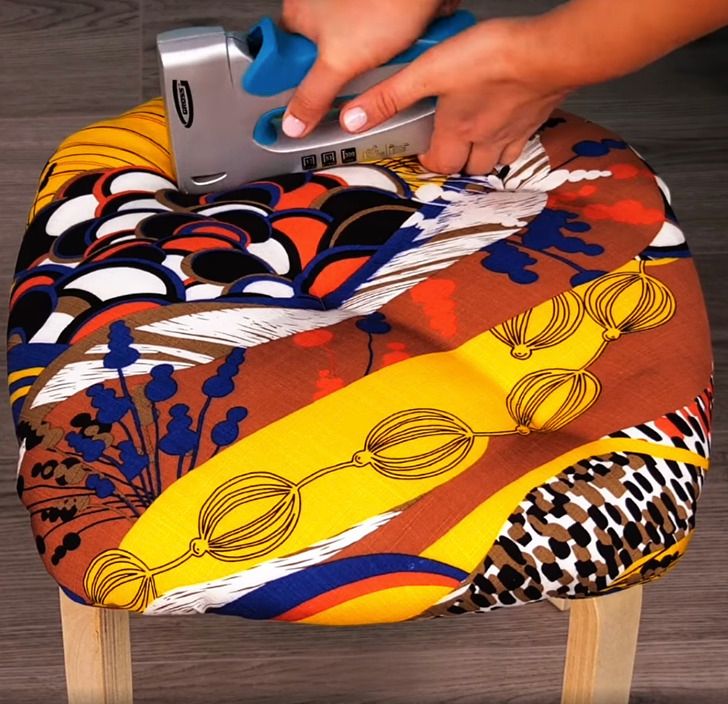
- A furniture stapler
How to do it: Place the foam on the seat, cover it with cloth, and turn the stool over. Secure the fabric by tying the opposite edges of the fabric together. Turn the stool over again.
Use a furniture stapler to attach the fabric to the foam.
10. Dresser handles
What you’ll need:
- Transparent epoxy resin
- Furniture dowels
- Silicone ice molds
- A small bowl
- A screwdriver and screws
- Dye for epoxy resin
- Universal glue
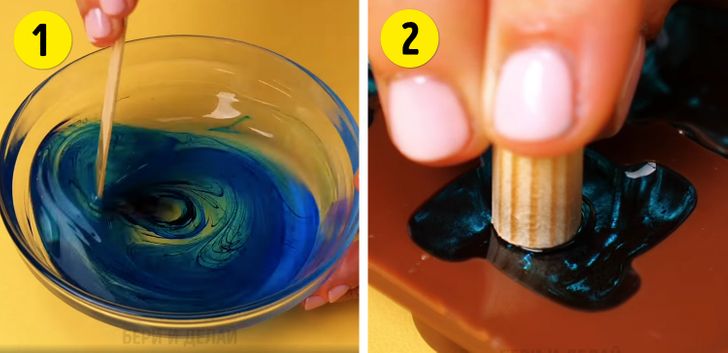
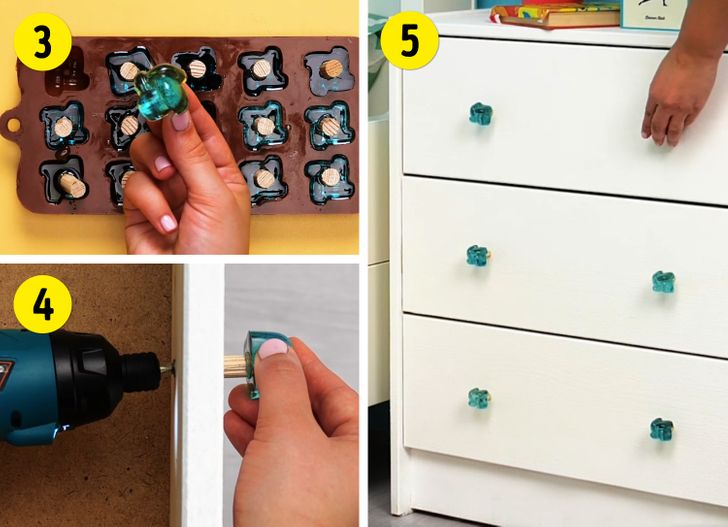
How to do it: Stir the epoxy resin and dye in a bowl. Pour the resulting mixture into an ice mold and let it dry. Using the glue, attach a furniture dowel to the center of each “piece of ice.”
Let them dry, then use the screws to attach the new handles to the dresser.
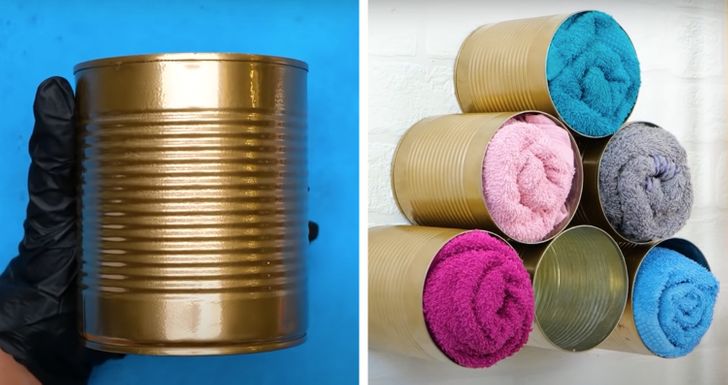
9. Towel holders
What you’ll need:
- Cans
- Spray paint
- A glue gun
How to do it: Paint the cans and stick them to the wall with a glue gun, as is shown in the photo above.
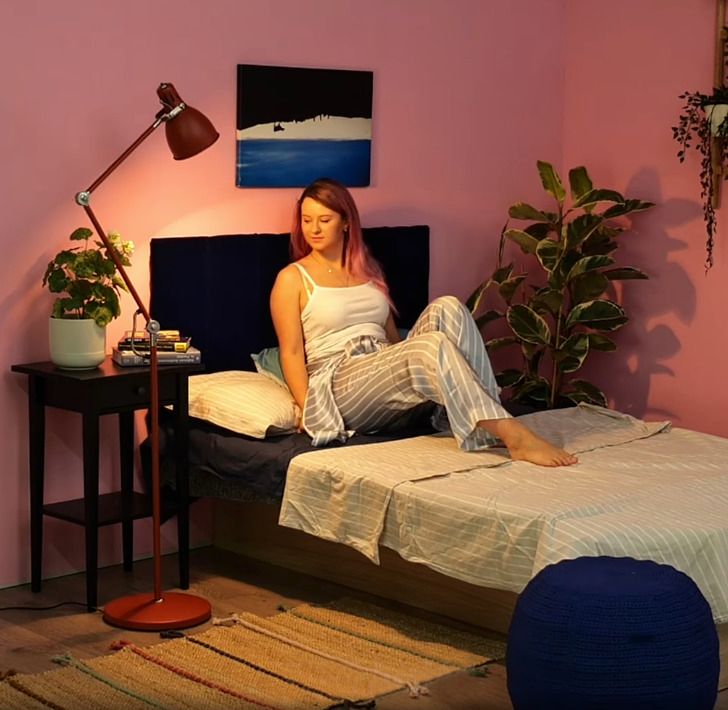
8. A headboard for the bed
What you’ll need:
- 10 wooden frames
- Linen
- A furniture stapler
- Synthetic insulation
- Velvet
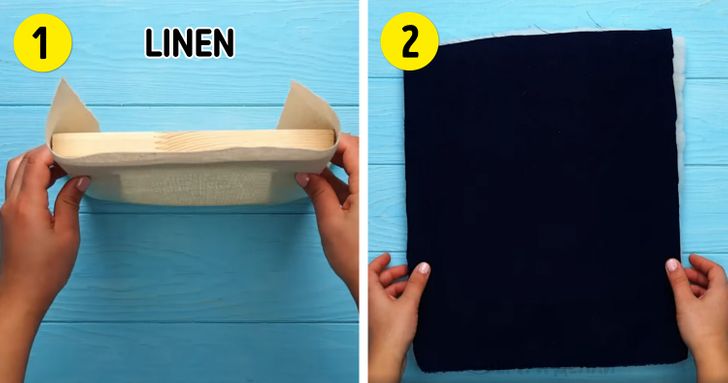
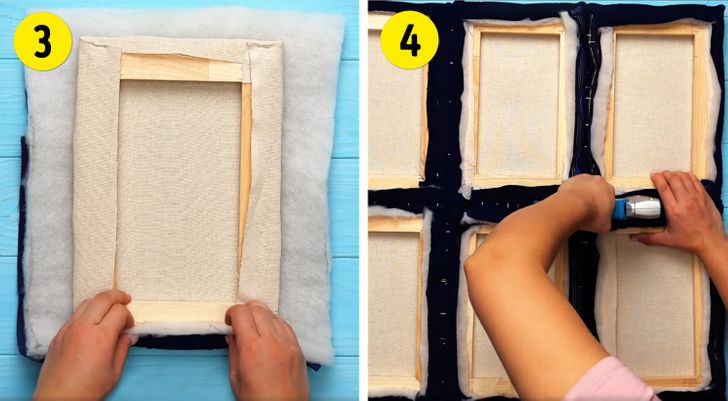
How to do it: Wrap the frames in linen and secure the fabric with a stapler. Wrap it in a layer of insulation and velvet, and secure it with a stapler.
Secure all the frames together, as is shown in the photo above.
7. A container for small items
What you’ll need:
- A rubber toy snake
- Spray paint
- A glue gun
- A small transparent bowl
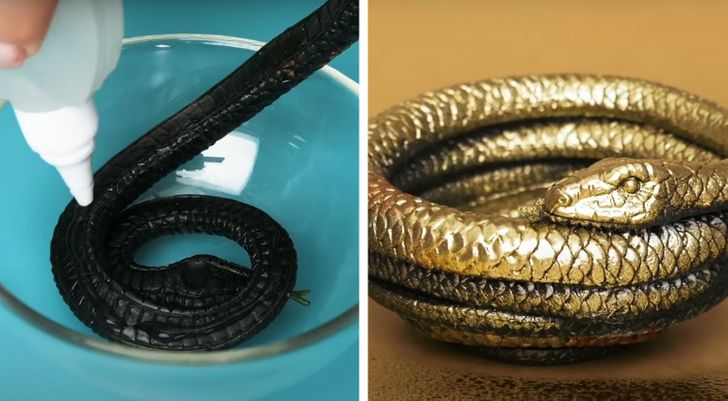
How to do it: Place the snake at the bottom of the bowl, as is shown in the photo above, applying glue in such a way that the snake rings stick together. Wait until the glue dries, remove the snake from the bowl, and paint it.
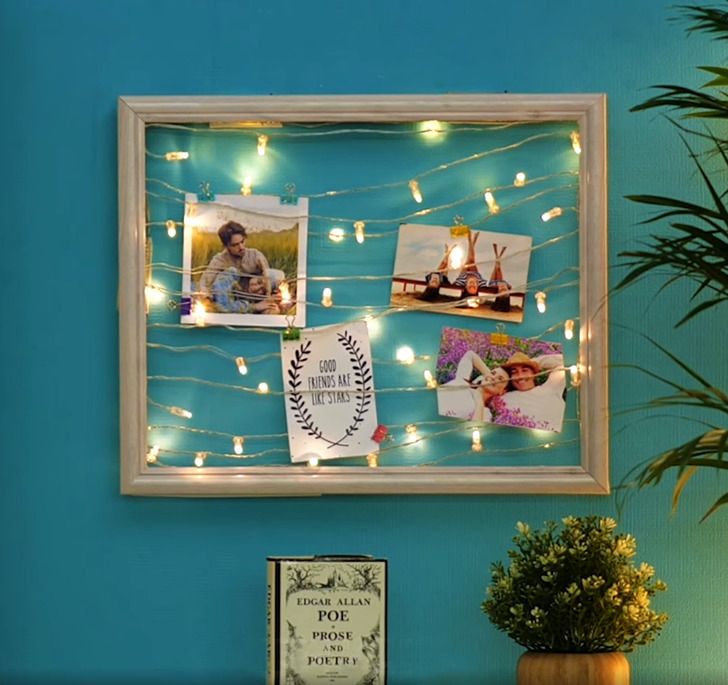
6. A backlit photo frame
What you’ll need:
- A photo frame
- 2 to 3 battery-powered fairy lights (depending on the frame’s size)
- A glue gun
- Stationery clips
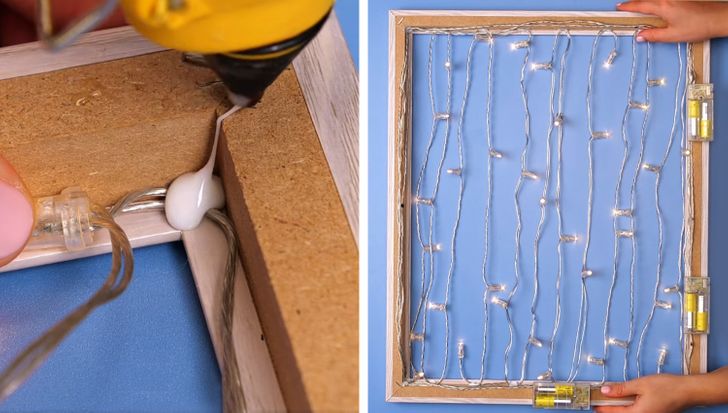
How to do it: Use a glue gun to secure the fairy lights on the back of the frame, as is shown in the photo above.
Flip the frame over and use the clips to secure the photos.
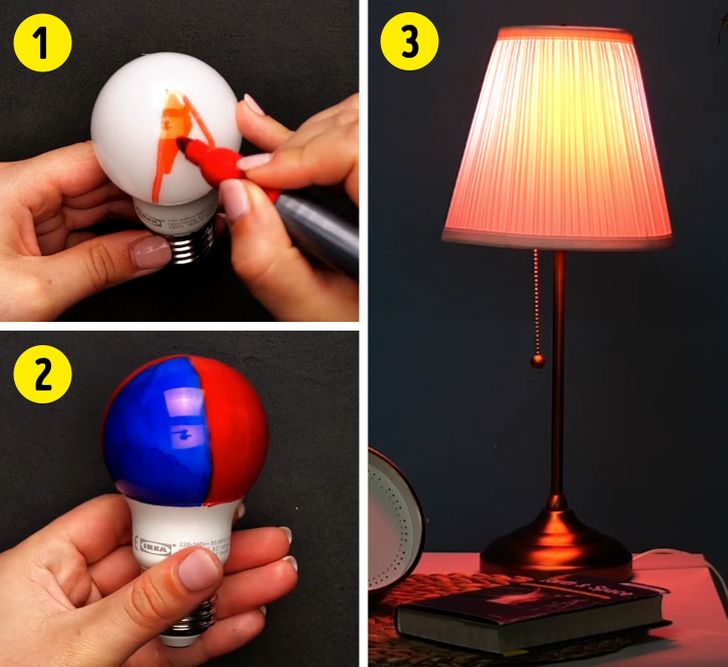
5. A colorful lamp
What you’ll need:
- An eco-lamp or incandescent low-power light bulb
- 2 markers of different colors
How to do it: Take a light bulb and use markers to color it, as is shown in the photo above. Install it into the lamp instead of a regular light bulb. Done!
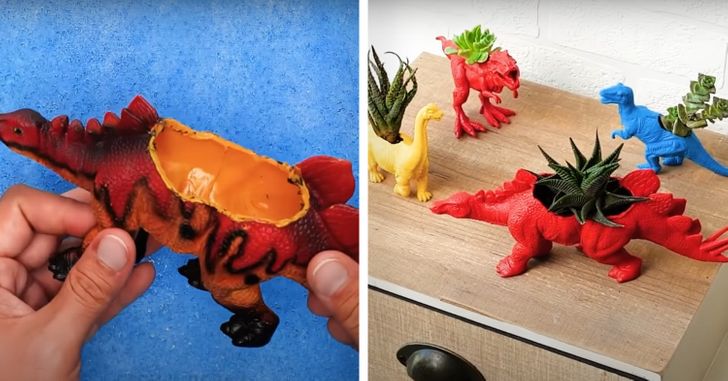
4. A dinosaur planter
What you’ll need:
- A rubber dinosaur toy
- Spray paint
- A stationery knife
- Soil for plants
- A plant
How to do it: Take a toy and cut a hole in its back. Color the dinosaur. Pour soil inside the toy and begin planting.
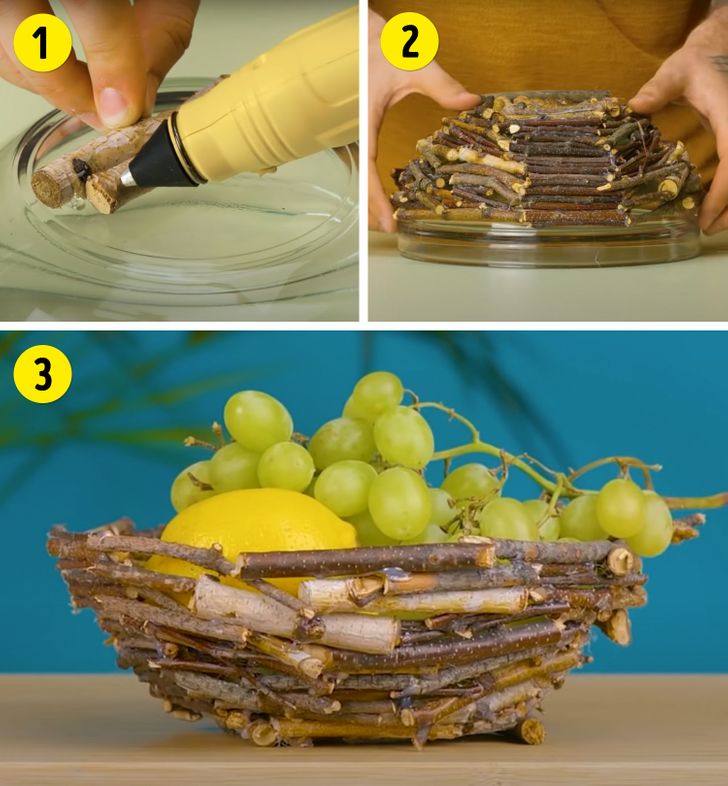
3. Fruit plate
What you’ll need:
- Wooden sticks or twigs
- A glue gun
- A small transparent bowl
How to do it: Place a bowl upside down on the table. Lay the sticks on top of it, gluing them together, as is shown in the photo above until you make a bowl of sticks. Wait until they dry and remove the glass bowl.
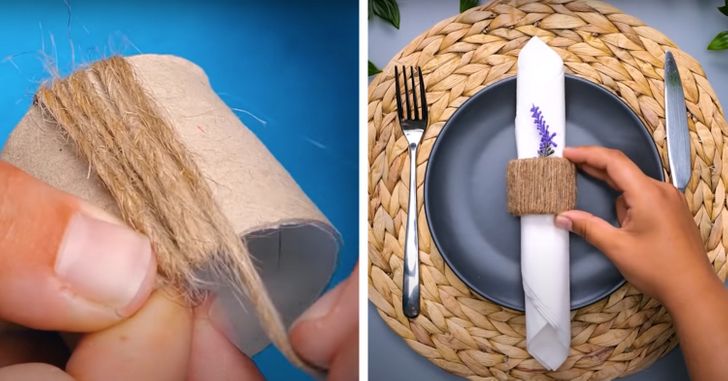
2. Napkin ring
What you’ll need:
- A thin twine rope
- Half of a toilet paper roll
How to do it: Tie the rope around the paper roll. To attach it more securely, you can first apply glue to the roll.
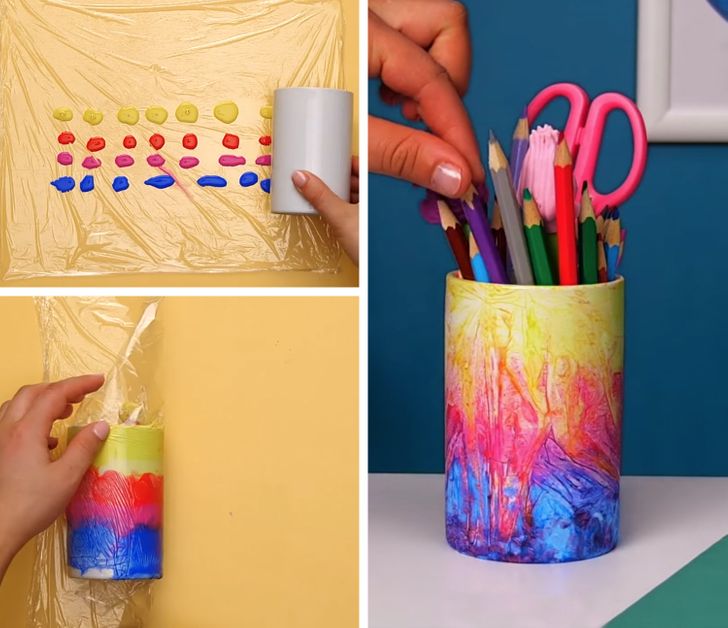
1. A pencil cup
What you’ll need:
- Plastic wrap
- Acrylic paint (several different colors)
- A white mug
How to do it: Spread out a piece of plastic wrap and apply a small amount of paint to it, as is shown in the photo above. Place a mug on top of it and roll it to the opposite end of the film so that the entire film is wrapped around it. Unroll the plastic carefully by rolling the mug back, then let the paint dry.
