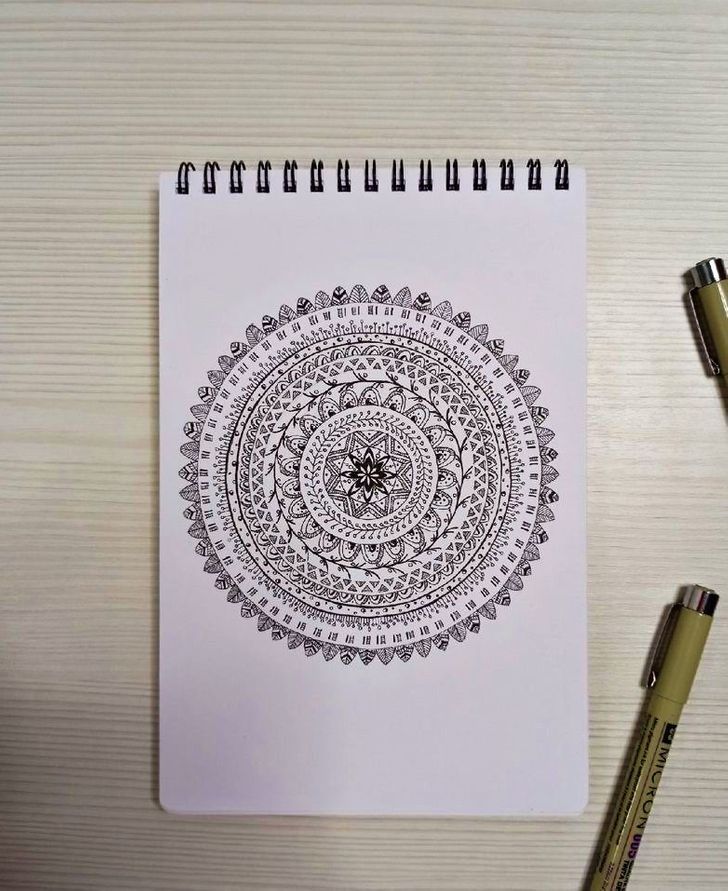
How to Learn Zentangle Art
As a form of graphic art, Zentangle wasn’t well-known until recently, but it has already found many fans around the world. Anyone can easily master this drawing technique that includes repetitive elements, and can create tiny masterpieces with their own hands.
5-Minute Crafts would like to show you how to start your journey into the world of Zentangle.
The basics of Zentangle
Traditionally, you’ll need thick white paper and a thin black marker to create Zentangle patterns. The pattern is drawn inside a 3.5×3.5-inch square and is an abstraction with no top and no bottom. Usually, the pattern is black and white, but gradually you will learn to include colorful elements in your work.
If you don’t have a thin marker, you can draw with a ballpoint, gel, or ink pen, or a pencil.
First steps
The best way to get acquainted with Zentangle art is by studying simple patterns (tangles), which you can use in your future drawings. At first, choose a quiet place, put all your tools in front of you, and start drawing. Allow yourself to do it intuitively, starting on any side of the paper and move in any direction. You can start to draw from the center, top, or bottom — any direction will be correct. If necessary, plan your direction with a pencil — just outline the boundaries of the drawing, and then follow them.
Important: In the process of drawing, you shouldn’t use a ruler — draw all the lines by hand, so you can relax and get carried away with the process. Over time, your lines will become smoother and clearer.
Basic tangles
There are countless Zentangle patterns. In the process of drawing, you can improve them, as well as come up with your own. However, it’s best to practice and sharpen your skills with simple tangles.
Here are some of them:
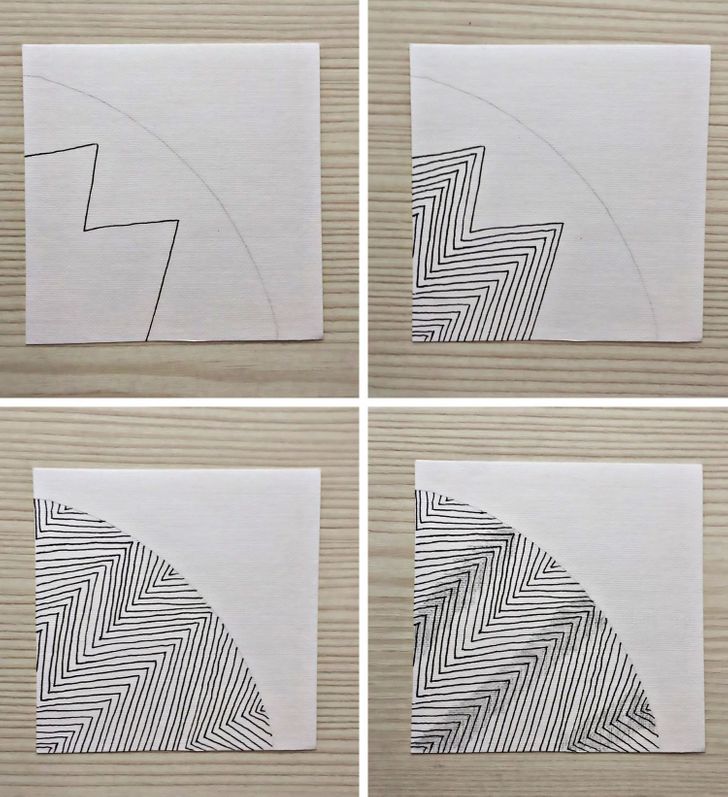
- “Wing”
1. Mark out the boundaries of your tangle with a pencil and draw a zigzag line inside it.
2. Duplicate the line several times, filling the entire space of your tangle.
3. If you wish, you can shade some parts of the tangle with a pencil to make the drawing look more voluminous.
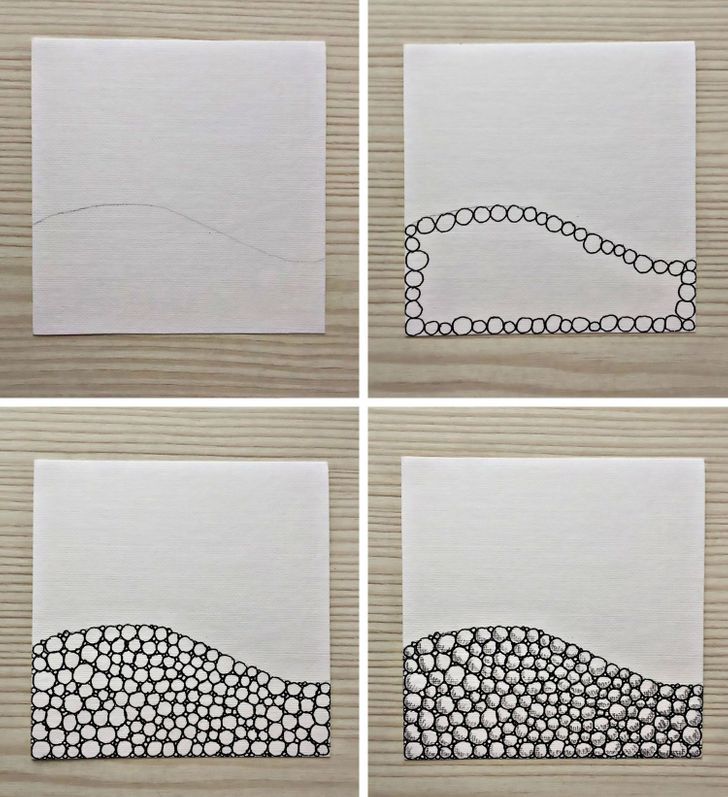
- “Rocks”
1. Draw a line with a pencil to make the border of your tangle.
2. Start drawing small circles, in different sizes, along the outline of the marked area, placing them next to each other.
3. When the outline is complete, start drawing the circles inside the resulting shape. You can shade the gaps between the circles or fill them with smaller circles.
4. Draw shadows on the circles with a pencil to make the picture looks more voluminous.
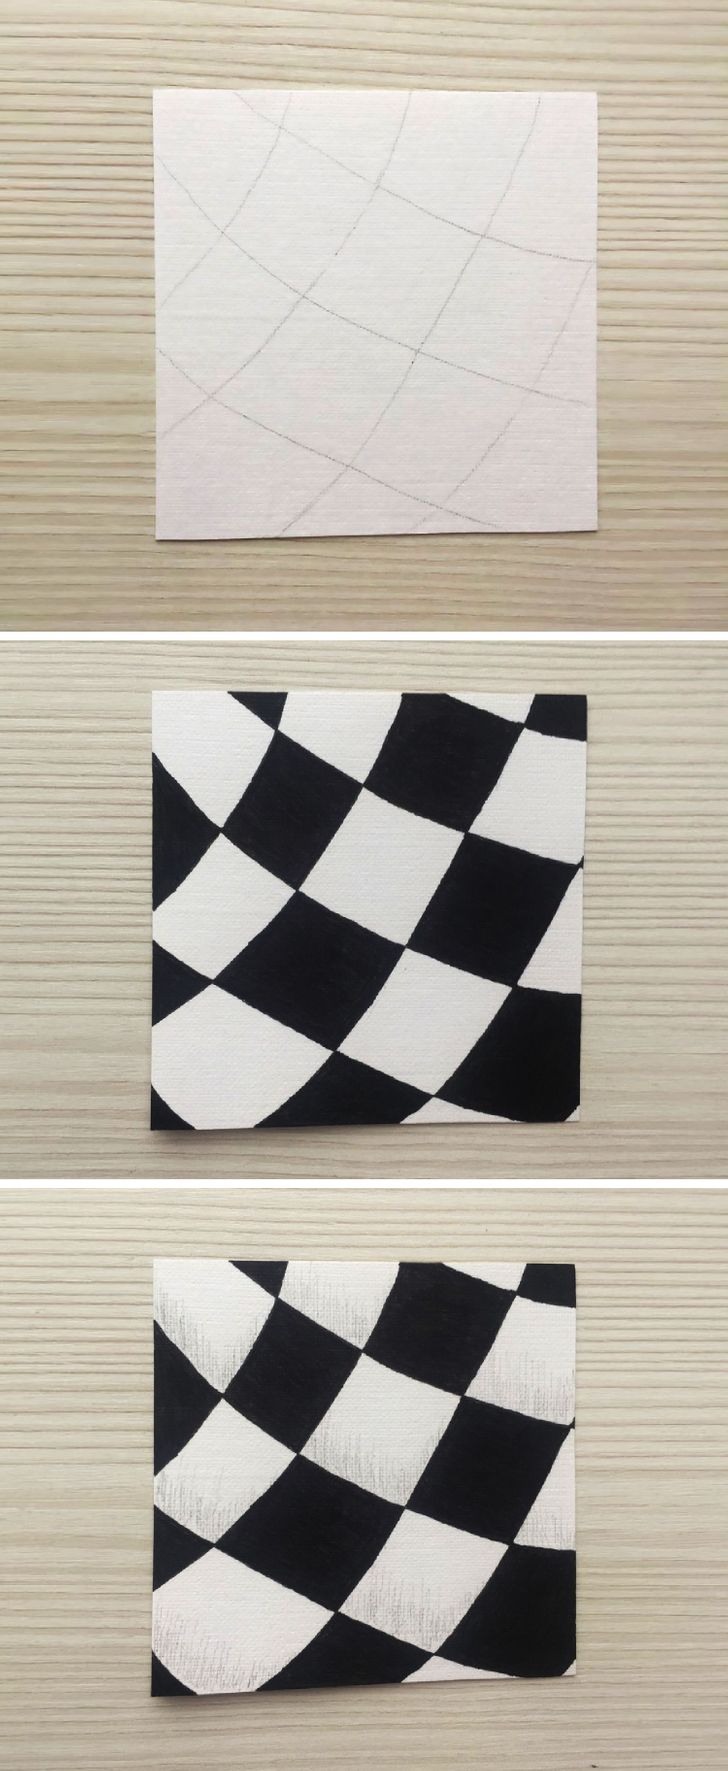
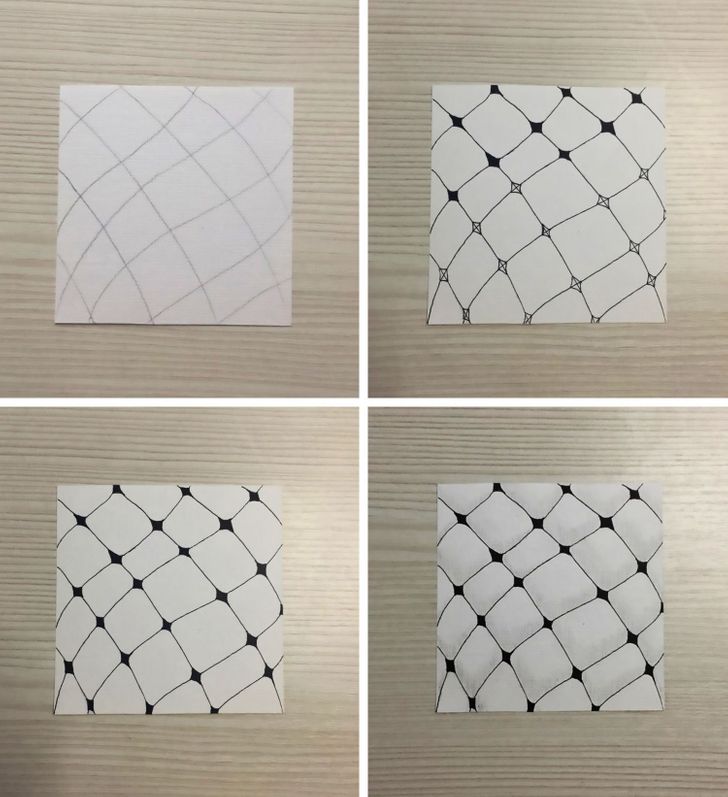
- “Knightsbridge”
1. At random, draw several intersecting lines on the paper. They can be slightly wavy or straight — it’s up to you. As a result, you will have a grid.
2. Paint over some of the resulting “squares” so that the black and white areas alternate with each other in a checkerboard pattern.
3. Using a pencil, draw shadows on the white squares with light strokes.
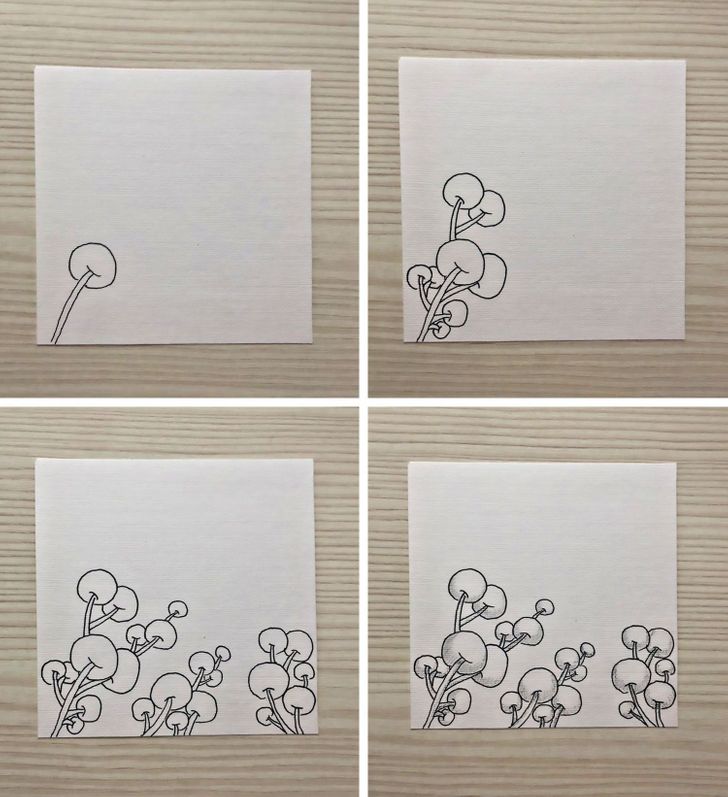
- “Wild cotton”
1. Draw the basic element of this tangle — a flower with a round head — in any place on your piece of paper. You need to draw 2 short parallel lines at a small distance from each other. This will be the stem. Then draw a small line at the top of it that is a bit wider than the gap between the lines. At a distance of about 5 mm from the stem, pick a point and draw a small circle from it, without crossing the stem.
2. Using this pattern, start adding flowers from different sides of the first flower. You can place them on top of each other, cross them, or put them in the background.
3. When finished, add shadows to the heads of the flowers with a pencil to make the drawing look more voluminous.
- “Festoon”
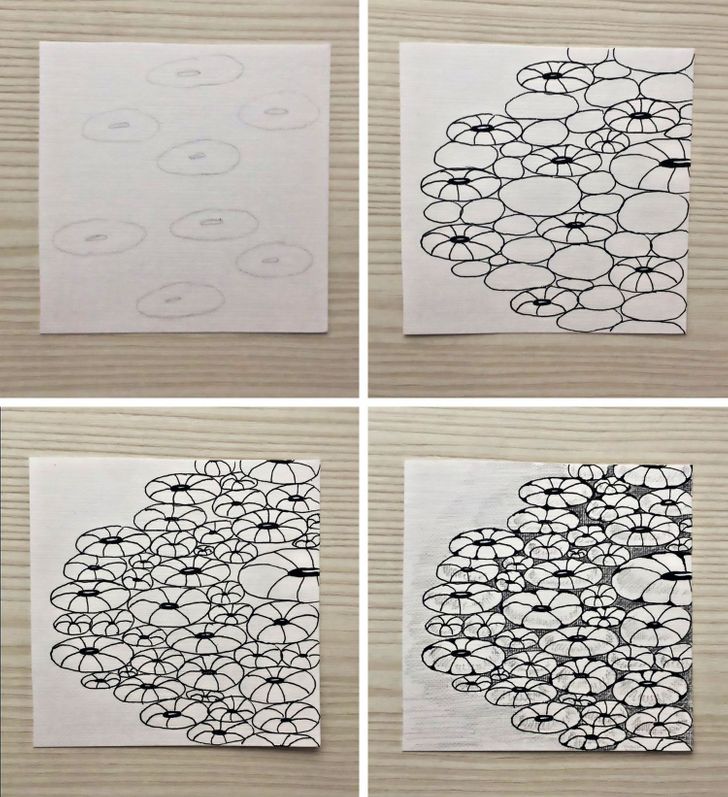
1. Draw several ellipses on the paper, placing them in a random order. Draw a smaller shaded ellipse inside each bigger one.
2. In each light ellipse, draw several curved lines that begin at the center and end at the border of the light ellipses.
3. Fill in the rest of the area with large and small ellipses.
4. Shade small gaps between the shapes with a pencil. You can also draw shadows on the shapes, adding volume to the pattern.
- “Bamboo”
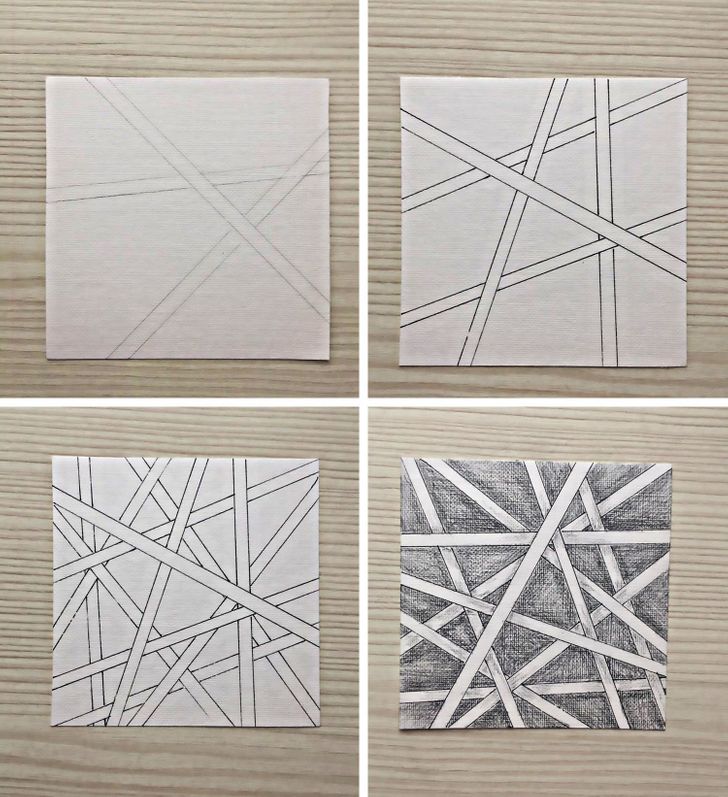
1. Draw a few double intersecting lines on the paper. They can go at any angle and cross in different places.
2. Fill the area between them with hatching and add shadows at the intersections of the lines.
- “Shell”
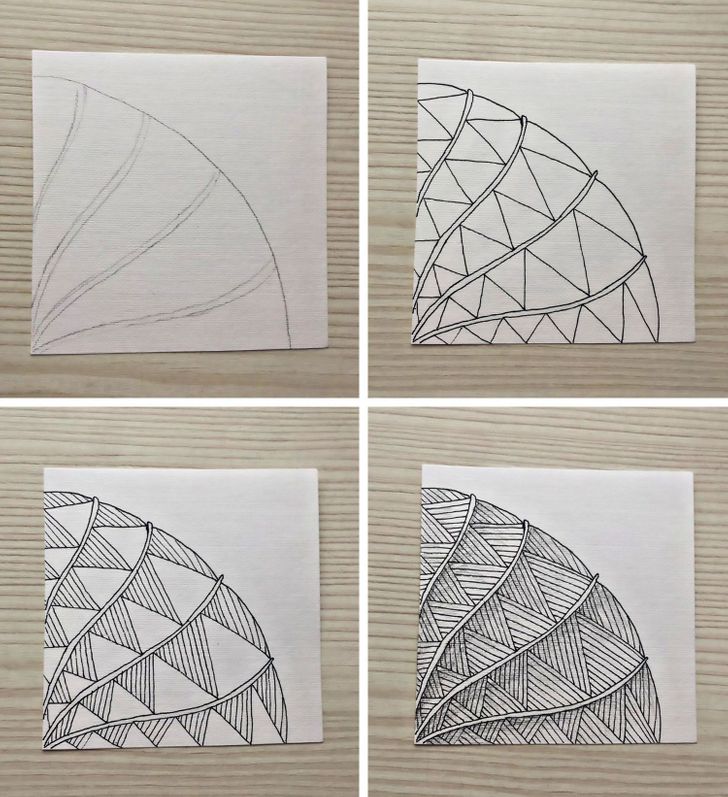
1. Draw a slightly curved line with a pencil and draw several thin wavy lines from the intended center to the edge of the main line.
2. Draw zigzag lines inside the resulting sectors.
3. Hatch the upper triangles so that the lines run parallel to one side of the triangles.
4. Hatch the lower triangles in the same way.
5. Add shadows.
- “Spiral”
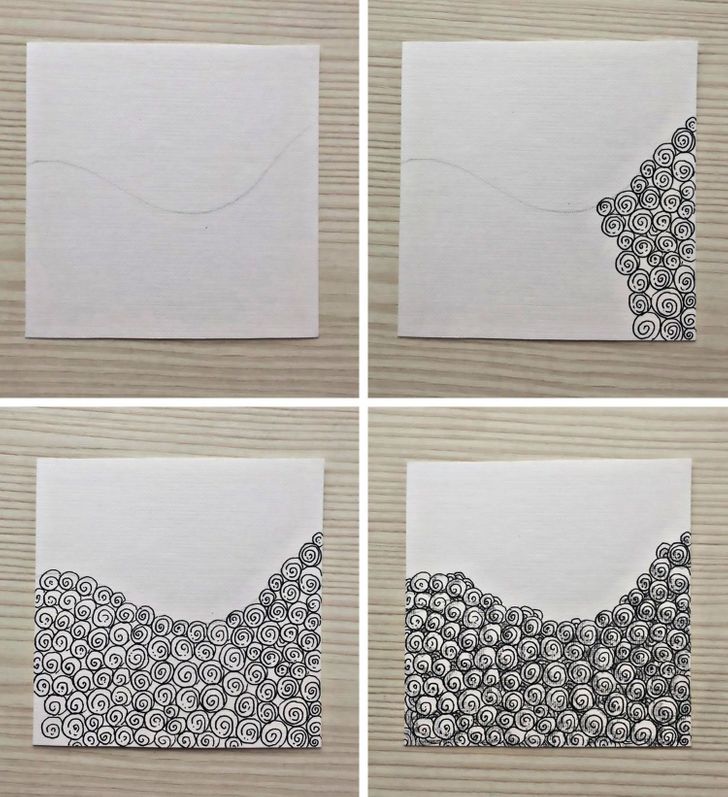
1. Outline the area of your tangle with a pencil.
2. Within the marked area, start drawing small circles with spirals inside. A spiral can be made of a full or dashed line, that is thin or wide — it’s up to you.
3. When you fill the entire space with this pattern, shade the gaps between the spirals with a pencil and add shadows to the spirals.
- “Sail”
1. Trace the paper into small quads with intersecting lines.
2. At the intersections of the lines, draw small diamonds and paint them black.
3. Hatch the large quads.
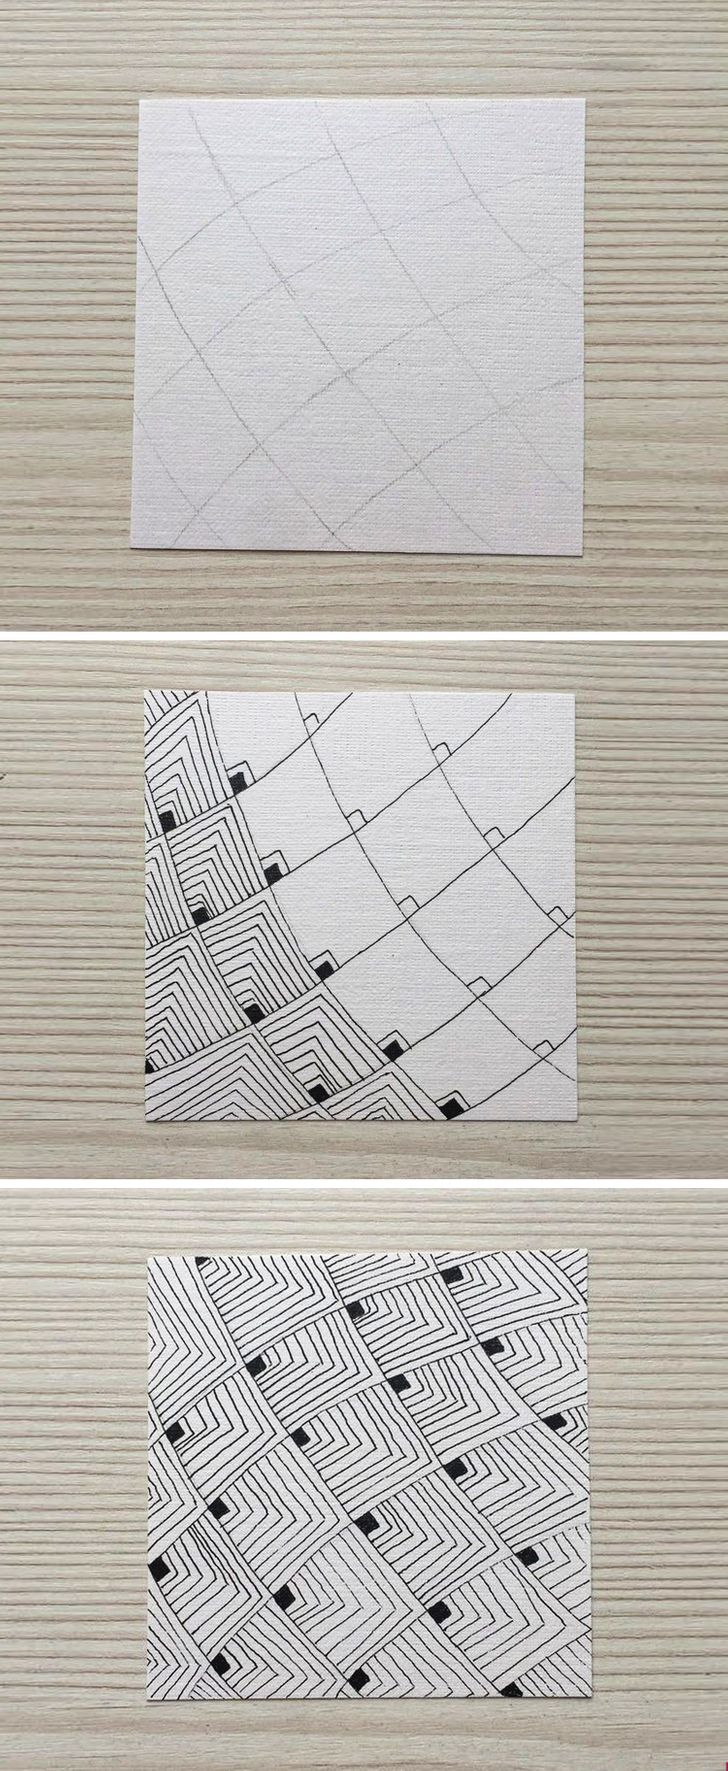
- “Skate”
1. Draw quads on the paper. You can use straight or wavy lines.
2. At one corner of each quad, draw a small black square, and then start filling each quad with lines that follow the outline of the black square.
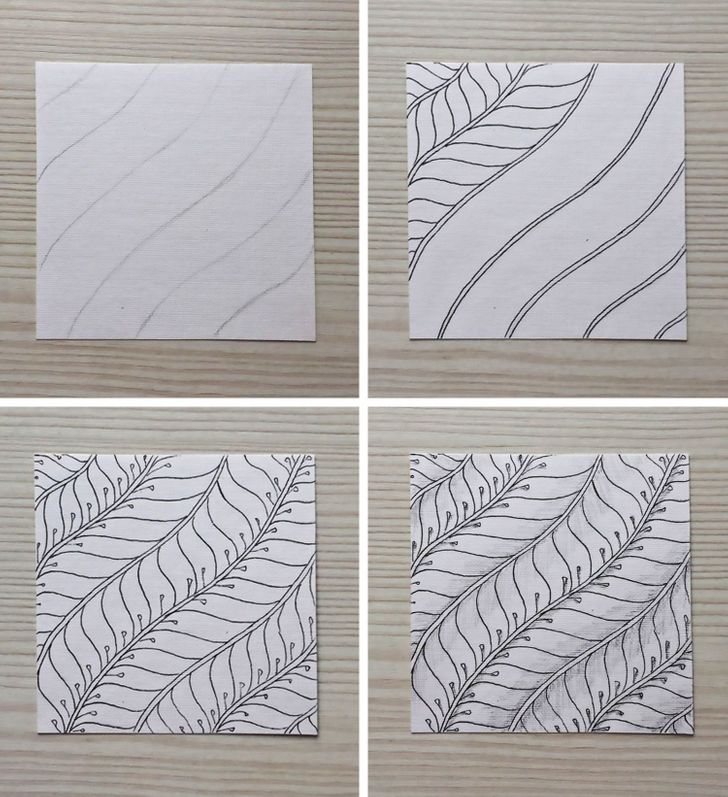
- “Luxury”
1. Outline your paper with soft, parallel, wavy lines. Duplicate each line by drawing another one next to it, a couple of millimeters apart.
2. Connect one of the main lines with the other one with wavy short lines, as if drawing veins on the leaf of a plant.
3. Do the same on the other side of the chosen line.
4. Follow this principle to fill in the entire area of your drawing.
5. Draw thin stamens on either side of the center lines of the resulting leaves. And then add some hatching with a pencil to complete the drawing.
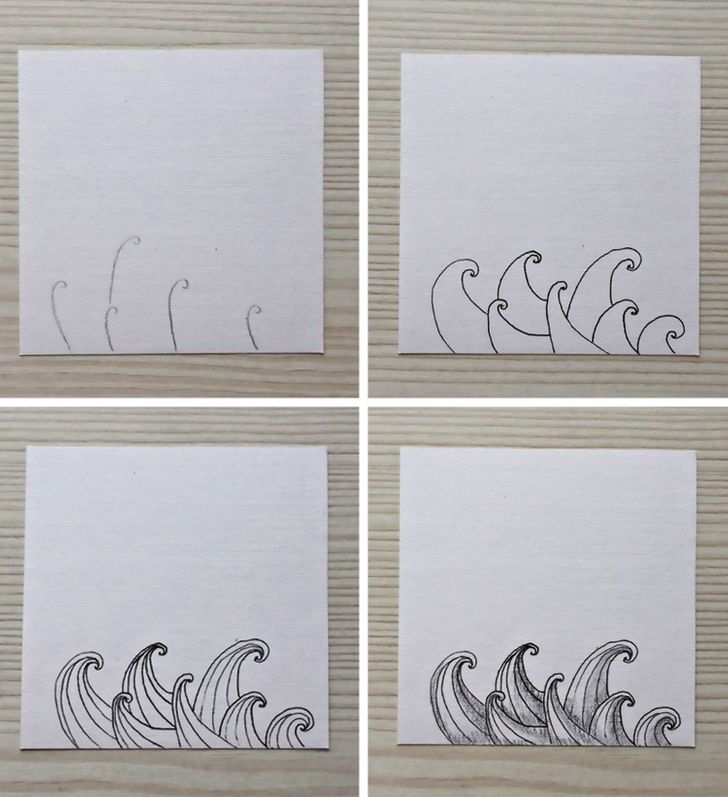
- “Waves”
1. Draw a few thin hooks on a piece of paper.
2. To make waves from them, duplicate the lines by starting from the center of the curls and giving them a slightly different direction.
3. Shade each wave with smooth lines, extending from the center of the curl.
4. Darken the bottom part of the waves, and the spots where they intersect with each other, with hatching to create volume.
What’s next
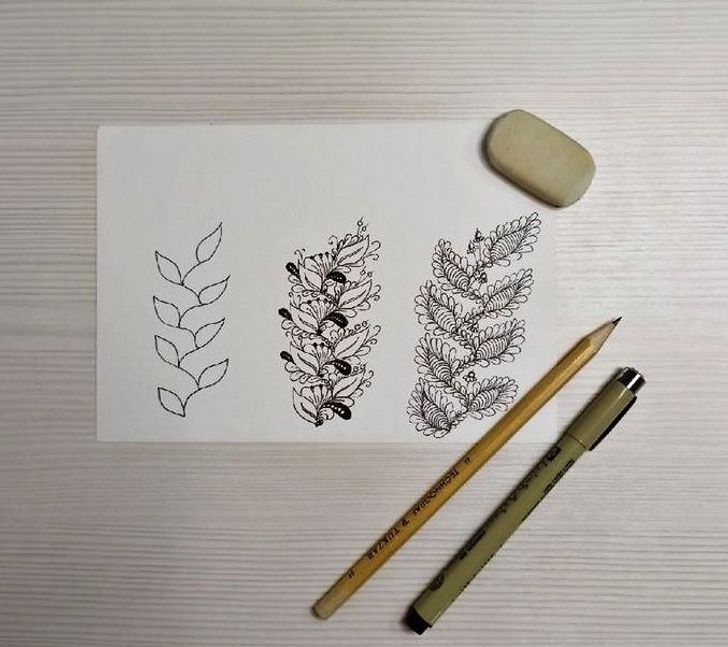
- After you’ve practiced drawing simple tangles, you can start learning more complex ones, experiment with volume, or come up with your own variations of already familiar patterns. To improve a tangle, it’s enough to add some details to a simple form or combine 2 tangles together.
See how you can get 2 completely different patterns from a simple shape with alternating leaves.
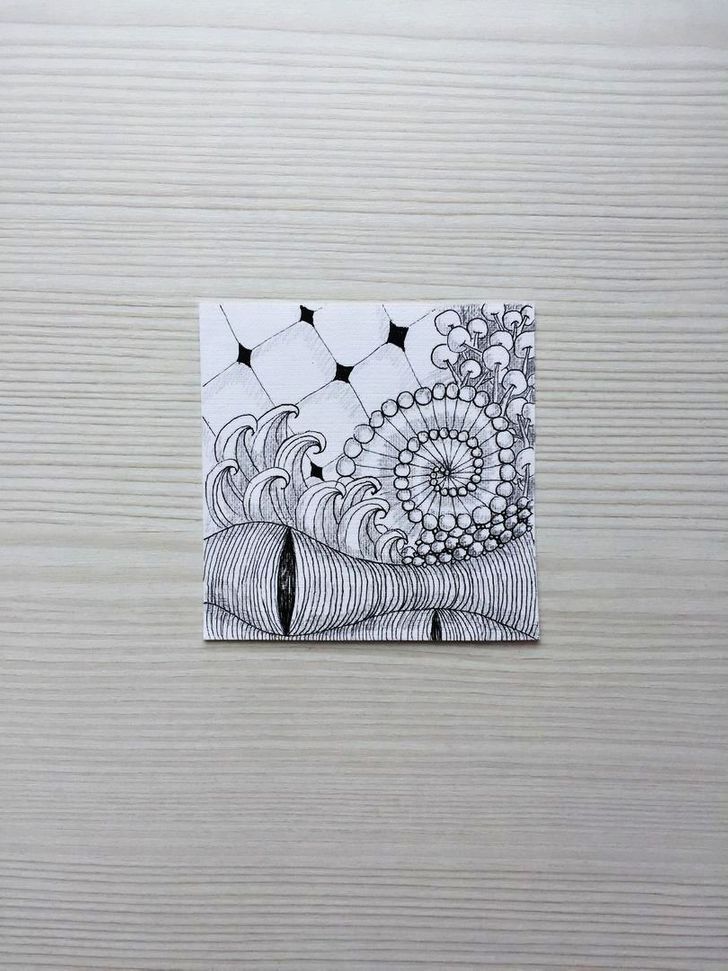
- To create more complex works, you can intertwine different tangles with each other, placing them as you like. Don’t be afraid to experiment and use a pencil if you’re not yet sure about your new pattern.
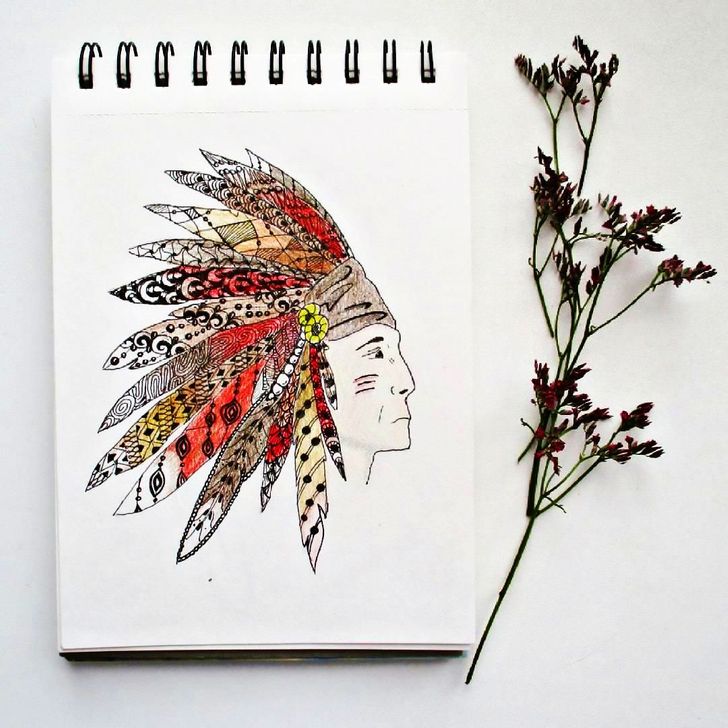
- You can color the finished tangles to make them even more meaningful. Use colored pencils, crayons, or oil pastels for this. You can also weave tangles into large designs to make your picture unique.
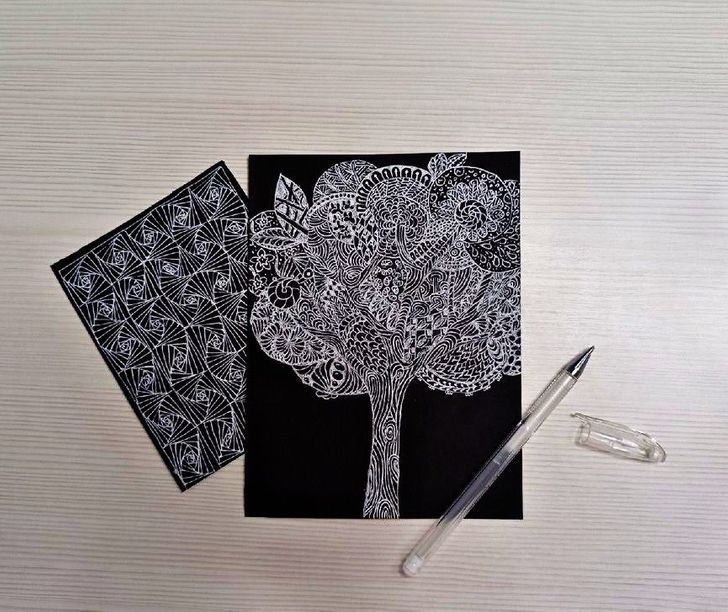
- Tangles can be beautiful on black paper too. You’ll need a white gel pen or a thin brush with white paint to create this kind of pattern.
- When you hone your technique to draw thin straight lines, you’ll be able to draw mandalas and decorate your space with the help of tangles.
