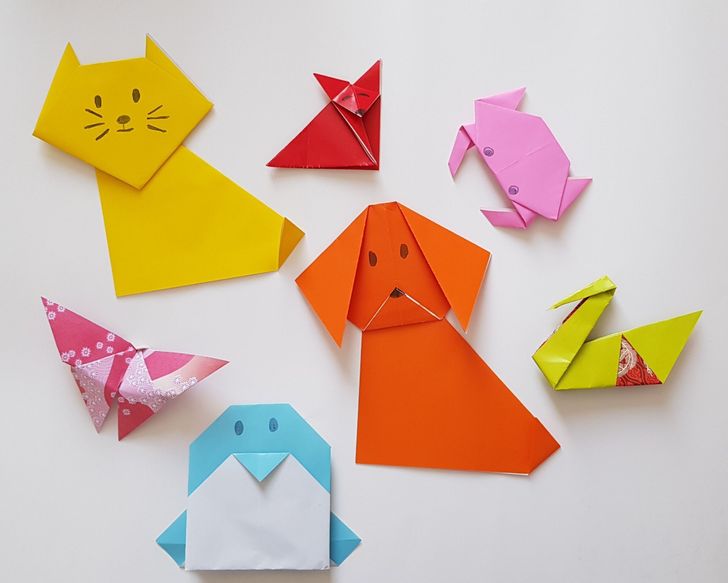
How to Make 7 Easy Origami Animals
Origami is the art of folding a sheet of paper, usually square, to create a particular figure, which can range from very easy to very difficult. Unlike kirigami, it doesn’t involve cutting anything. If you are interested in learning how to get started in this art, either as a hobby or as a way to relax, 5-Minute Crafts has put together 7 simple animal figures that you can make. This is a good way to start your journey through both origami and kirigami.
Here are the animals that you can make:
1. Penguin
What you’ll need:
- a square sheet of paper
- a black marker
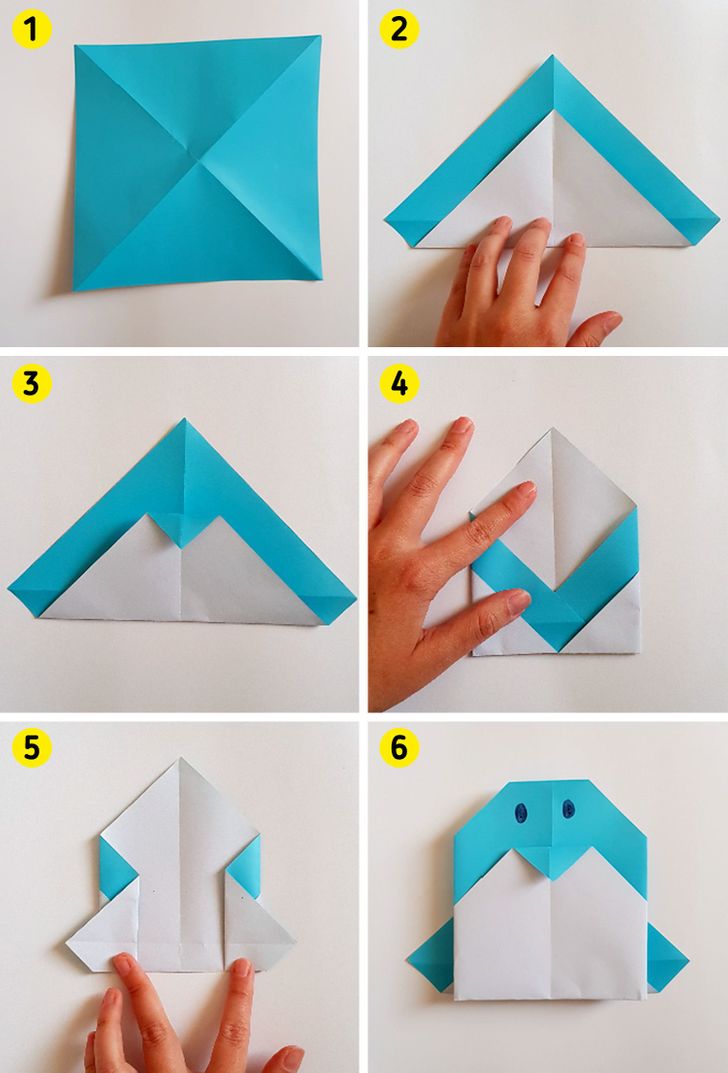
Instructions:
- Fold the paper diagonally. Unfold and flatten. Then fold the paper diagonally again, but on the other diagonal. Unfold again. Both diagonals should be clearly visible now.
- Turn your paper and choose one of the diagonals. Fold diagonally half an inch below the marked line. You’ll have 2 triangles, one slightly smaller than the other.
- Fold the upper tip of the smaller triangle down.
- Turn the paper again. Fold both lateral points inward, and join them by inserting one of them in the smaller fold of the other one.
- Unfold the points and fold them in half, but this time outward.
- Turn the paper one last time. Fold a little bit the upper tip backward to create the head of the penguin. Draw the eyes with the marker.
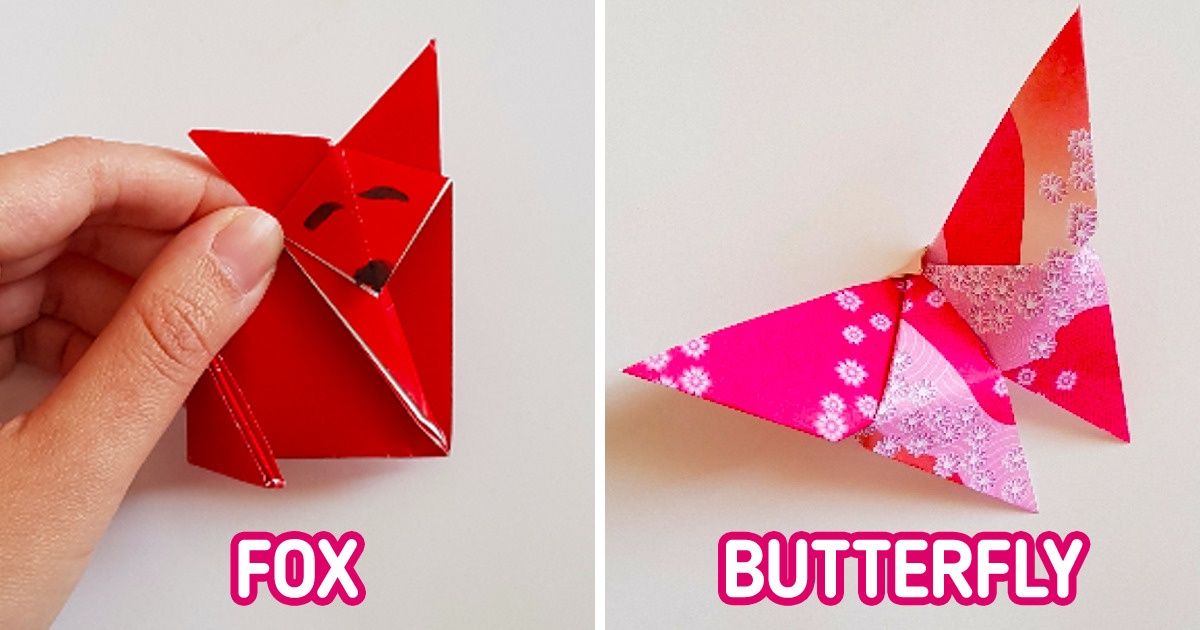
2. Butterfly
What you’ll need:
-
a square sheet of paper
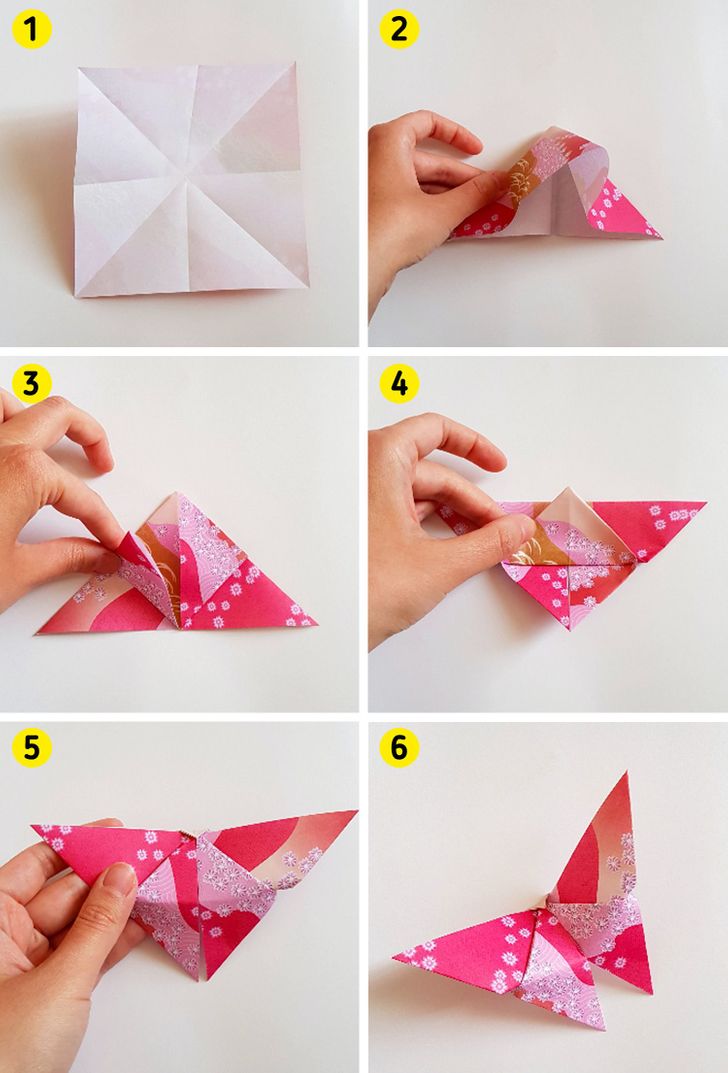
Instructions:
- Mark all horizontal and diagonal folds of the paper by folding it in half both lengthwise, widthwise, and diagonally (twice).
- Flatten the paper and put the colored part facing down. Join the horizontal folds inward to form a triangle with flaps.
- Fold 2 of the flaps inward and join them with the upper end.
- Turn the figure so that the top point of the triangle is facing down and fold it up, letting it stick out slightly from the edge.
- Turn the figure again and fold the small triangle that protrudes inward.
- Fold the figure slightly in the center to give it the shape of a butterfly... and that’s it!
3. Cat
What you’ll need:
- 2 square sheets of paper
- a black marker
- glue
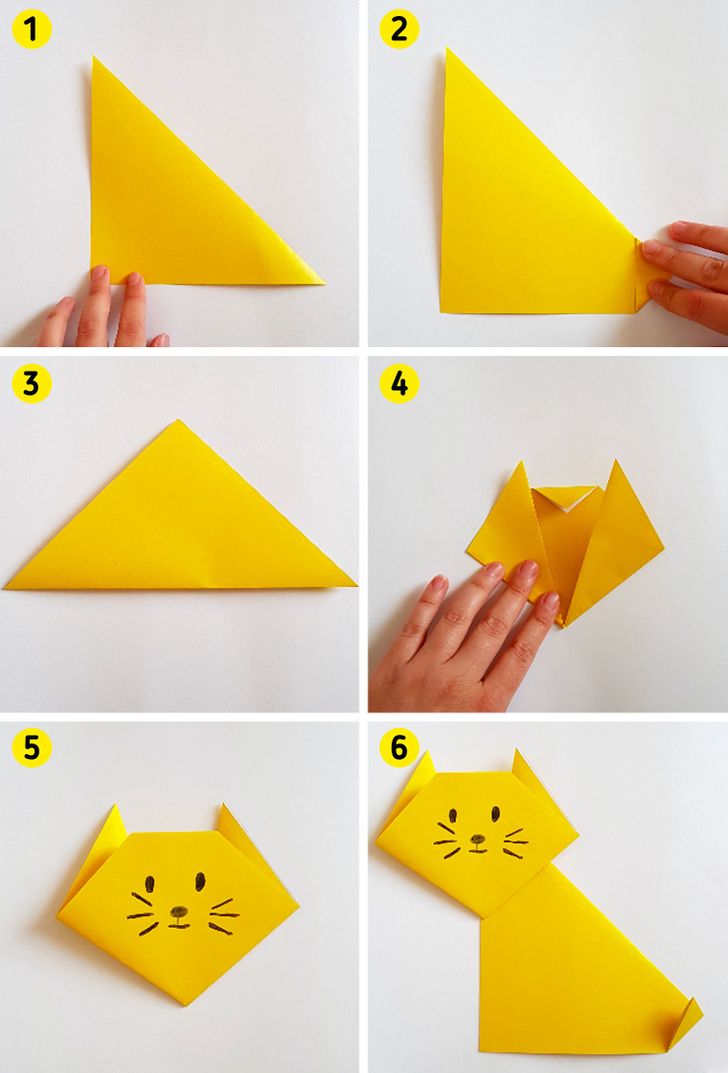
Instructions:
- Fold the first sheet of paper diagonally. You will get a triangle that will be the body of our cat.
- Fold the lower tip of the right end upward to form the tail.
- Use the second sheet of paper to form the head of the cat. Start by folding the piece of paper diagonally. You’ll get a triangle.
- Fold the top point of the triangle down and inward. Then fold the side points up and inward. It will look as if they are sticking out of the figure.
- Turn the paper over and draw the face of a cat.
- Stick the head to the body with a drop of glue, and that’s it!
4. Dog
What you’ll need:
- 2 square sheets of paper
- a black marker
- glue
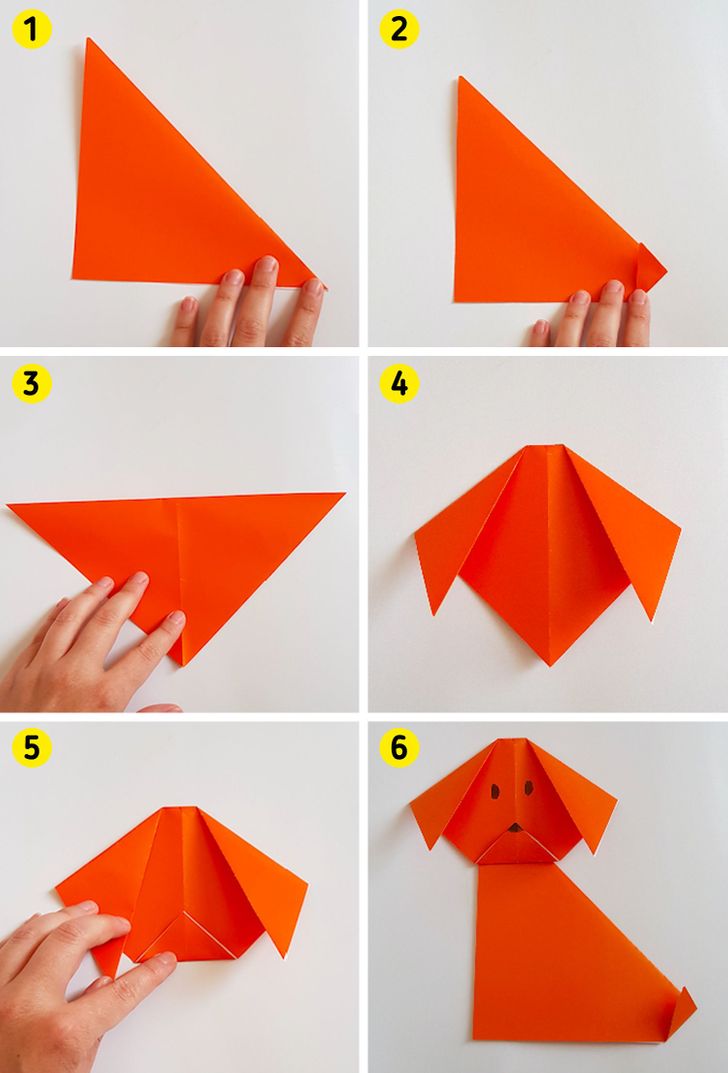
This figure is very similar to the previous one, so it will not be very difficult for you to make it.
Instructions:
- We’ll start by making the dog’s body. Use the first sheet of paper and fold it diagonally. You’ll have a triangle.
- Fold the lower tip of the right end upward to form the tail.
- Now we’re going to make the head. Mark the diagonals on the second sheet by folding it twice diagonally and then unfold. Then, fold the paper diagonally to form a triangle.
- With the triangle’s top angle facing down, fold the side points down and inward to form the ears of the dog.
- Then, fold the bottom point up and inward to form the snout.
- Draw the dog’s nose and eyes and finally stick the head to the body with a drop of glue.
5. Fox
What you’ll need:
- a square sheet of paper
- a black marker
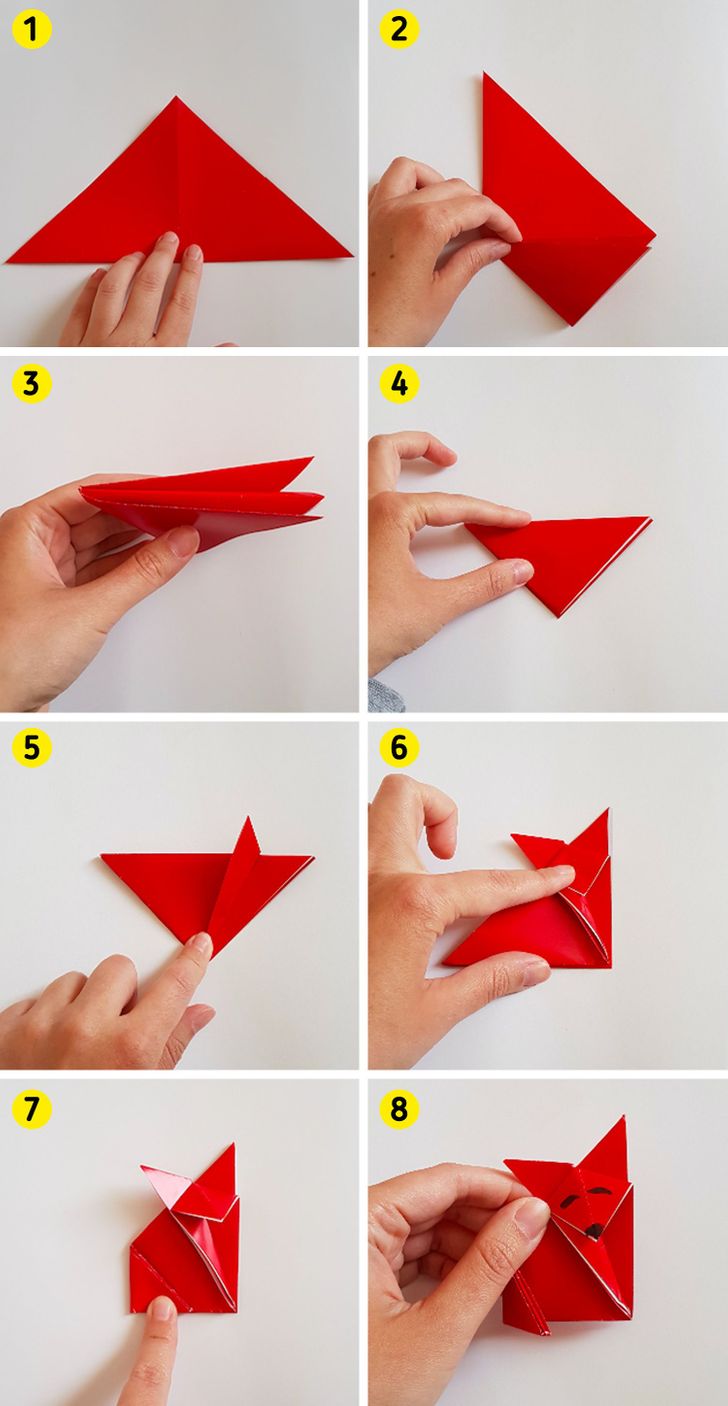
Instructions:
- Fold the paper diagonally on both sides to mark the folds and then flatten the paper. Fold diagonally again to get a triangle.
- Turn the triangle 90º and fold the bottom end upward in half.
- Now fold the upper point downward. For this step, you might want to lift the figure just to make sure that both points are folded well.
- Place the triangle you have on a flat surface and press it against the table to make sure it’s flat too.
- Bend one of the lateral flaps slightly inward. It should stick out of the upper edge.
- Bend the tip of the center flap downward and flatten the resulting figure. In this step, you should be able to clearly see the head and body of a fox.
- Bend the tip of the left side inward to form the tail.
- Finally, draw the face of the fox... and that’s it, you’ve got a fox!
6. Crab
What you’ll need:
- a square sheet of paper
- a black marker
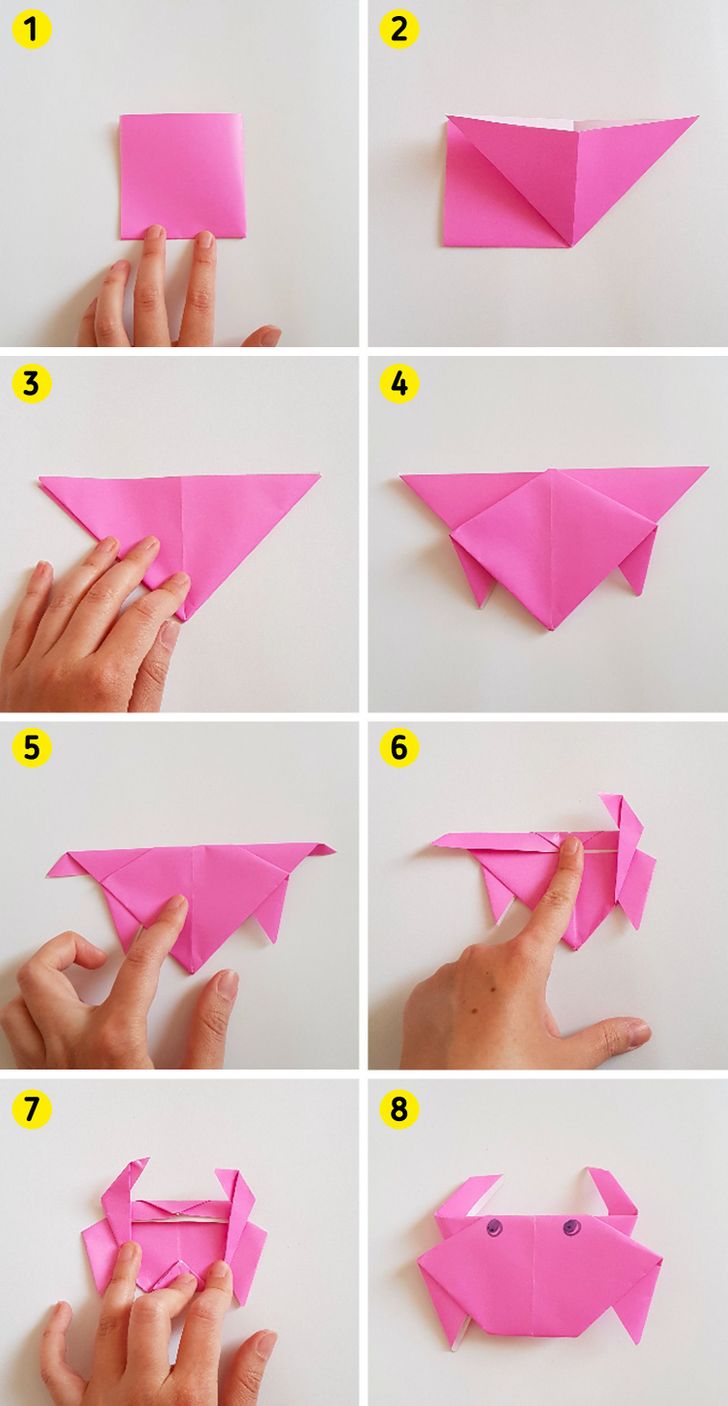
Instructions:
- Fold the paper in half and then in half again. This time you should have a small square.
- Fold one of the corners of the square outward, to form a flap shaped like a triangle on top of the square.
- Fold the corner of the square inward to get a double flapped triangle that’s facing down.
- Fold the side points of the upper triangle inward to make the legs of the crab.
- Fold the base of the triangles back. This should be about a 1/2 inch fold.
- Turn the figure over and fold both side points upward.
- Fold the lower point upward to form a small triangle. It’s possible that in this step your figure does not look completely perfect due to the thickness of the paper you are using, but that is completely normal.
- Turn the figure over, draw the eyes of the crab... and that’s it!
7. Swan
What you’ll need:
-
a square sheet of paper
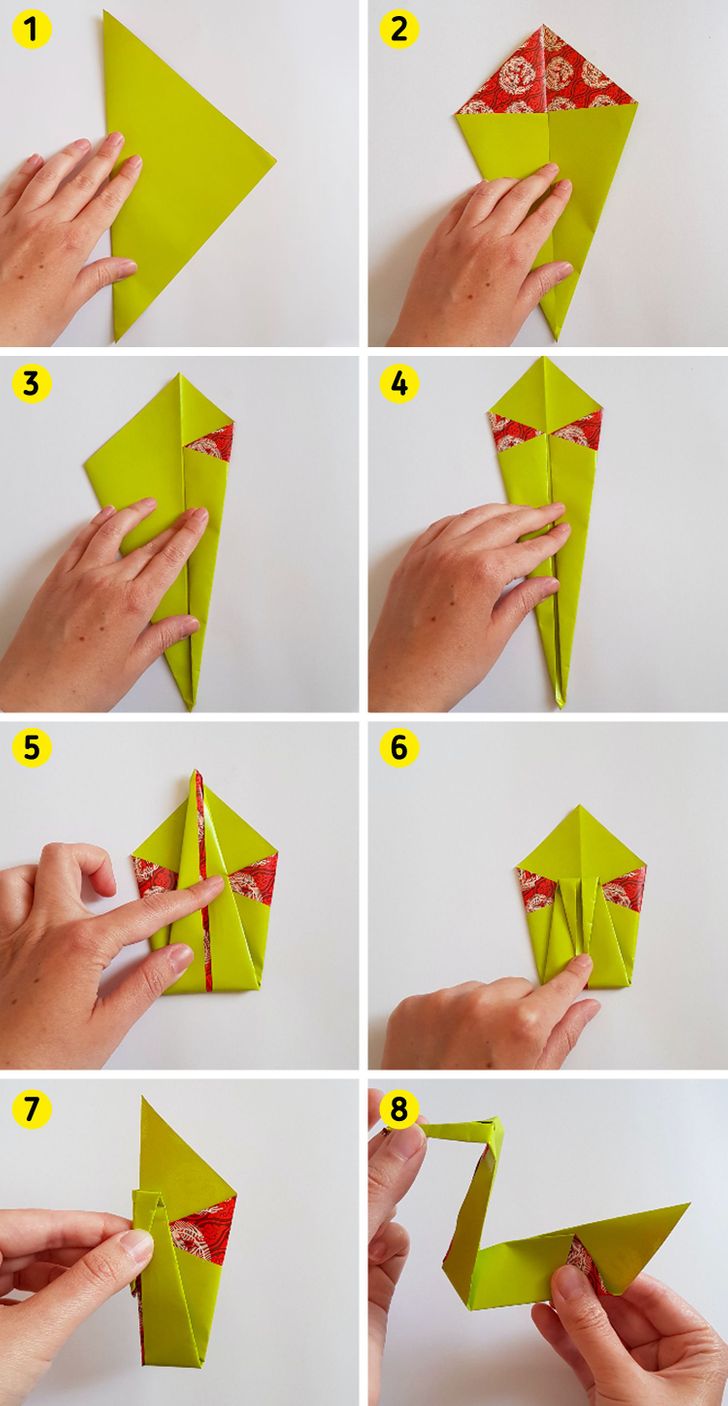
Instructions:
- Fold the paper diagonally to form a triangle.
- Unfold it and fold it again, but this time, just the lateral points toward the center, as if you were trying to make a cone.
- Turn the paper around and fold the lateral points again toward the center.
- Place the figure on a flat surface and press it down to flatten it. Make sure you do this properly, as it will prevent the figure from disassembling once you’re done with all the steps.
- Fold the lower tip upward to meet the upper tip.
- Bend the front tip downward right where all the folds meet. This is supposed to be the head of the swan.
- Bend the whole figure backward, holding the head.
- Carefully pull the head of the swan forward holding the figure from the tail ... and that’s it!
When you’re done making all the figures, this is the collection you’ll have:
