How to Make a Paper-Quilling Picture
You don’t need to be able to paint well in order to create beautiful pictures. There are many alternatives to painting and one of them is quilling. It’s a type of art when one makes simple and voluminous compositions from rolled strips of paper of different widths.
5-Minute Crafts wants to offer you a chance to learn the basic rules and tricks, thanks to which you’ll be able to create your own quilling-style masterpieces.
You’ll need
-
A quilling tool that looks like a long pen with a metal nozzle. It is used to make the process of rolling paper easier. Sometimes there can be an awl at the other end that also eases the working process.
-
Paper strips for quilling. Usually, they are sold as part of a set and they differ in width. You can also cut them yourself, but make sure to choose thick paper so that it keeps its shape well when creating rolls.
-
A fixative — this can be PVA glue, glue for cardboard, or a glue-gun. It’s convenient to apply glue to the little details with the help of a toothpick.
-
Tweezers
-
Scissors with pointed edges to turn strips of paper into fine fringe
-
Quilling stencil ruler with holes, which makes it easy to make curls of the same size and shape
Tip: You can also make a backing from cork or foam to glue small parts on, additionally you can fasten them together with the help of tailor’s pins until the glue sets.
How to make basic shapes
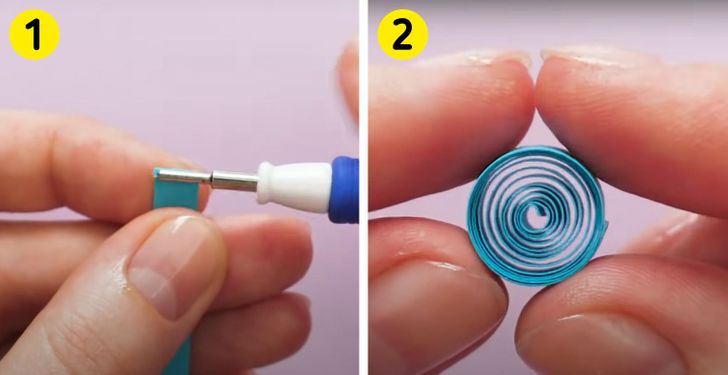
Step 1. Place one end of the paper strip into the quilling tool. Start to twist the strip into a spiral, pulling it tight until it is completely curled.
Step 2. Remove the quilling tool. You should get a roll that can be used for creating various shapes.
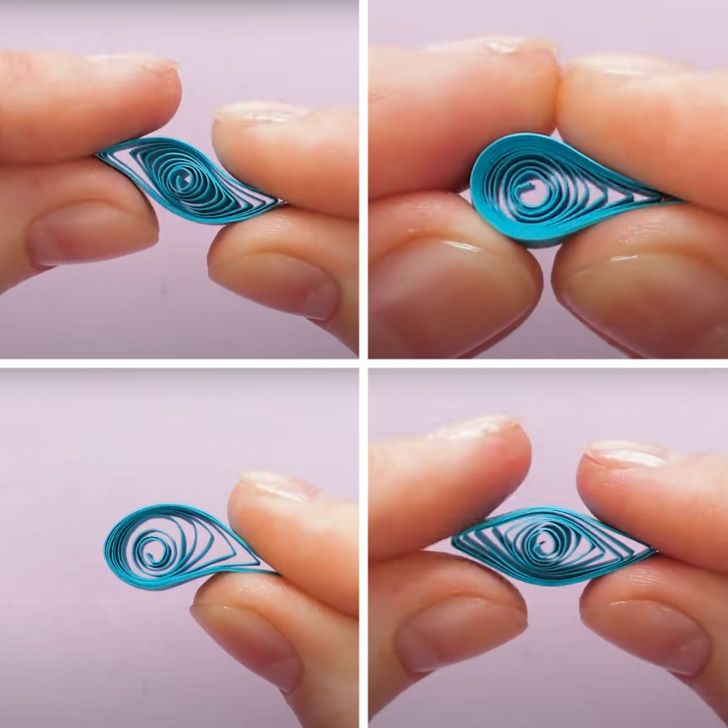
The shape of the future element depends on how tight or loose the roll will be, whether you’ll squeeze it, move its center to the side, whether you’ll glue the tip to the shape, or leave it free.
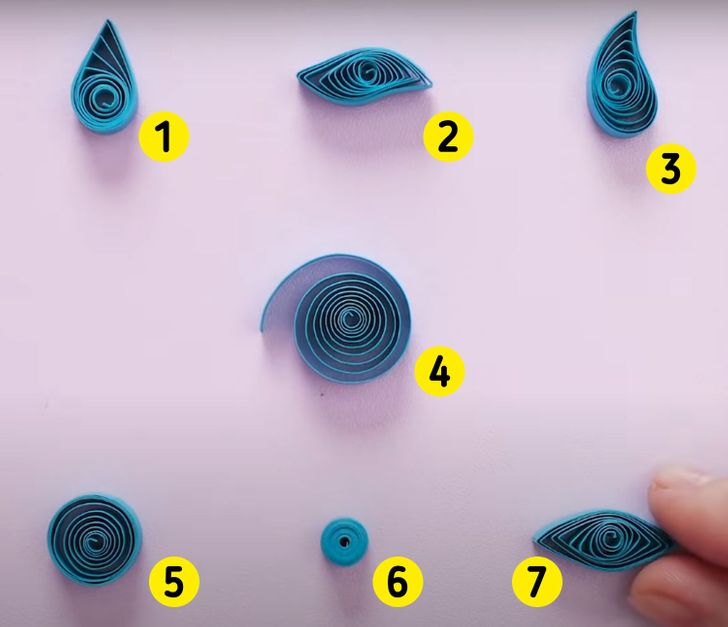
The picture above shows several simple basic shapes that even a newbie won’t find difficult to create:
-
Drop
-
Wave
-
Curved drop
-
Open roll
-
Free roll
-
Tight roll
-
Eye
Please note: If the tip of the roll is not supposed to stick out, then it should be glued to the roll. Also, there are many other elements that you can learn to do with the help of video lessons.
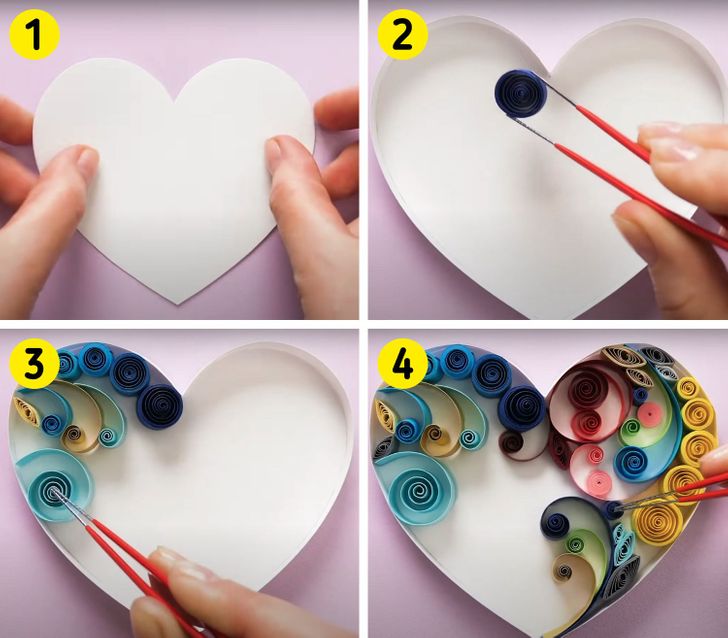
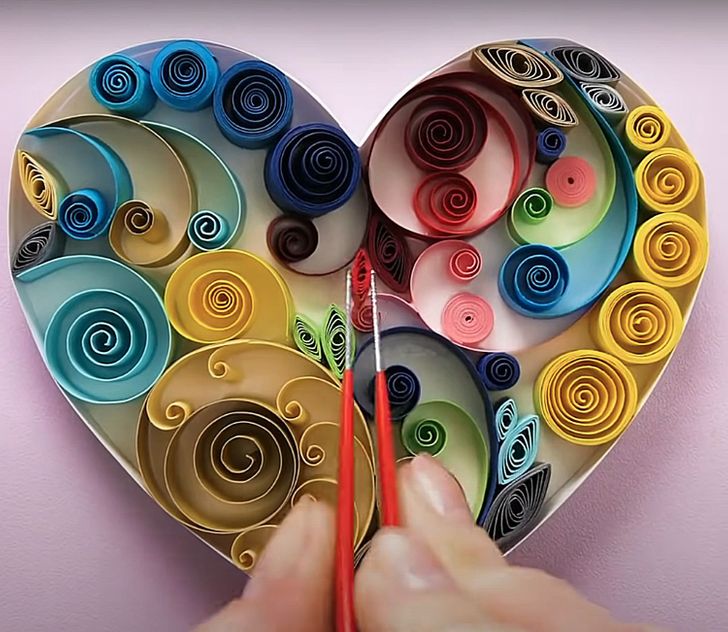
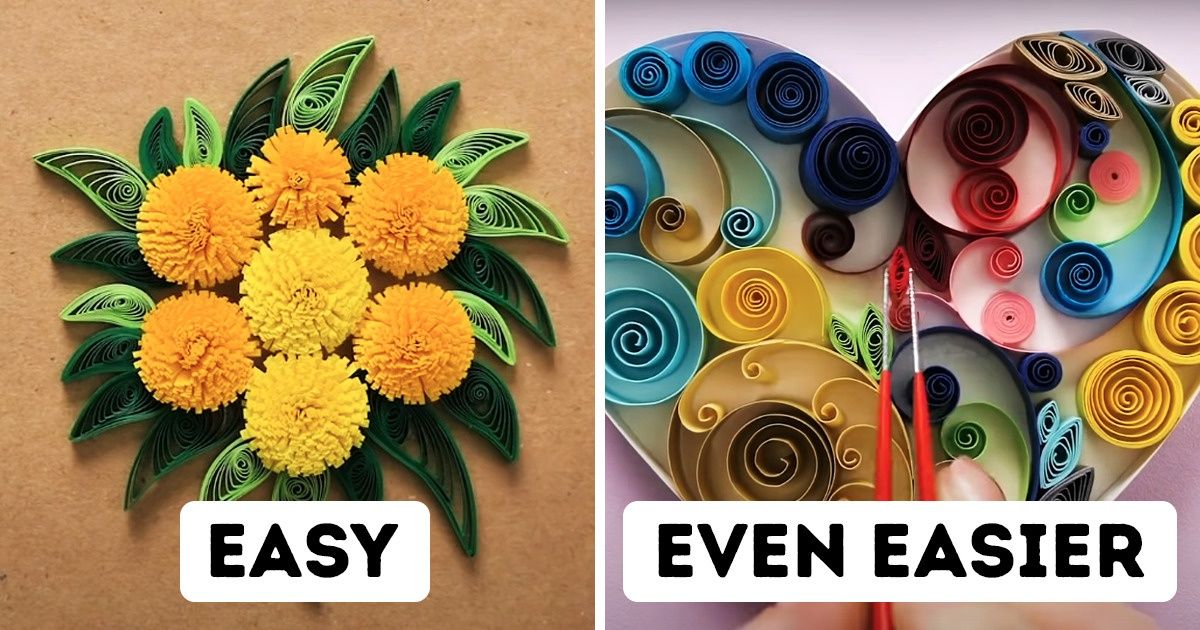
Picture #1. Decorated heart
Step 1. Cut a heart in a desired size out of thick paper. Afterward, make its walls with the help of white-colored strips. You’ll get a shape that you’ll later be filling with various elements. Please note that the width of the strips for the heart’s walls and the elements inside of it should be the same.
Step 2. Using tweezers, accurately place the first element inside the heart, having previously applied glue to the lower surface of the element.
Step 3. By repeating the same movements, first fill the upper left part of the heart with various elements.
Step 4. Then move to the right part, and later start filling the lower part. Combine various elements with each other, creating unusual patterns.
If you want, you can fill any empty space with smaller elements. Glue the ready heart to a piece of paper in a contrasting color so that the composition looks more noticeable against its background.
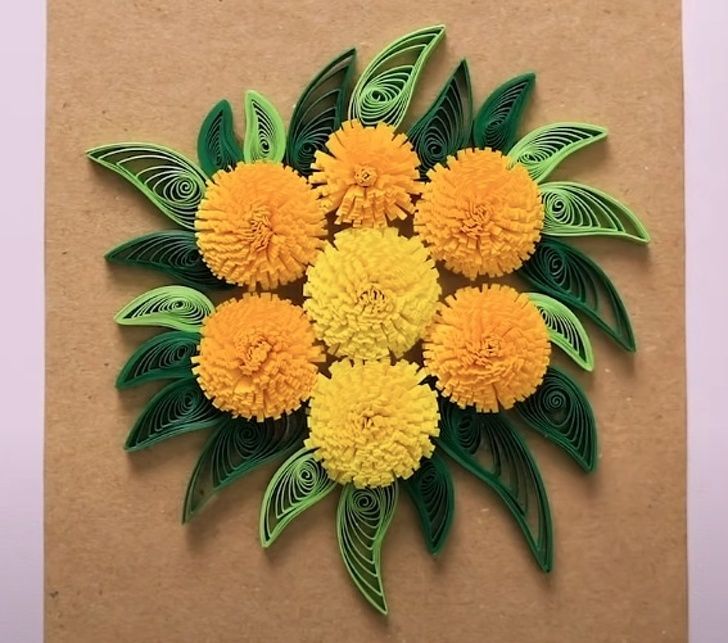
Picture #2. A bouquet of dandelions
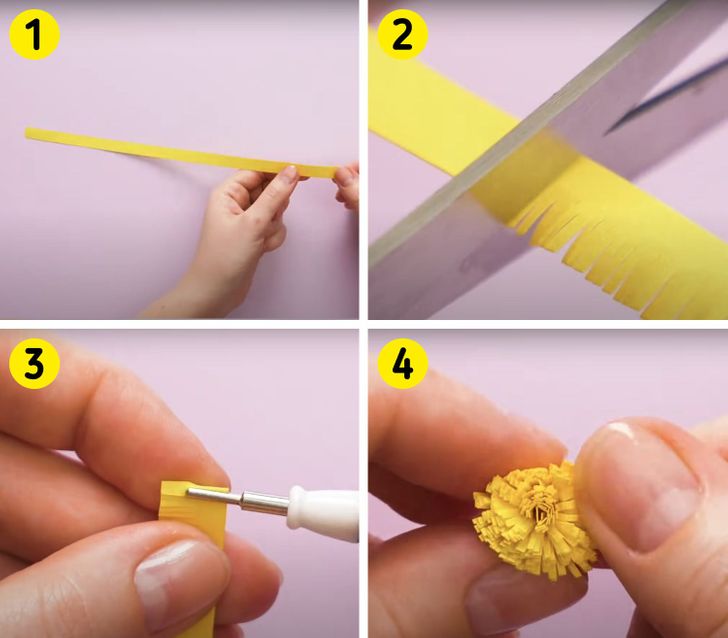
Step 1. Take a strip of yellow paper.
Step 2. Turn its end into fringe with the help of scissors.
Step 3. Take a quilling tool and roll up the entire strip. Secure the end at the end of the roll so it doesn’t unroll.
Step 4. Using your fingers, gently fluff the fringe, moving from the edge of the roll to its middle to make a flower, as it’s shown in the photo above.
Step 5. Repeat the process, by making several more flowers in yellow and orange colors. Afterward, take strips in various colors of green and make curved drops out of them. Now glue everything to the base of the picture: first the leaves, then place flowers over the leaves — it will help your masterpiece look more voluminous.
Picture #3. Aster flower
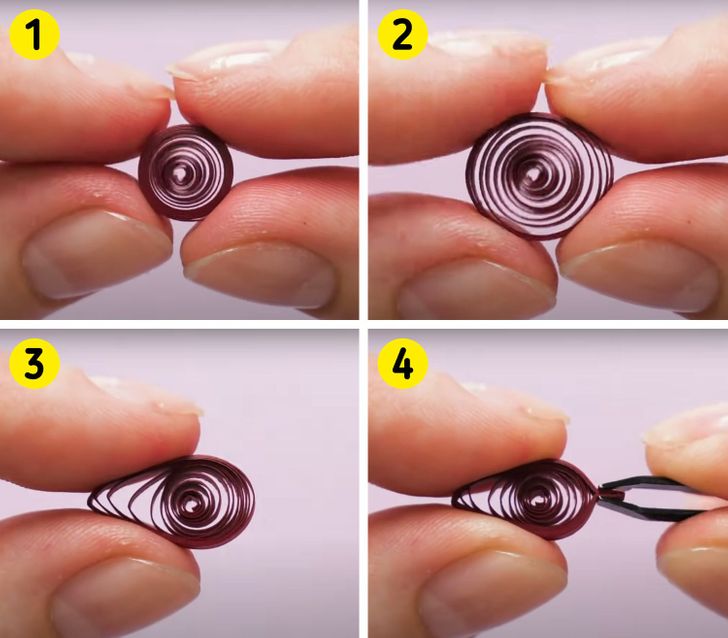
Step 1. Make a roll from burgundy-colored paper.
Step 2. Let it get a bit loose by weakening your hold.
Step 3. Squeeze the edge with your fingers to get the “drop” element.
Step 4. Squeeze the other end with tweezers to make the petal’s end pointed.
Using this method, make:
-
14 large petals in burgundy
-
13 middle-sized petals in dark red
-
12 red petals in a smaller size
-
11 pink petals in an even smaller size
-
1 white flower. This should be done in the same way as the dandelions above, but in this case, you should wrap it around a small tight roll, which is required to serve as the core of the flower.
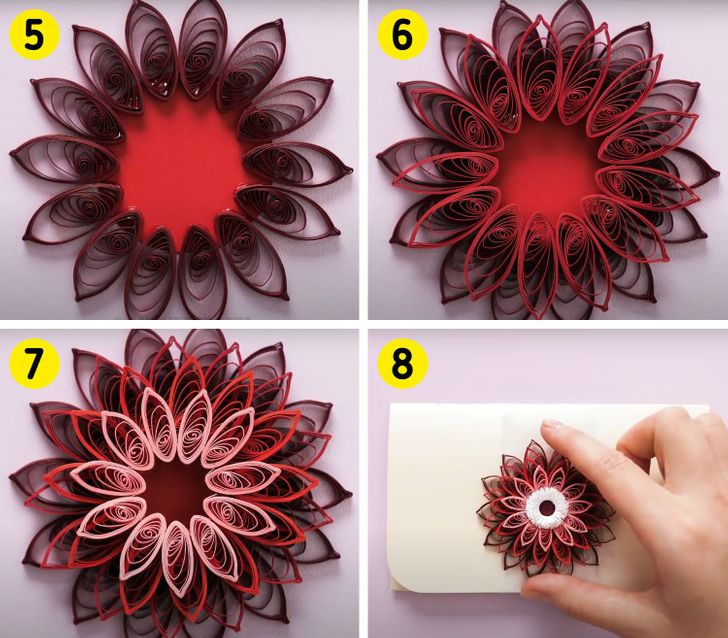
Step 5. Cut a circle out of red cardstock or thick red paper. This will be the base of the flower. Glue burgundy petals along the edge of the circle so that the pointed end looks outward.
Step 6. Place the dark red petals over them, moving them closer to the center of the circle.
Step 7. Glue the red and pink petals over them in the same manner.
Step 8. Attach the white flower to the center, after having made the fluffy core. If you’d like, you can create several similar flowers and decorate them with other elements, adding leaves and twigs to create a bouquet of asters.
Picture #4. Exotic flowers on bamboo sticks
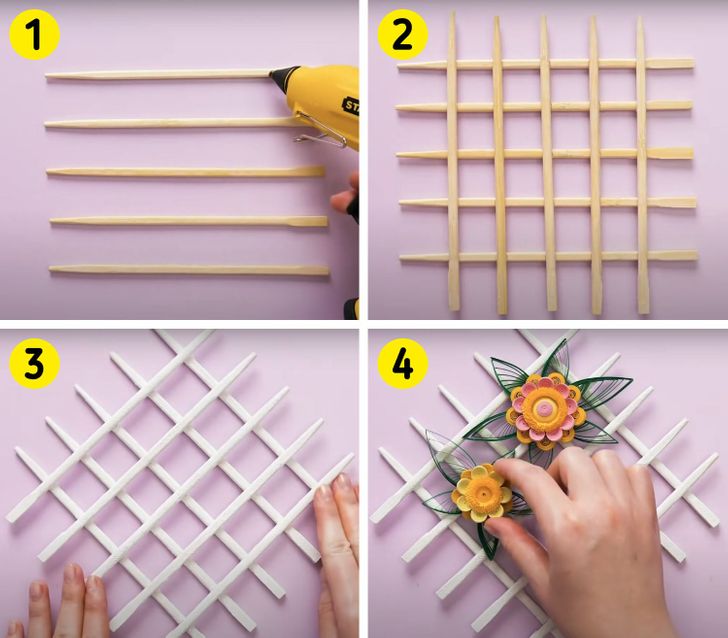
Step 1. Take 5 bamboo sticks and place them parallel to each other at a short distance apart. Apply glue on top.
Step 2. Glue 5 more bamboo sticks to them so that you get a lattice.
Step 3. Paint it white and turn it over the way it’s shown in the photo above.
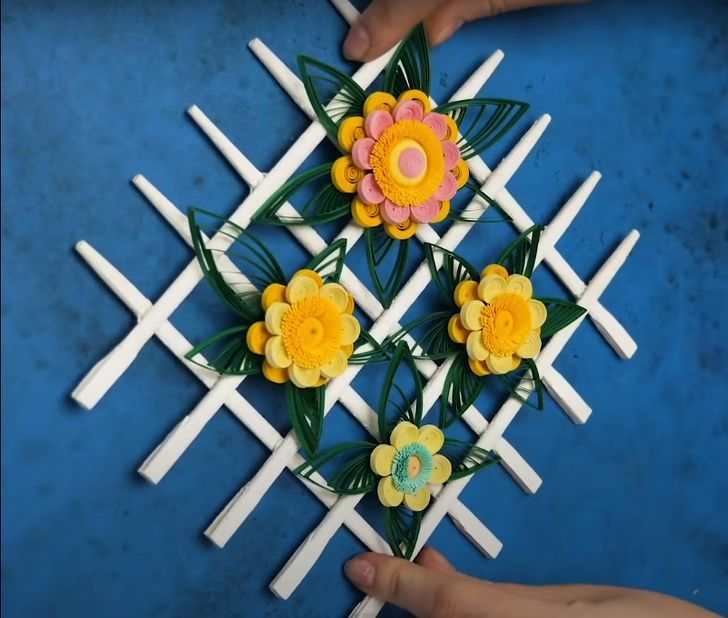
Step 4. Use it as a base for creating a flower composition: first glue leaves, then big petals over the leaves, then smaller petals, and don’t forget about the core.
Tip: To get the same composition, make the leaves in the shape of large drops, and use a big tight roll for the petals by gluing strips to it so that it turns out to be large, the way it’s shown here. For the core, also use a tight roll and make sure to glue the fringe to its edge in the same manner as it was done for the aster flower and dandelions.
Thus, you’ll get a picture without a frame that will look good on the wall of a contrasting color.
