How to Make Holiday Cards for Your Loved Ones
There’s a different charm to greeting cards when they’re handmade. It also helps you save money rather than spending it on generic cards or sending photo cards to your loved ones. Handmade holiday cards can totally be customized and make your wishes stand out as well. So 5-Minute Crafts has your back if you’re looking for some out-of-the-box ideas when creating DIY holiday cards.
I. With the help of everyday objects
1. The Q-tip wreath card
Things you’ll need:
- A bunch of Q-tips
- A rubber band
- An empty toilet paper roll
- Paint
- Red ribbon
- Glue
- A card
Steps:
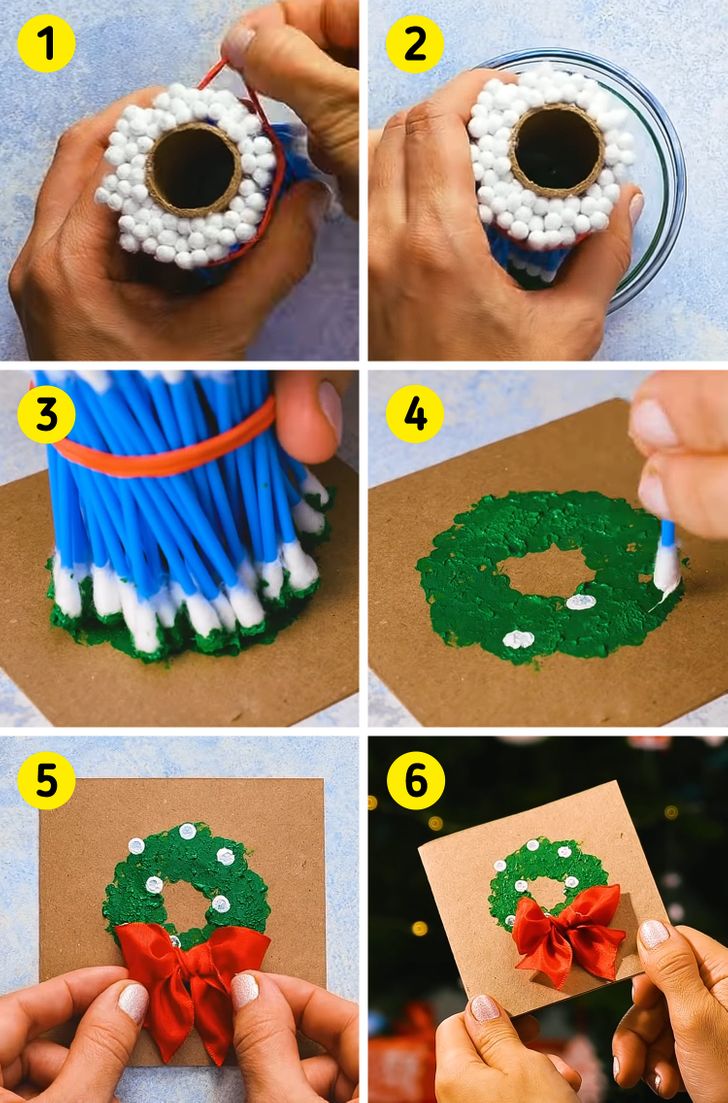
- Take an empty toilet paper roll, surround it with a bunch of Q-tips as shown above, and secure them in place with the help of a rubber band.
- Dip this entire bunch in paint.
- Dab the bunch on a card to get an imprint of a wreath on it.
- Take an uncolored Q-tip and dab it in white paint. Dab it inside the wreath you made on the paper.
- Add necessary decorations, like red ribbons, sequins, etc.
- Your card may look like this.
2. The Christmas pasta card
Things you’ll need:
- Lots of uncooked pasta, like farfalle, etc.
- Glue
- Metallic paint
- A card
Steps:
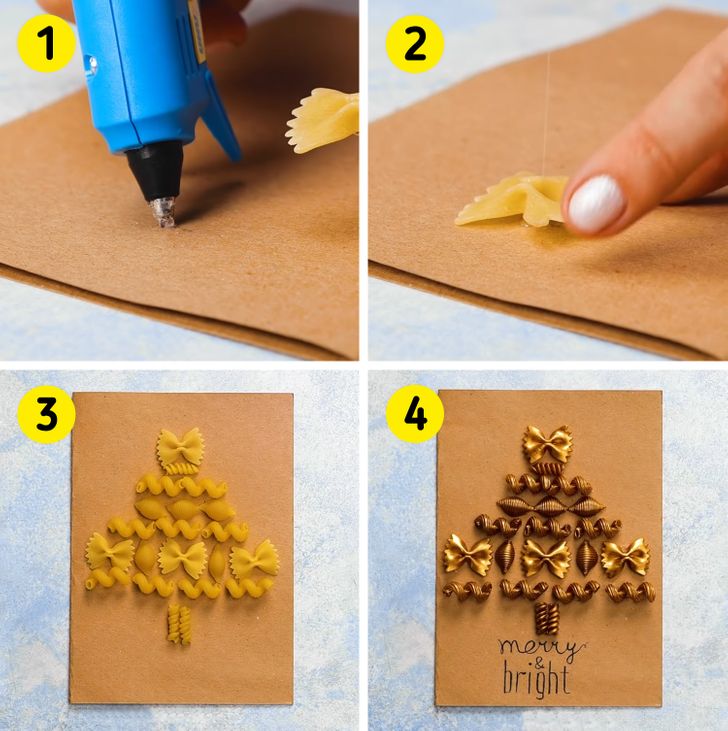
- Put some glue somewhere on the top of a card as shown in the image above.
- Paste some farfalle pasta on it.
- Keep pasting different types of pasta so that it takes the shape of a Christmas tree.
- Paint it with a metallic color to make it look magnificent.
3. The candle snowman card
Things you’ll need:
- A small candle
- A pair of scissors
- Sketch pens
- Glue
- A card
Steps:
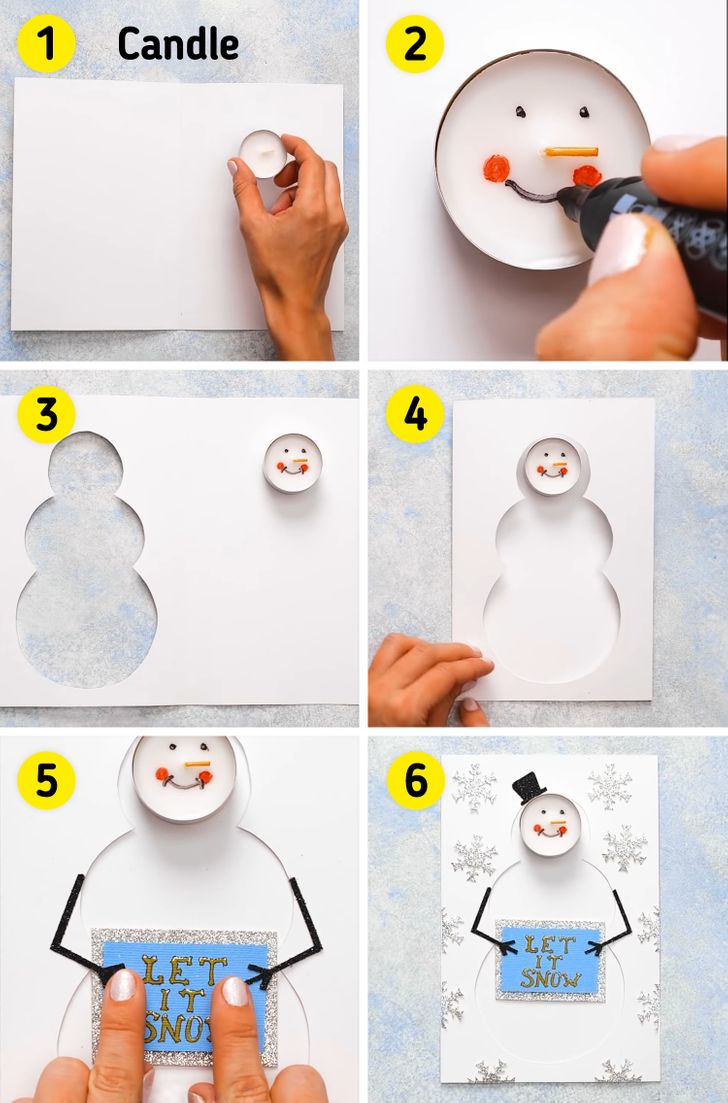
- On the inside of a card, paste a candle to the right side as shown in the image above.
- Draw the eyes, nose, and cheeks of a snowman on the candle with the help of sketch pens.
- Carve out the left part of a card in such a way that it looks like the body of a snowman.
- Close the card.
- Add the necessary decorations, like tags with a note and the arms of a snowman as shown.
- Your card may look something like this.
4. The moon and stars lamp card
Things you’ll need:
- A pair of scissors
- Glitter paper
- An LED candle
- Glue
- A card
Steps:
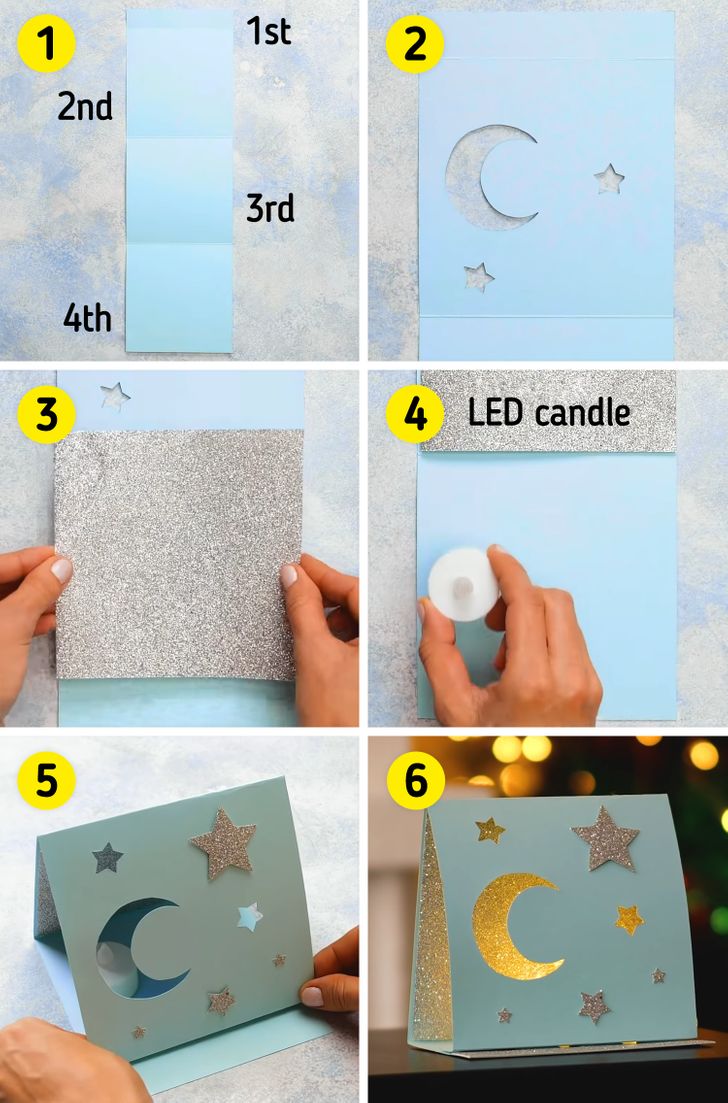
- This is more like a vertical card, so make sure it looks something like frame 1 of the image above.
- In the second section of the card, carve out the shapes of the moon and stars.
- In the third section of the card, paste some glitter paper in a way so that it covers this section entirely.
- Paste an LED candle in the fourth section of the card. Turn it on.
- Connect the first section of the card with the fourth so that it looks like a tent. This will hide the first section of the card on the base section.
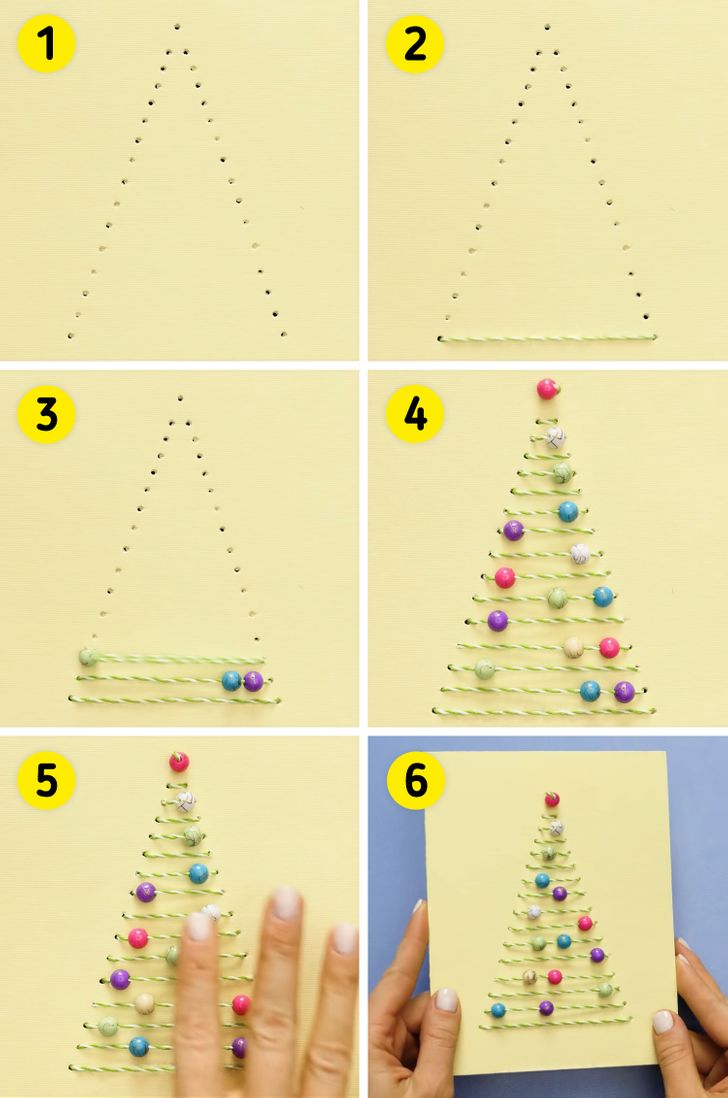
5. The stitched Christmas tree card
Things you’ll need:
- String and a needle
- Colorful pearls
- A card
Steps:
- On a card, poke holes in an inverted-V pattern with the help of a pin.
- From the most bottom horizontal pair of holes, sew a string from the hole horizontally, as shown in the image above.
- Then keep sewing till the top and while you do, make sure to sew some colorful beads or pearls along the thread.
- Also, don’t forget to add a single bead in the topmost hole. Secure the ends of the strand with glue or maybe tie a knot.
- You can shuffle the beads and pearls to adjust the look of the tree.
- Your card may look something like this.
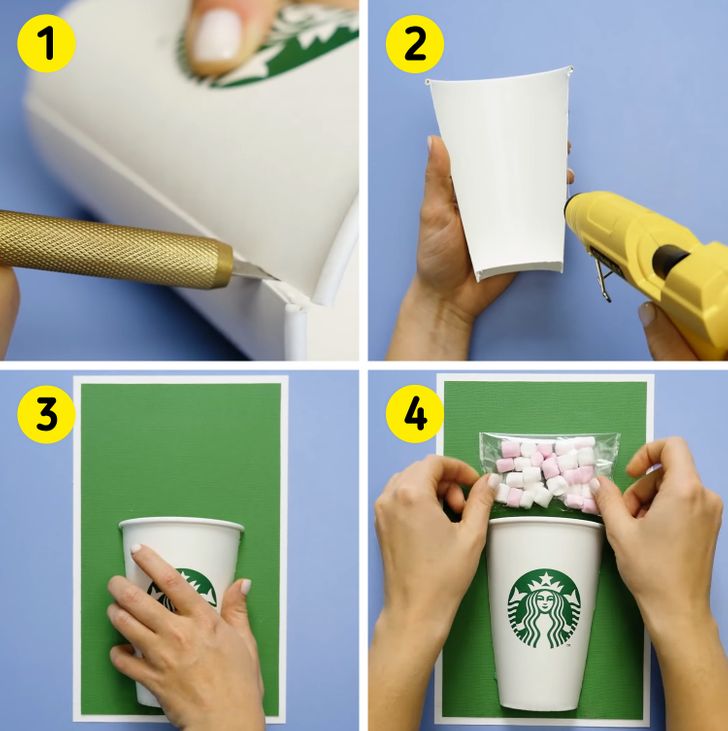
6. The Starbucks sweetness card
Things you’ll need:
- A Starbucks paper cup
- Glue
- A small pack of marshmallows
- A card
Steps:
- Cut a Starbucks paper cup in half, vertically, as shown in the image above.
- Glue the edges of the cut paper cup.
- Paste the glued side onto a card.
- Paste a small pack of marshmallows above. Your card may look something like this.
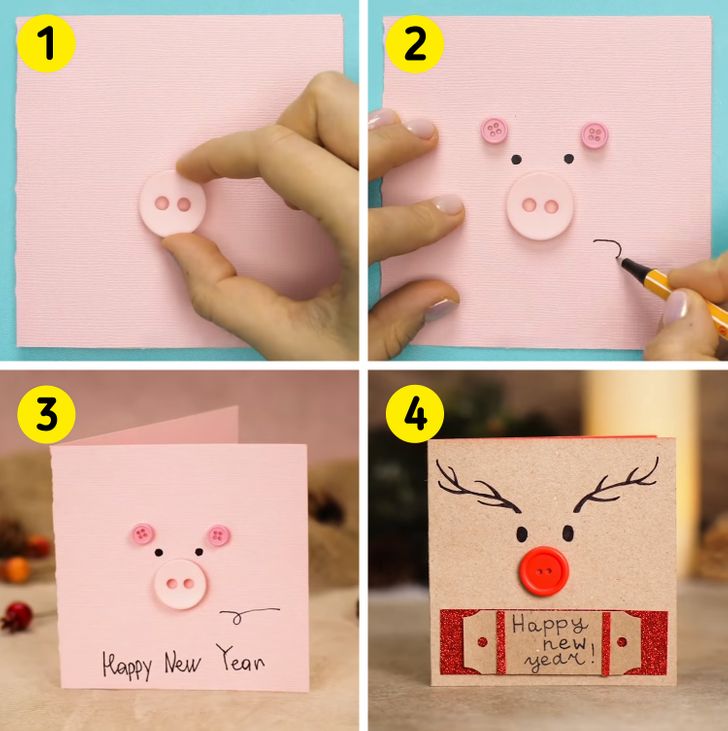
7. The piggy button nose card
Things you’ll need:
- A light pink card
- Pink buttons: small and large
- A black pen
Steps:
- In the middle of the front page of the card, paste a large pink button.
- Add the eyes and tail with a black pen and 2 pink buttons as the piggy’s ears.
- Your card may look something like this.
- You can try other designs with this method too.
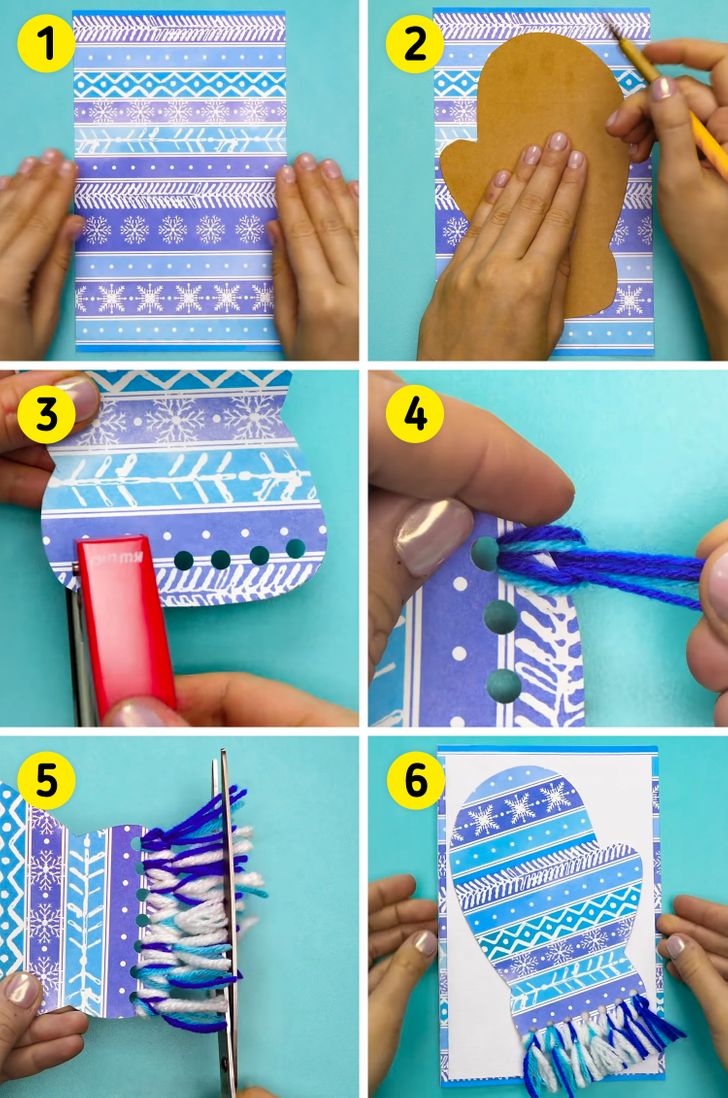
8. The glove card
Things you’ll need:
- Some Christmas-themed paper
- A piece of cardboard
- A hole punch
- Strands of wool
- A card
Steps:
- Get some Christmas-themed paper.
- Place a cardboard piece that bears the shape of a hand glove shown in the image above. Carve out the shape of the glove on the Christmas-themed paper.
- Paste the Christmas-themed paper on the cardboard.
- On the bottom, punch a few holes in a line. Tie strands of wool through each hole of the glove.
- Cut away the extra wool to make the strands look even. Paste the entire piece on a card.
- Your card may look something like this.
II. With paper crafts
1. The Christmas tree card
Things you’ll need:
- A pair of scissors
- Some glittery green paper pasted on a red card
- Glue
- A star cut from glitter paper
- A white card
Steps:
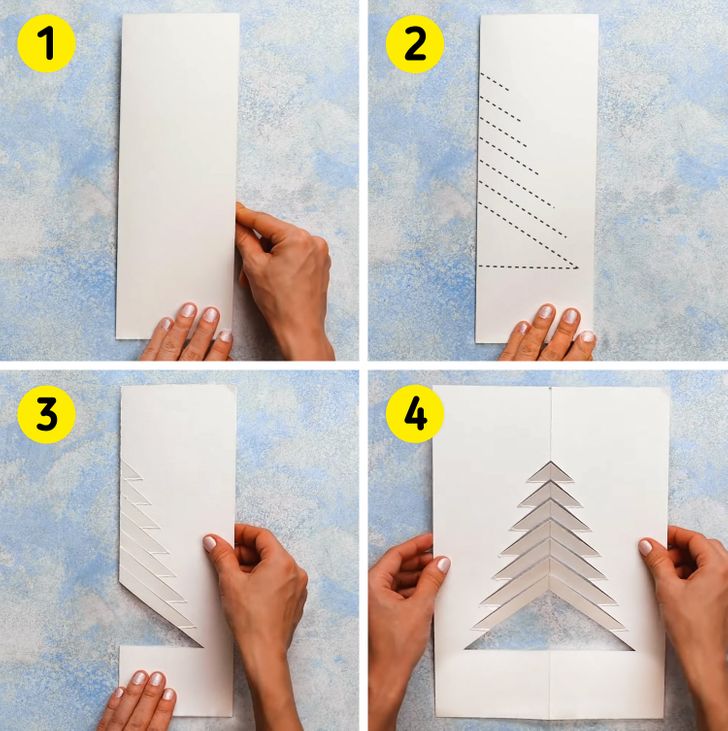
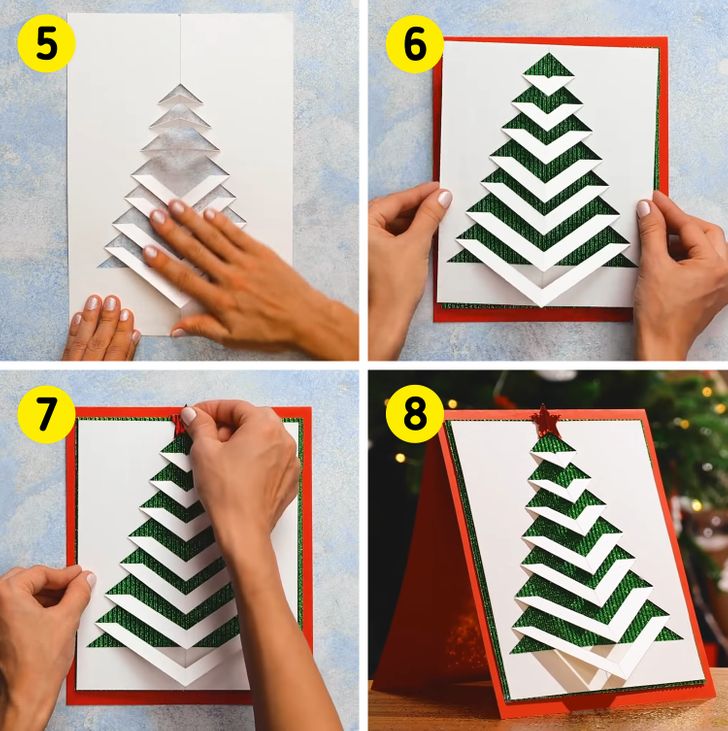
- Fold a white card in half.
- Add the dotted lines on the paper as shown in the image above.
- Cut along the lines in a way exactly as displayed in the image above.
- Open the card and it may look something like this.
5. Hover your hands over the cuts to make the inverted V face down.
6. Paste this entire white card on a glittery green card with a red boundary.
7. Paste a glittery star on the top of the tree on the card.
8. Your card is ready.
2. “It’s snowing” card
Things you’ll need:
- Some Christmas-themed paper
- A piece of horizontal paper equal to the width of the card
- Glue
- Paper-made snowflakes
- Thread
Steps:
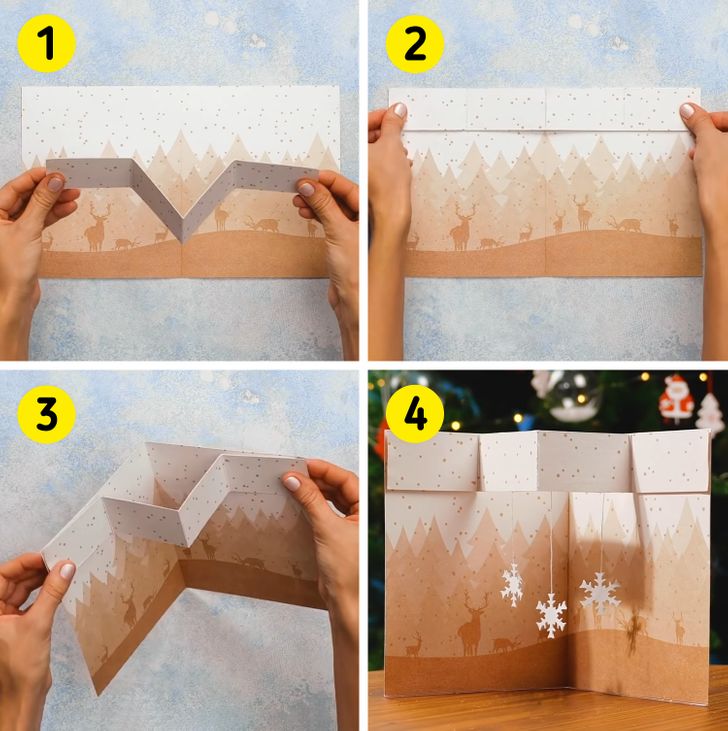
- Place down a Christmas-themed card and a piece of horizontal paper folded as shown in the image above.
- Now paste the edges of the horizontal paper onto the top edges of the Christmas-themed paper.
- Close the card halfway.
- Now take a few thread strands and paste paper-made snowflakes on one end and the other end underneath the protruding part of the card as shown in the image above.
3. The fluffy Santa card
Things you’ll need:
- A few cotton balls
- A pair of scissors
- A pair of googly eyes
- A red pom-pom ball
- A card
Steps:
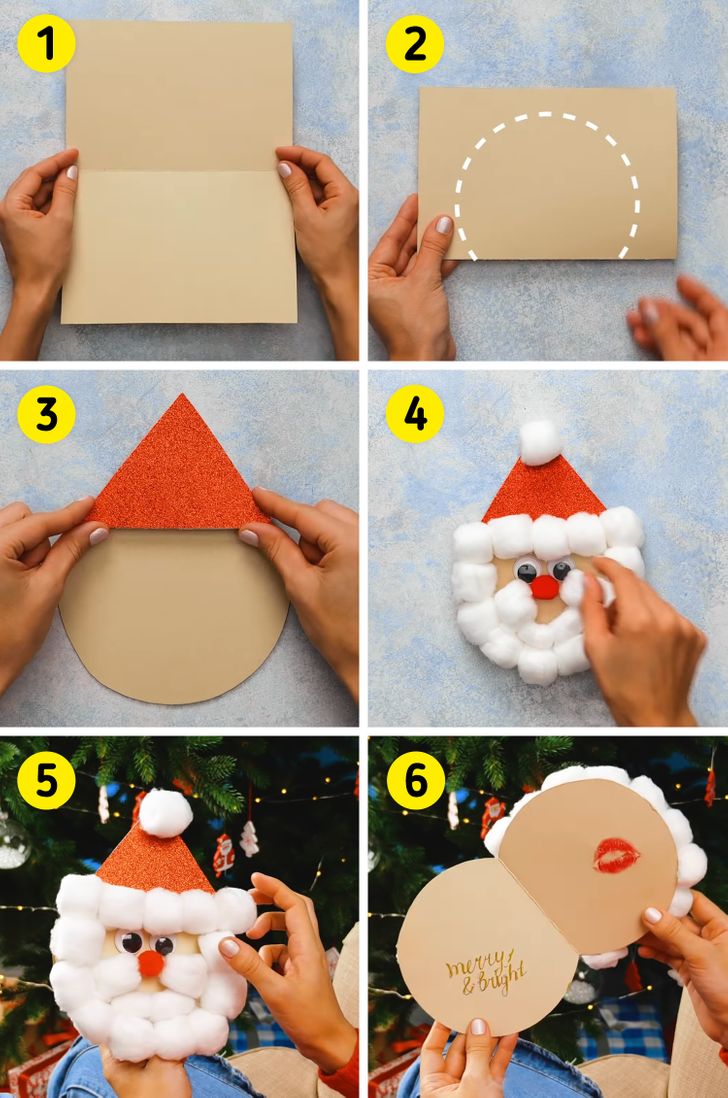
- Fold a card in half and rotate it so that looks like a greeting card that opens vertically.
- Make a circle with dotted lines as shown in the image above. Make sure that the straight part of this circle goes where the card stays closed and the curved part goes where the card opens.
- Put some red glittery paper in the shape of a triangle on the closed side of the card.
- Paste cotton balls as shown in the image to create Santa’s face, a red pom-pom ball for the nose, and a pair of googly eyes for the eyes.
- Your card may look something like this.
- You can also add a personalized message inside the card.
4. “What a pleasant surprise” card
Things you’ll need:
- Ice cream stick
- A memorable photograph or a greeting card
- Glue
- Gold and red glittery paper
- A red ribbon
Steps:
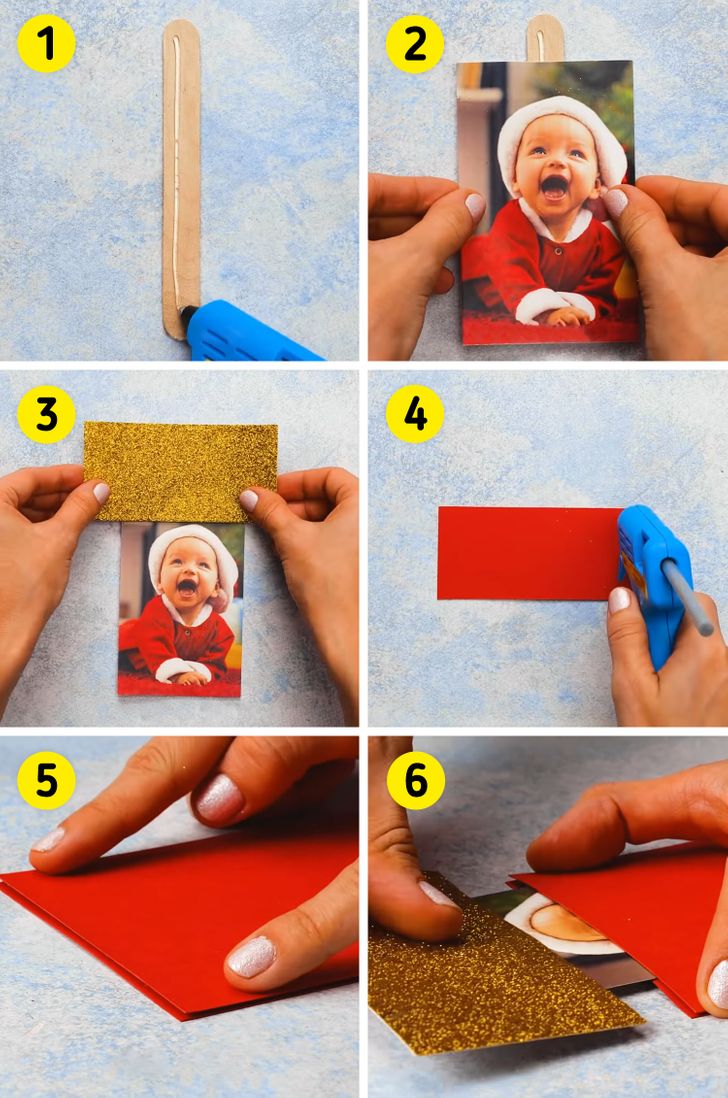
- Put some glue on an ice cream stick.
- Paste a memorable photo or a greeting card on it. Make sure the card or the photo is smaller than the ice cream stick.
- Paste the golden glittery card horizontally on the remaining part of the stick where the glue was applied.
- Now cut a part of a red card in the shape of a rectangle. Put some glue on its edges.
- Paste this rectangular part of the card onto the top portion of the main card. Make sure that the edges of both the rectangular paper are equal to each other and slightly smaller than the golden glittery card.
- Now turn the card over. Slide the photo along with the golden glitter card in the smaller rectangle that lies behind the main card.
7. You can add even more decorations to it, like red glitter paper to symbolize red ribbons.
8. You can also add a red ribbon to the golden glittery paper.
9. Your card may look something like this.
10. Pull the golden card upward to surprise the recipient.
5. A fan-folded Christmas tree card
Things you’ll need:
- Green-colored craft paper
- Double-sided tape
- A star made from golden paper
- A card
Steps:
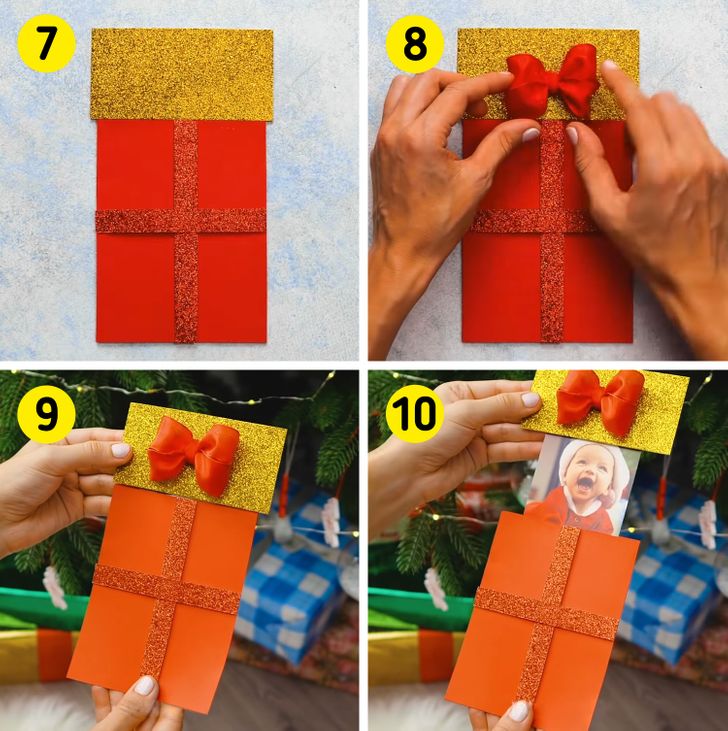
- Fanfold a piece of green craft paper as shown.
- Repeat step 1 for various sizes of fan-folded papers, preferably 5 to 6 depending on the length of your main card.
- Fold the fan-folded papers from the middle and apply double-sided tape on both sides.
- Now open the card and begin pasting these folded papers according to their length as shown in the image above.
- Close the card and press it firmly to let the other fan-folded papers stick to the left part of the card.
- Open the card for a cute surprise. You can also add a golden star to the top of the Christmas tree on the card.
6. The snowman card
Things you’ll need:
- A textured or Christmas-themed plain card
- Double-sided tape
- Glue
- Colored pens and ribbon for decorating and detailing
Steps:
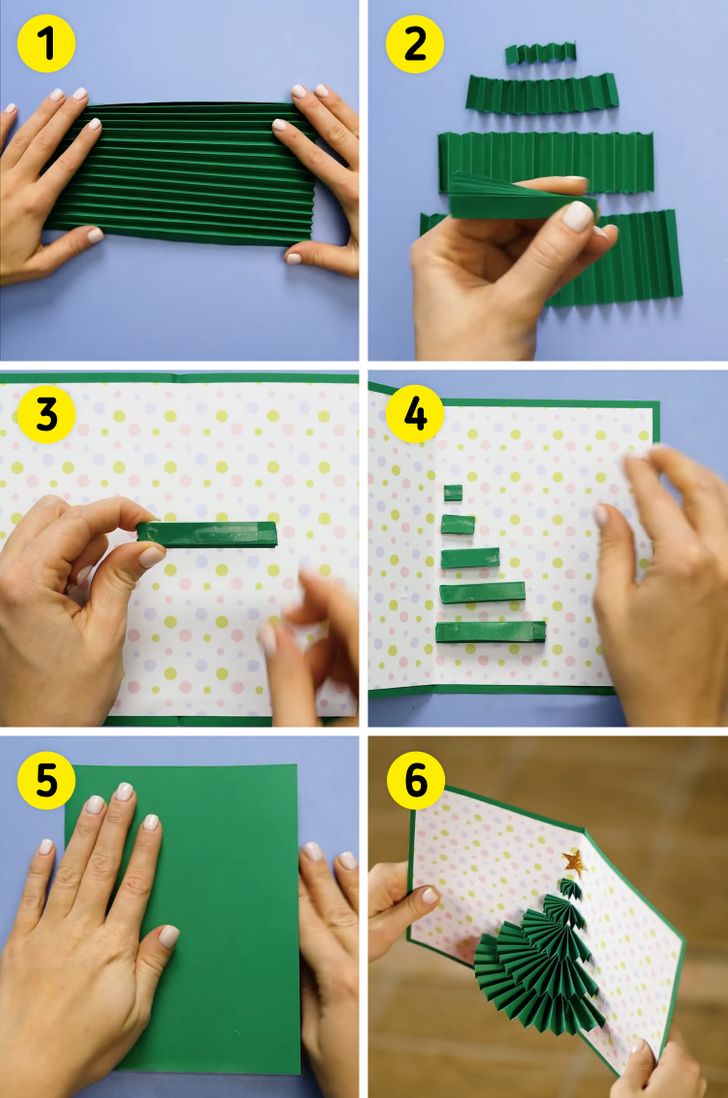
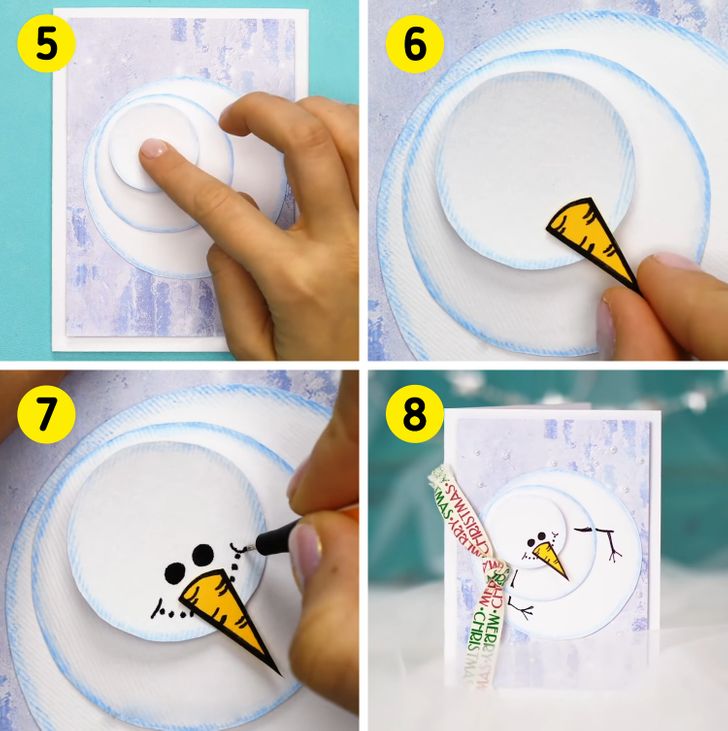
- Take a textured or Christmas-themed plain card.
- Stick some double-sided tape in the middle of the card as shown.
- Place a rounded piece of paper on the double-sided tape. Make sure that the diameter of the round paper is lesser than the width of the main card. You can also add a faint blue boundary around these papers. Put double-sided tape on the left edge of the round paper.
- Now place a piece of smaller, round paper on the double-sided tape. Put the double-sided tape on this paper too.
5. Now place a tiny round paper onto the double-sided tape.
6. Place some tiny yellow triangular-shaped paper on the smallest round paper. This is the snowman’s nose.
7. Add further details, like eyes, a mouth, arms, and a ribbon for decoration.
8. Your card is ready.
