How to Make Paper Flowers
Paper flowers are usually used as a decoration. You can put them around your home, either in a vase or attached to the wall. They are also great if you want to wrap a present in an unusual way. And of course, they look great at any celebration.
5-Minute Crafts has prepared a simple manual on how to make paper flowers with wires, glue, and other things.
Hyacinthus
You need:
-
colored crepe paper
-
scissors
-
long stick
-
green wire (there are special floral wires)
-
glue
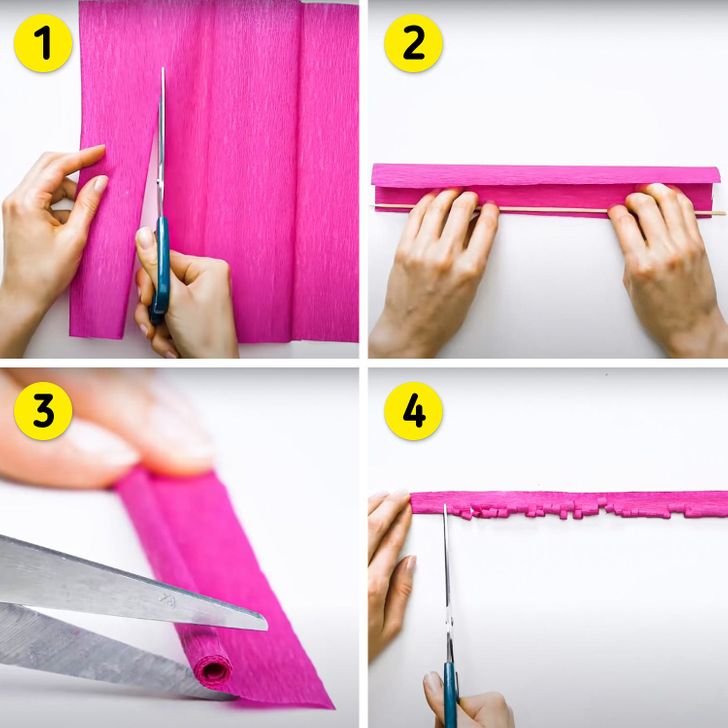
Step 1. Take the crepe paper you will use to make the flower itself. Cut a small piece of it around 7-8 cm in width.
Step 2. Put a wooden stick on the side of the cut and wrap the paper around it.
Step 3. Carefully remove the stick and cut the wrap into similar-sized pieces. You should end up with fringe, like in the picture above.
Step 4. Now you have all you need to make a flower.
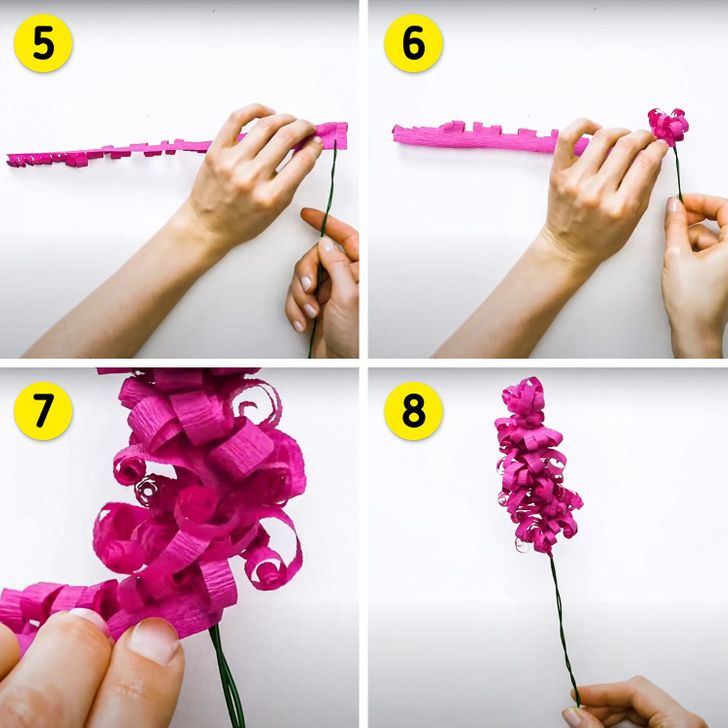
Step 5. Take 2 pieces of wire and interlace them to create the trunk for the future flower. Make the tip forked to make it easier to stick the ends of the flower to it.
Step 6. Wrap the end of the trunk as the photo above shows, to make the bushy top of the Hyacinthus.
Step 7. Keep wrapping the trunk going down from the top.
Step 8. Glue the end to the wire.
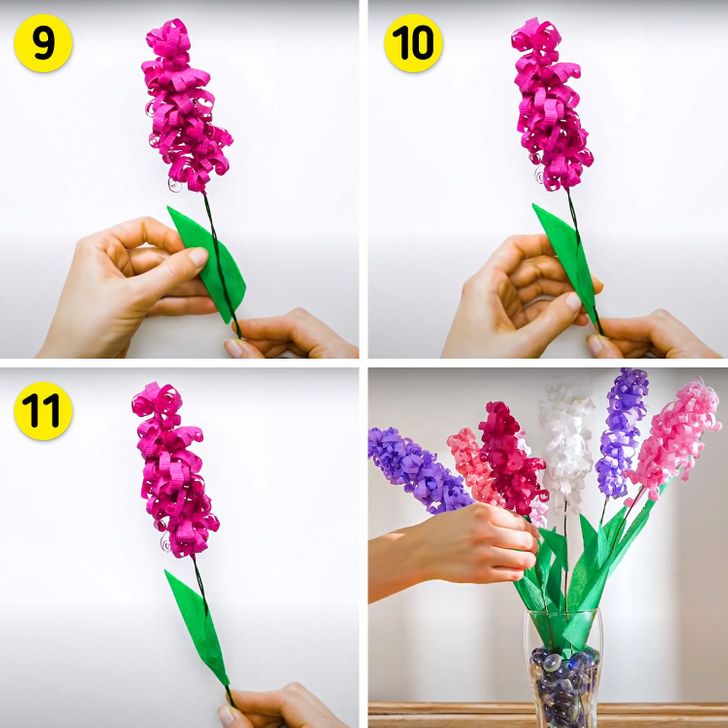
Step 9. Take green crepe paper and cut out 2 identical pieces that look like triangles. Put the sheets on top of each other and against the wire where you will secure them.
Step 10. Apply the glue and wrap the wire with the paper as the photo above shows.
Step 11. Fold the sheet at the bottom to make it look more realistic. The flower is done!
You can make several flowers this way and make a bouquet!
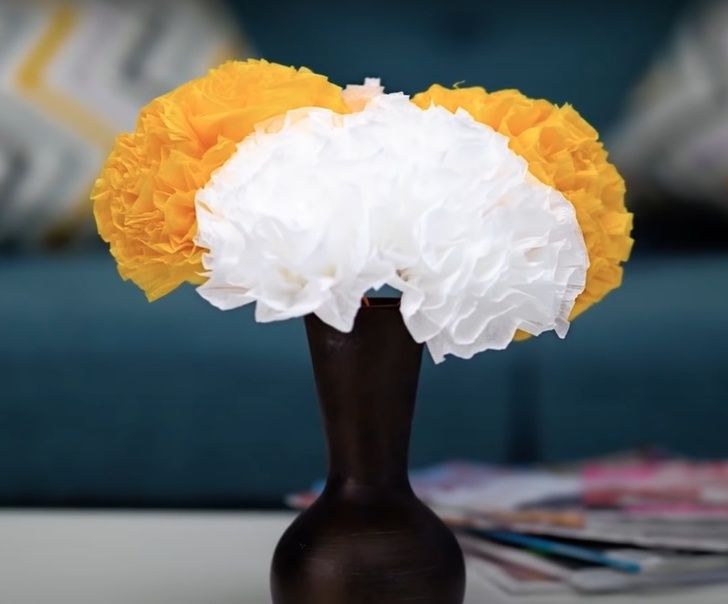
Cloves or asters
You need:
-
white napkins
-
scissors
-
wire
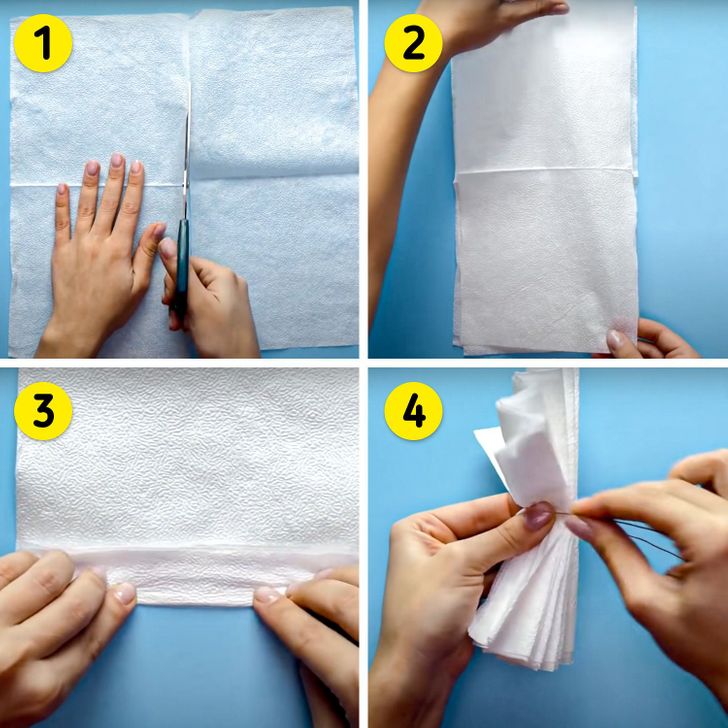
Step 1. Unwrap the napkin and cut it in half. Do it again with the other napkin.
Step 2. Put the cut napkins on top of each other as the photo above shows.
Step 3. Make a fanfold.
Step 4. Use wire to press the fanfold in the middle, then fold the wire at the bottom of the future flower.
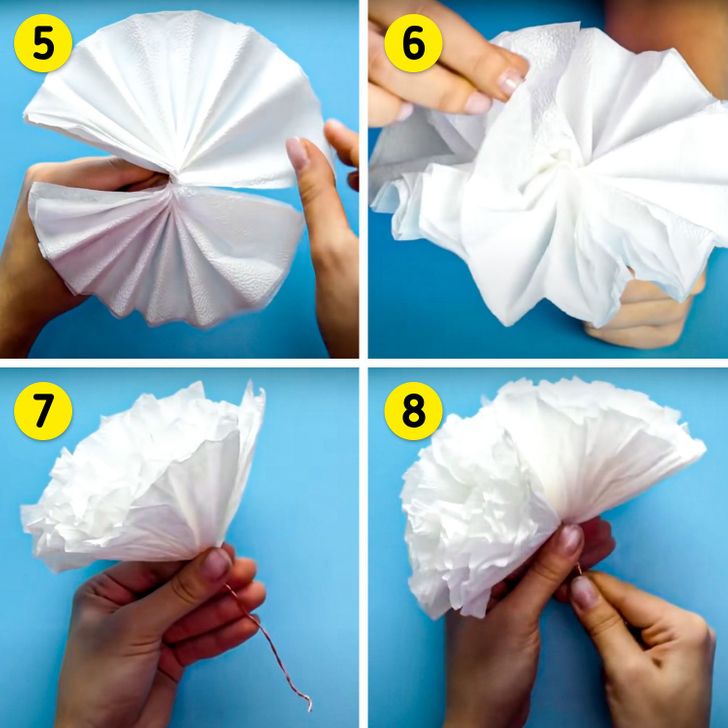
Step 5. Open the fanfold by stretching the edges.
Step 6. Open up the napkins to make the flowers more voluminous.
Step 7. Make 3 more of these flowers.
Step 8. Connect them at the bottom and wrap them together. The flower is done.
Try this technique by using napkins in different colors and sizes.
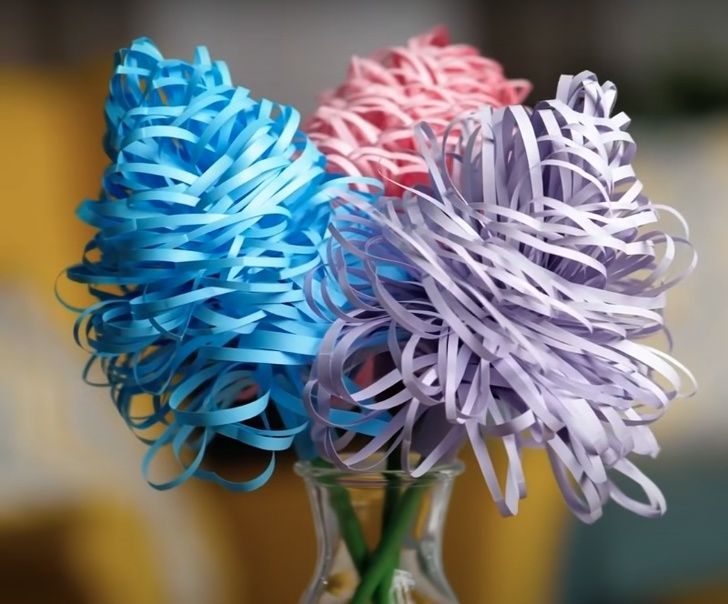
Simple Hyacinthus
You need:
-
double-sided colored paper (it should be pretty thick)
-
scissors
-
ruler and pencil
-
sticky tape and glue stick
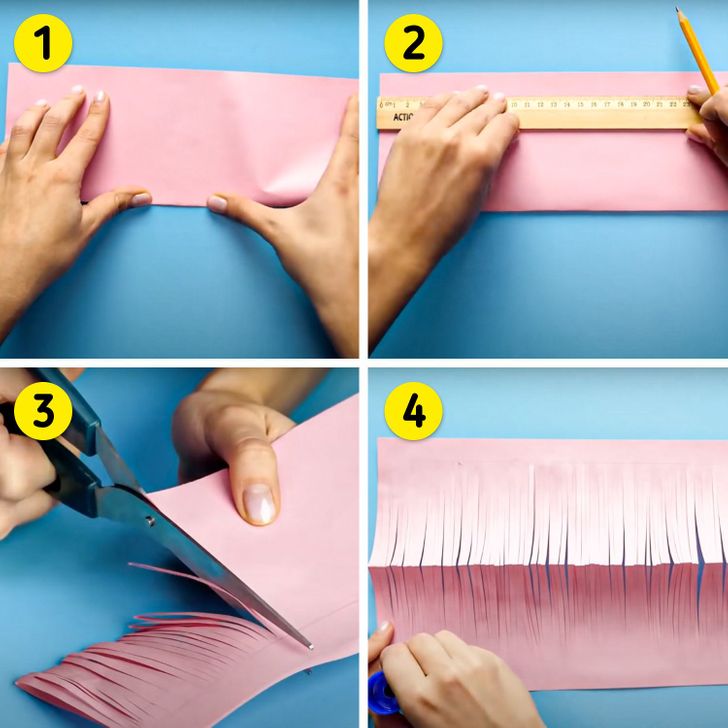
Step 1. Take a rectangular sheet of double-sided colored paper. Fold it in half horizontally.
Step 2. 2 cm away from the edge, draw a line. This is the line where you’ll need to stop your cut.
Step 3. The other edge of the folded sheet should be cut into thin lines but don’t cross the line you drew.
Step 4. Open the sheet and put some glue on the lower edge. Then, stick the other edge to it. It’s important to make the cut fringe very voluminous, like the photos above show. Repeat the process with one more sheet of paper.
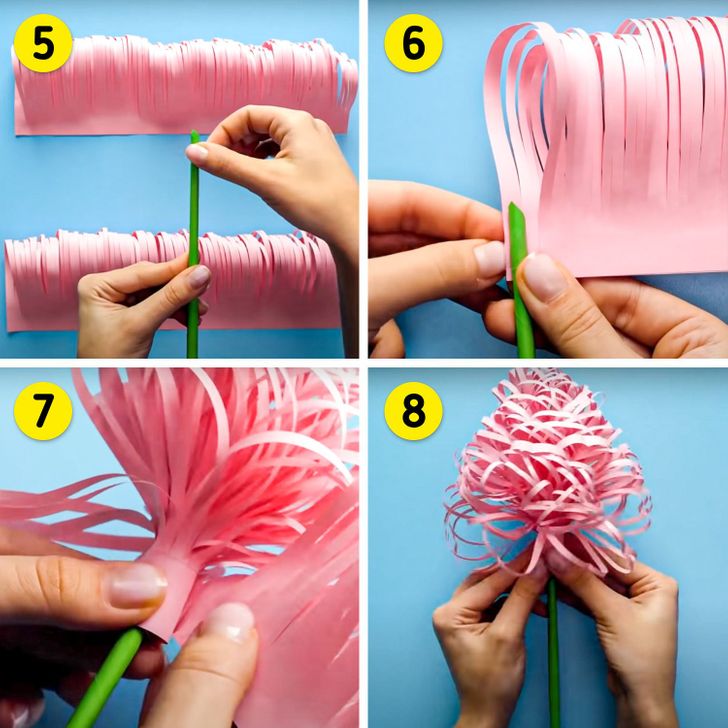
Step 5. Make a tube using a green sheet of paper.
Step 6. Using sticky tape, attach the tube to the bottom of the flower.
Step 7. Start wrapping the future flower around the tube, going top to bottom.
Step 8. Attach the second part of the flower and keep going around the tube. At the end, carefully secure the edge at the bottom and make the strips look really big, bigger than they are at the top.
Use different-colored paper to make a heap of flowers.
Dandelion
You need:
-
double-sided colored paper (it should be pretty thick)
-
scissors
-
sticky tape
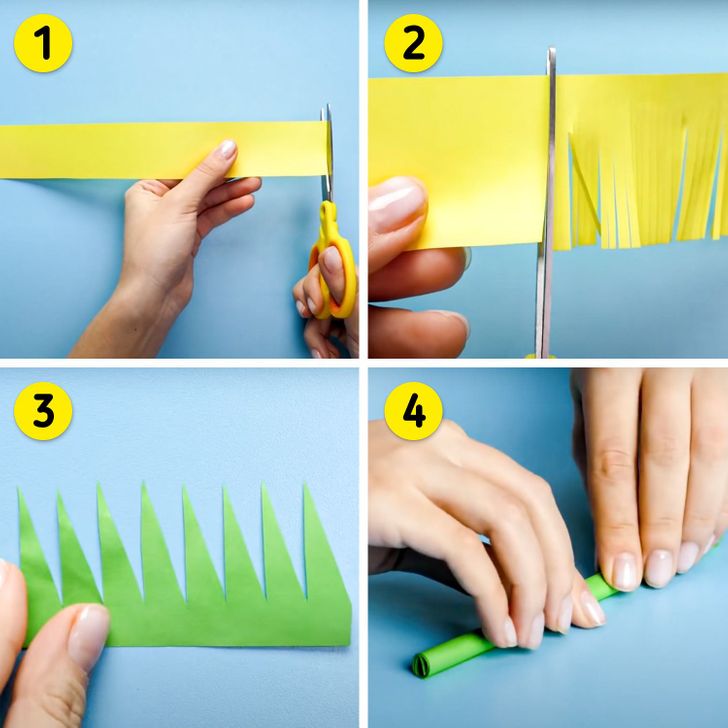
Step 1. Cut yellow paper into stripes that are 2-3 cm in width.
Step 2. Make fringe using scissors.
Step 3. Using green paper, cut the shape as the photo above shows. This will be the green part at the bottom of the flower.
Step 4. Take another sheet of green paper and make a roll.
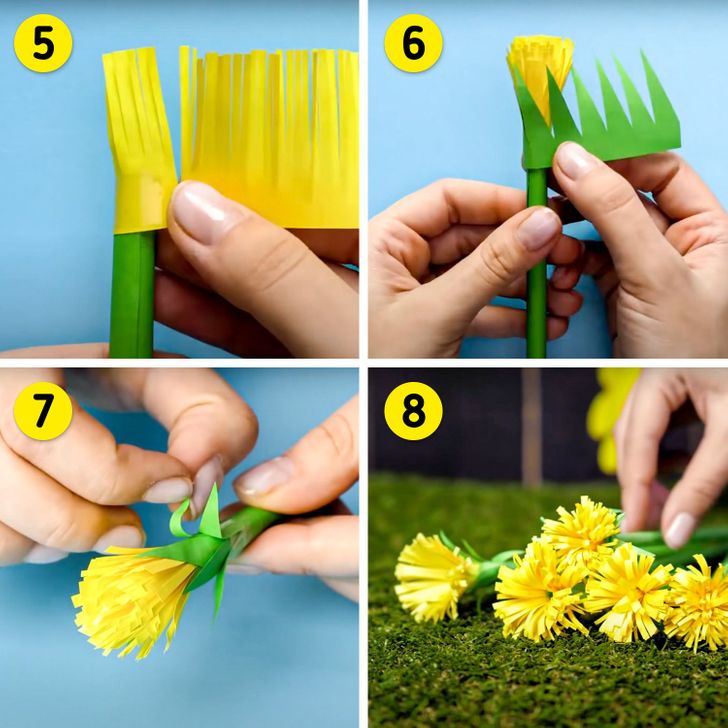
Step 5. Attach the edge of the yellow sheet to the green tube so the fringe is at the top. Wrap the tube with the yellow sheet. This will be the bud.
Step 6. Take the green shape you cut before and wrap the bud with it.
Step 7. Fold the ends to the bottom.
Step 8. Make some more flowers this way.
Chrysanthemum
You need:
-
double-sided colored paper
-
scissors
-
stapler
-
wire
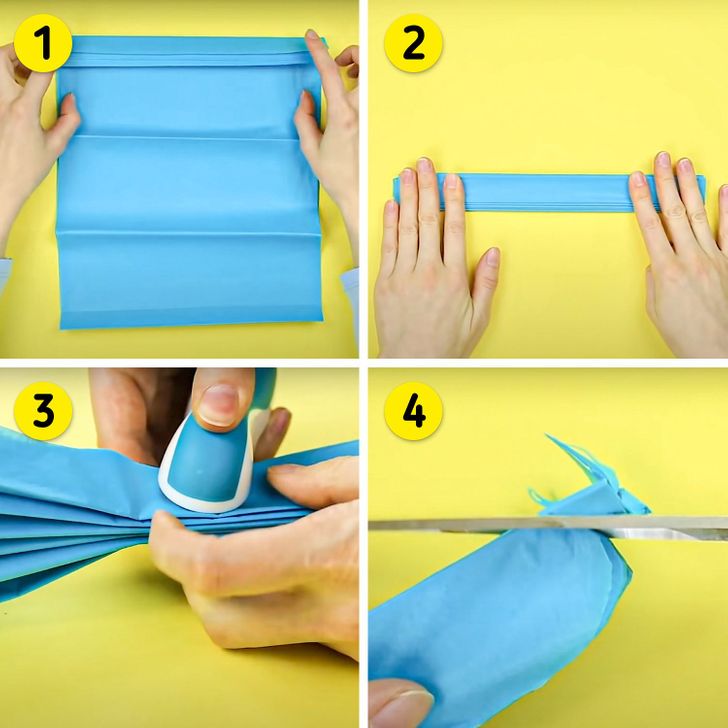
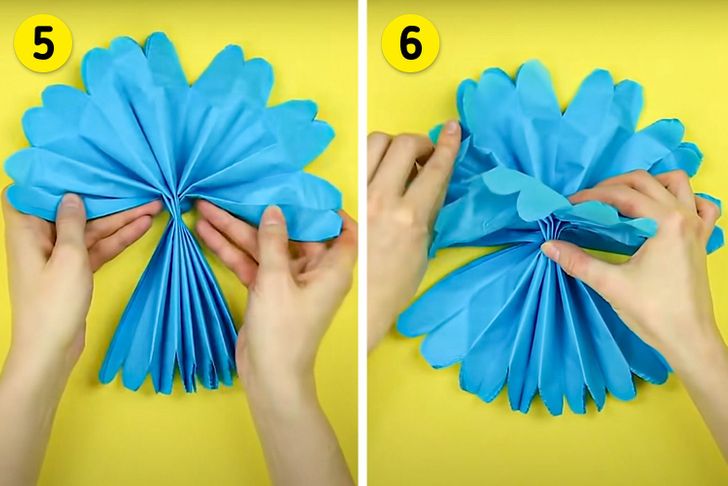
Step 1. Take sheets of blue paper, put them on top of each other, and make a fanfold.
Step 2. Press the folds to make the paper hold shape.
Step 3. Use a stapler to fix the paper in the middle.
Step 4. Make a semicircle with the edges.
Step 5. Carefully open the future flower into a semicircle.
Step 6. Lifting the sheet from the center to the top, make the future flower look big.
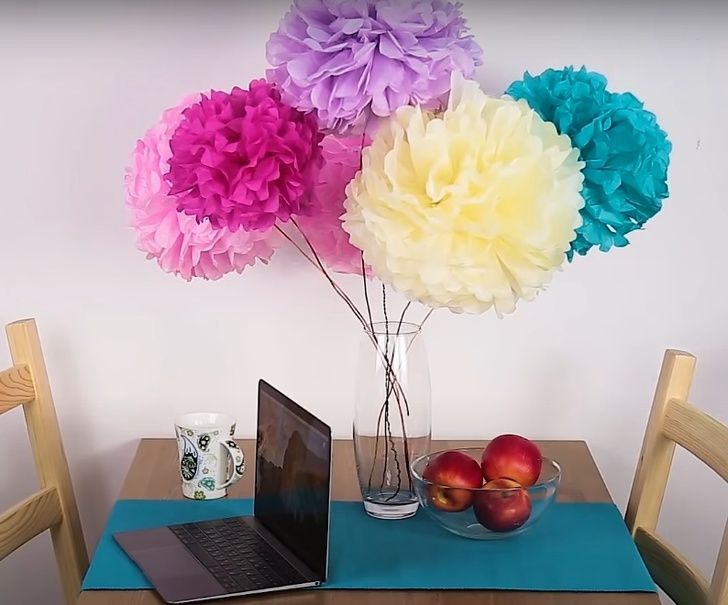
Secure the bud on a wire and put it into a vase to make an unusual decoration for your home.
Simple roses
You need:
-
double-sided colored paper
-
scissors
-
CD (or any other round object)
-
pencil
-
wooden stick
-
glue
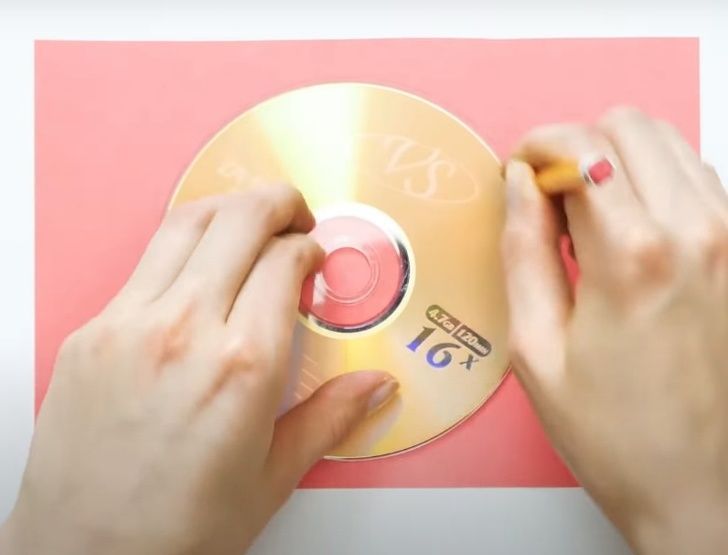
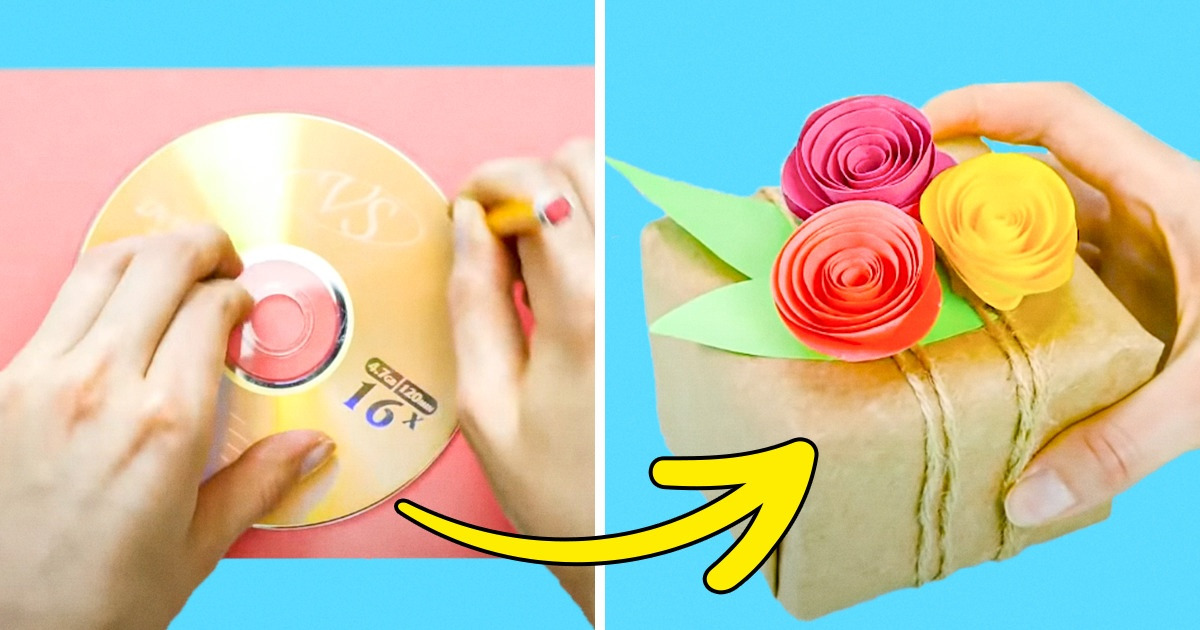
Step 1. Put the CD in the center of the colored paper and trace around it with a pencil.
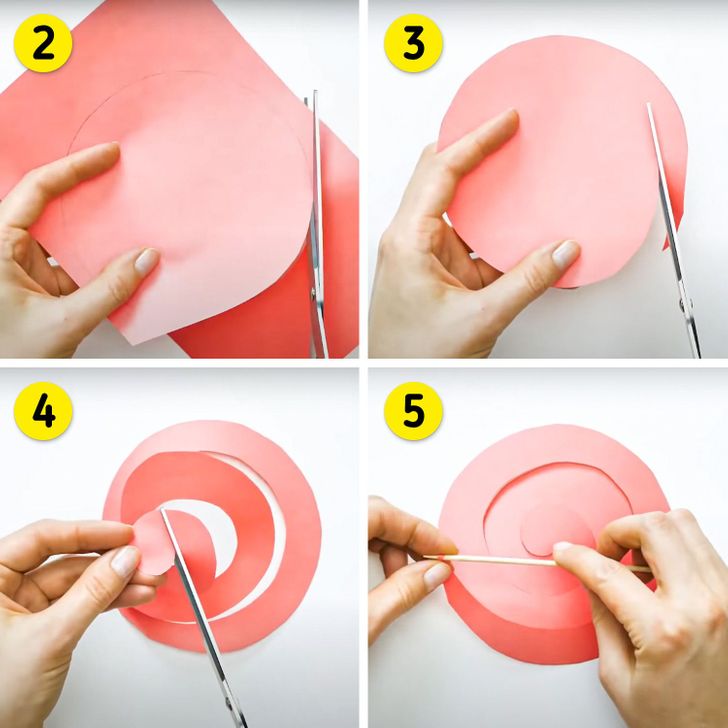
Step 2. Going along the line, cut out a circle.
Step 3. Then, start cutting it in a spiral going from the edge to the center. Make sure that the start of the spiral is a sharp tip.
Step 4. In the center of the circle, don’t cut the spiral and leave a rounded end. It will be the base for the future rose.
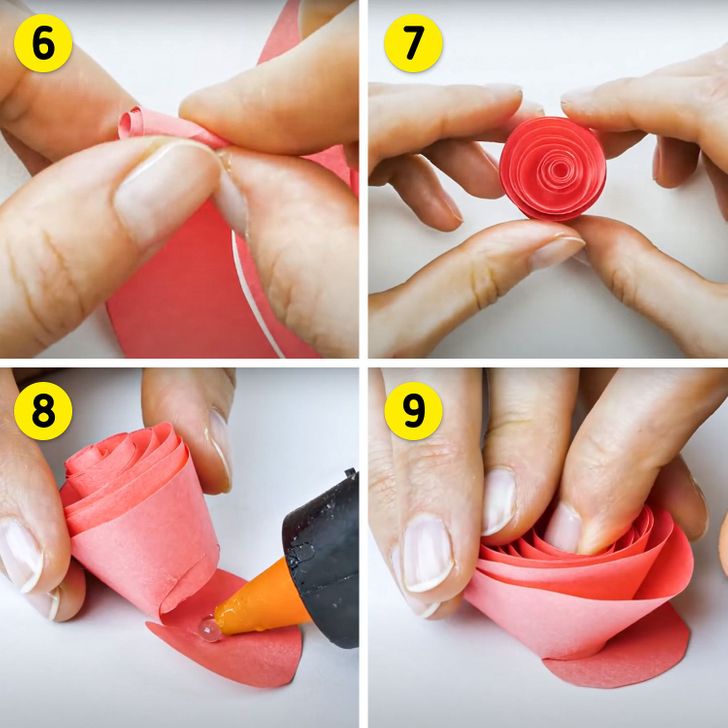
Step 5. Take a wooden stick and put it on the sharp end of the strip you have. Now, wrap the end of the strip on the stick.
Step 6. Keep wrapping the strip until you have the bud.
Step 7. Open it up a little bit.
Step 8. Put a drop of glue at the base of the bud.
Step 9. Put the bud on the top to glue it and secure it. The rose is done!
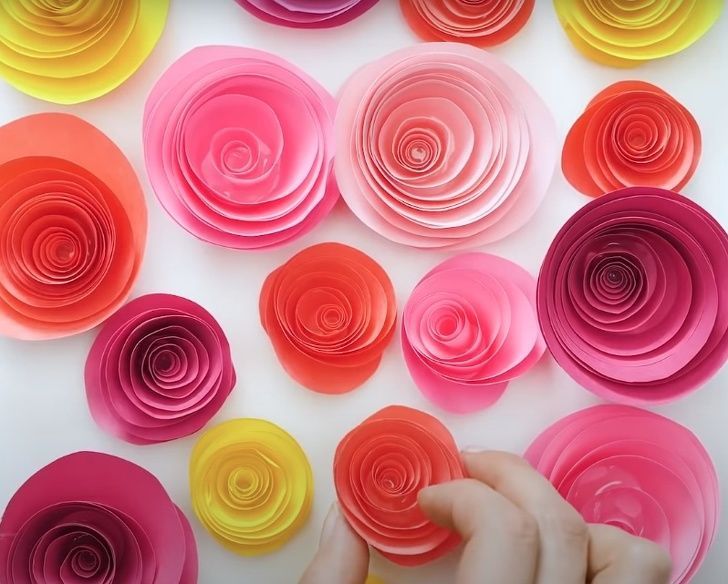
Don’t be afraid to experiment: try using different lengths, widths, and colors.
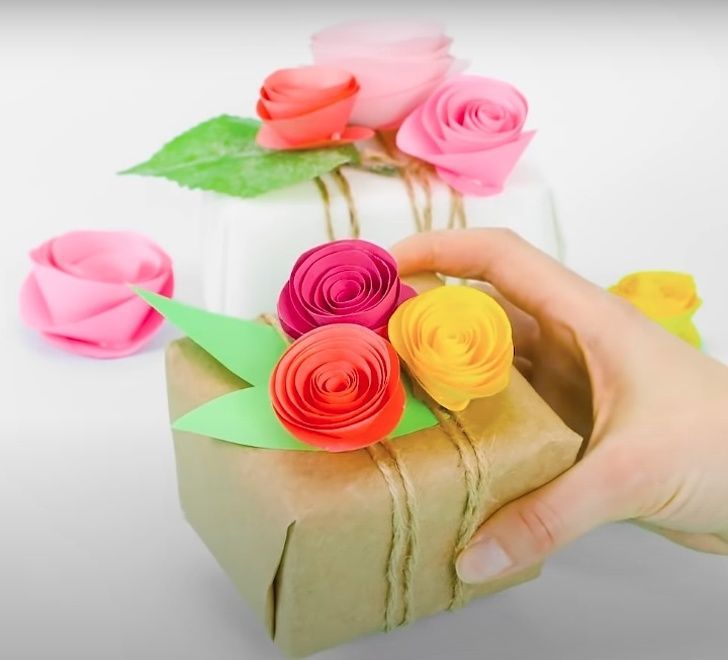
You can use the roses to decorate a wrapped gift — they will look great.
Bonus: Roses made of coffee filters
You need:
-
coffee filters
-
double-sided colored paper
-
scissors
-
pencil
-
wire (floral preferably)
-
glue
-
glass bowl of water
-
paints that you can dissolve in water
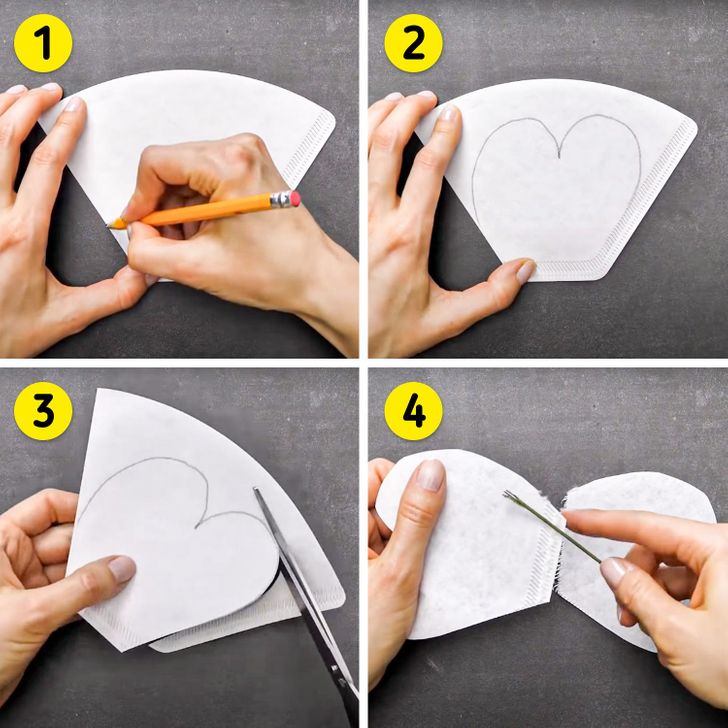
Step 1. Take a new coffee filter.
Step 2. Draw the future rose petal.
Step 3. Cut it out going along the line. The number of the petals will determine the size of the flower.
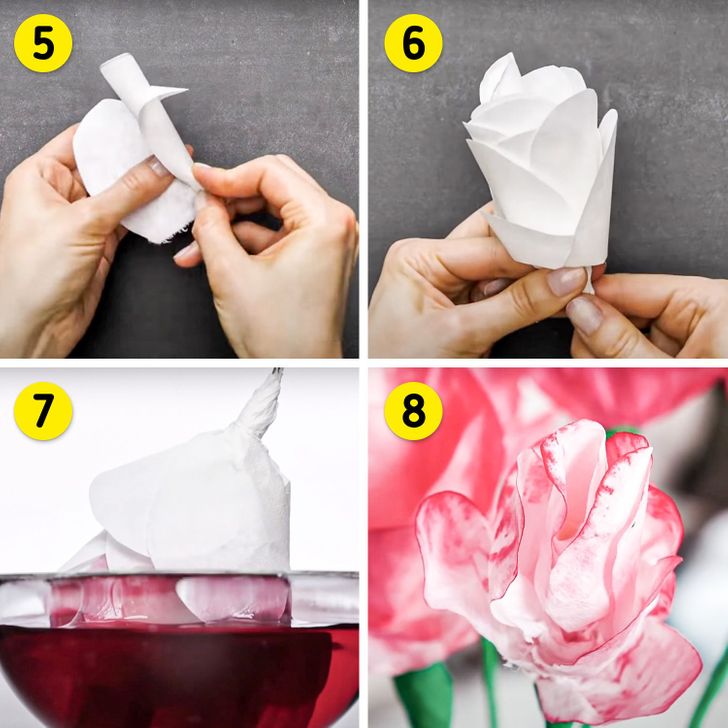
Step 4. Split the filter into 2 parts. Then put a little bit of glue on the wire and wrap one of the petals around it. You now have the base part for the bud. Next, wrap another petal.
Step 5. Keep adding the petals along the wire. Wrap the base of the petal tightly. If you want, you can use more glue.
Step 6. When the bud is done, secure the edges of the petals at the bottom of the flower. Spread the petals.
Step 7. Add a little bit of paint into the bowl of water. Dip the flower into the water.
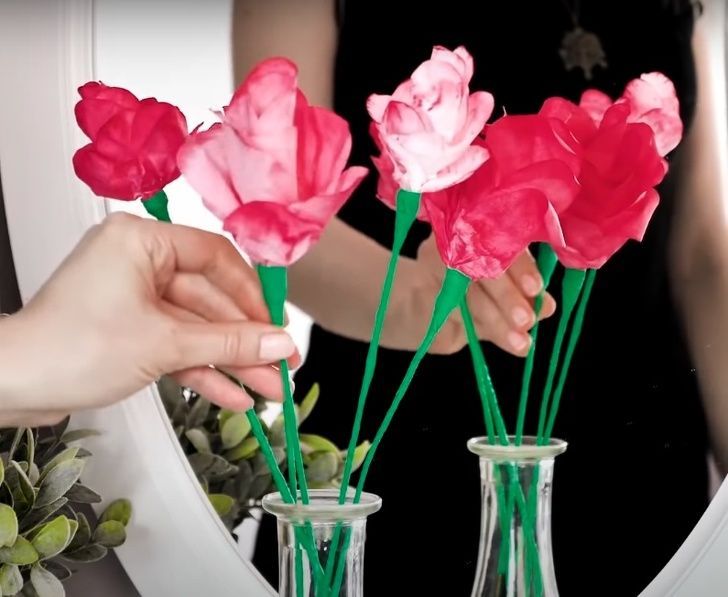
Step 8. Depending on the paint concentration, the water will make beautiful colors that will look like a natural rose color.
Let the buds dry. After that, wrap the trunks with green paper to make the flowers appear more realistic.
