How to Recycle Objects You’d Normally Throw Away
Learning how to recycle and generate less waste not only helps you lead a more environment-friendly lifestyle, but it can give you fun ways to spend your free time, making new crafts, developing fun hobbies, and maybe even saving some money.
5-Minute Crafts has compiled 10 different ways of recycling objects that you’d normally end up throwing away. So now, instead of chucking things into the garbage, you can use them to create new things for your home.
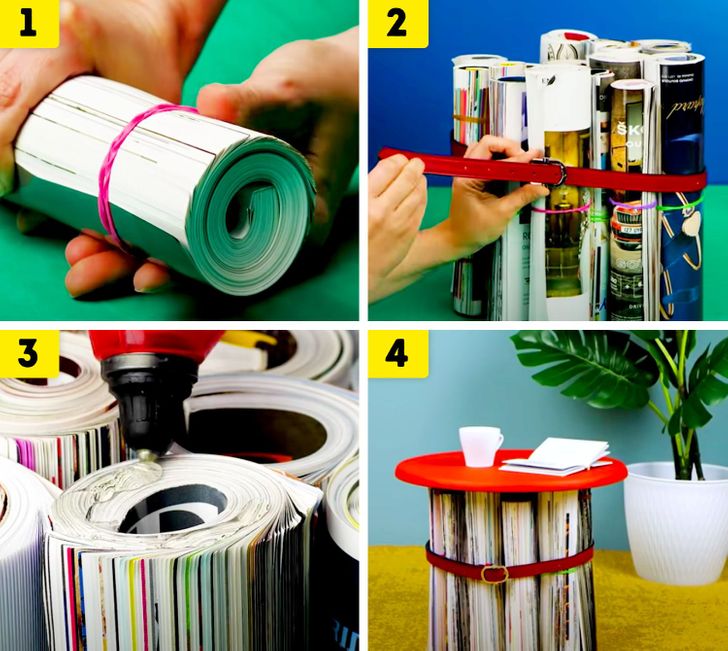
1. A coffee table made with old magazines
What you’ll need:
- Magazines
- A glue gun or strong glue
- A circular wood panel
- Elastic bands
- 1 belt or a rope
Instructions:
- Roll up the magazines and secure them with elastic bands.
- Put the vertically rolled magazines together and tie them in place using a belt or some rope.
- Apply hot glue or strong glue evenly on the tops of the magazines.
- Place the circular board over them and wait for the silicone or glue to dry.
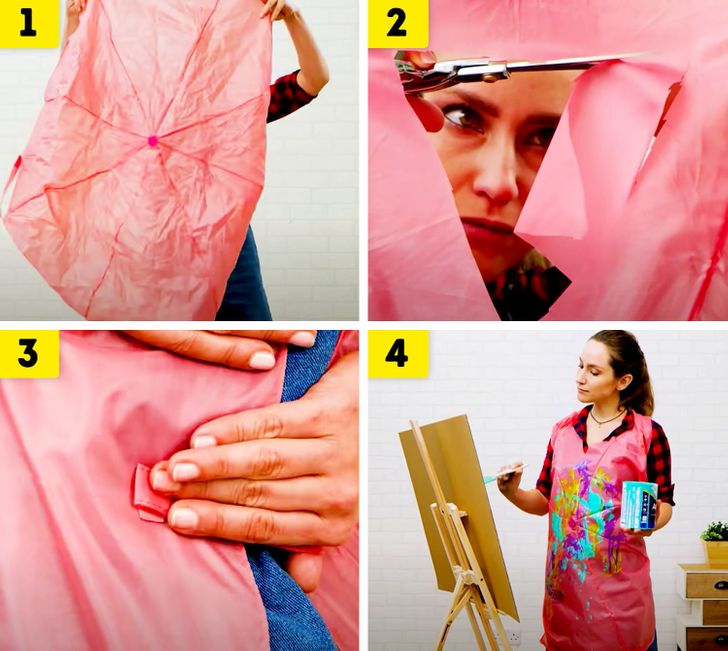
2. An apron made with a broken umbrella
What you’ll need:
-
1 broken umbrella
-
Scissors
Instructions:
- Detach the umbrella fabric from the metal structure. Then, open the fabric and place the ribbon used to close the umbrella on the side.
- Cut a triangle big enough to fit your head on the upper part of the fabric.
- To use the apron, insert your head into the triangle and fasten the fabric to your body with the ribbon on the side.
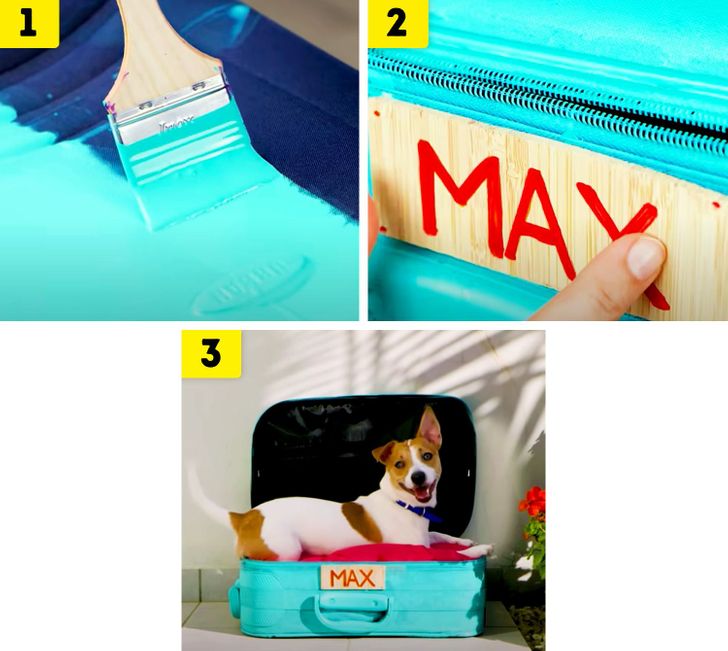
3. A pet bed made with an old suitcase
What you’ll need:
- An old suitcase
- Paint
- A paintbrush
- 1 large cushion
- 1 rectangular piece of wood
- A marker
- Glue
Instructions:
- Paint the whole exterior of the suitcase and wait for it to dry.
- Write your pet’s name on the piece of wood and stick it on the front of your new bed.
- Place the cushion inside the suitcase for comfort.
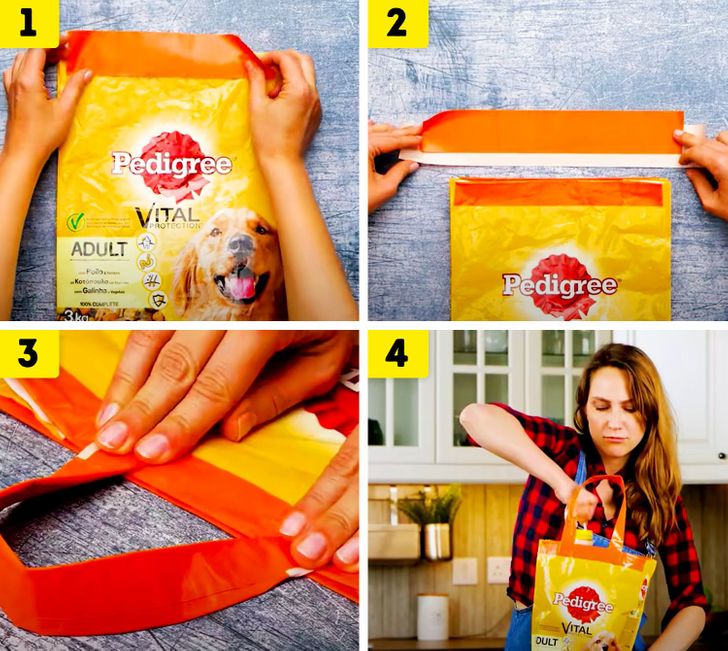
4. A shopping bag made with pet food packaging
What you’ll need:
- 1 bag of pet food
- Thick adhesive tape
Instructions:
- Stick 2 pieces of tape along the top edges of the bag and fold them inward.
- Cut a piece of long tape and place it on a flat surface with the glue facing up. Then, cut a bit of a shorter piece of tape and stick it to the middle of the previous one. Repeat this step.
- Fold the pieces of tape from the previous step very well and stick them to the top edge of the bag. These will serve as handles. If you want to reinforce them, we recommend sewing them to the bag using a needle and thread.
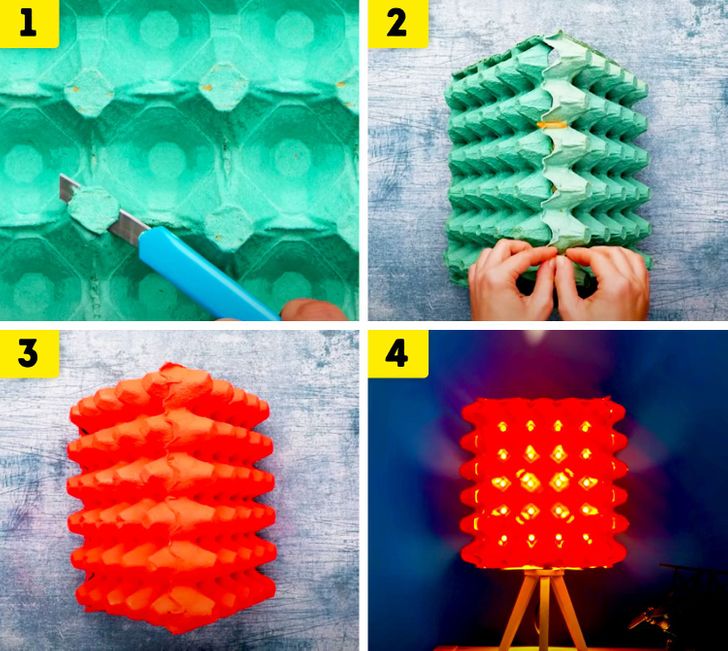
5. A lampshade made with clean egg trays
What you’ll need:
- 3 egg trays
- A box cutter
- Aerosol paint
- Plastic security seals
Instructions:
- Cut holes in the bulging parts of the 3 trays using the box cutter.
- Join the trays to make a triangle and tie them up using the safety seals.
- Paint the screen using spray paint and let it dry.
- Mount the lampshade on the base of the lamp. Use some glue if you need it.
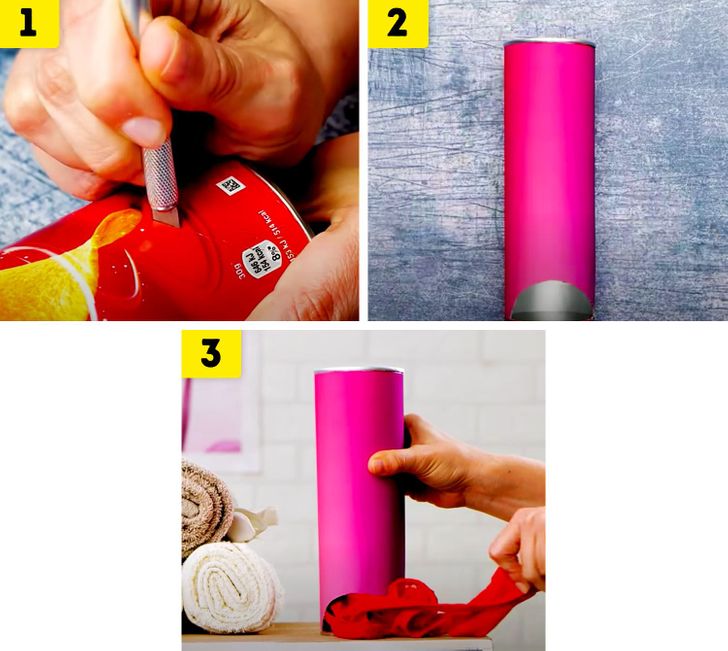
6. An underwear dispenser made with a chip container
What you’ll need:
- 1 tube of chips
- A box cutter or steel knife
- Printed paper
- Glue
Instructions:
- Cut out a half-circle at the bottom end of the tube.
- Glue the printed paper to the tube and cut it so that you leave the opening you made in the previous step accessible.
- Place the underwear you want in your new dispenser.
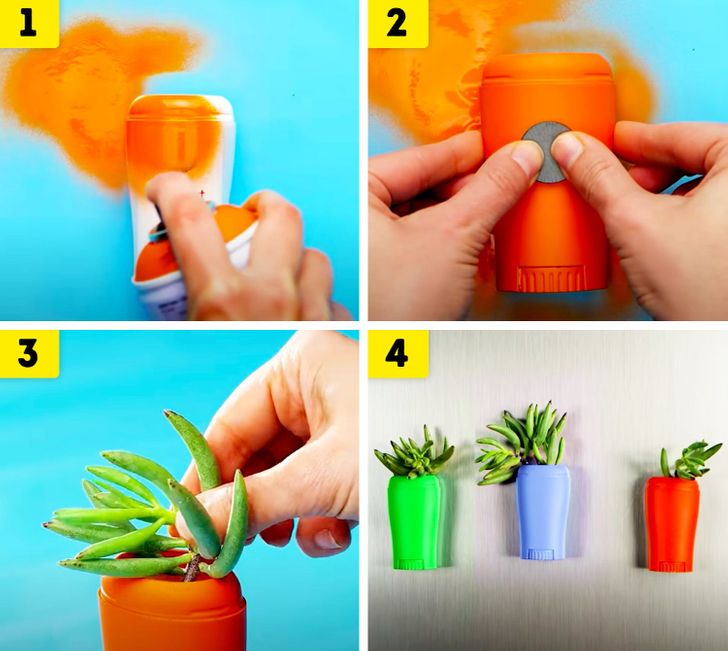
7. Magnetic pots made with empty deodorant bottles
What you’ll need:
- Deodorant stick containers (empty and cleaned)
- Aerosol paint
- Loam soil
- Small plants
- Glue
- Small magnets
Instructions:
- Remove the lids of the containers and paint the whole exterior part. Let it dry.
- Stick the magnets to the containers on one of the sides of the container. The magnets, besides adhering to the door of your fridge or any other metal surface, will help the plants grow.
- Place the loam soil and a small plant inside the container.
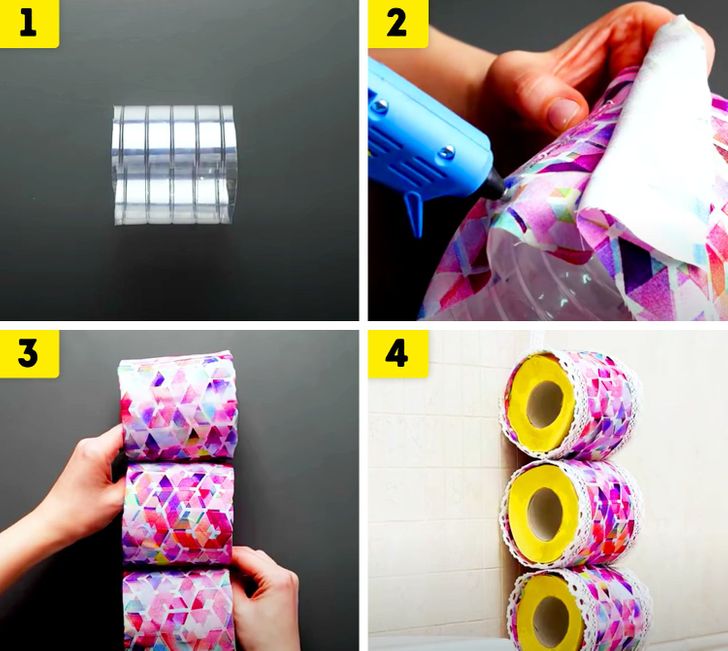
8. A toilet paper holder made with empty plastic bottles
What you’ll need:
- 3 plastic bottles of the same size
- Fabric and border tape
- A glue gun
- Scissors or a box cutter
Instructions:
- Cut each plastic bottle to remove the bottom and the part from which you normally drink. You’ll be left with the middle sections of the bottles. Cut them to meet the size of a regular toilet paper roll.
- Glue the fabric to the pieces of plastic using hot glue.
- Stick the 3 pieces on top of each other horizontally.
- Stick the tape to the edges of each piece of plastic and let it dry. Remember to add a long piece of tape to hang your new toilet paper holder.
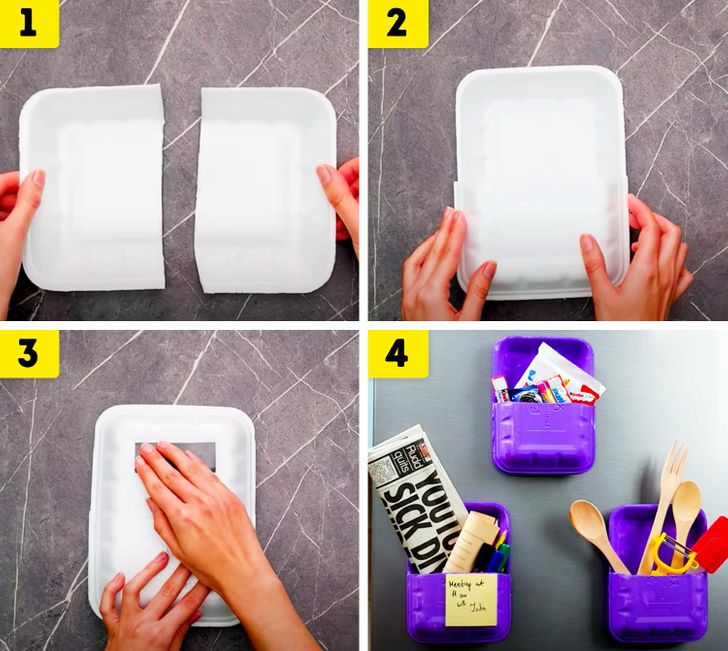
9. Storage made with old food containers
What you’ll need:
- Polystyrene trays
- A glue gun or strong glue
- Magnets (medium size)
- Acrylic paint
- A paintbrush
Instructions:
- Cut one of the trays in half and set it aside.
- Take another tray and apply the silicone or glue along the edge, up to the middle. Then, glue the reserved half to form a box, and let it dry for a few minutes.
- Glue the magnets on the side that contains the whole tray.
- Paint the box with any color paint of your choice before placing it on the door of your refrigerator.
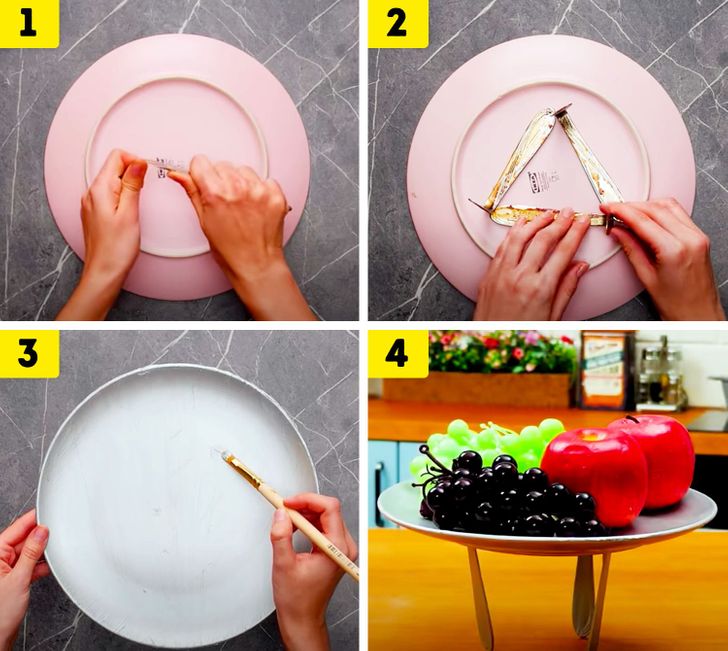
10. A fruit bowl made with an old plate and utensils
What you’ll need:
- 1 plate
- 3 butter knives
- A glue gun or strong glue
- Paint
- A paintbrush
Instructions:
- Bend the 3 knives at the thinnest section (which is normally the blade).
- Glue the thickest part of the knives under the plate to form a triangle. Let the silicone or glue dry for a few minutes.
- Paint the plate and the knives in any color of your choice and let them dry. If the knives are in good condition, you can leave them in their original color.
