9 Useful Things You Can Do by Recycling Plastic at Home
Our homes are filled with plastic things, and this tendency has become a cause for concern for many people since it can take up to 1,000 years for plastic to decompose. 5-Minute Crafts is constantly looking for new ways to reuse bottles, drinking straws, and other plastic objects and hopes that these tricks will help save some things from ending up in a landfill.
1. Turn drinking straws into flip flops
What you’ll need:
- Used plastic drinking straws
- Baking parchment
- Insoles from you shoes
- An iron
- A marker
- A pair of scissors
- Glue
How to do it:
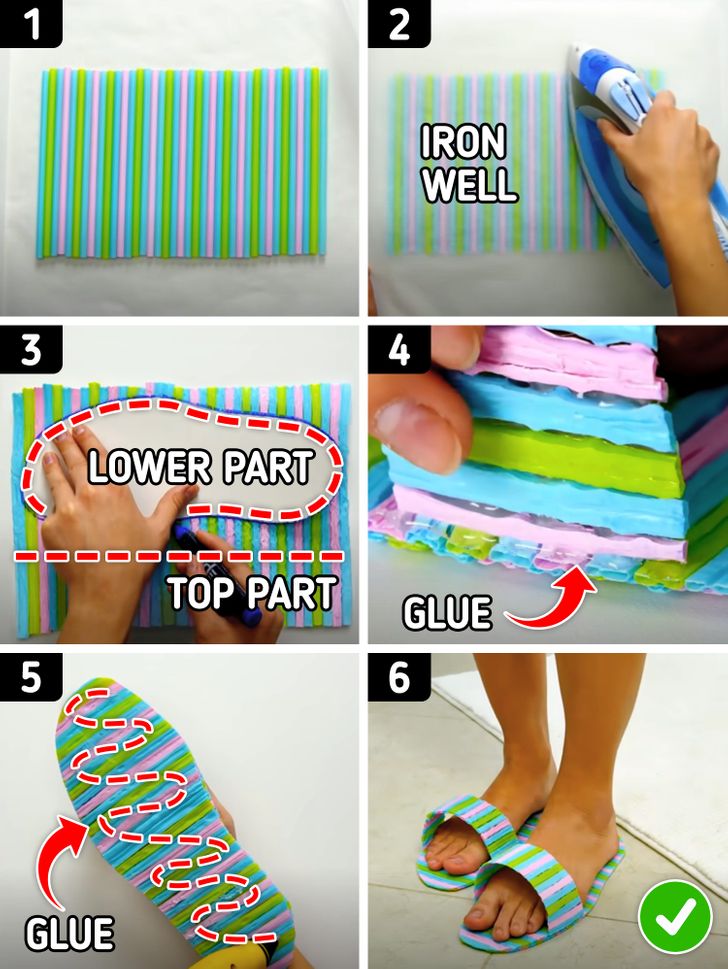
1. Place drinking straws on a piece of parchment paper as shown in the picture above.
2. Cover the straws with another piece of parchment paper and iron well them through this paper. Keep ironing until straws are properly glued together.
3. Remove the straws from the parchment paper, take your shoe insole, put it on the straws, and outline it. Then cut it out from the straws. Use the remaining part of the straws to make the top part for your flip flop.
- If the remaining part of the straws is too narrow, you’ll have to glue more drinking straws together.
4. Glue the top part to the sides of the insole.
5. Turn your flip flop and apply glue to the outsole. Let it dry completely. It’ll make your flip flop less slippery.
6. Make a flip flop for another leg and your new shoes are ready!
2. Turn bottle caps into a coaster
What you’ll need:
- 6 bottle caps
- A piece of parchment paper
- An iron
How to do it:
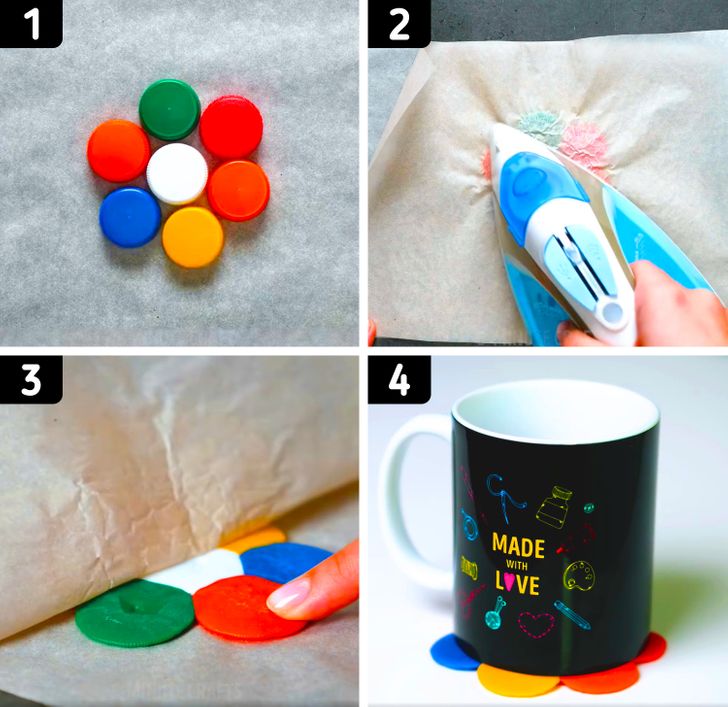
1. Place bottle caps on a piece of parchment paper, as shown in the picture above.
2. Cover the bottle caps with another piece of parchment paper and iron them well. Keep ironing until the bottle caps are properly glued together.
3. Remove the parchment paper.
4. Enjoy your new coaster!
3. Turn plastic bottles into a thread holder
What you’ll need:
- A plastic bottle with a bottle cap
- A sharp knife
- Used drinking straws (about 10-12, depending on the size of the bottle)
- A sharp object to make holes in plastic
How to do it:
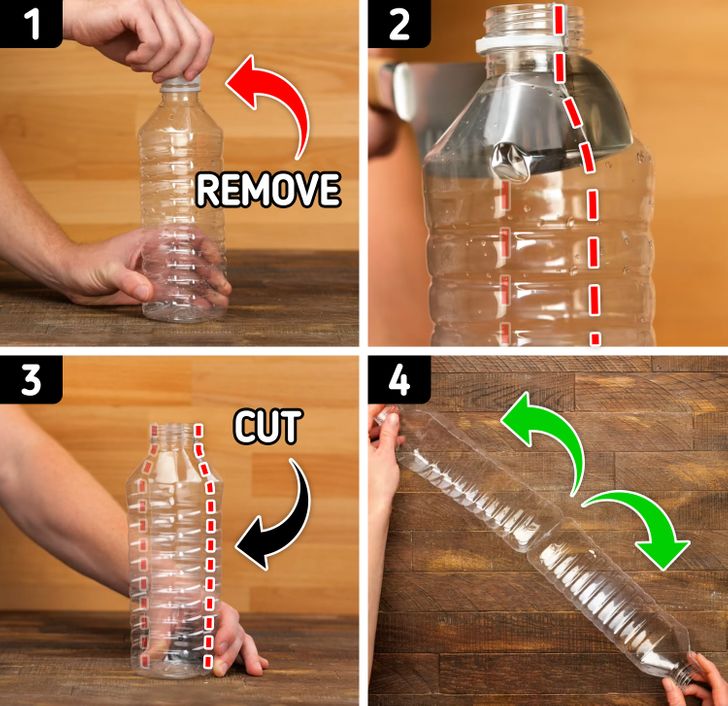
1. Take a plastic bottle and remove the bottle cap.
2. Take a sharp knife and start cutting the bottle in half.
3. Keep cutting until you reach the bottom.
4. Pull the bottle halves to the sides.
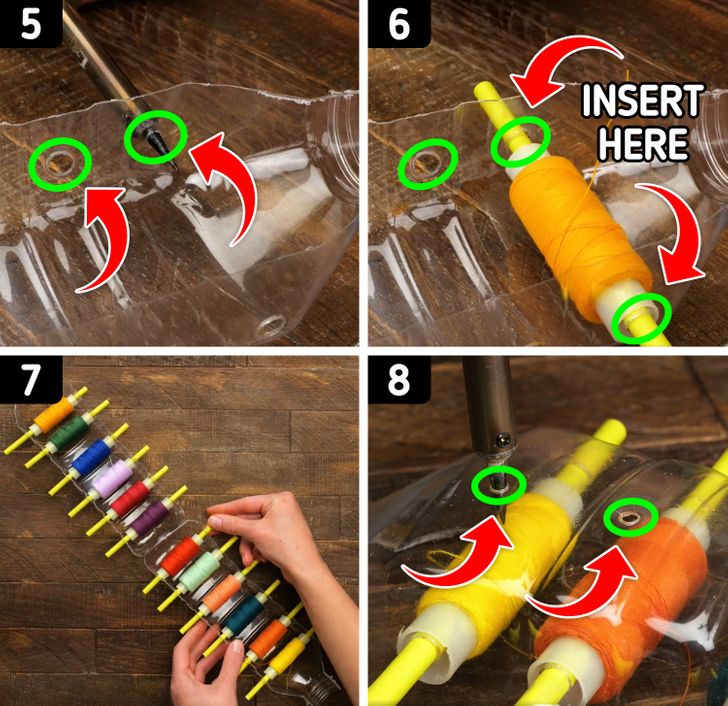
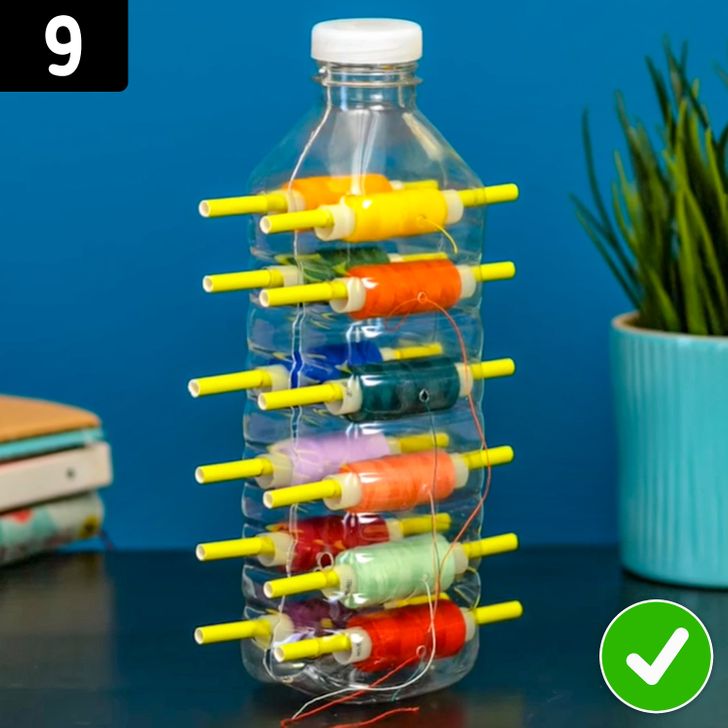
5. Make holes along both sides of the bottle, closer to their outer end. Holes should be located across from each other. The holes should be wide enough that you can pull a straw through them. The distance between the holes should be enough for 2 straws with spools of thread to be placed between them.
6. Pull a piece of straw through a spool of thread. Then pull the ends of the straw through the holes in the plastic bottle. If the straw is too long, cut off the excess.
7. Keep inserting spools of thread with straws until you fill the bottle.
8. Turn the bottle over and make small holes in its wider parts. The holes should be located above the middle part of each spool of thread. Pull a thread from a corresponding spool through every hole.
9. Secure the parts of the bottle with a bottle cap and enjoy the result.
4. Turn plastic bottles into a sauce bottle
What you’ll need:
- A plastic bottle with a bottle cap
- A lighter
- A pair of scissors
- An orange stick
How to do it:
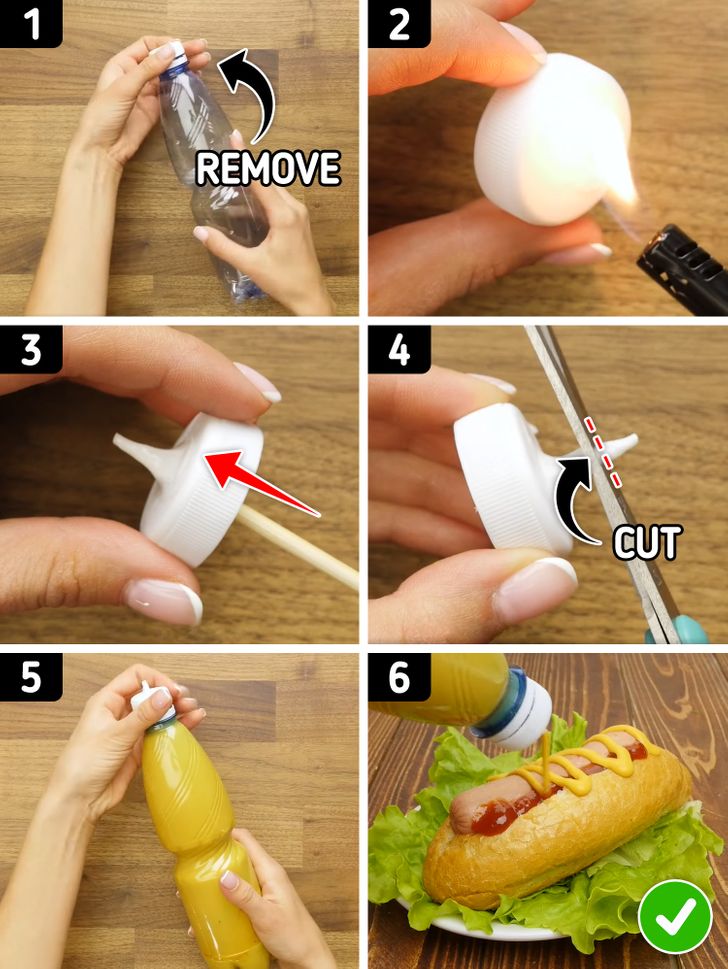
1. Take a plastic bottle and remove the bottle cap.
2. Heat the bottle cap from its outer side with a lighter until the plastic becomes soft. Don’t melt the plastic!
3. Take an orange stick and insert it in the bottle cap from its inner side, forming a pointed tip.
4. Cut off the end of the tip.
5. Fill the bottle with sauce and close it with the cap.
6. Enjoy your new sauce holder!
5. Turn drinking straws into a beauty organizer
What you’ll need:
- Used drinking straws (about 30 straws are supposed to be enough)
- Glue
How to do it:
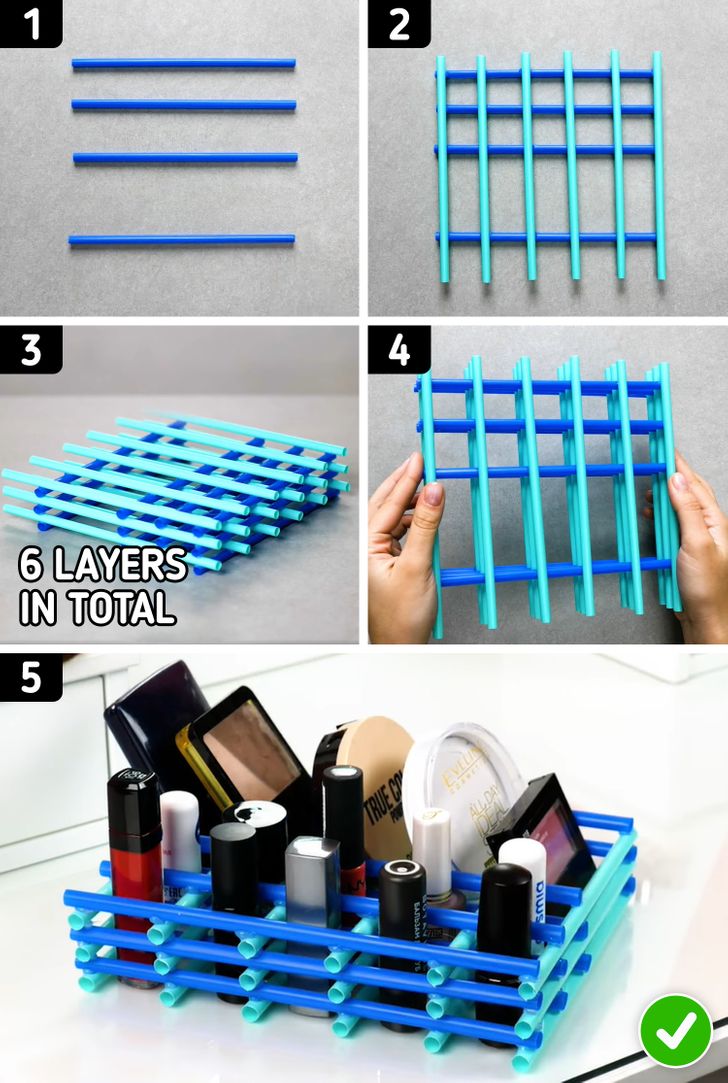
1. Place 4 straws as shown in the picture above.
2. Glue another 6 straws to them (see example).
3. Keep adding new layers of straws until your organizer is high enough. We used 6 layers of drinking straws in total to make our beauty organizer.
4. Let the glue dry completely and make sure the straws are secured properly.
5. Put your makeup products in the organizer and enjoy it!
6. Turn shampoo bottles into a utensil organizer
What you’ll need:
- 4 empty shampoo bottles and a bottle cap
- Glue
- A marker
- A pair of scissors
How to do it:
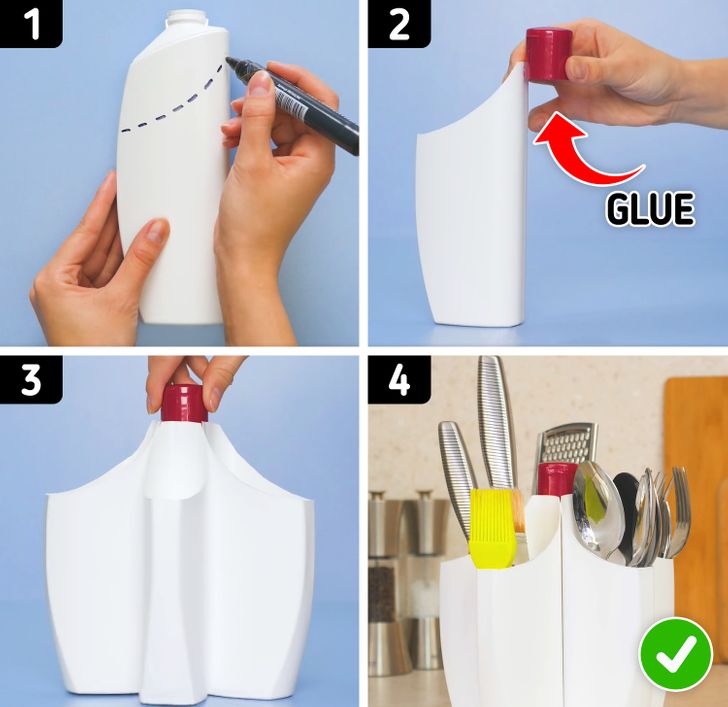
1. Take 4 shampoo bottles and remove their upper parts as shown in the picture above.
2. Glue the top part of one of the bottles to the bottle cap.
3. Glue the rest of the bottles around this bottle cap, as shown in the picture above.
4. Enjoy your new utensil organizer!
7. Turn a laundry detergent bottle into a sponge holder
What you’ll need:
- An empty bottle from any laundry detergent with a handle
- A marker
- A piece of rope
- A pair of sharp scissors or a knife
- A sharp object to make holes in the plastic
How to do it:
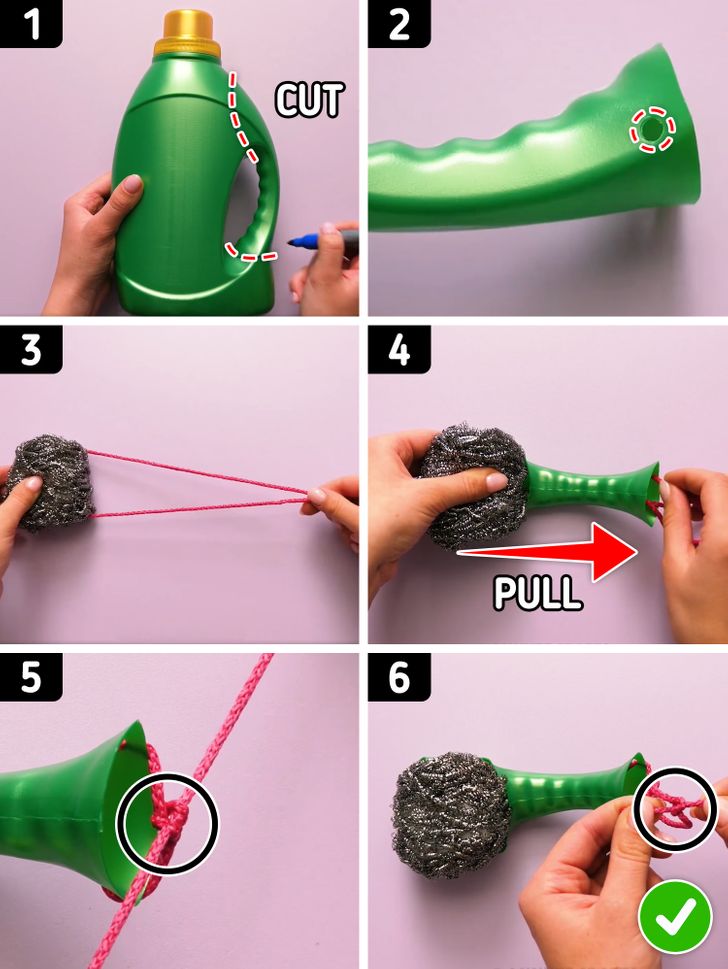
1. Take an empty bottle of laundry detergent and cut off its handle.
2. Make a hole on each side of the narrower end of the handle.
3. Take a sponge and pull a rope through it.
4. Pull the ends of the rope through the handle, starting from its wider side.
5. Insert the ends of the ropes into the holes and tie a knot to secure the rope.
6. Leave a bit of the rope free and tie another knot to form a hanging loop.
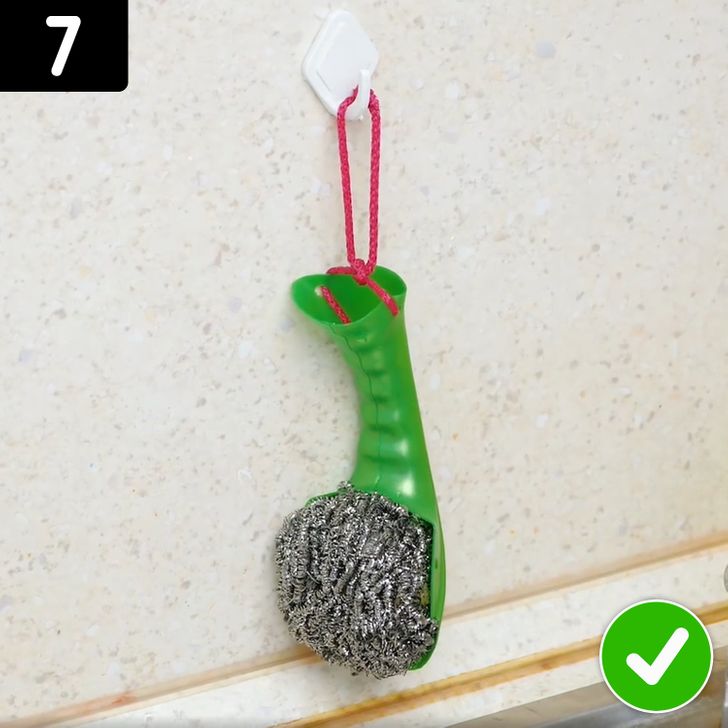
7. Enjoy your new sponge holder!
8. Turn a plastic bottle into a piggy bank
What you’ll need:
- A plastic bottle with a bottle cap
- A utility knife
- Some paint and any additional materials, like tinted cardboard, to decorate your piggy bank
How to do it:
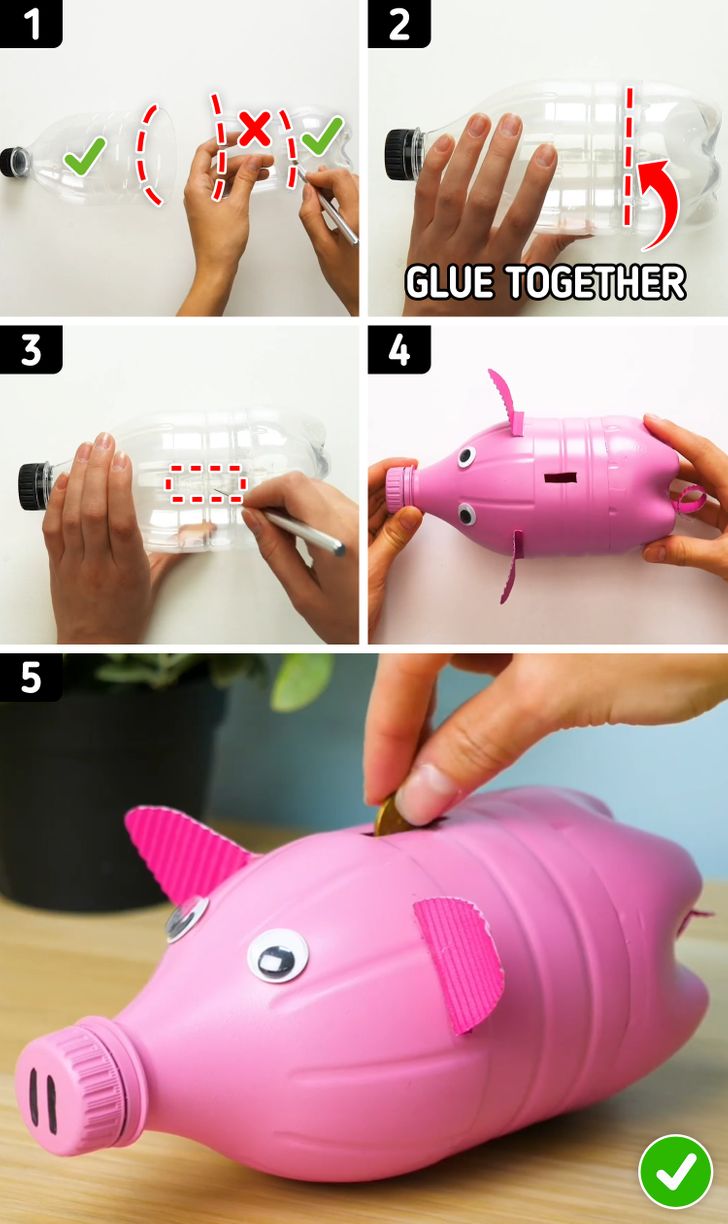
1. Cut the bottle in 3 parts, as shown in the picture above.
2. Glue the first and the third parts together to form a smaller bottle.
3. Make a hole for coins in the upper part of the new bottle.
4. Color the bottle and decorate it in accordance with your taste.
5. Start saving money!
9. Turn a plastic container into a lunch box
What you’ll need:
- A large plastic container (for example, a milk container). Don’t use containers from inedible products like washing detergents.
- A utility knife
- A sharp object to make holes in the plastic
- A piece of ribbon
- A large button, a piece of thick thread, and a thick needle
- A marker
How to do it:
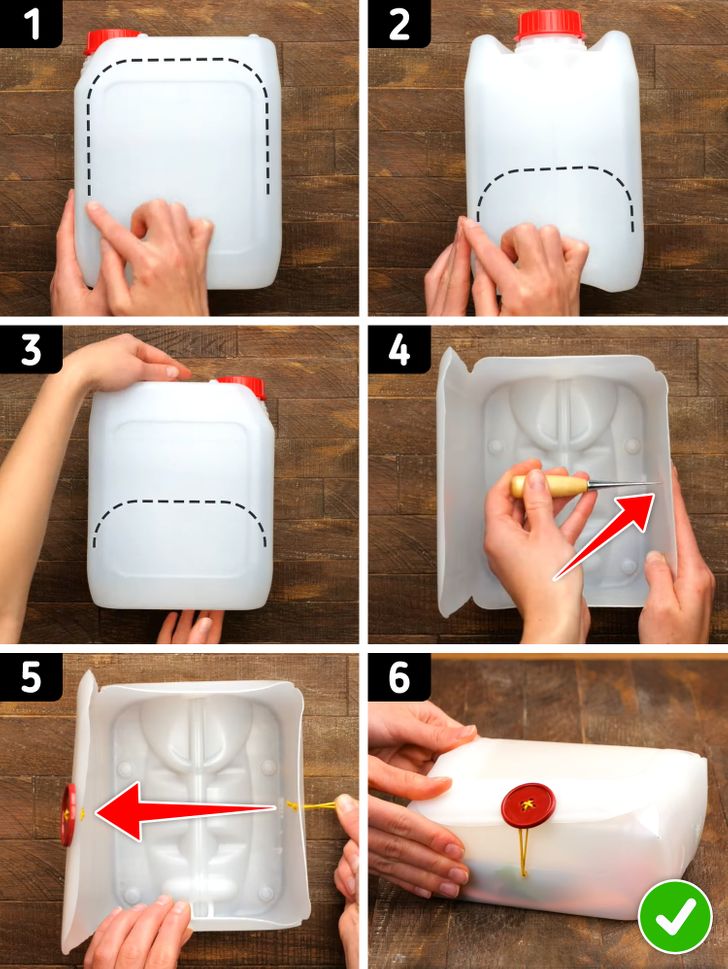
1. Take a container and cut off the upper part of its wider side, following the line shown in the picture above.
2. Turn the container and cut off the upper part of its narrower side, following the line shown in the picture above.
3. Turn the container again and cut off the upper part of its other wider side, following the line shown in the picture above.
4. At this point, you should have a box shaped like a lunchbox. Make a hole in the middle of the small wall that is located in front of the larger wall.
5. Pull a piece of ribbon that’s folded in half through this hole. Secure it with a tight knot on the inner side of the box. Sew a button on the covering lid so it’s placed above the ribbon when you close the lid.
6. Close your lunchbox to make sure everything is secured properly and enjoy your meal!
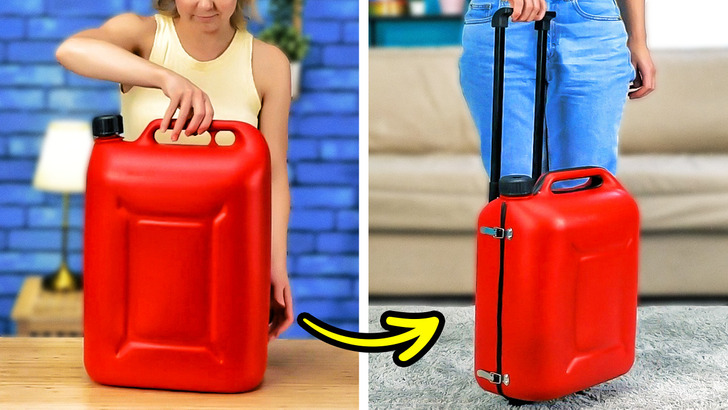
Bonus: Turn a used plastic jug into a travel bag
- First, you’ll need to split your jug in 2. Try to cut it in a way that both sides stay symmetrical.
- Then, make 6 holes on the opposite side of where the bottle’s neck is. Keep them a few inches apart from each other. Make 3 of them close to the top, and the other 3 close to the bottom.
- With the help of screws, tighten 2 hinges to the plastic (one in each at the pierced spots).
- Afterward, add 2 seals spaced apart from each other. One close to the top, and another close to the bottom. Make sure to do the same for the second piece of the jug, in the exact same spot.
- Then, add rubber to your recently cut edges (both sides).
- Attach the wheels and a handle to the back of the jug.
- Use your bottleneck as a sort of key. It’ll keep your bag tightly sealed.
