Light Modeling Clay Craft Ideas
Light modeling clay crafting is a nice activity for both children and adults. You can make almost anything out of this material and it is also helpful in developing fine motor skills. Crafts that are made of light modeling clay dry quickly, which makes their storage easier.
5-Minute Crafts would like to show you how to make simple crafts out of light modeling clay and get to know a few helpful tricks.
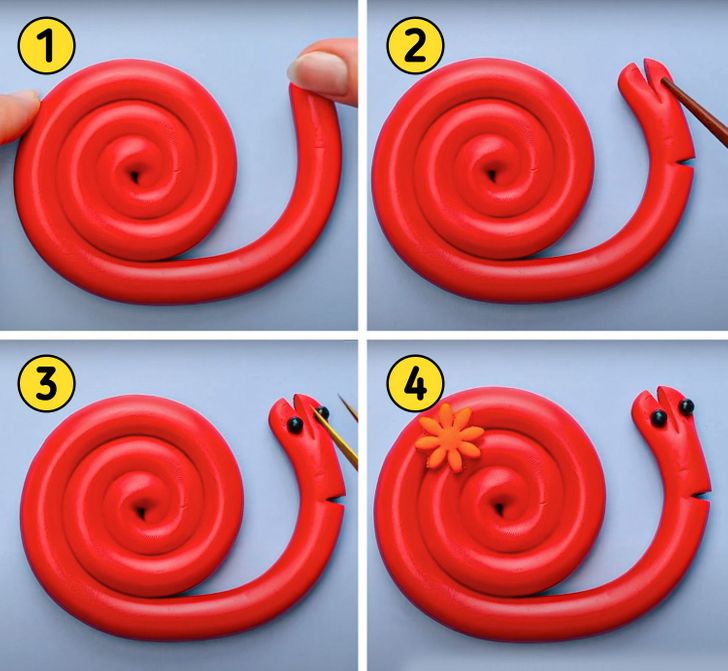
Snail
Step 1. Roll a piece of light modeling clay into a long cylinder. Twist it into a spiral. Slightly separate the end of the spiral to make the head of the snail.
Step 2. Use a sharp object to cut this end in the middle. That’s where the horns with the eyes will be. Make a hole for the mouth in the same way. Use a stick with a rounded end to make hollows for the eyes.
Step 3. Roll 2 small balls out of black light modeling clay. Use tweezers to place them in the eye hollows.
Step 4. The snail is ready. Its shell can be decorated with light modeling clay flowers and leaves.
Frog
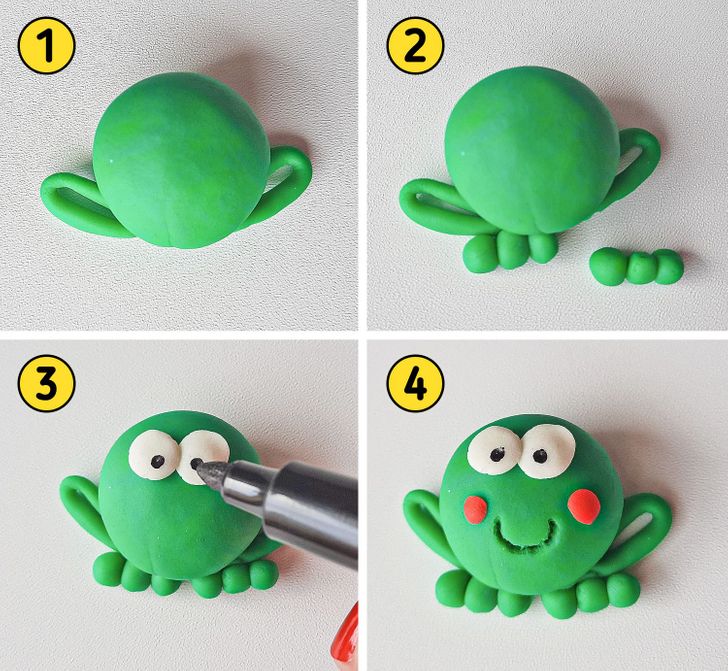
Step 1. Roll a ball out of light modeling clay and press it down a little. This will be the body of the frog. Add legs on the sides: make a couple of thin cylinders, bend them in the middle, and attach them to the frog’s body.
Step 2. Attach 6 small balls to the bottom of the frog’s belly.
Step 3. Make the eyes out of white light modeling clay. Attach them. Draw the pupils with a black marker.
Step 4. Make the mouth with a toothpick. Then use red light modeling clay to make a couple of tiny discs and stick them onto either side of the mouth, those will be the cheeks.
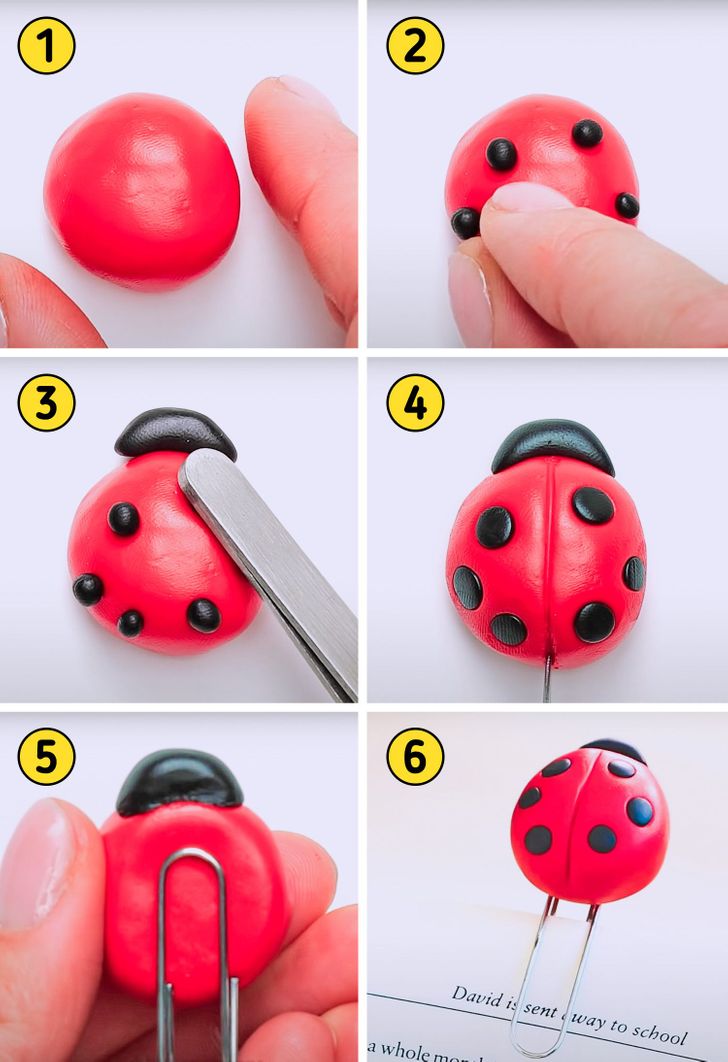
Ladybug
Step 1. To make the body of a ladybug, roll a ball out of red light modeling clay and press it down a little.
Step 2. Make 6 small balls out of black light modeling clay and attach them to the back of the ladybug: 3 on each side, symmetrical to each other.
Step 3. Roll a small piece of light modeling clay into a cylinder with elongated edges and secure it on top of the body. This will be the head. With any tool at hand, press the small balls slightly so that they turn into flat points on the back of the insect.
Step 4. Using a toothpick, or any other thin sharp object, draw a line in the middle of the back.
Steps 5 and 6. The ladybug is ready. You can attach your craft to a paper clip, turning it into an original bookmark.
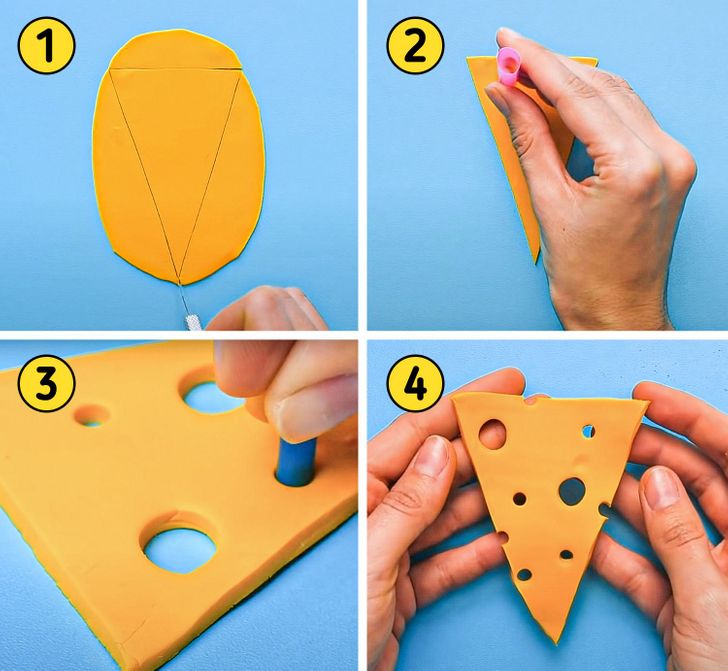
Slice of cheese
Step 1. Roll out a piece of light modeling clay into a thin sheet. Cut the edges, giving it a triangular shape.
Step 2. Use a big beverage straw to make holes in the slice of cheese.
Step 3. Do the same with smaller straws.
Step 4. The slice of cheese is ready.
Caterpillar
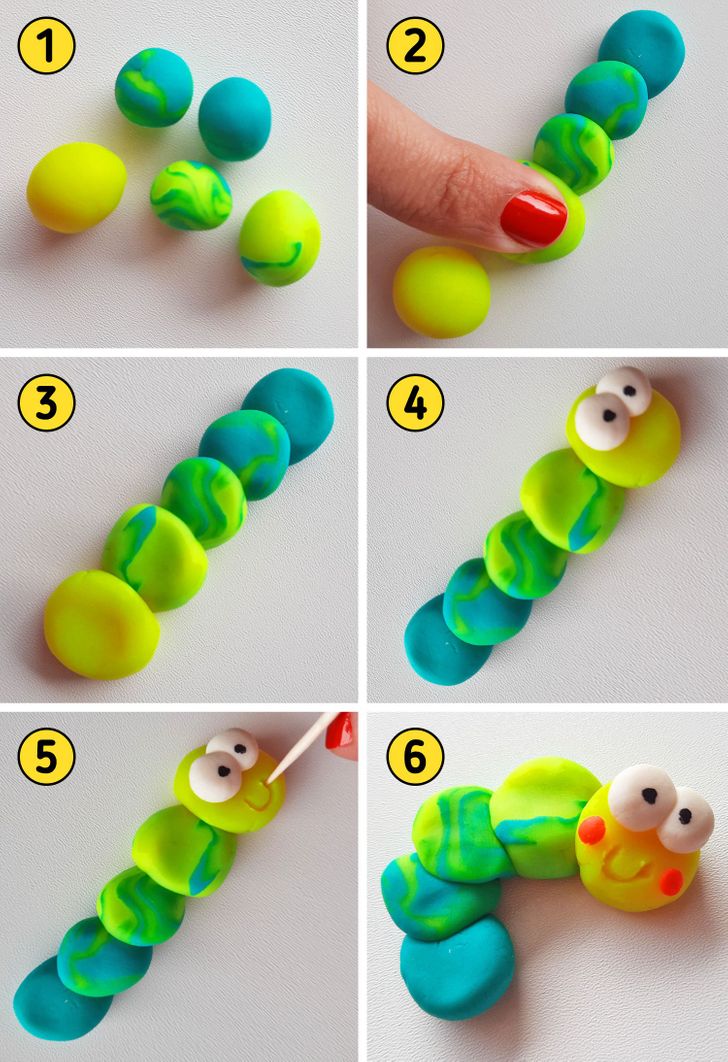
Step 1. Make a few balls in different colors.
Step 2. Place the balls one after another and press them down with your finger.
Step 3. Place the flattened balls on top of each other. To secure them in place, pierce the balls with a toothpick or wire.
Step 4. Attach the eyes made of white light modeling clay to the head of the caterpillar, and then draw the pupils on with a black marker.
Step 5. Use a toothpick to make the mouth of the caterpillar.
Step 6. Make the cheeks out of pink light modeling clay and attach them to the head. You can twist the body of the caterpillar or add more balls to make it longer.
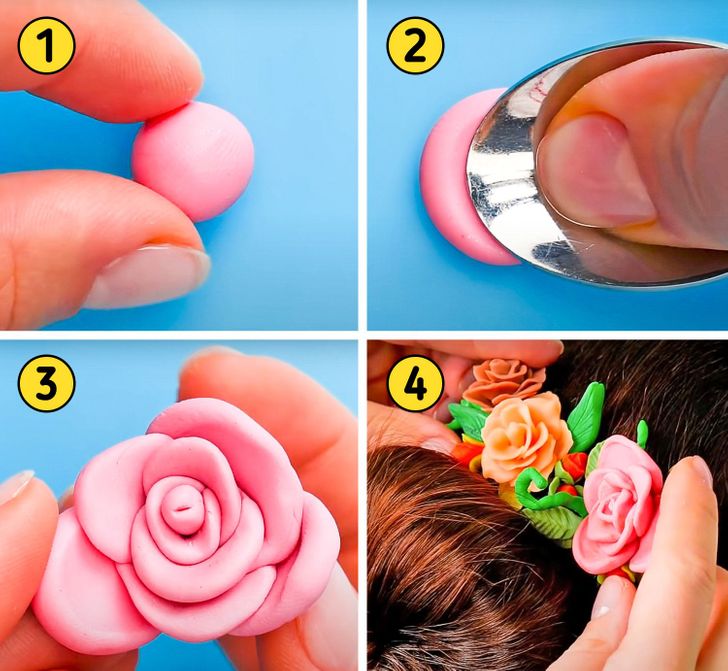
Rose (option 1)
Step 1. Make a ball out of pink light modeling clay.
Step 2. Press it down on one end with a spoon to make a petal.
Step 3. Make other petals in different sizes and shapes in a similar way, and then fashion them into a rosebud.
Step 4. The rose is ready. Feel free to experiment. For example, try gently squeezing the edges of the petals to make them look as thin as a real flower. The finished flowers can be glued to a hair comb or hairpin.
Rose (option 2)
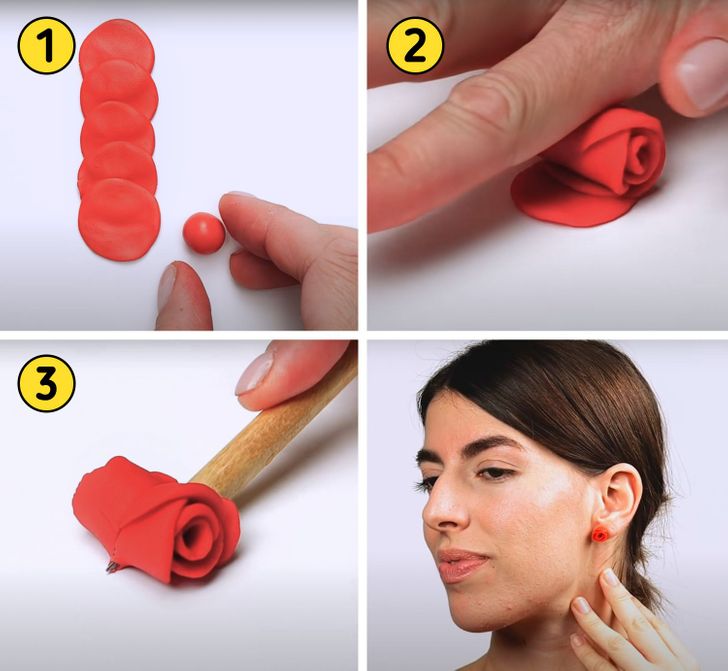
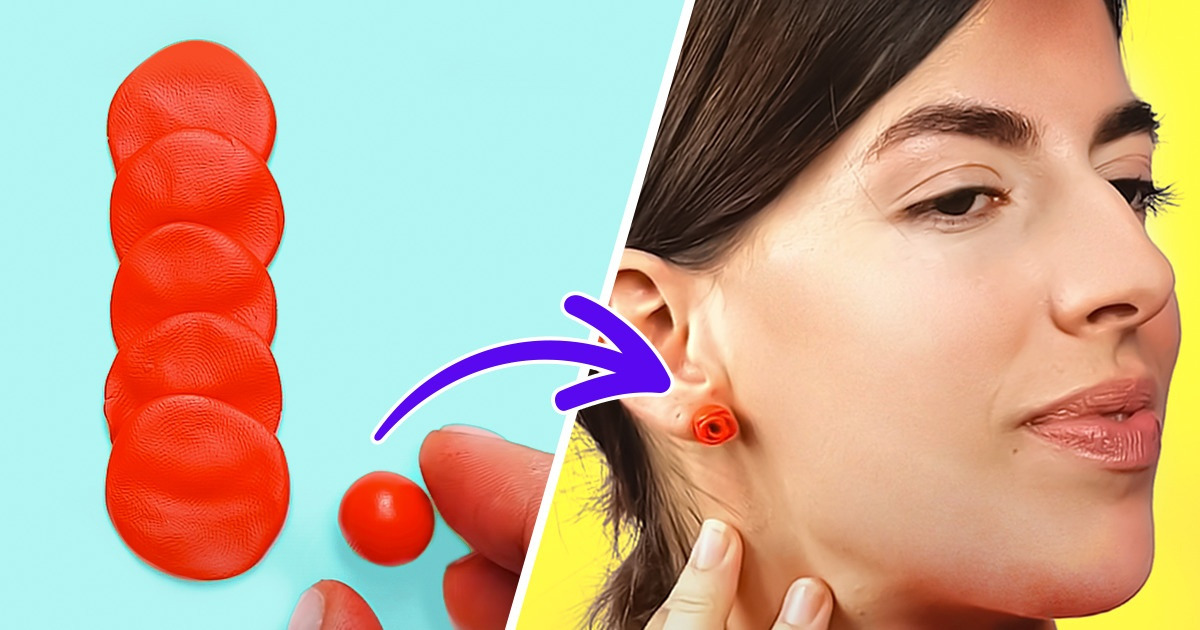
Step 1. Make 6 small balls out of light modeling clay. Place them side by side and roll them out to form discs, stacked on top of each other.
Step 2. Roll them into a small roll.
Step 3. Using a sharp object, divide the roll into 2 pieces to make 2 small rosebuds. To make them look more spectacular, attach green leaves to the base of each flower. You can also glue them to earring studs — this way you’ll have a nice piece of jewelry.
Raspberry
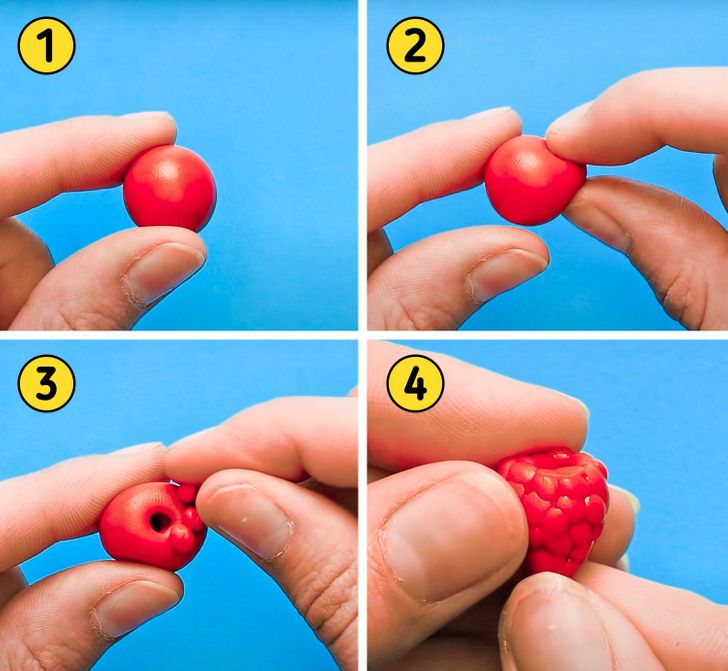
Step 1. Make a light modeling clay ball.
Step 2. Squeeze it slightly on one side to make it look like a berry.
Step 3. Make a hole in the center of the top part. Make smaller balls and attach them to the berry, imitating the texture of a raspberry. You can pierce a berry with a toothpick, it will be more convenient to attach the balls this way.
Step 4. Press the small balls slightly around the edges of the berry. Done! This berry can be set on a wire and twisted into a loop to make a pendant for a chain or bracelet.
Fish
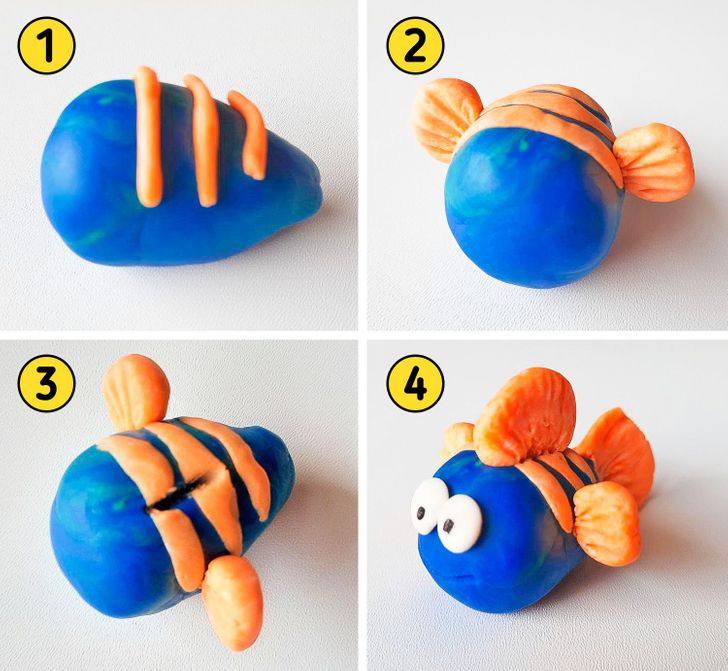
Step 1. Roll a piece of light modeling clay into a teardrop shape. This will be the body of the fish. Make a thin cylinder out of a contrasting color of light modeling clay and divide it into 3 parts. Attach them to the back of the fish and press them flat.
Step 2. Make fins out of 2 balls. Give them the same texture as in the photo above with a toothpick. Make grooves on the sides of the body and insert the ends of the fins into them.
Step 3. Make the fin on the back in the same way.
Step 4. Make eyes out of white light modeling clay and paint the pupils with a marker. Make the mouth using a toothpick.
Knitted heart
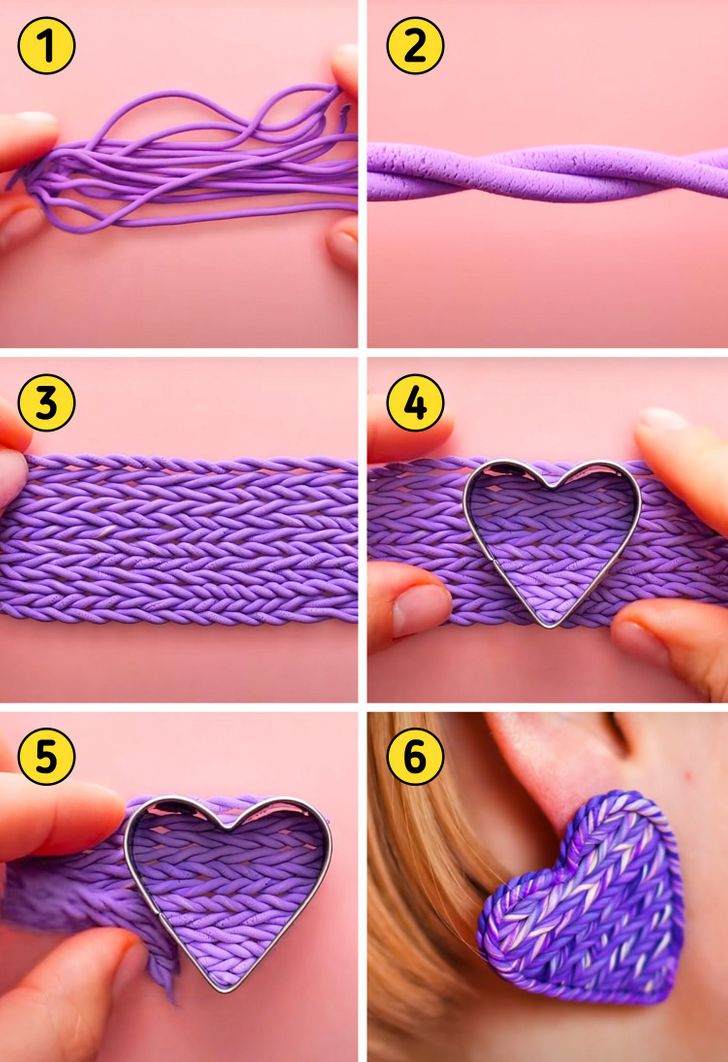
Step 1. Make many thin light modeling clay cords. If you don’t have a special device for this, you can use a pasta maker or garlic press.
Step 2. Gently twist 2 cords together.
Step 3. Do the same with the other cords. Place the resulting twines next to each other, like in the photo above. Press them slightly so that they touch each other, forming a canvas.
Step 4. Put a heart-shaped cookie cutter on the canvas.
Step 5. Cut out a heart and remove the excess light modeling clay.
Step 6. Remove the cutter and attach twine around the edges of the heart. You can glue clips to the finished hearts, turning them into clip earrings.
Octopus
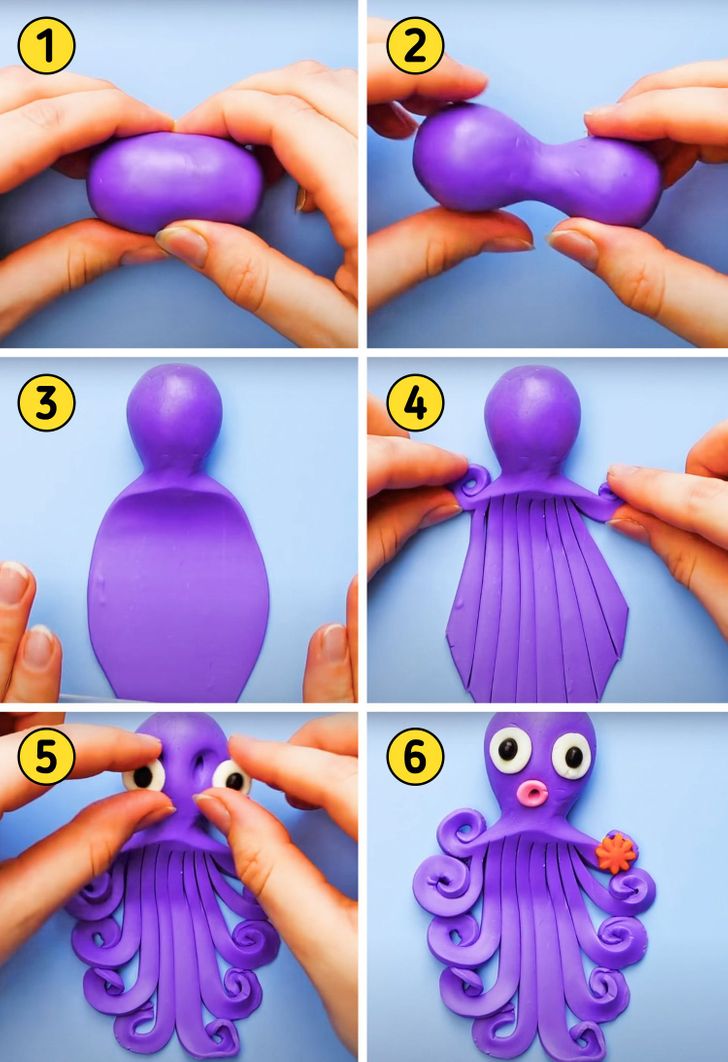
Step 1. Make a ball out of light modeling clay and squeeze it a little.
Step 2. Roll it out, pressing on its middle to shape it into a dumbbell.
Step 3. Roll the lower half of this dumbbell into a flat oval sheet. This will be the body.
Step 4. Use a sharp object to cut the sheet into strips. Twist their ends into spirals, moving upward, as shown in the photo above.
Step 5. Make holes for the eyes in the head with a stick. Make white eyes with black pupils out of light modeling clay and put them into the holes.
Step 6. Make a hole for the mouth. Insert a pink flat circle into it and pierce it in the center to make a hole. Attach a flower to one of the tentacles.
Catfish
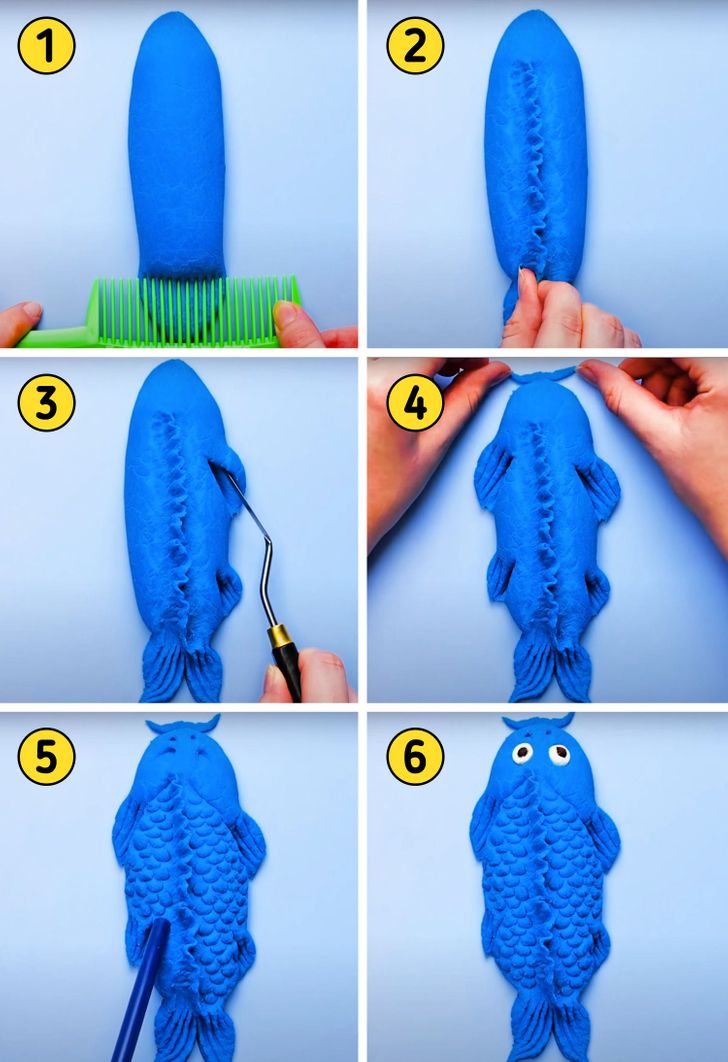
Step 1. Roll a cucumber-like shape out of light modeling clay to make the body of the catfish. Press down one end with a comb and divide it in half, forming a tail.
Step 2. To make the dorsal fin, lift and squeeze the light modeling clay with your fingers, forming a mohawk that stretches from head to tail.
Step 3. Pull the light modeling clay a little from the right side to make 2 fins. Use a sharp object or spoon to rib them on both sides.
Step 4. Carefully separate small pieces around the edge of the catfish head to make the barbels. Twist them up a bit.
Step 5. Make indentations on the head for the eyes and nostrils. Use a drink straw to give the body a scale-like texture as shown in the photo above.
Step 6. Insert white eyes with black pupils into the hollows on the head. Done!
Broccoli or tree
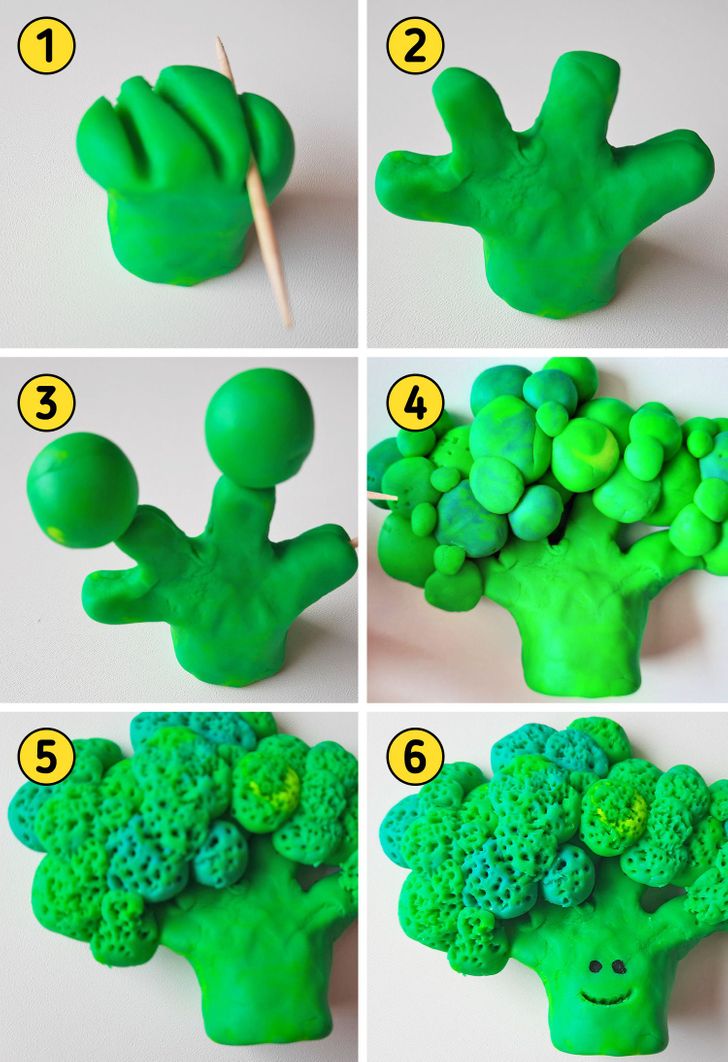
Step 1. Roll the light modeling clay into a cylinder and divide one of its edges into several branches with a toothpick.
Step 2. Draw out the branches with your fingers gently and give them the appearance of voluminous branches.
Step 3. Insert toothpicks into the branches and put balls on their ends. Toothpicks will provide a more secure hold.
Step 4. Fix the balls on the branches and press them down a little so that they sit more securely. Then add texture to the balls piercing them with a toothpick.
Step 5. Do the same with the entire crown. Carefully tweak the stem and its branches so that the lines are smooth.
Step 6. Draw the eyes with a marker and make the mouth with a toothpick.
Rainbow with the sun
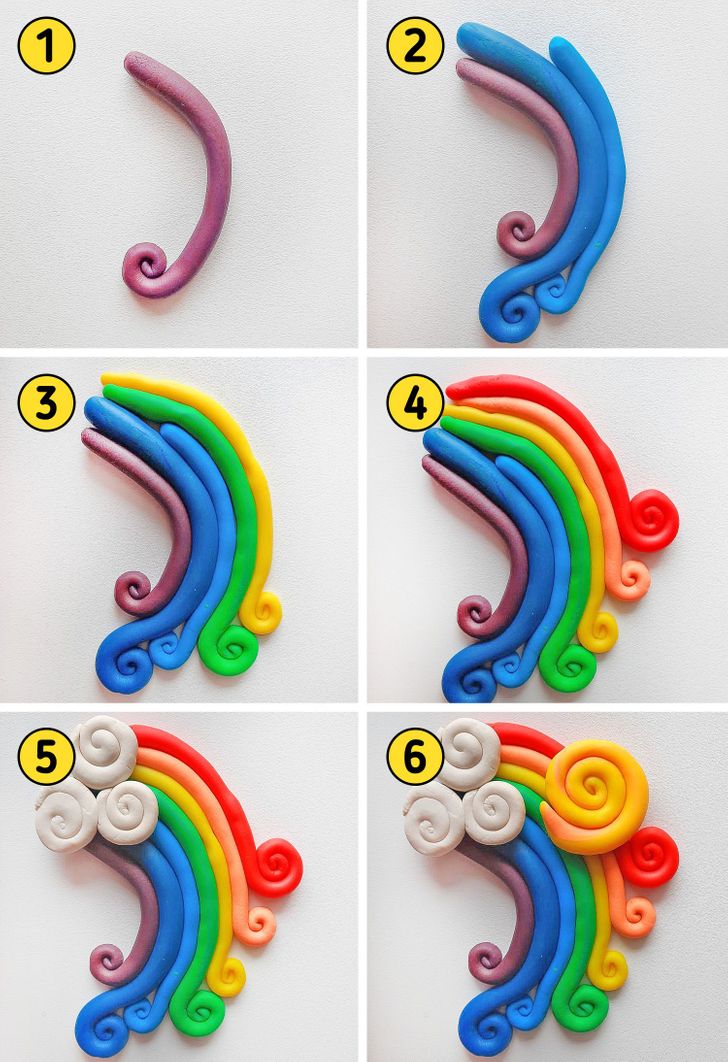
Step 1. Roll up a long, voluminous strip of purple light modeling clay. Twist its end into a spiral.
Step 2. Make similar strips of the blue and light blue colors, and attach them to the purple strip. The ends of the strips can be twisted in different directions.
Step 3. Add green and yellow strips to the composition.
Step 4. Make orange and red strips in the same way. The rainbow is ready!
Step 5. Make 3 small strips of white light modeling clay and roll them into spirals, then attach them to the base of the rainbow. These will be clouds.
Step 6. Make the sun circle in the same way. In the photo above, it’s made of the light modeling clay in 2 colors to add depth to the design.
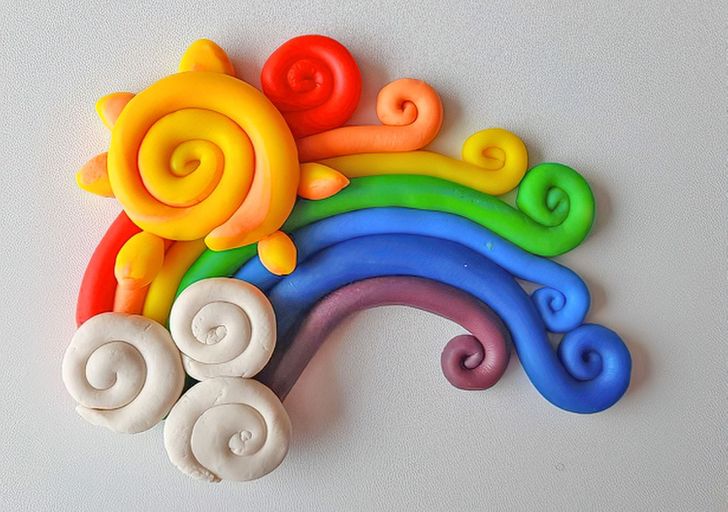
You just need to add short rays to the sun, and your composition is ready. Wait until it’s dry and glue a big pin to the back side. Now you have a wonderful brooch.
A sheep at a farm (a light modeling clay painting)
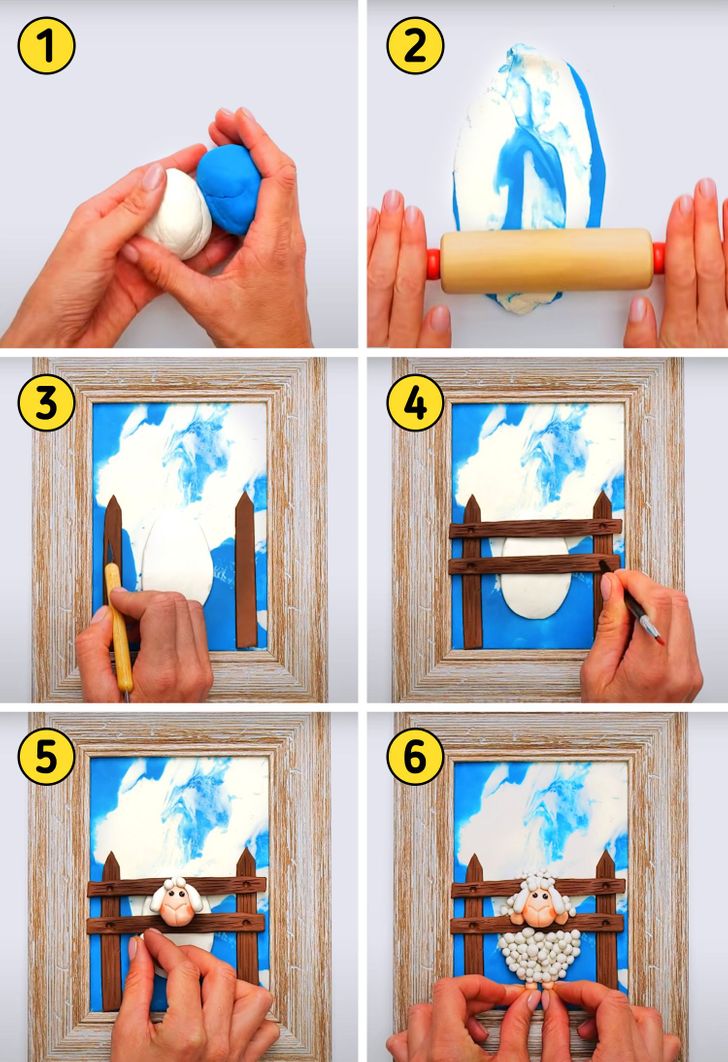
Step 1. Take light modeling clay in blue and white colors, and mix them together.
Step 2. Roll them with a rolling pin to make a flat rectangular sheet with blue and white streaks. This will be the sky that will work as the background for the painting.
Step 3. Put a frame on top. Roll out a ball of white light modeling clay into an oval and attach it to the center of the painting — this will be the body of the future sheep. Roll out brown light modeling clay into a narrow sheet and cut out 2 fence boards from it. Arrange them like in the photo above. Use a sharp object to carve grooves on the planks to imitate the surface of the wood.
Step 4. Add 2 more horizontal boards. Make holes in the boards intersections with a stick with a rounded end.
Step 5. Make the sheep’s head like in the photo above.
Step 6. Roll up a lot of white balls and attach them to the body of the sheep. Add legs.
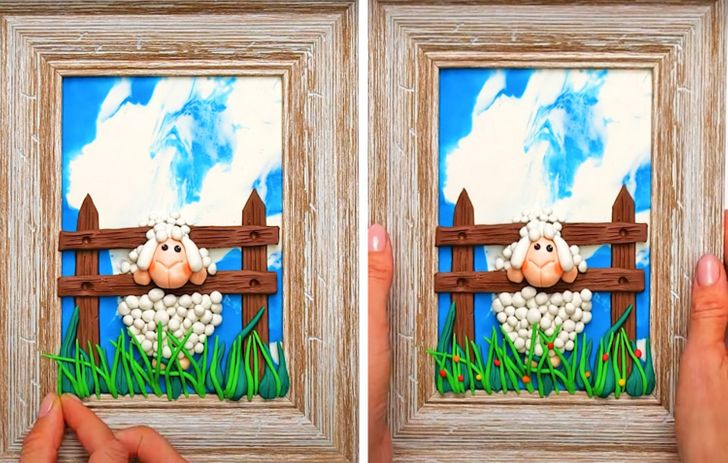
Make grass out of green light modeling clay, and add colorful balls to imitate flowers.
Useful tips for crafting with light modeling clay
- Finished crafts, or their parts, can be additionally secured with PVA glue.
- You can paint dried light modeling clay in different colors.
- You can create almost weightless decorative elements using molds for modeling, and then attach them to any surface with glue. For example, you can decorate the walls of a room this way.
- If light modeling clay has dried up, don’t throw it away. Just moisten it with water or wrap a damp cloth around it and put it in the package for a night to restore its plasticity.
How to create different textures on light modeling clay
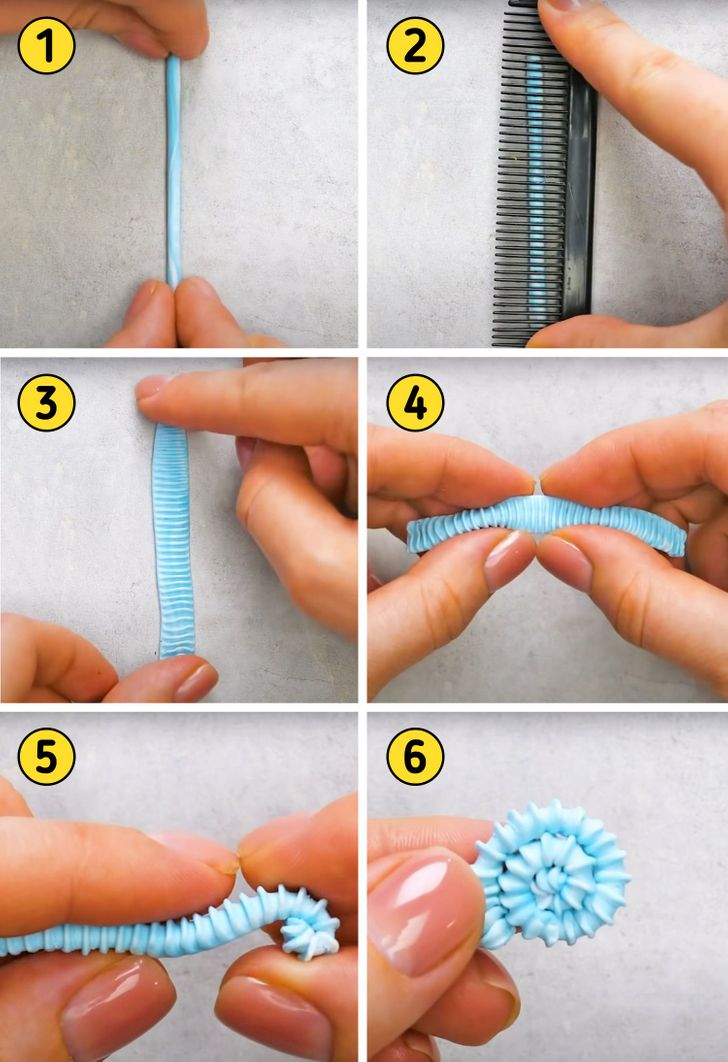
To make a ribbed snail, press down a voluminous strip of light modeling clay with a regular straight comb, and then twist it into a spiral.
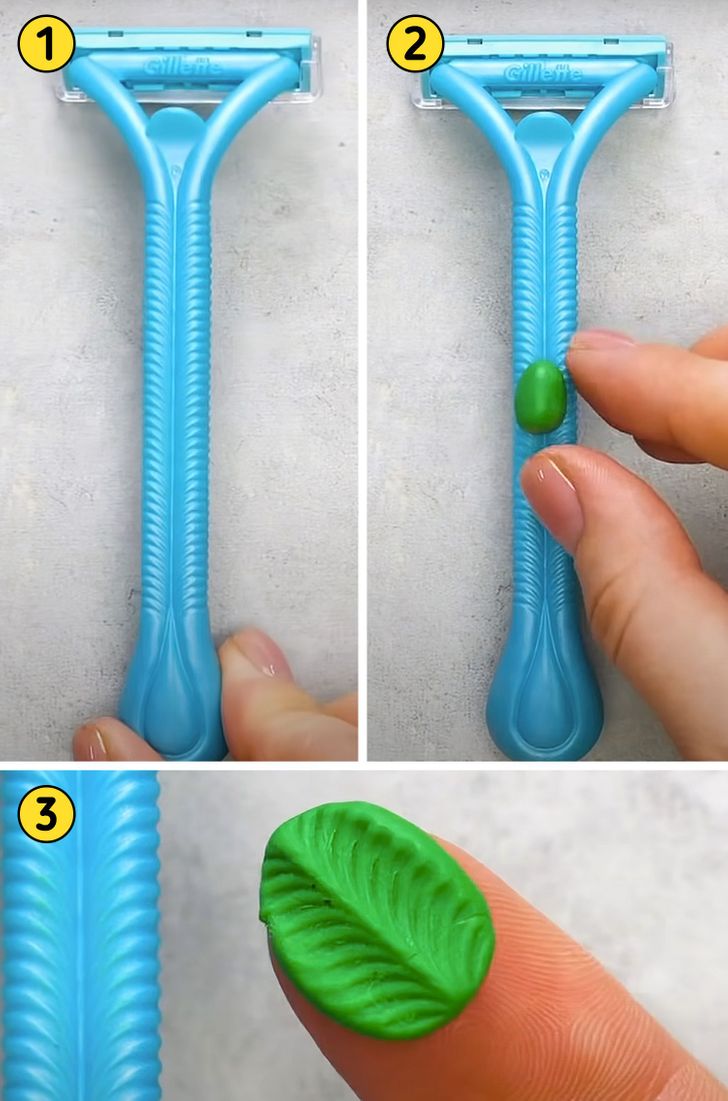
You can give additional texture to your crafts if you use different surfaces. For example, the leaf from the photo above will look more realistic if you use the texture from the handle of a razor. Also try using a food grater, a faceted glass, or a sieve.
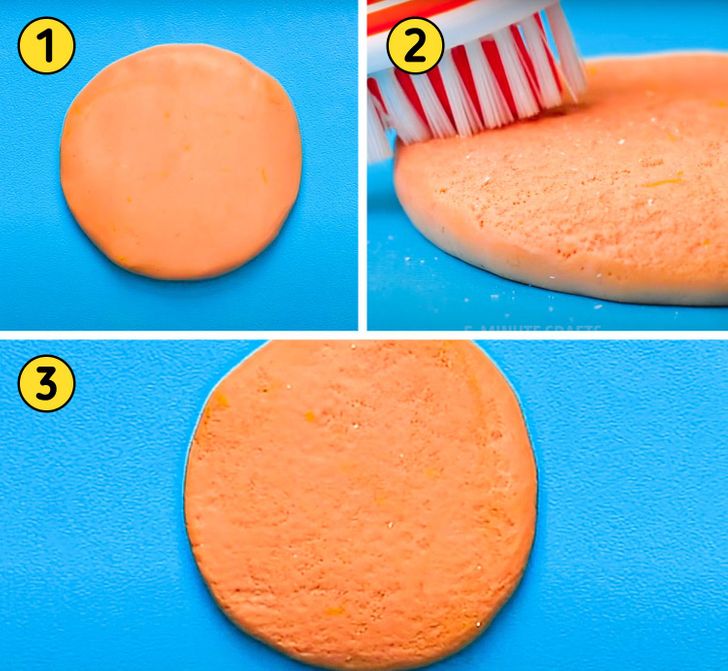
You can create an uneven surface on light modeling clay if you touch it with a toothbrush lightly. This texture will make your cookie or cupcake craft look more realistic.
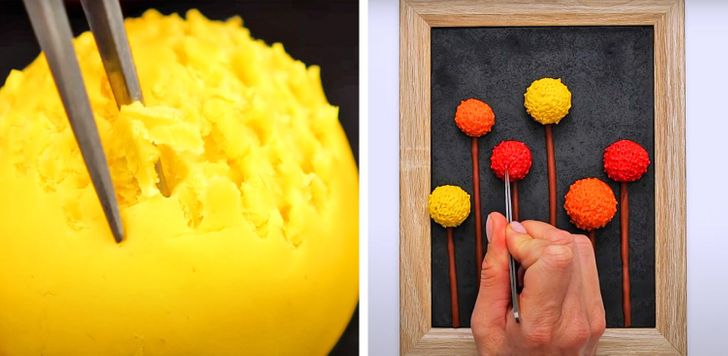
To make your crafts more voluminous or puffy, tweeze them with tweezers.
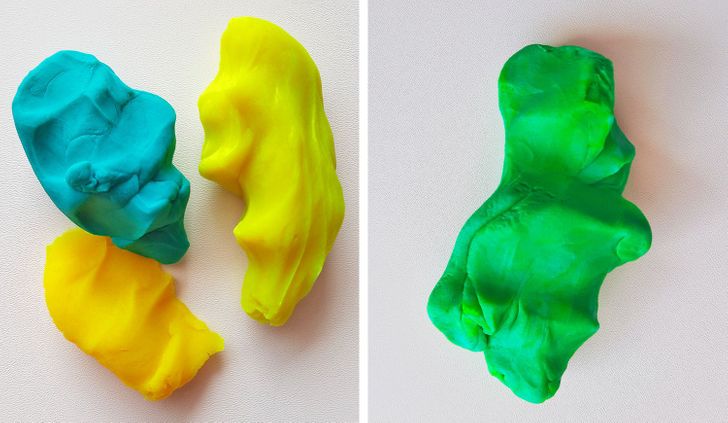
If you don’t have the right shade of light modeling clay at hand, try to mix pieces of different colors. So, you can get a purple color by mixing blue and red, and the mix of yellow and blue will turn into green.
