How to Decorate Your Home for Christmas and New Year’s Eve
The holidays are around the corner and chances are you’re going to want to adorn your home with pretty decorations. There are endless options when making your home look festive and going DIY is one of them. It helps in saving lots of money and making these decorations is fun too. So, 5-Minute Crafts gathered some adorable and easy DIY decoration ideas to enhance the holiday spirit of your home in no time!
1. The Christmas bauble wreath
Things you’ll need:
- A cloth hanger
- A wire cutter
- Christmas baubles
Steps:
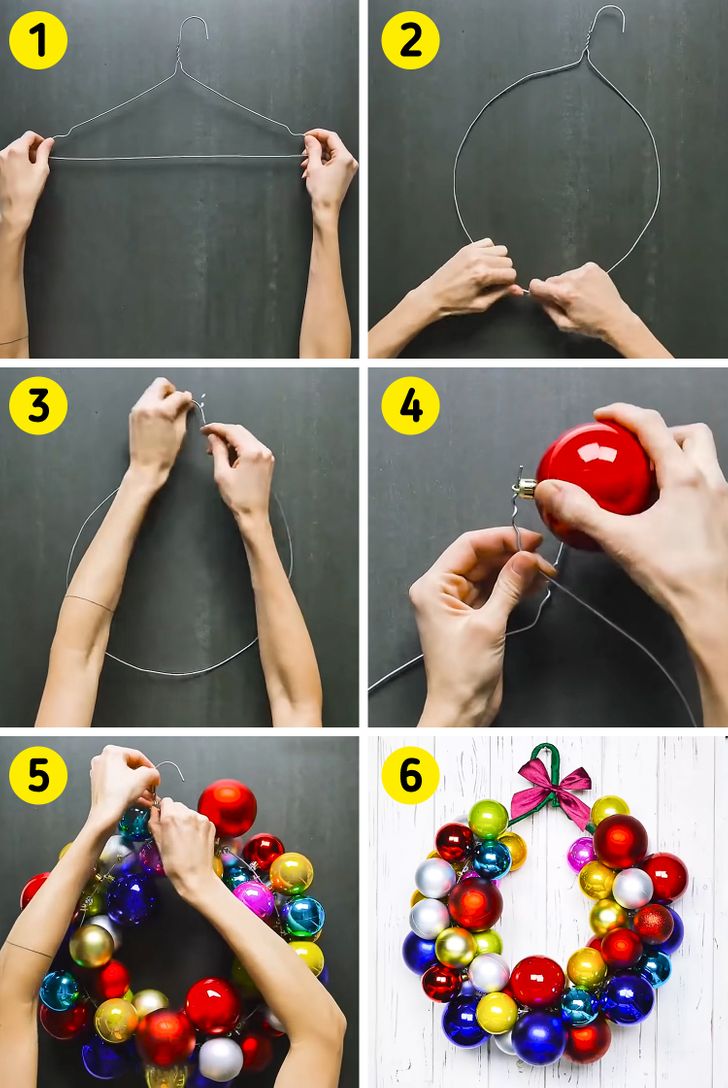
- Take a cloth hanger. Make sure to pick the one that is easily bendable.
- Bend the wire of the hanger in such a way it becomes a circle.
- Unhook the hanger from the top as shown.
- Insert the baubles inside the wire of the hanger.
- Hook the hanger from the top to lock the baubles in place.
- Your Christmas bauble wreath is ready.
2. The Santa wreath
Things you’ll need:
- A pool noodle
- A Santa hat
- Netted fabric
- Glue
- A sewing kit
- A red pom-pom ball
Steps:
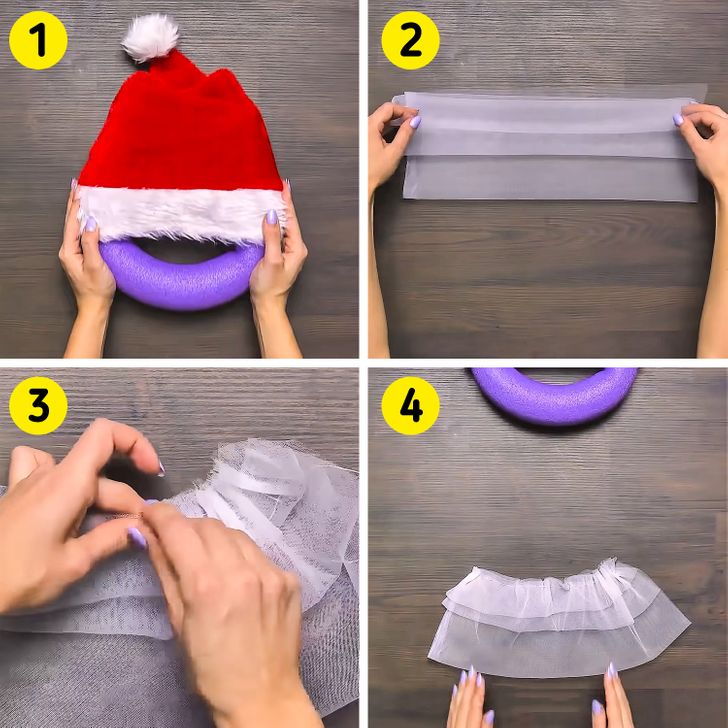
- Insert a pool noodle in a Santa hat in a way that the curved part is visible.
- Take some netted fabric and make creases on it in layers as shown.
- Stitch it along the top part so that it becomes frilled.
- The frilled fabric may look something like this. Repeat steps 1-3 to make more frilled fabric.
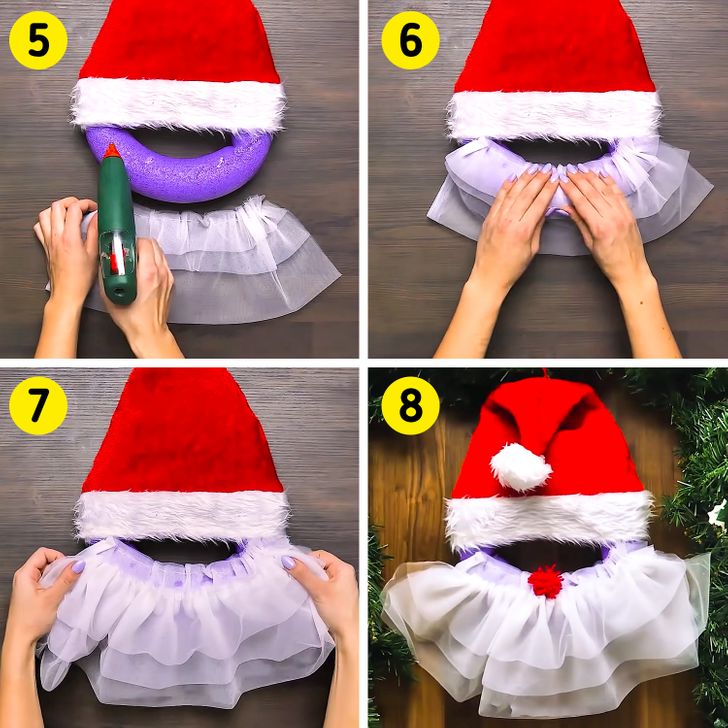
5. Apply glue to the visible part of the pool noodle.
6. Paste one frilled piece of fabric onto a slightly lower part of the pool noodle to make space for the other piece of frilled fabric we made in step 4.
7. Paste another frilled fabric on the leftover space on the pool noodle. Stick one red pom-pom ball in the middle.
8. Your Santa wreath is ready.
3. A hidden Santa in a tree
Things you’ll need:
- A cloth hanger
- A wire cutter
- Toddler-sized red pajama pants
- Cotton
- Toddler-sized black socks
- A decorated Christmas tree
Steps:
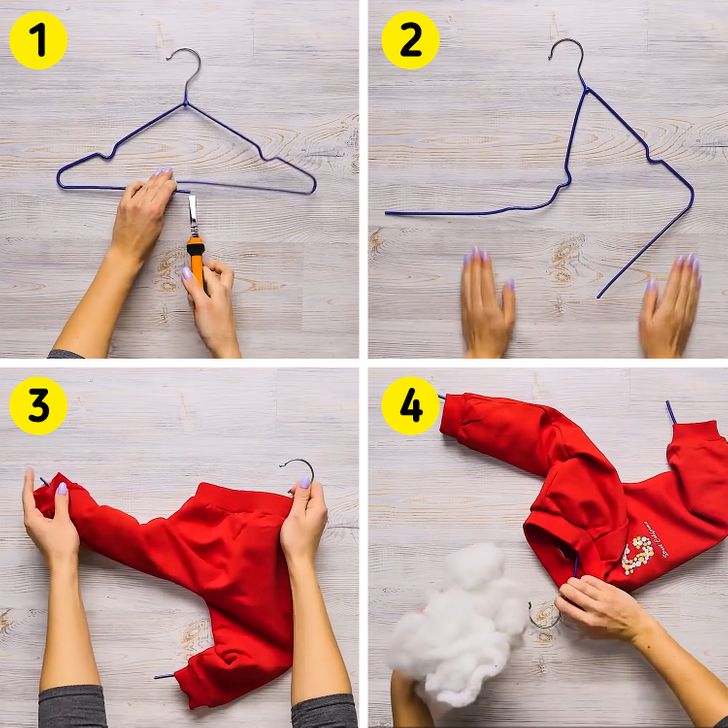
- Cut the lower part of the hanger in half.
- Bend it as shown in the image above.
- Insert the red pajama pants in the hanger.
- Stuff the pajama pants with cotton.
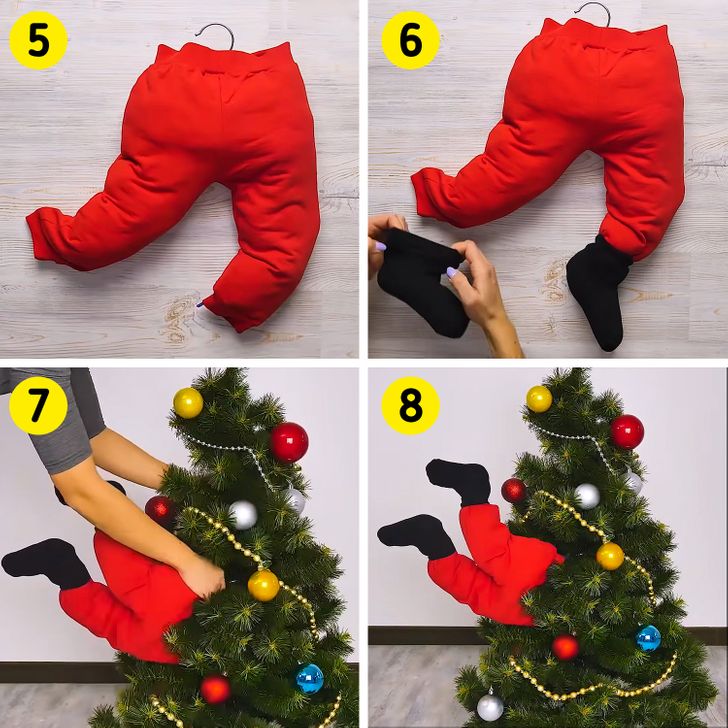
5. The Santa’s legs may look something like this.
6. Now stuff black socks with cotton and fit them at the end of the pajamas, as shown.
7. Hook the hanger inside the tree.
8. Your hiding Santa is ready.
4. The spooning Christmas tree
Things you’ll need:
- Green craft paper
- Glue
- Disposable spoons
- A pair of scissors
- Green spray paint
- Tiny Christmas decorations like little baubles, pearl strands, etc.
Steps:
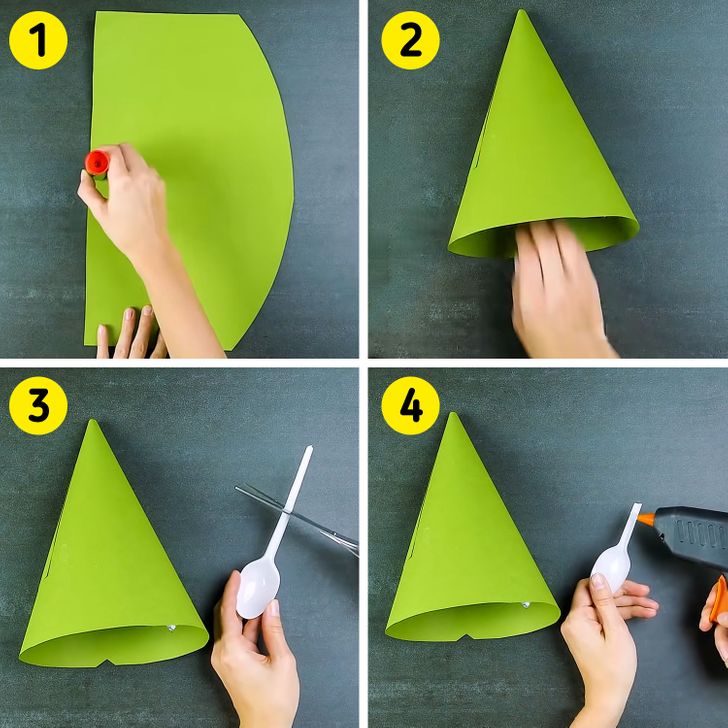
- Cut craft paper as shown above. Apply some glue to one side (vertically).
- Roll it into a cone. Secure its end where the glue is applied.
- Cut a disposable spoon in half.
- Apply glue to the end of its backside where the cut was made.
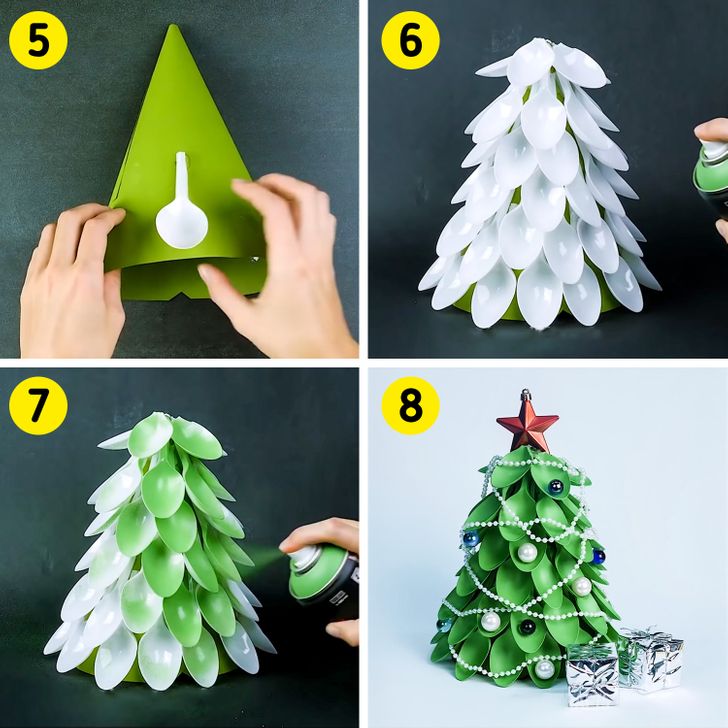
5. Stick the glued end of the spoon on the paper cone.
6. Keep sticking the cut spoons on the cone until it takes the shape of a Christmas tree.
7. Spray paint it green.
8. Add the necessary decorations.
5. The X-Mas lollipop decor
Things you’ll need:
- Disposable plates
- Painting colors
- Glue
- A wooden stick
- Plastic bag
- Red ribbons
Steps:
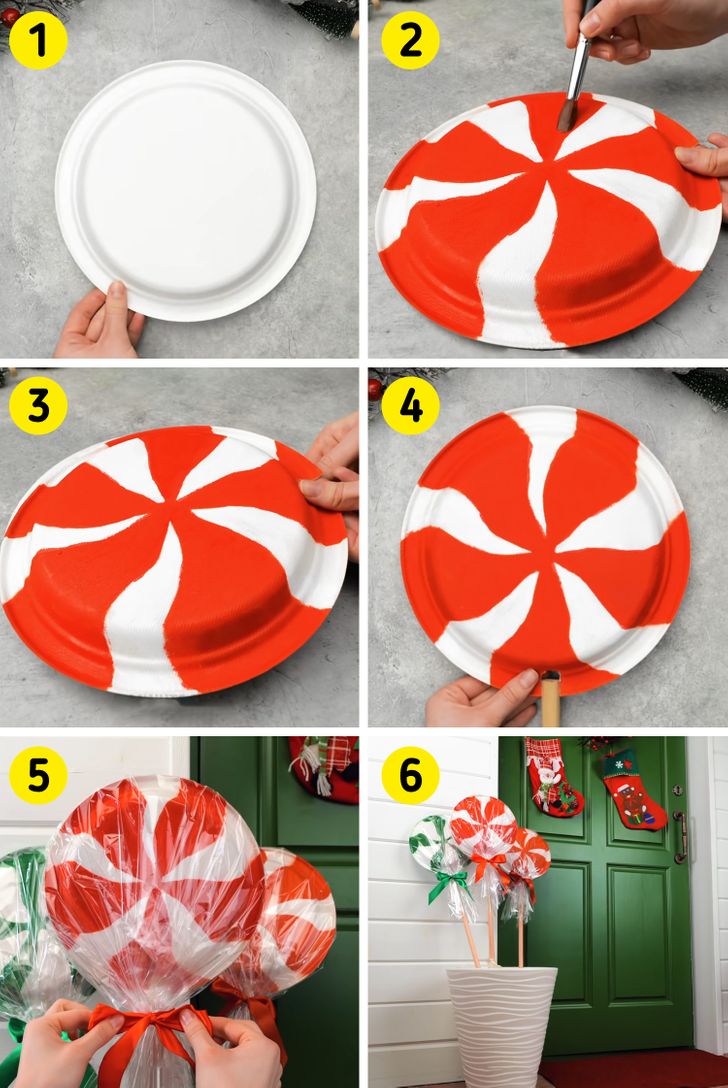
- Take one disposable plate and turn it over.
- Paint it in the pattern of a lollipop. Repeat this step with 2 more disposable plates.
- Stick them together in such a way that their painted sides are visible.
- Now make a hole on one side between the plates and insert a wooden stick.
- Put a plastic bag on top of the plate and secure the bag with a red ribbon.
- Place it in a pot on your porch. Your Xmas lollipop decor is ready.
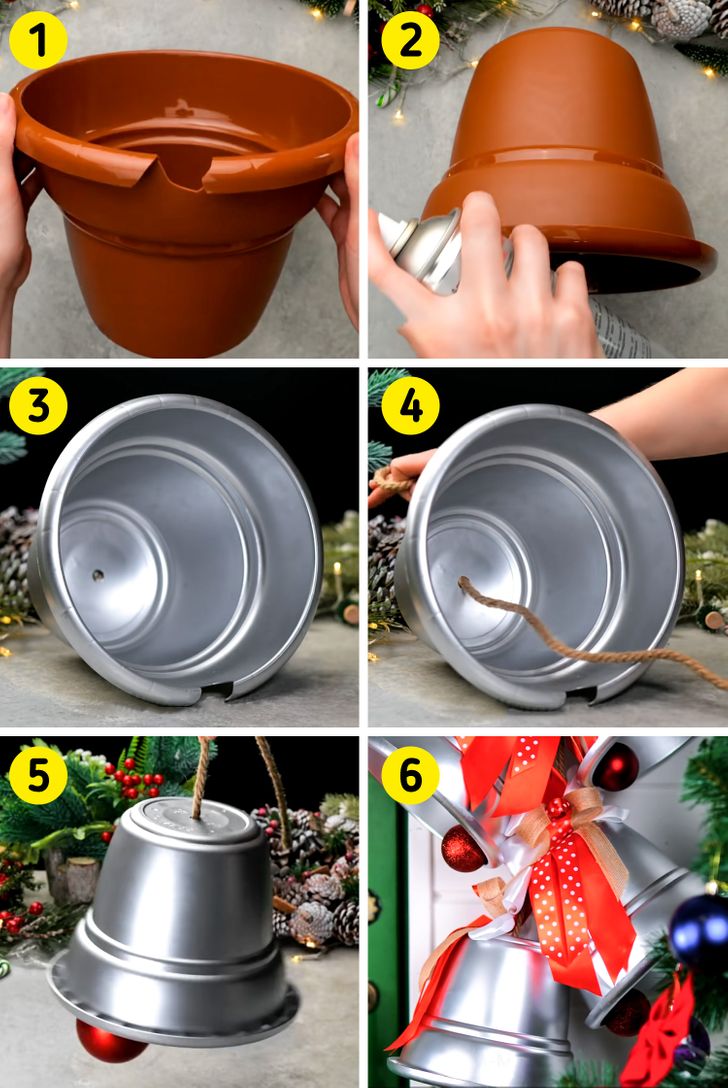
6. A bell pot
Things you’ll need:
- A plastic flower pot, a slightly broken pot would work too
- Spray paint
- Rope
- A Christmas bauble
Steps:
- Take a plastic flower pot. If there is no hole in the center of the base, make one.
- Color the pot with metallic spray paint.
- This is how the pot will look.
- Now insert a rope through the hole but from the inside. The rope must have a knot in the middle and a bauble at its other end. The knot must be made so that once you pull the rope out from the pot, the knot stops the rope from going out, and makes the bauble looks like a bell’s clapper.
- Then pull the rope up in a way that the pot also takes a shape of a bell.
- You can hang this with your other Christmas decorations too.
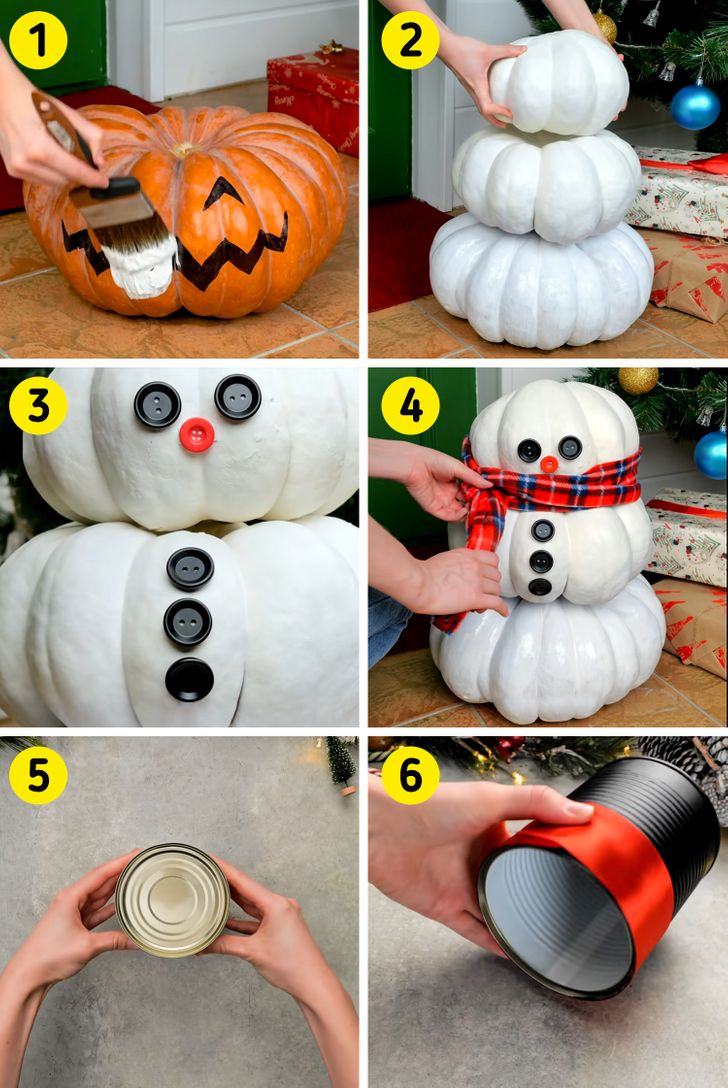
7. Jack-O-Lantern to a snowman figure
Things you’ll need:
- Halloween pumpkins or old Jack-o-lanterns without holes
- White paint
- Black paint
- Black and red buttons
- A woolen muffler
- Glue
- A black plate
- A tin can
- Christmas decor for a hat
- A red satin ribbon
Steps:
- Paint an old Halloween pumpkin white.
- Paint 2 more pumpkins of descending sizes in the same color and place them on top of each other.
- Glue on some buttons to portray the eyes, nose, and buttons of the snowman.
- Tie a muffler lightly below the first pumpkin.
- Now take a tin can and color it black.
- Tie a red satin ribbon near its base, like shown in the image.
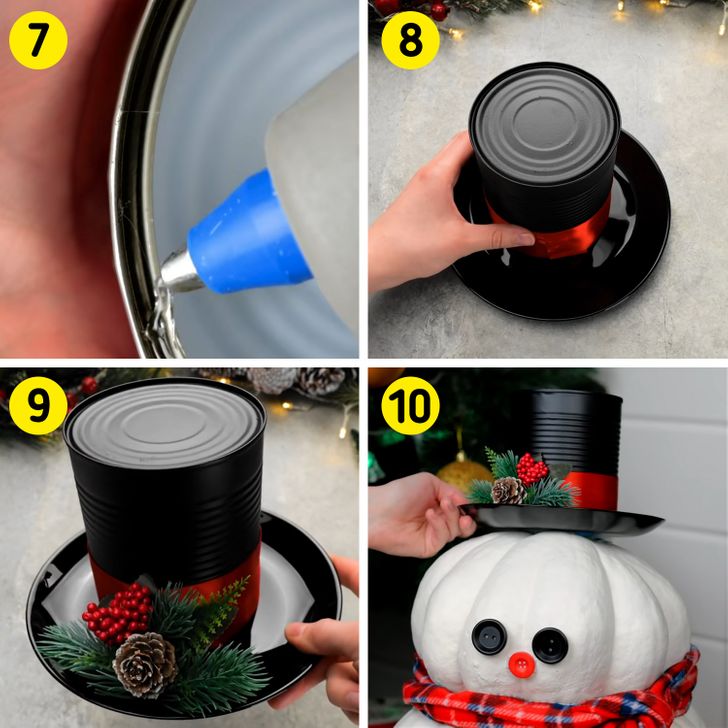
7. Apply some glue to the outer edges of the can near its base.
8. Place the can in the center of a black plate. It will look like a hat.
9. Add some decoration to the hat.
10. Place it on the snowman’s head.
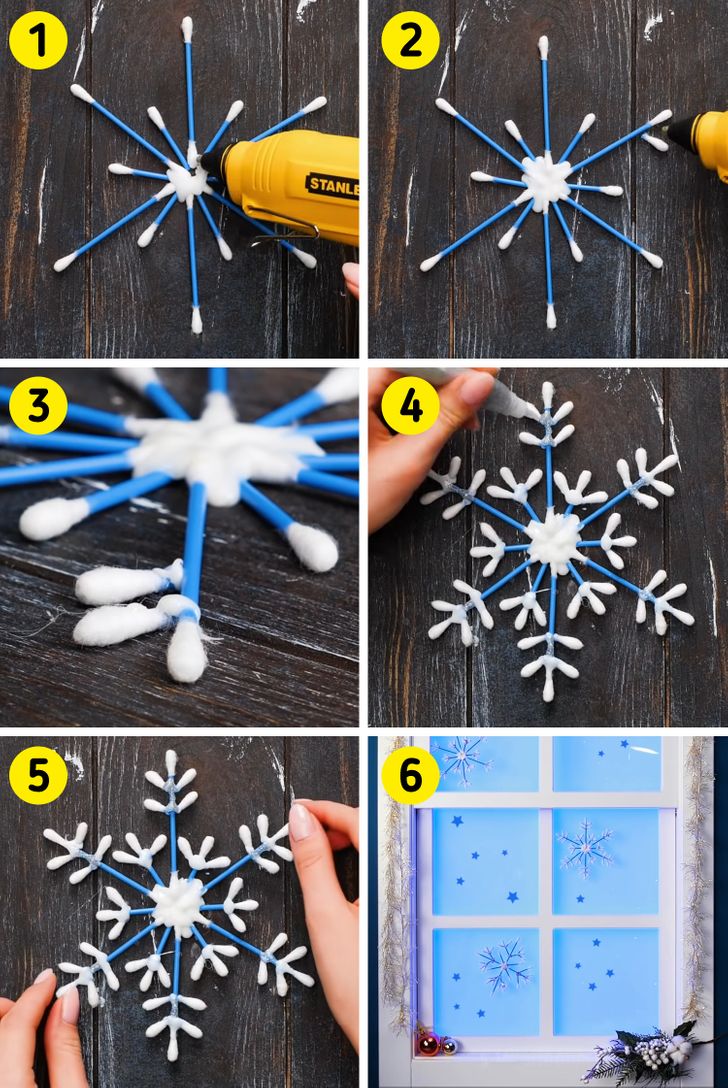
8. Q-tip snowflakes
Things you’ll need:
- Q-tips
- Glue
- 3d glitter highlighter
- A pair of scissors
Steps:
- Arrange 6 full-sized Q-tips as the main part of the snowflakes, cut 3 snowflakes into halves, and place them between 2 Q-tips, as shown. Add some glue in between the snowflake figure to secure the Q-tips in place.
- Now cut the Q-tip in a way that it separates the cotton swab from the stick. Place it near a larger Q-tip as shown in the image. Cut multiple Q-tips in the same way.
- Put some glue on the swab part of the stick. You can see a closer view of how to place them in the image above.
- Decorate the snowflake with glitter.
- Your snowflake may look like this.
- You can decorate your windows with these snowflakes.
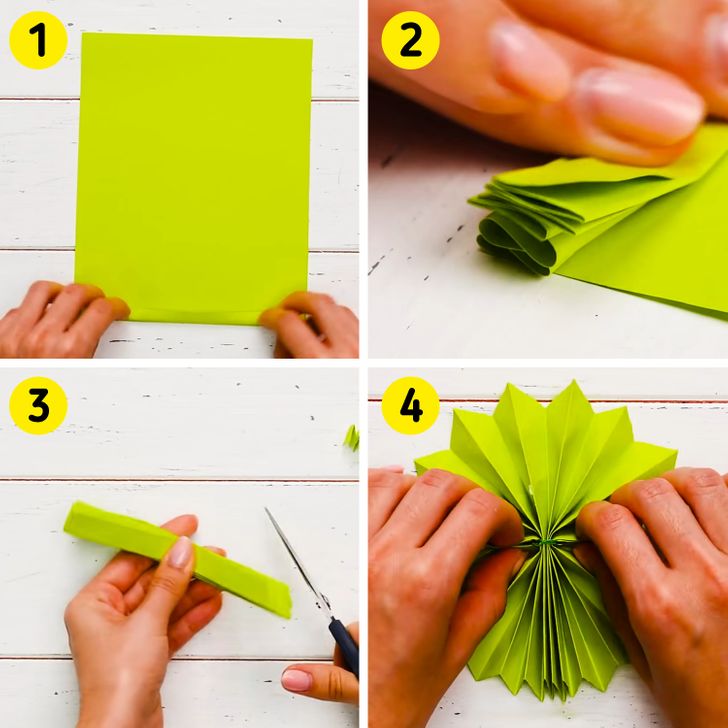
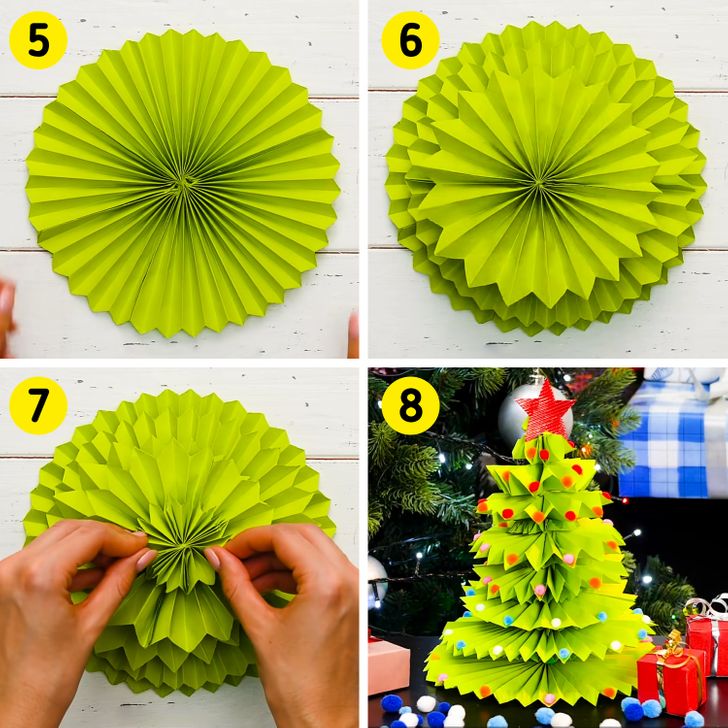
9. A fan-folded Christmas tree
Things you’ll need:
- Green craft paper
- Green thread
- Glue
- A pair of scissors
- Tiny Christmas decorations
Steps:
- Take a green craft paper.
- Begin fan-folding it.
- Wrap a thread around the center of the paper. Cut the edges of the paper diagonally as shown in the image.
- Open the edges of the fan-folded paper in a way that it meets its other end as shown.
5. It may look something like this.
6. Make more fan-folded paper cutouts like this but progressively smaller than their previous sizes and keep placing them on top of one another.
7. Add the smallest fan-folded paper cutout on top.
8. Finish the look by adding the Christmas decorations on and around the tree.
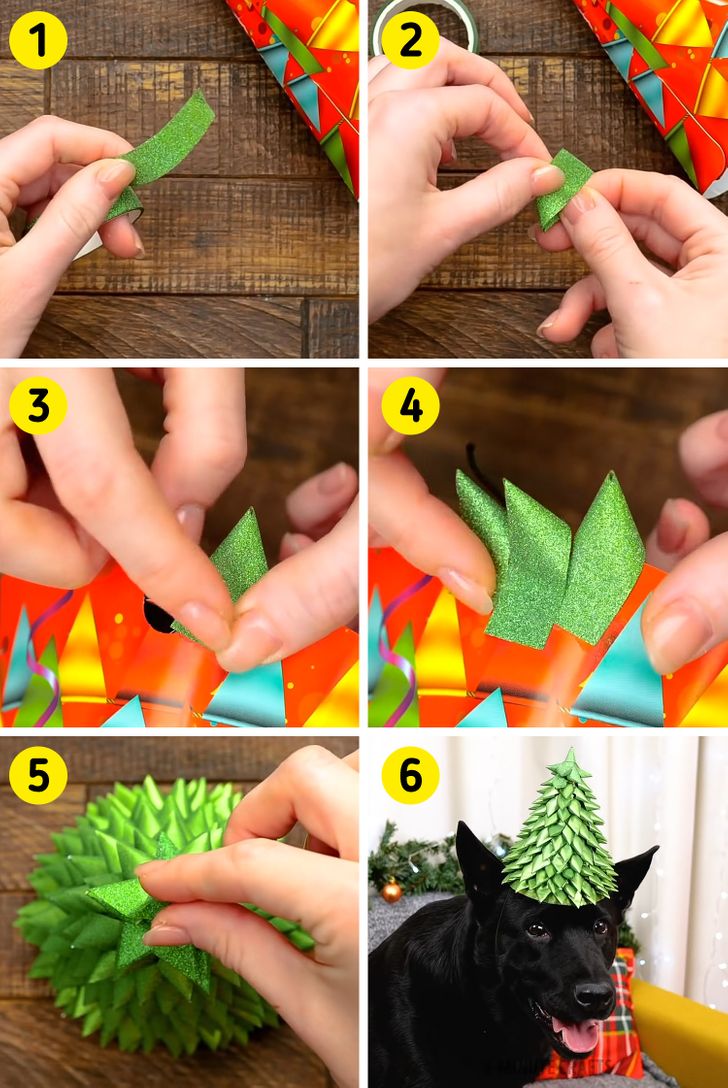
Bonus: The pupper Christmas hat
Things you’ll need:
- Green glitter tape
- A birthday hat
- A pair of scissors
Steps:
- Take a birthday hat and green glitter tape.
- Cut a part of the tape and rotate it in such a way that one part becomes conical and another has a piece of a tape coming out from it.
- Paste the latter part onto the edge of the birthday hat.
- Keep repeating steps 2 and 3 until you cover the entire hat with conical tape.
- The hat may look something like this.
- You can put it on your dog’s head to make him look festive.
