How to Make a Valentine’s Day Card
Valentine’s Day is coming soon, but you still have enough time to prepare for this romantic holiday.
5-Minute Crafts prepared a few original ideas for DIY Valentine’s Day cards for you that will bring your loved one joy. At the end of the article, you’ll see a bonus and you’ll find out how to make an edible Valentine’s Day gift quickly and easily.
Idea 1
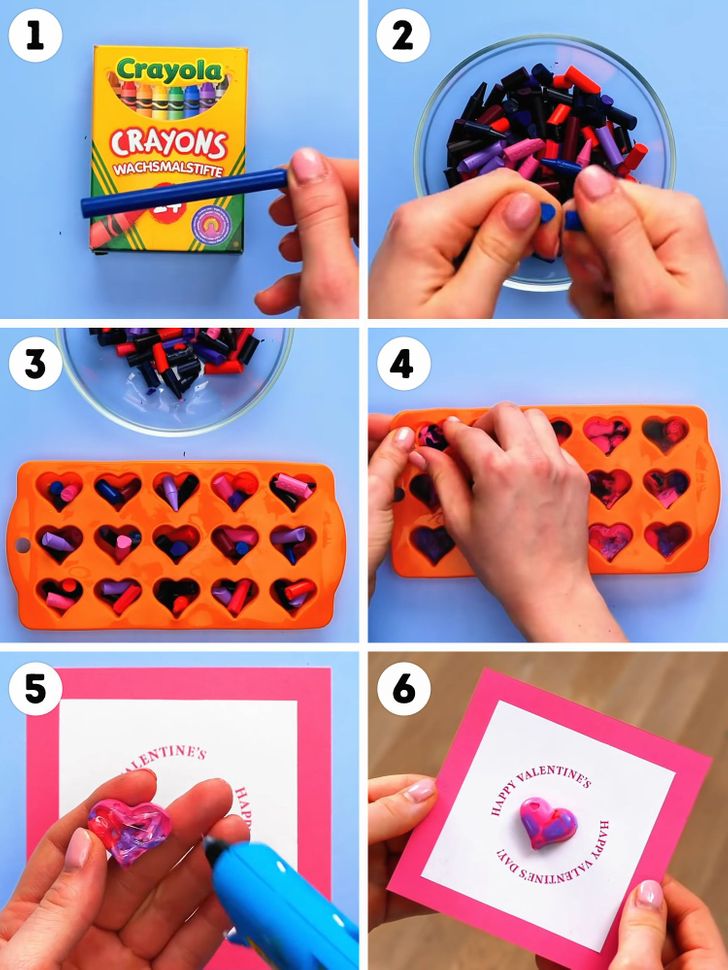
1. Take wax crayons and remove their paper wrapping.
2. Break the crayons into small pieces.
3. Fill a silicone baking mold with broken crayons.
4. Bake the crayons in the oven at 230°F for 15 minutes. Then let them cool and remove the hearts from the mold.
5. Apply glue to the back of one of the hearts using a hot glue gun.
6. Glue the heart to the prepared cardstock postcard.
Idea 2
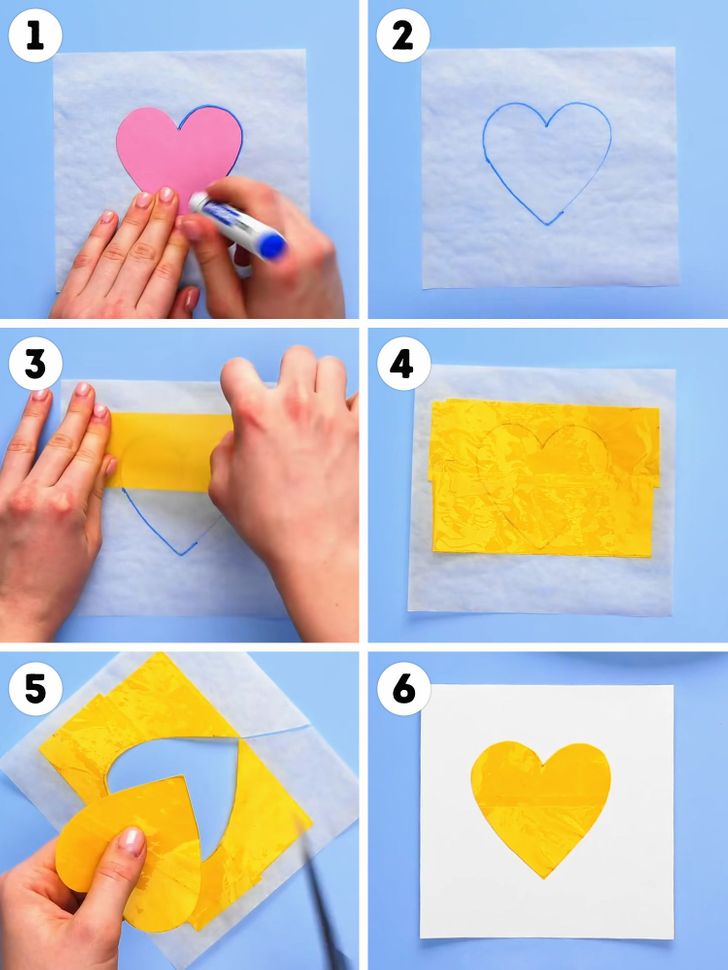
1 and 2. Put a heart on tracing paper and outline it with a pen.
3 and 4. Attach 2 layers of translucent tape to the drawn heart.
5. Cut the heart out.
6. Remove the heart’s tracing paper base and glue the heart made of the tape onto a carboard square.
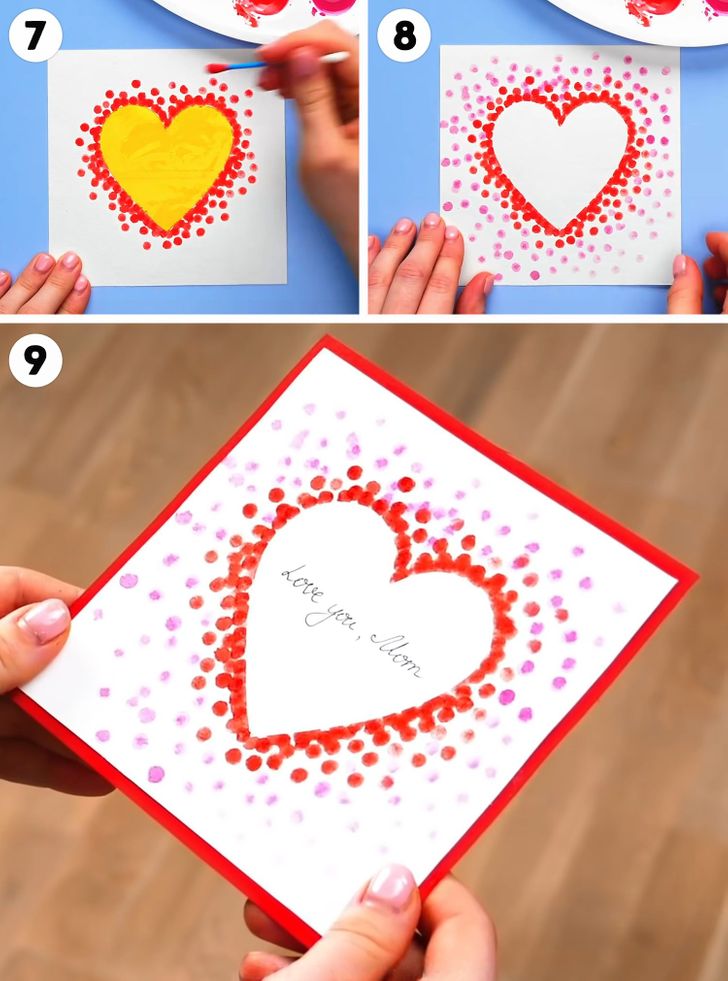
7. Take cotton swabs and paints of different shades of red and pink. Dip a cotton swab in the paint and paint bright dots around the heart.
8. Let the paint dry and carefully remove the heart made of tape from the cardstock.
9. Glue the white cardstock square with the heart onto a slightly bigger, red piece of cardstock. Sign your card.
Idea 3
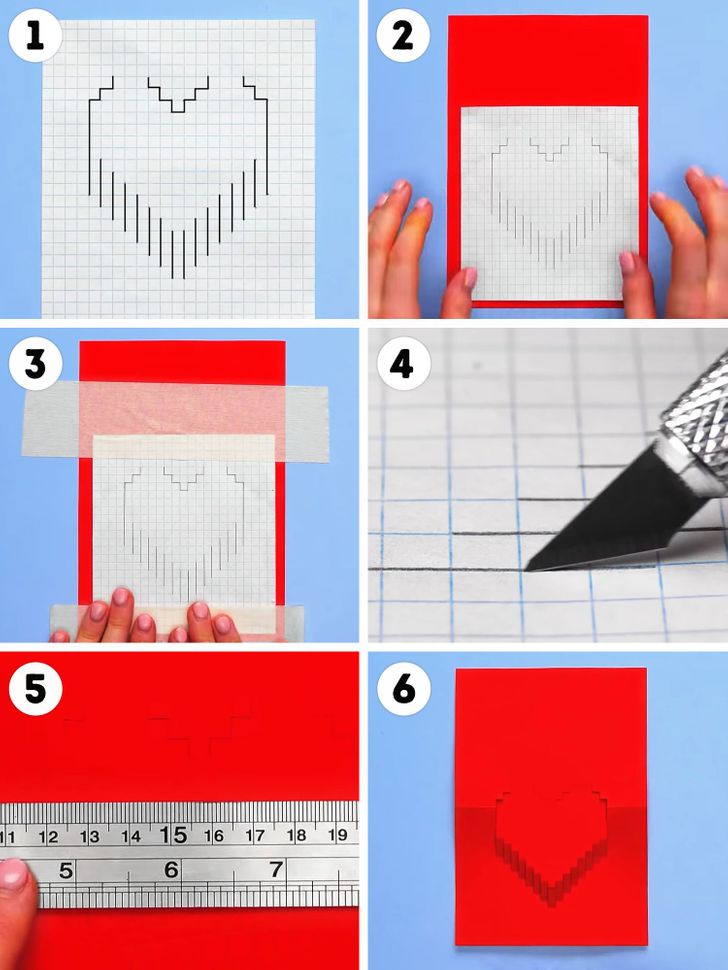
1. Take a piece of graph paper and draw a schematic heart on it just like shown in the photo above.
2 and 3. Put this piece of paper on red paper and attach it with masking tape.
4. With a cutter, make cuts in the paper along the lines you have drawn. Then remove the piece of graph paper.
5. Follow the horizontal lines with the non-working side of the cutter to help the card fold in these places.
6. You will get a 3D heart like in the photo.
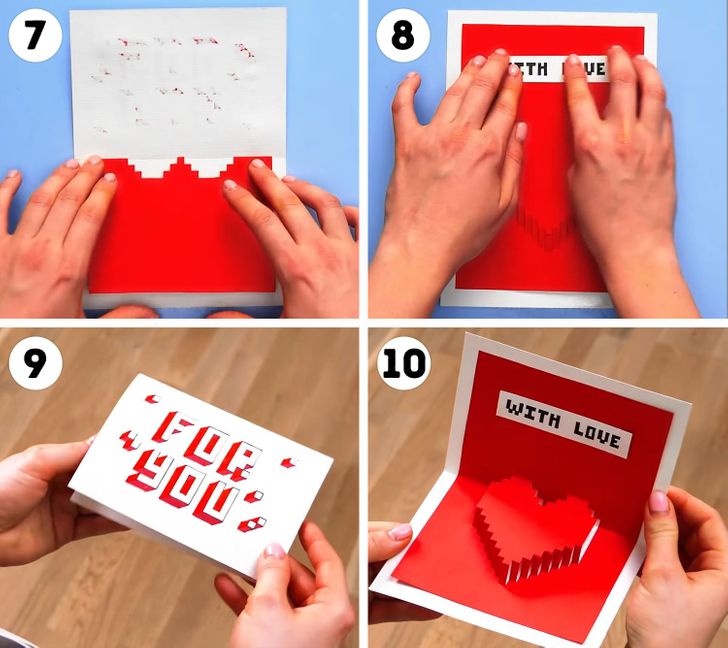
7. Fold the piece of red paper in half and glue it to the white cardstock base (don’t cover the 3D heart with glue — it should be able to move freely).
8. Glue the inscription “For you” on the card, or any other inscription of your choice.
9. Decorate the top of the postcard to your taste.
10. Your Valentine’s Day card is ready!
Idea 4
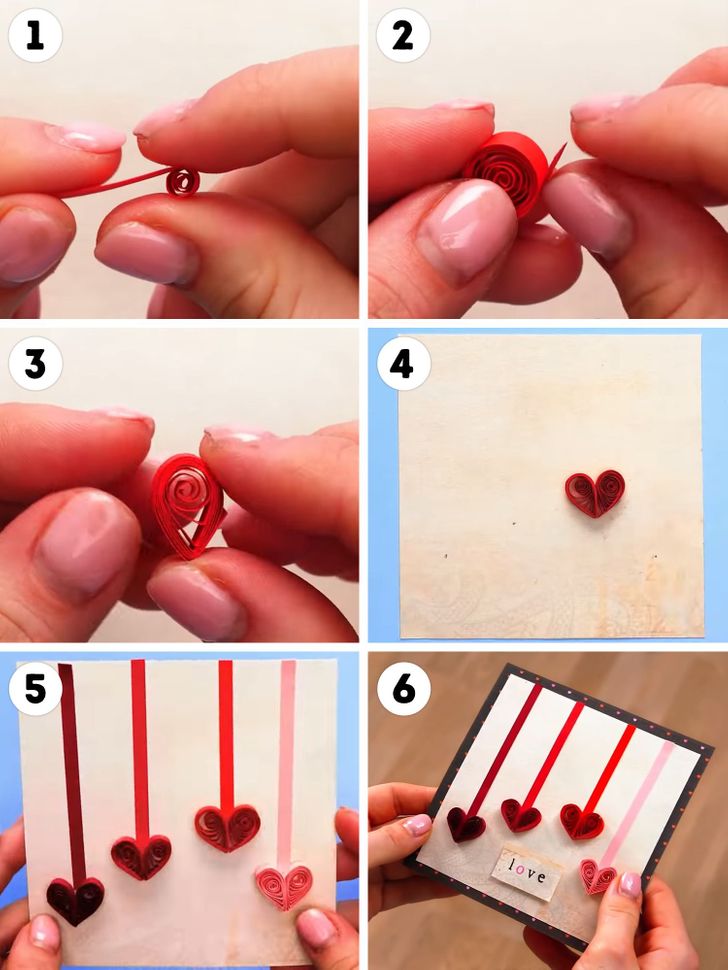
1. Roll up a thin strip of colored paper.
2. Glue the tip of the paper to the roll you’ve made.
3. Press the roll between your fingers to make it look like a petal.
4. Glue 2 of these petals together to form a heart, and glue it to a cardstock square.
5. Make 4 similar hearts in different shades of red and pink. Glue them to your future postcard. Then glue narrow ribbons in red and pink. One end of the ribbon should touch the heart, and the other one should touch the upper edge of the card.
6. Glue the decorated square onto a cardstock square in a contrasting color and that is slightly bigger in size. Decorate it and sign the finished postcard.
Idea 5
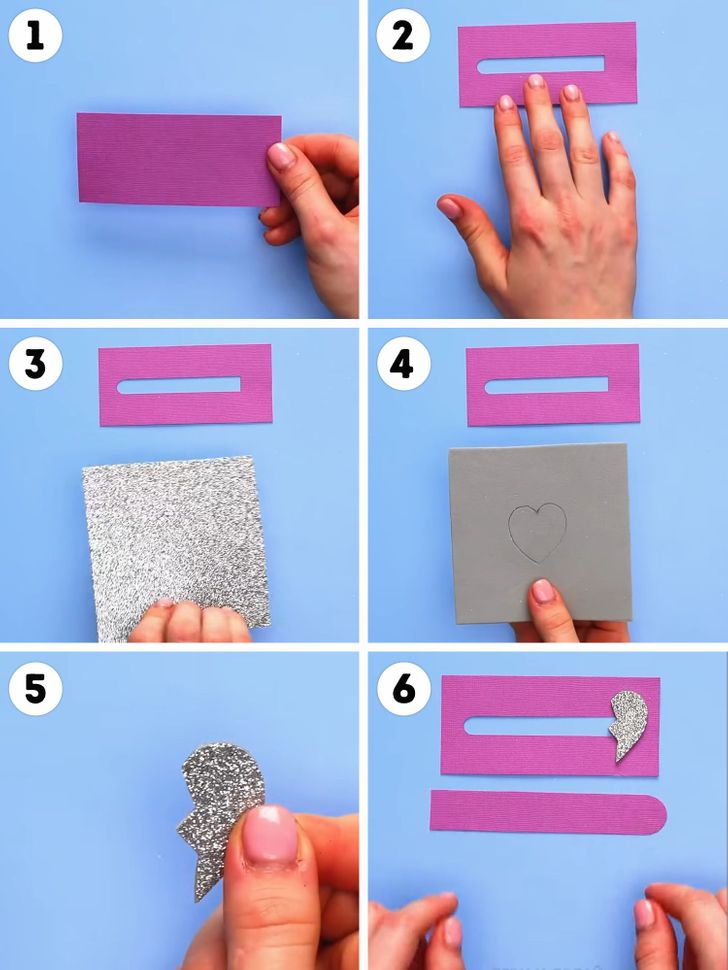
1. Cut a rectangle out of bright (like pink) cardstock.
2. Cut a strip out of the middle of this rectangle. One end of the strip should be straight, the other one should be rounded (see the photo above).
3. Take a piece of sparkly thick cardstock.
4 and 5. Draw a small heart on the sparkly cardstock and cut it out. Then cut it in half along a zigzag line.
6. Glue half of the heart to the pink cardstock rectangle next to the straight cut (see photo above). Cut a strip out of the same pink cardstock. It should be wider than the cut-out area on the rectangle. The length of the strip should be slightly longer than the rectangle. Again one end of the strip should be straight, and the other one should be rounded (see the photo above).
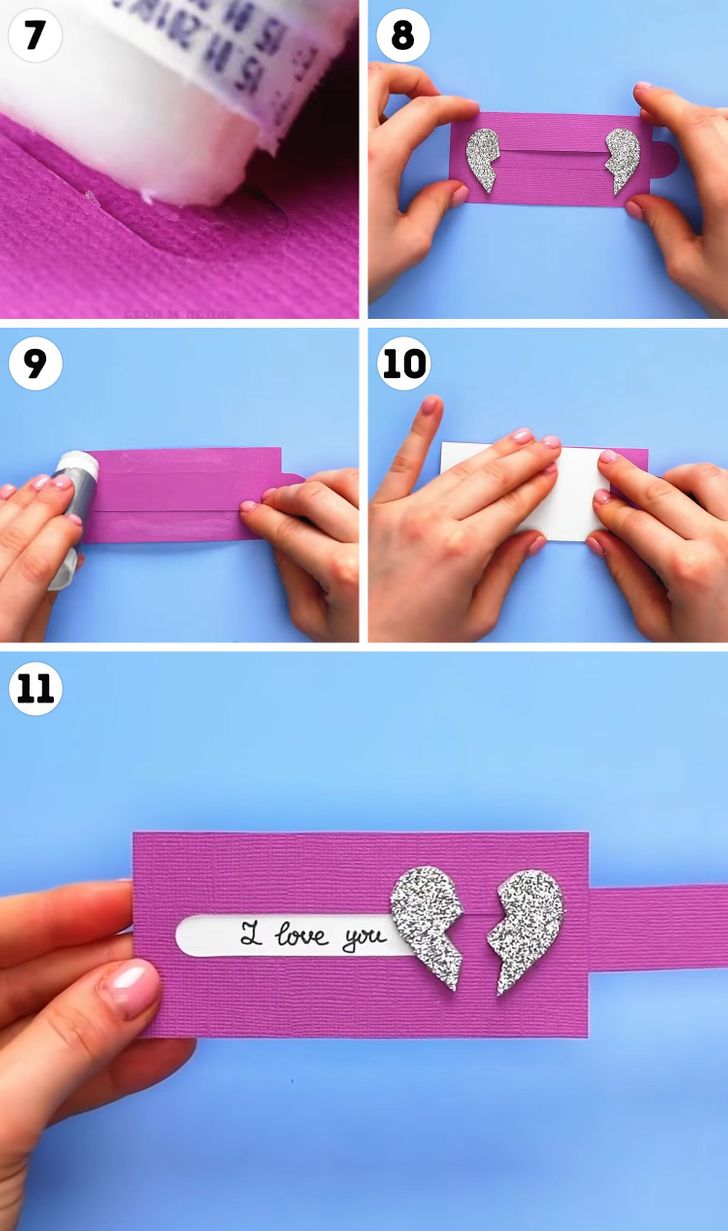
7. Place the bigger strip under the cutout in the rectangle, so that its rounded part is on the same side as the sparkly heart. This rounded part should protrude slightly outside the rectangle. Apply glue to the end of the strip that shows through the cutout.
8. Glue the second piece of the sparkly heart.
9. Turn the future postcard upside-down. Spread glue around the attached strip — it will move, so no glue should get on it.
10. Glue a rectangle of white cardstock on top. Write your love confession on it in advance and make sure that it matches the cutout.
11. Your postcard with a secret message is ready — when you move the strip, the words of love will appear.
Idea 6
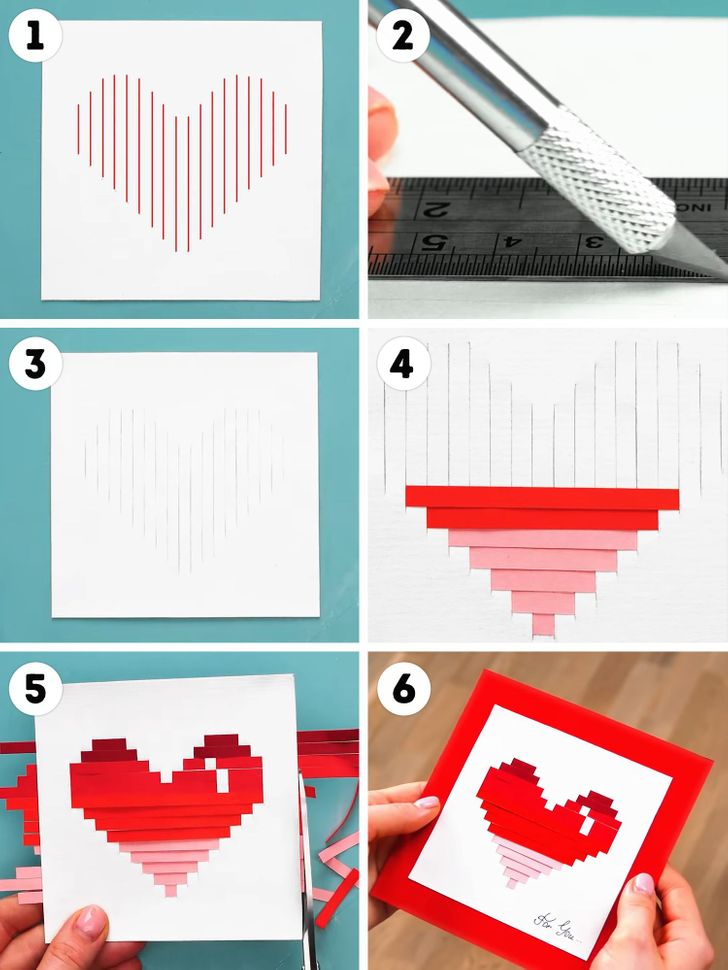
1. Draw a heart made of lines that are at a distance of 5 mm from each other, with a ruler on a cardstock square (see the photo above).
2 and 3. Using a ruler and a cutter, make cuts along the lines you have drawn.
4. Pull red and pink cardstock strips through the slots you’ve made.
5. Cut off the ends of the cardstock strips that stick outside the edges of your future postcard.
6. Glue the square with the heart onto a bigger square of red cardstock. Sign your finished postcard.
Idea 7
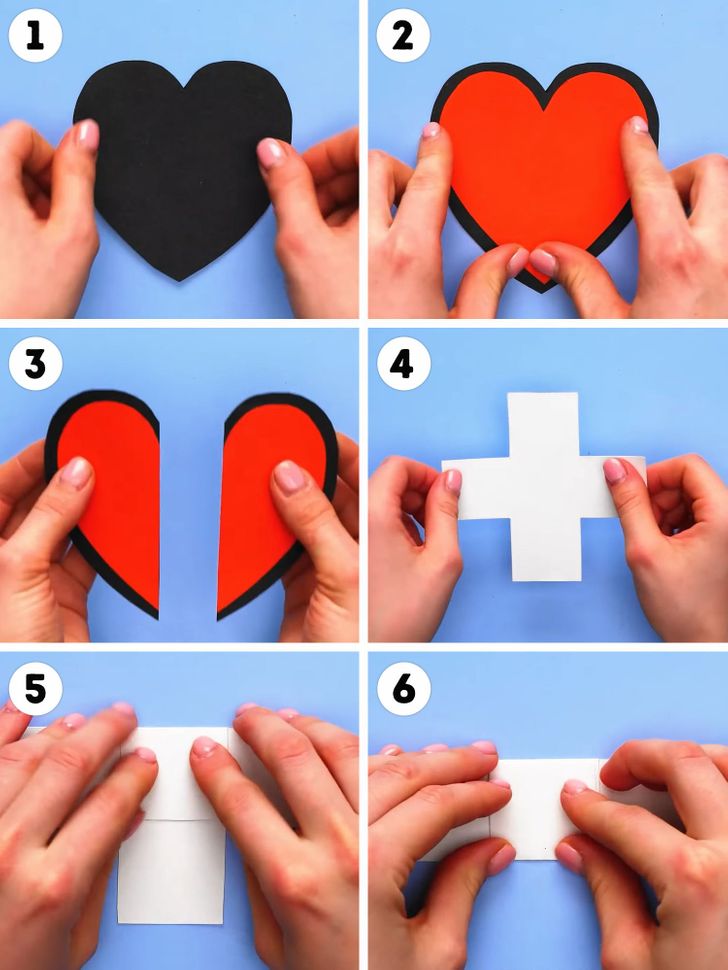
1. Cut a heart out of black cardstock.
2. Cut a slightly smaller heart out of red cardstock. Glue the red heart onto the black one.
3. Cut the cardstock heart you’ve made in half.
4. Cut a cross out of white cardstock.
5. Fold its top part toward the center.
6. Then do the same with its bottom part.
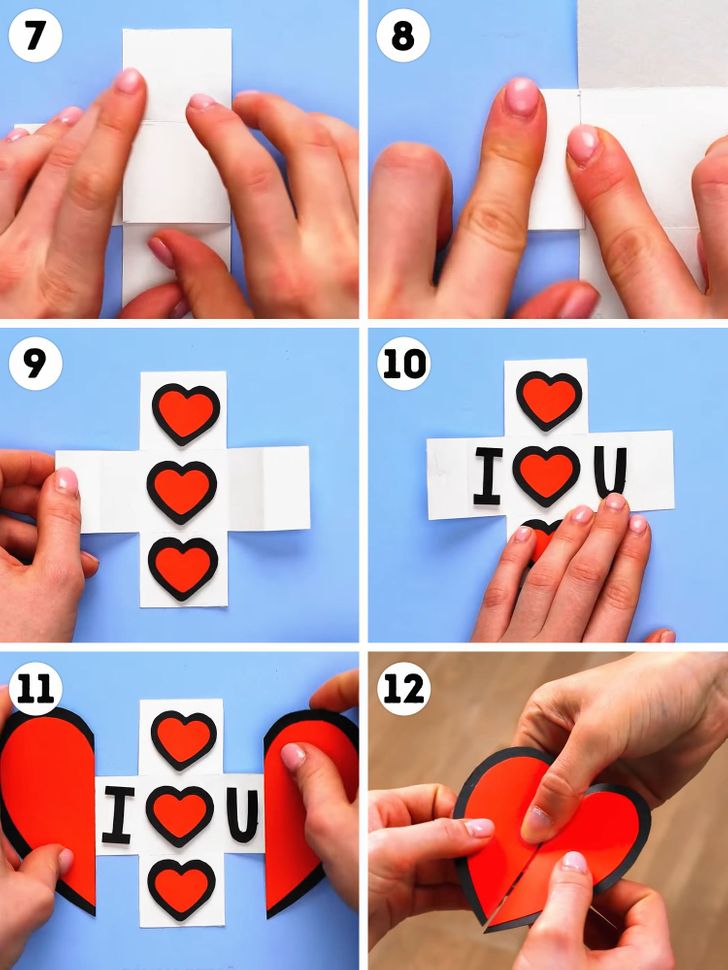
7. Unfold the top and bottom parts of the cardstock cross. Now bend its left and right parts.
8. Then unfold the left and right parts and fold each of them in half.
9. Unfold everything. Glue 3 small hearts made of red and black cardstock onto the vertical part of the cross.
10. Stick the letters I and U to the left and right of the heart, respectively. This way, you’ll get the inscription “I love you.”
11. Glue the halves of the heart prepared at the beginning of your work, to the side parts of the cross.
12. Fold the postcard and give it to your loved one. When your loved one takes your Valentine’s Day card, they will open it and see your love confession.
Idea 8
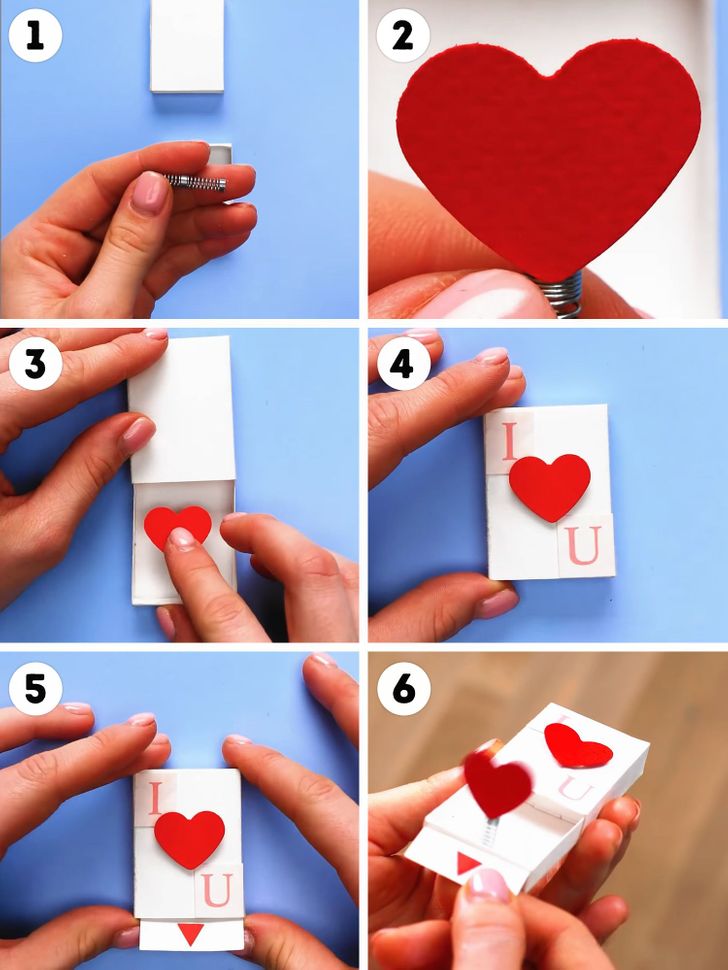
1. Take a matchbox and a spring from an automatic ballpoint pen.
2. Glue a heart made of fabric to the spring with a hot glue gun.
3. Glue the other end of the spring to the bottom of the matchbox.
4. Glue another heart and the printed letters I and U to the matchbox lid.
5. Glue a piece of cardstock with a bright triangle on it to the side part of the box. This tab will make it easier for the recipient to open the box.
6. Your Valentine’s Day card is done!
Idea 9
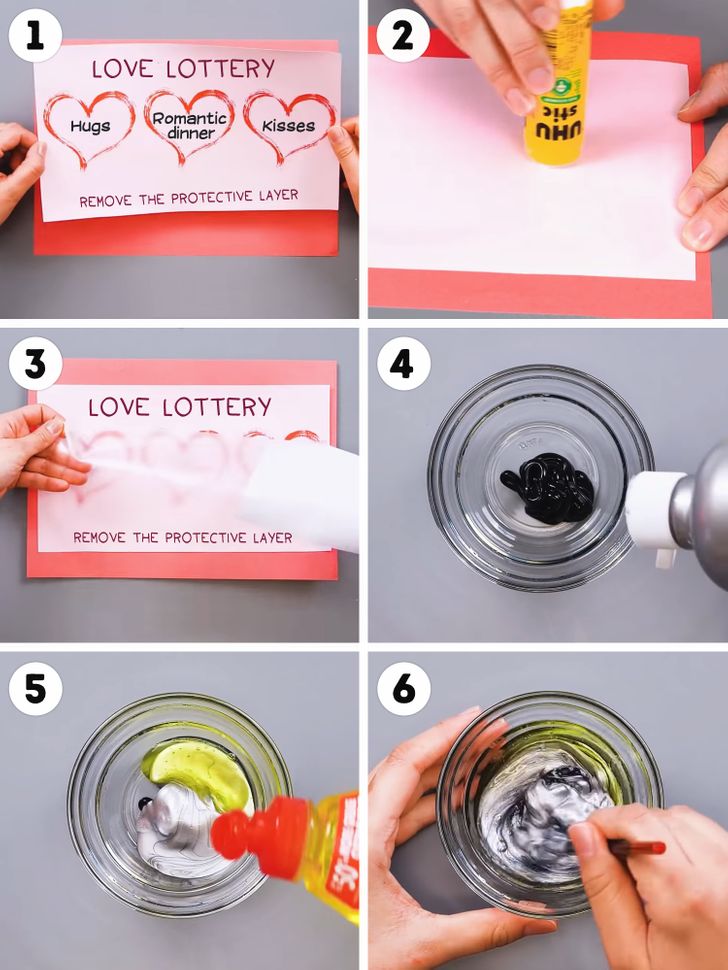
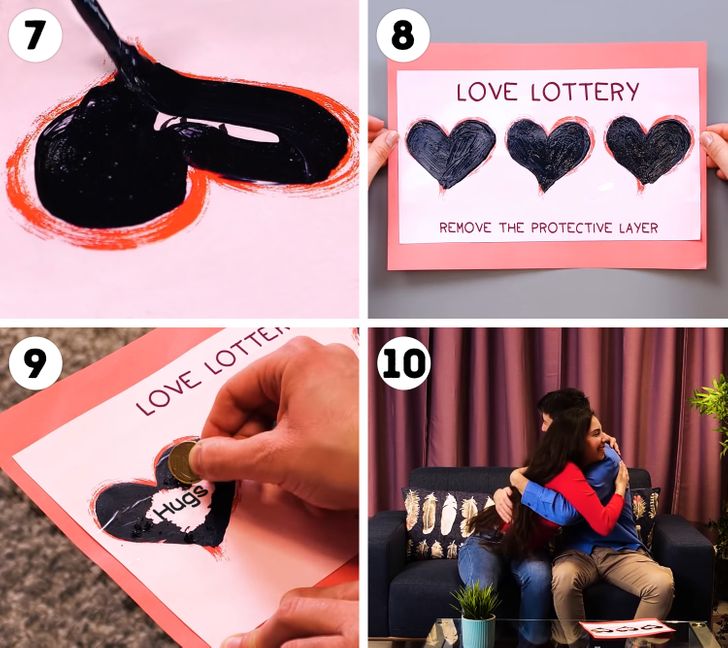
1. Prepare a piece of paper with drawn hearts and inscriptions on it.
2. Apply glue to its backside and then glue it onto a piece of colorful thick cardstock.
3. Place self-adhesive transparent tape on the top.
4 and 5. Squeeze out black and silver acrylic paints and dishwashing liquid at a ratio of 1:1:1, into a bowl.
6. Mix everything thoroughly.
7. Apply the resulting mixture of paint and dishwashing liquid to the hearts.
8, 9, and 10. Let the paint dry well and give this Valentine’s Day card to your loved one.
Idea 10
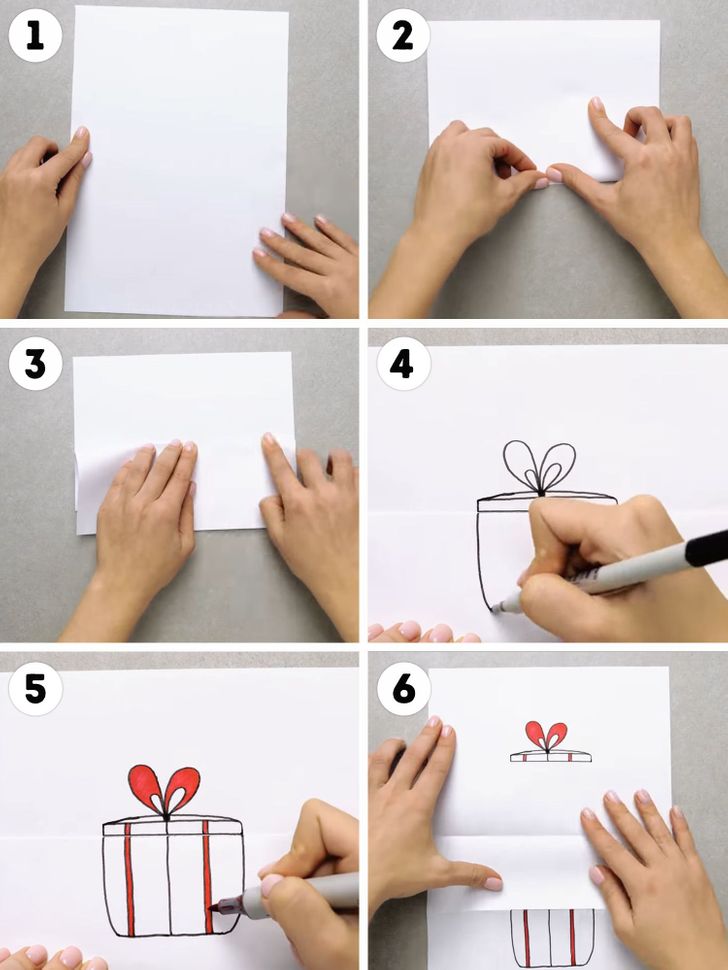
1. Take a sheet of thick white paper.
2. Fold it in half.
3. Then fold the top part of the sheet in half again.
4. Draw a gift box on the folded sheet so that its top is on one side of the sheet and its bottom is on the other.
5. Color the box with a bright marker.
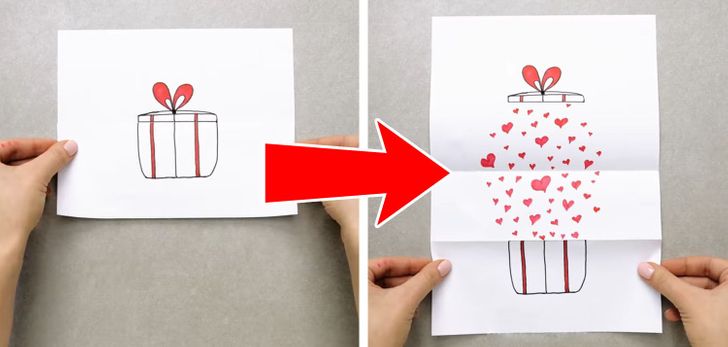
6. Unfold the sheet.
Draw red hearts of different sizes inside the open sheet. Then fold the sheet again and give it to your Valentine.
Have a nice and romantic holiday!
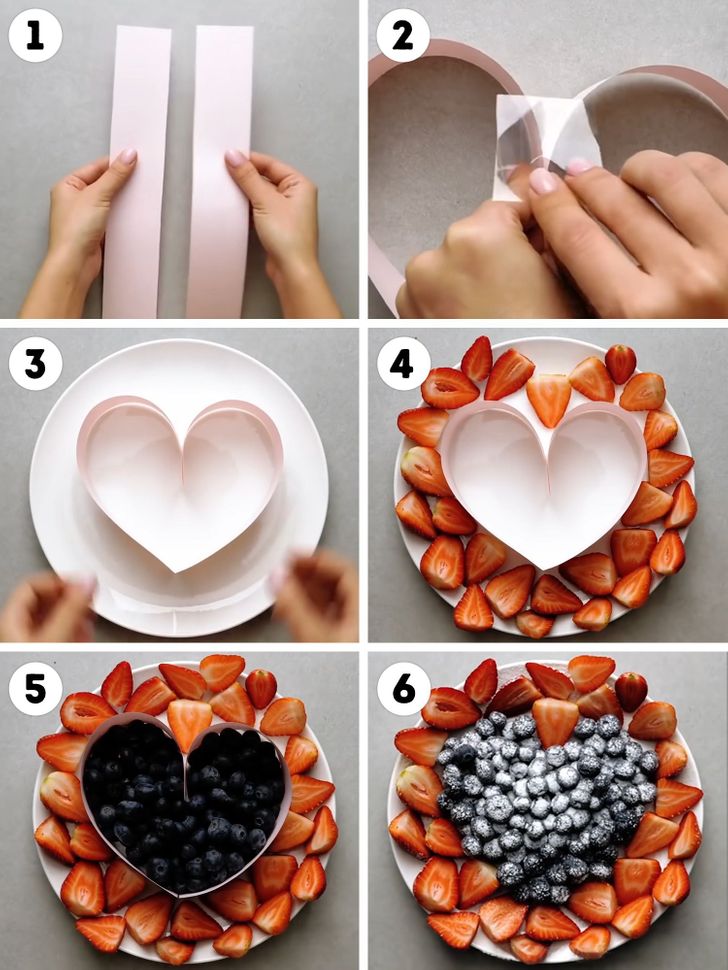
Bonus: How to make an edible Valentine’s Day gift
1. Take 2 strips of paper.
2. Glue them together to make a heart shape.
3. Put this heart on a plate.
4. Put halved strawberries around the heart.
5. Put blueberries inside the heart.
6. Carefully remove the paper heart and sprinkle the berries with icing sugar. Your Valentine’s Day gift is ready.
