How to Make Easter Decorations Yourself
Dyed eggs are the main symbol of Easter, along with the Easter Bunny. According to the legend, the infamous Bunny brings children dyed eggs and sweets.
5-Minute Crafts has made a compilation of ideas of how to make Easter decorations for your home.
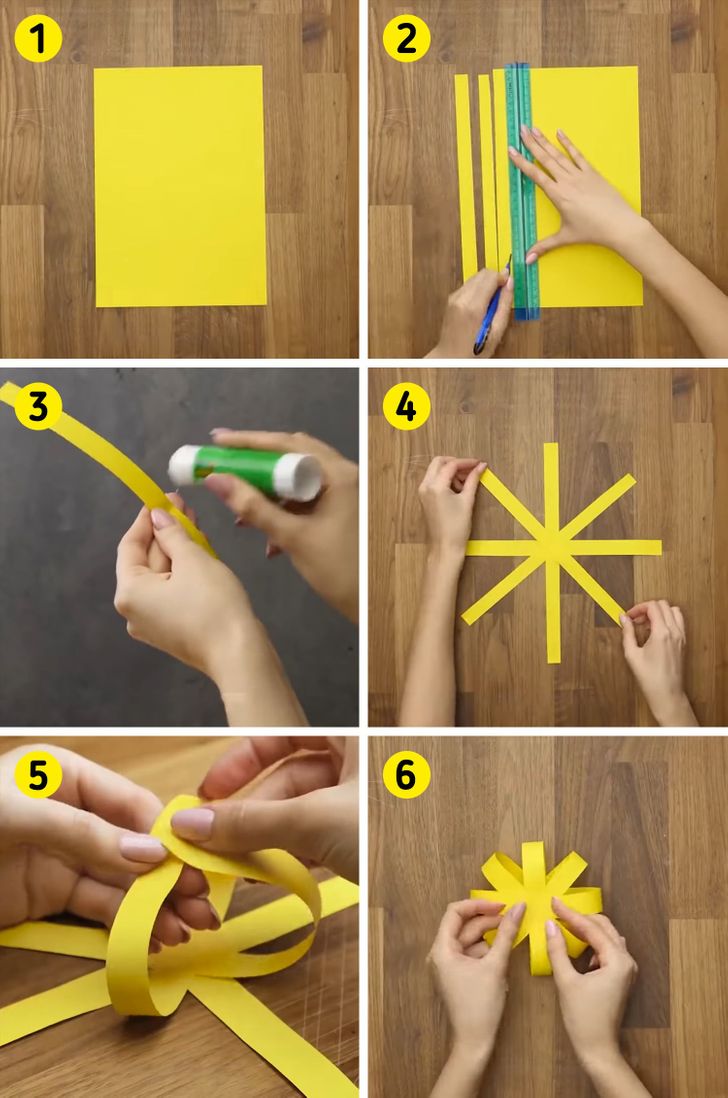
Easter Bunnies made of colorful paper
1. Take some cardboard.
2. Cut it into strips 1.5 cm in length.
3. Put some glue on the middle of one strip.
4. Glue 4 strips together to make a star.
5.—6. Make a paper ball gluing the ends of the strips together.
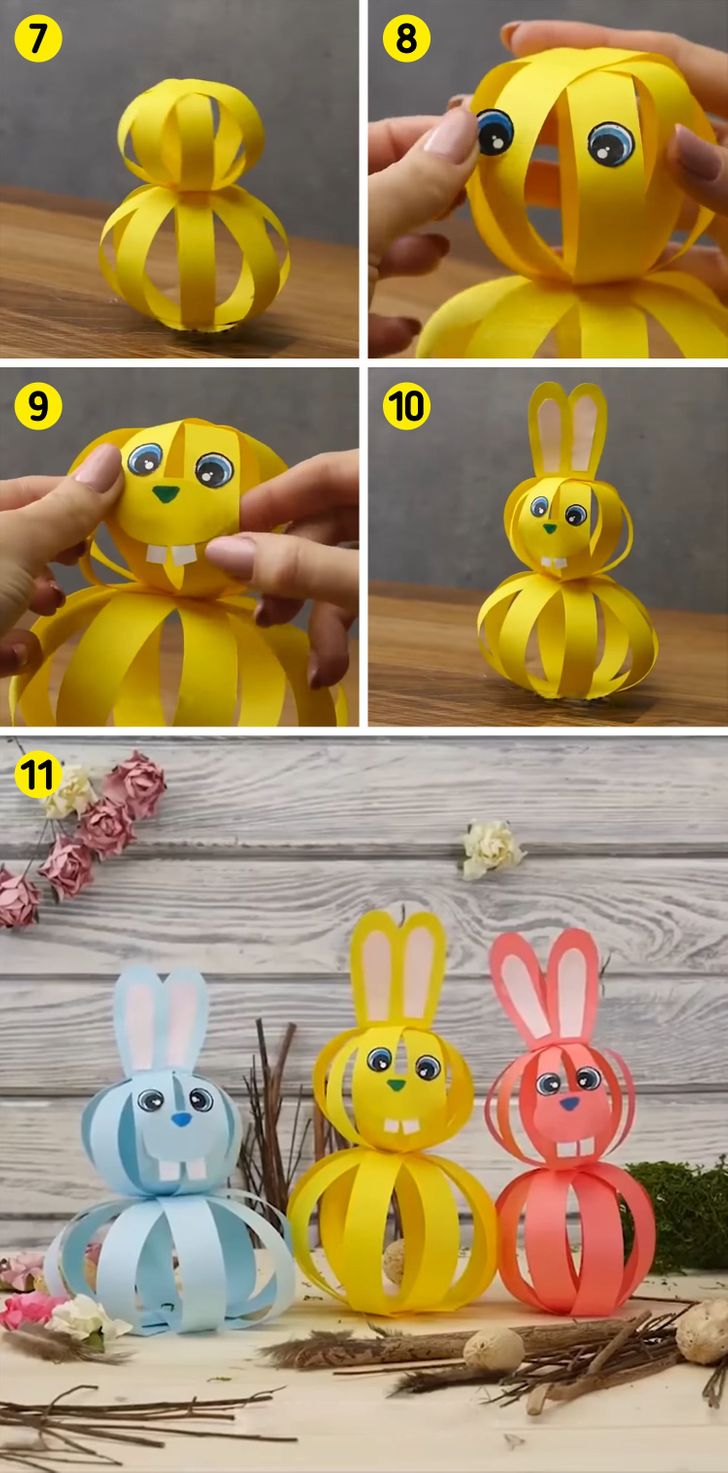
7. Make another paper ball in a smaller diameter. Glue the small one on top of the big one.
8. Glue eyes on the smaller one.
9. Cut out a cardboard oval in the same color and glue 2 white rectangles under it (this’ll be the teeth). Draw a triangular-shaped nose. Glue the face you made to the head of the bunny.
10. Make the ears (check the photo) and glue them to the bunny.
11. Make some more bunnies in different colors.
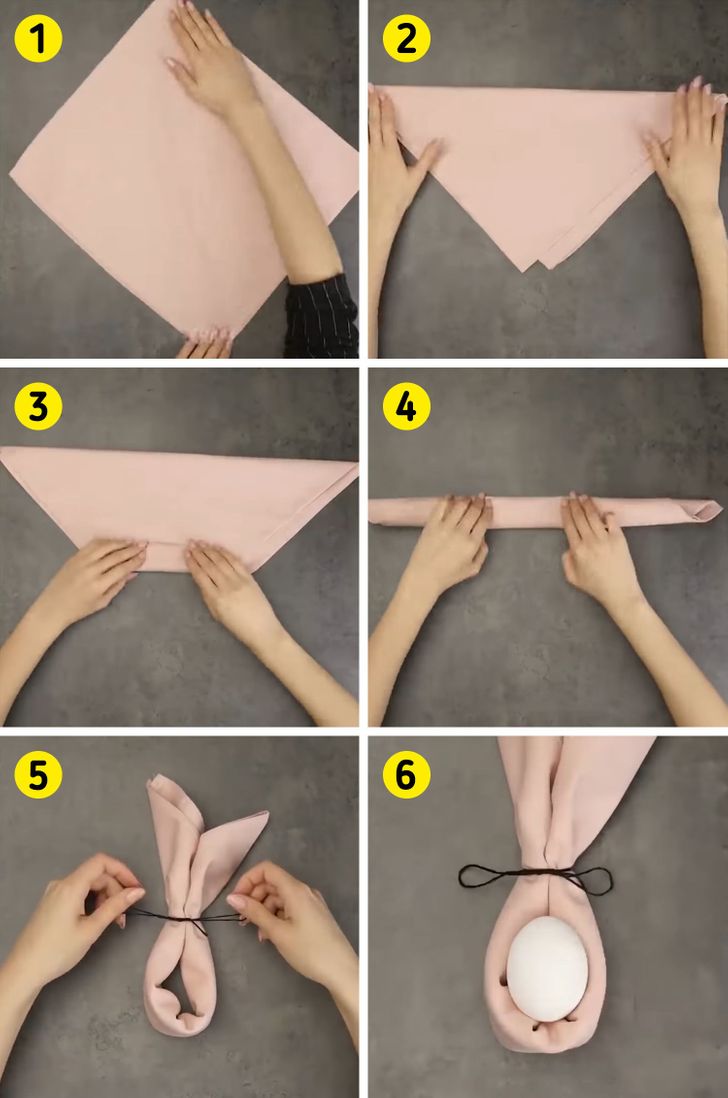
Napkins for the table
1. Take a napkin made of pastel-colored fabric.
2. Fold it to make a triangle.
3.—4. Roll the napkin going from the corner to the base.
5. Tie the napkin with a thread to make enough space below to put a chicken egg. The ends should look like bunny ears.
6. Put a boiled egg below.
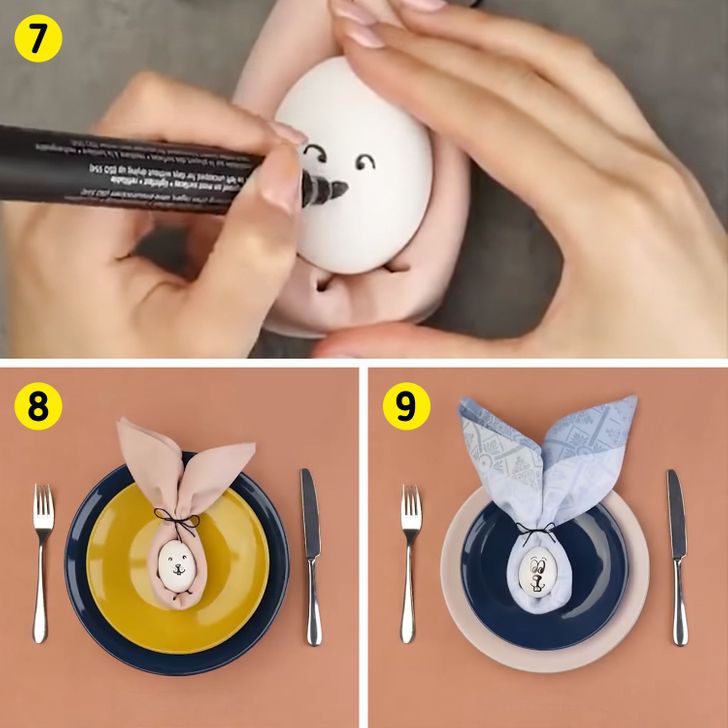
7. Draw a bunny face on the egg.
8.—9. Serve the table using these eggs.
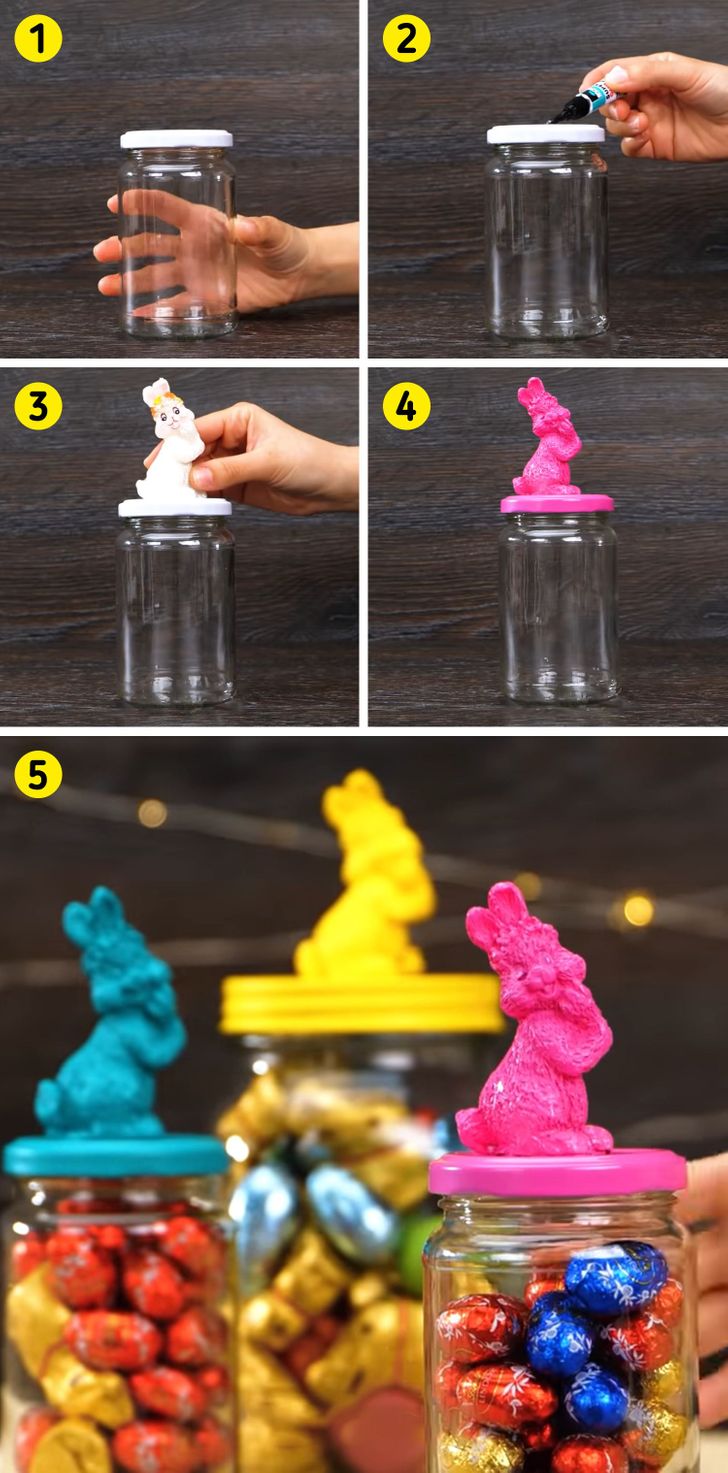
Jars with chocolate eggs
1. Take a glass jar with a lid.
2. Put some glue on the center of the lid.
3. Glue a tall bunny.
4. Spray some paint on the lid and the bunny.
5. Fill the decorated jars with chocolate eggs in bright foil.
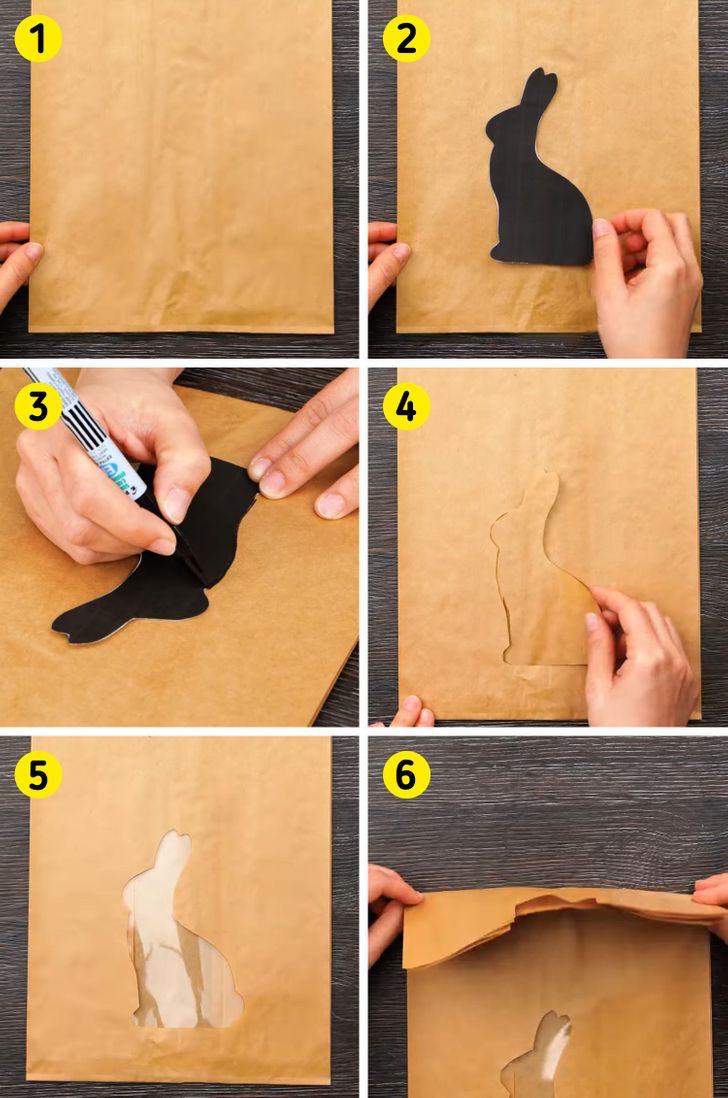
Easter candy bag
1. Take a paper bag
2.—3. Draw a bunny on the bag using a bunny-shaped template.
4. Cut out the bunny.
5. Take a clear sheet of plastic and glue it from inside the bag so that the bunny silhouette is covered with the wrap.
6. Roll down the upper part of the bag.
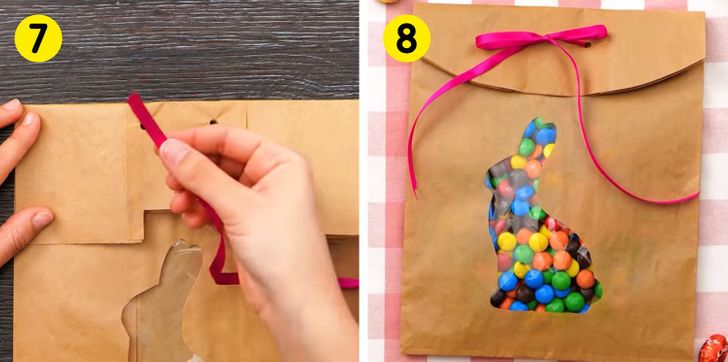
7. Use a hole punch to make holes in the upper part of the bag. Put a ribbon through the holes.
8. Carefully cut off the bag tops. Fill the bag with candy in different colors and tie the ribbon in a bow. Your Easter present is done!
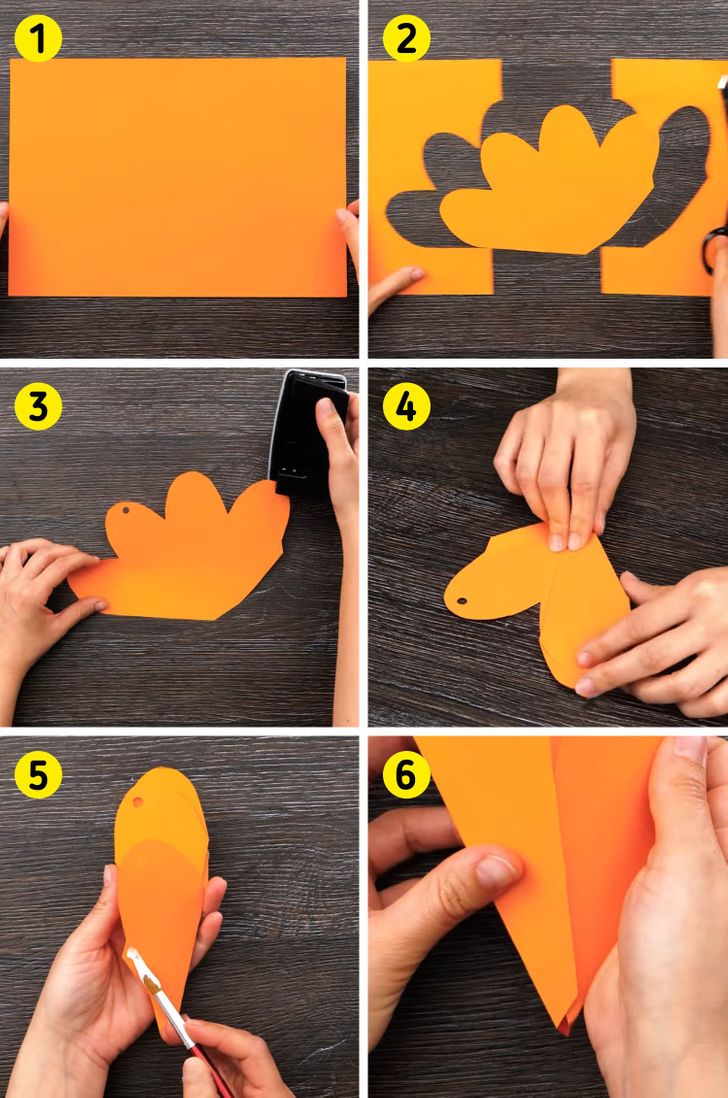
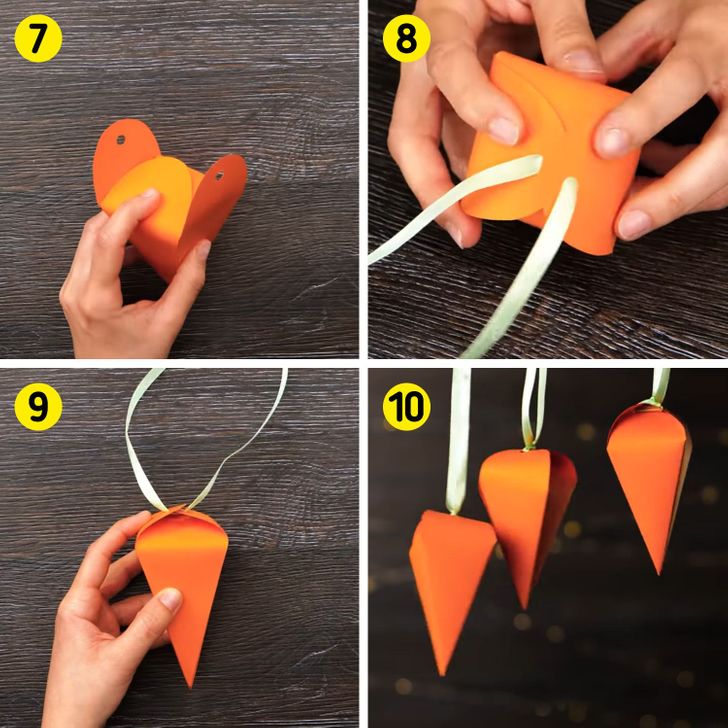
Carrots for the Easter tree
1. Take some orange cardboard.
2. Cut out a shape as the photo shows.
3. Using a hole punch, make holes on the 2nd and 4th tops from left to right.
4. Bend the future carrot as the photo shows.
5. Put some glue on the lower edge.
6. Glue the carrot.
7. Fold the 2 tops without holes inside.
8.—9. The tops with the holes should be bent slightly toward each other. Put a ribbon through the holes.
10. Put the carrots on the tree.
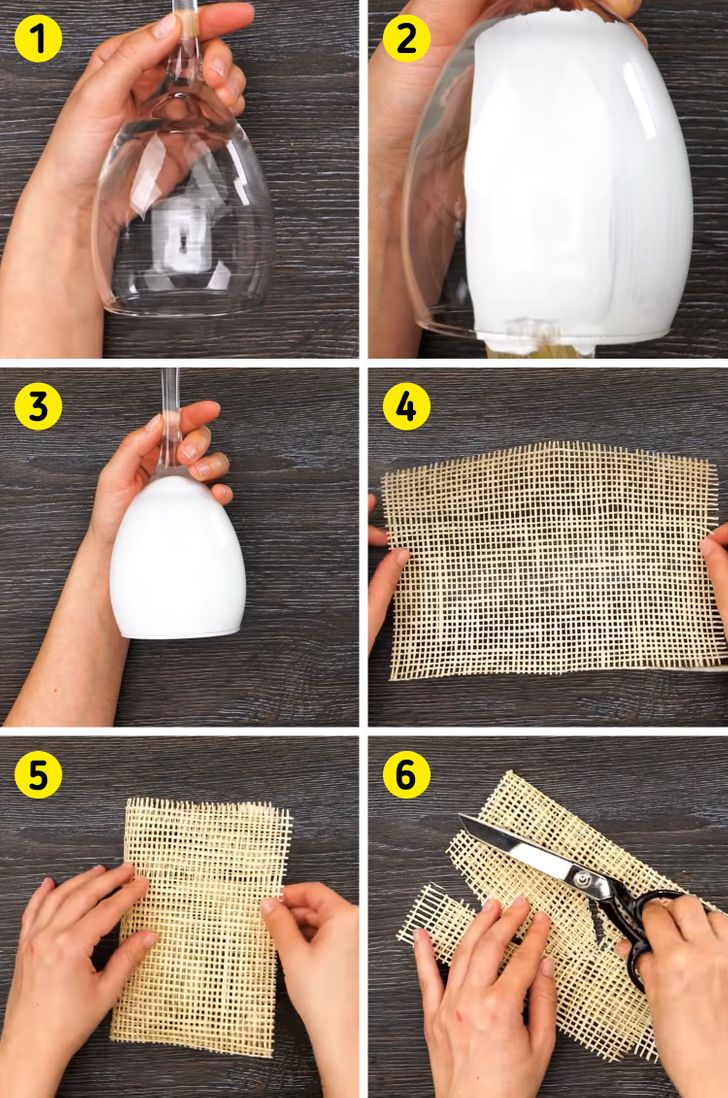
Candlesticks for the table
1. Take a glass.
2.—3. Cover the inside with white acrylic paint.
4.—5. Take a netted fabric and fold it in half.
6. Cut out bunny ears.
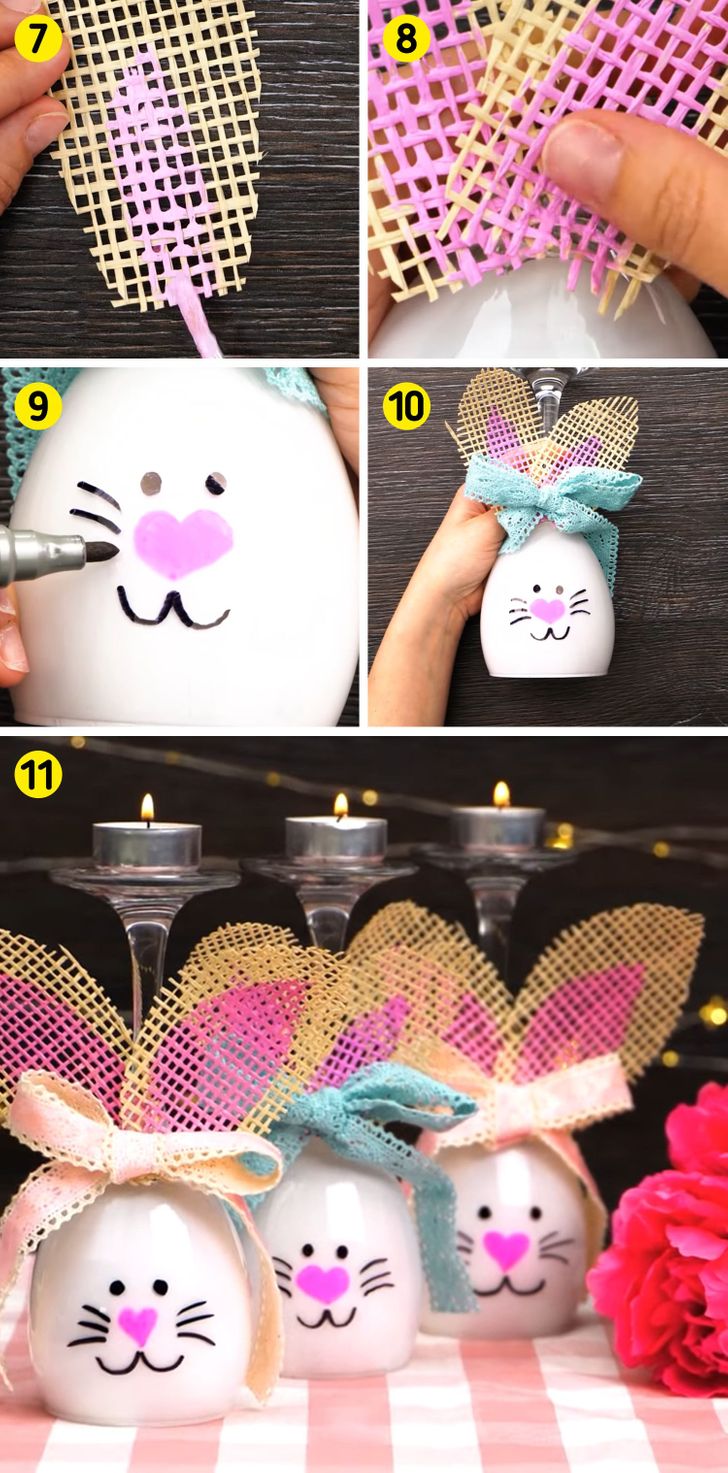
7. Put some pink paint on the middle of the ears.
8. Put some glue on the base of the glass and glue the ears to it.
9. Draw the face of the bunny.
10. Make a bow using a ribbon.
11. Put some small candles in the glasses.
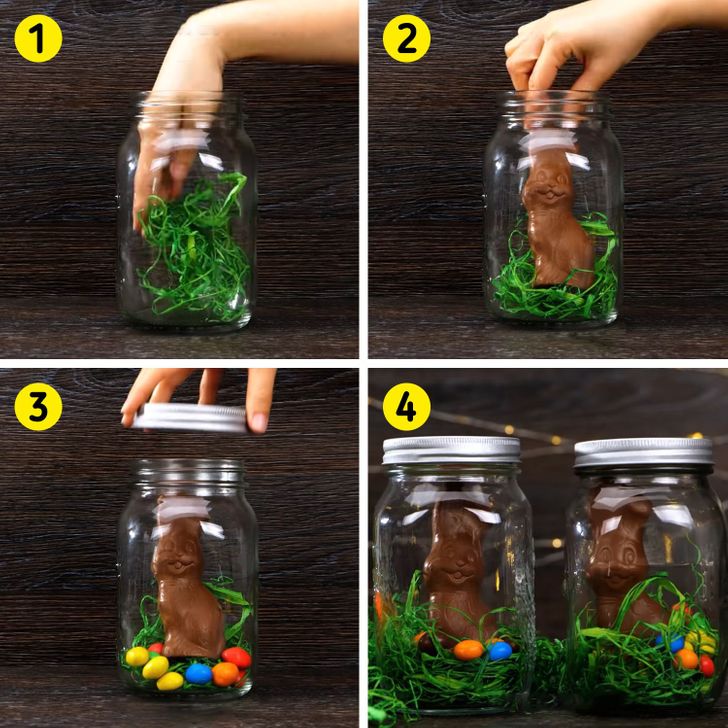
Jars with chocolate bunnies
1. Put some green paper strips on the bottom of a jar.
2. Put a chocolate bunny on the top.
3. Add some oval candy around that look like eggs.
4. Close the jars with lids. You can use them as decorations or as Easter presents for children.
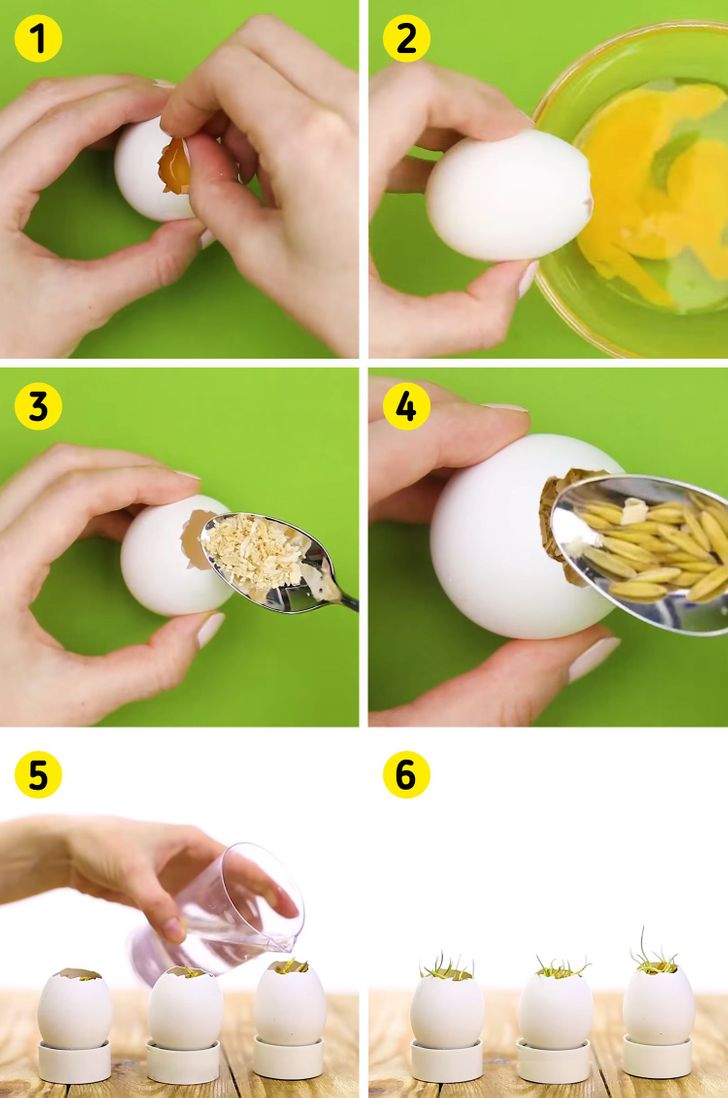
Easter grass in eggshells
1. Use a teaspoon to break the sharp end of a raw egg. Carefully remove some of the shell in the center to make a hole.
2. Put the egg white and yolk into a bowl. You can use them to make some food.
3. Wash the shell. Put some soil on the bottom.
4. Add some grass seeds. You can use wheat and oats.
5. Put the eggshell on something stable and add some water.
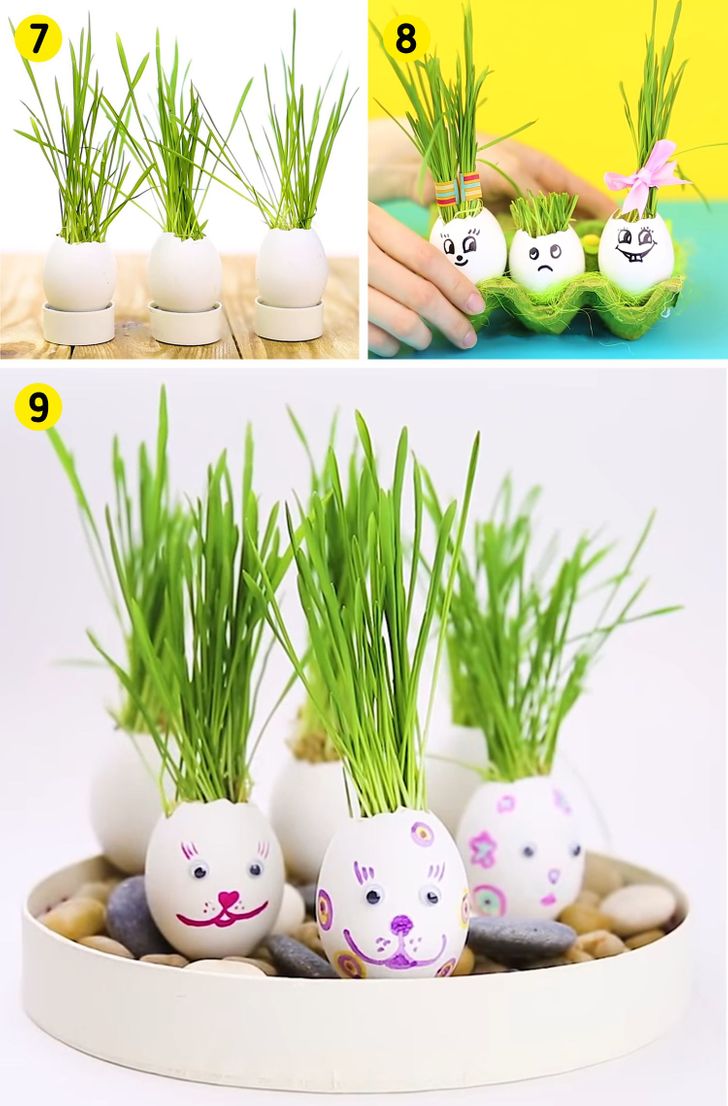
6. To let the grass grow, put the shells in a warm place and don’t let the seeds get dry.
7. You need about 1-1.5 weeks to have enough time to grow good grass.
8.—9. To decorate the grass, you can tie some ribbons on it, and draw some funny faces on the eggshells.
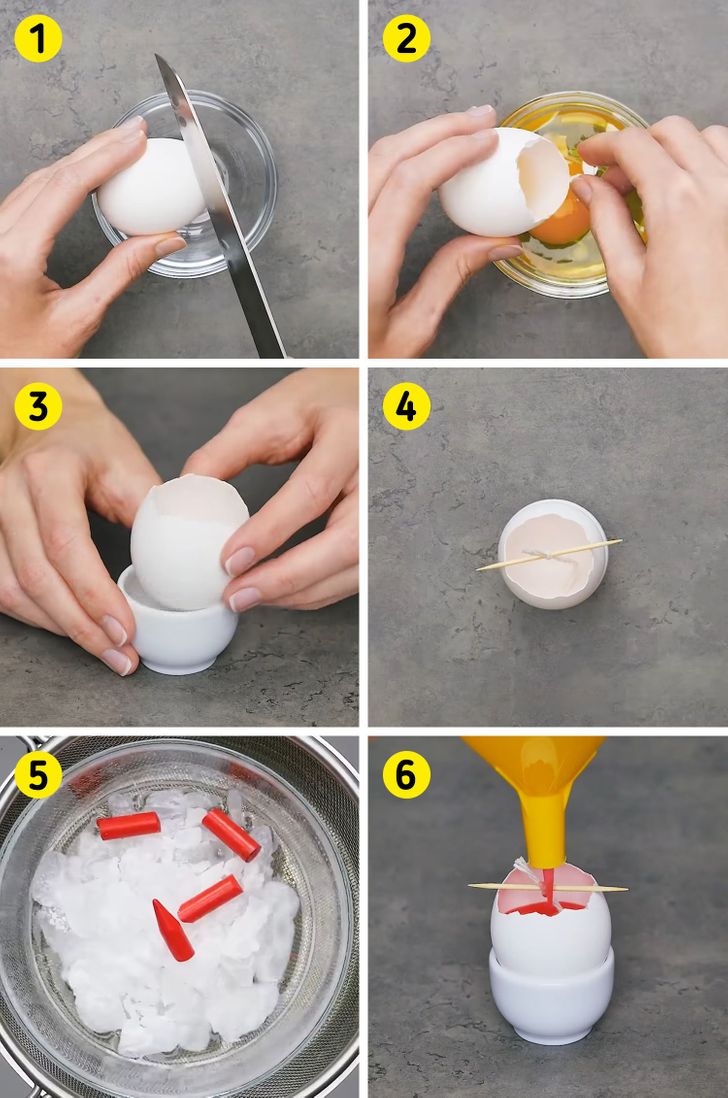
Egg-shaped candles
1. Break the small end of a raw egg.
2. Empty the insides of the egg into a bowl. Wash the eggshell.
3. Put the eggshell on a stand.
4. Tie a candlewick (you can buy it from a craft store) to a toothpick. Put the toothpick horizontally onto the egg shell with the long end of the wick down.
5. Melt some paraffin wax.
6. Pour the paraffin into the eggshell.
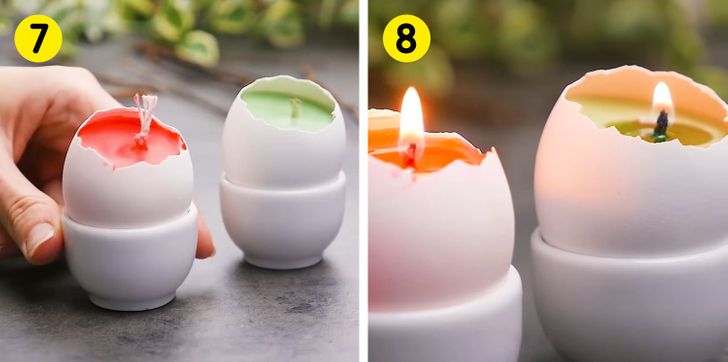
7. Let the wax solidify and remove the toothpick.
8. Use the candles.
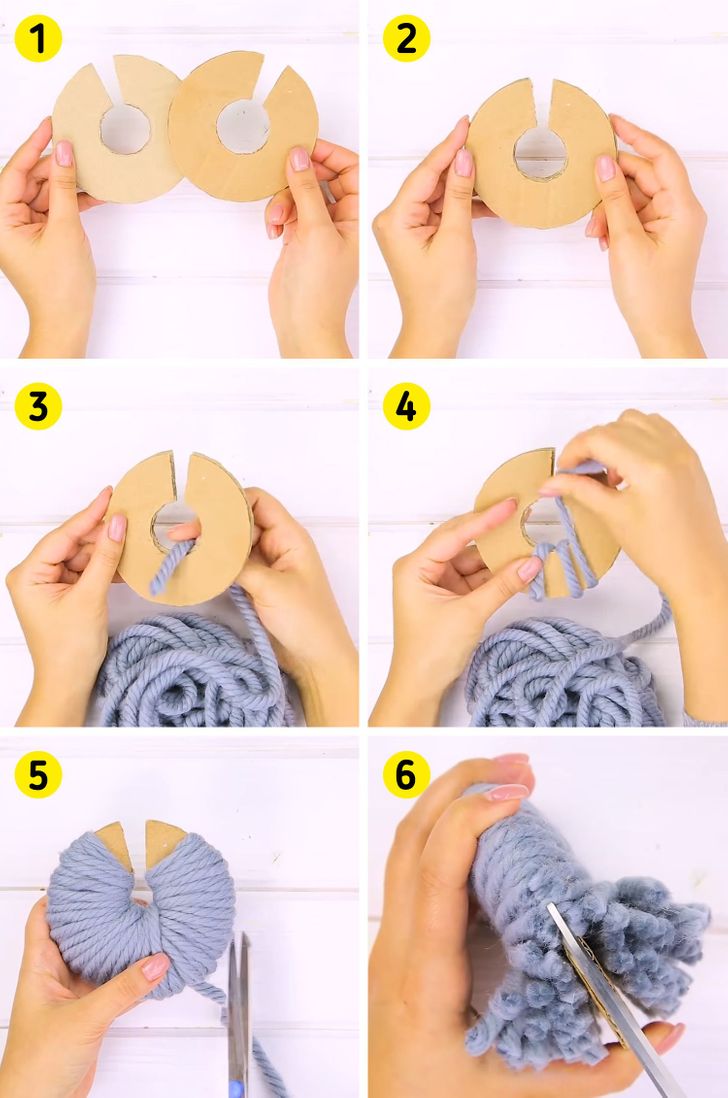
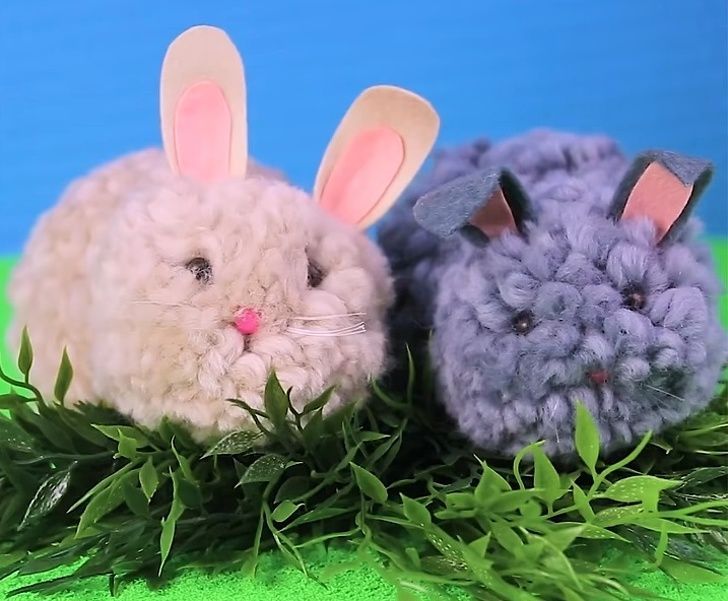
Fluffy yarn bunnies
1. Take 2 round cardboard pieces with cuts (just like in the photos).
2. Put them together so that the cuts meet.
3.—4. Take some yarn and wrap it around the cardboard.
5. Once the yard is on the cardboard, cut the thread and put the end under one of the threads at the base.
6. Cut the threads between the 2 cardboard circles.
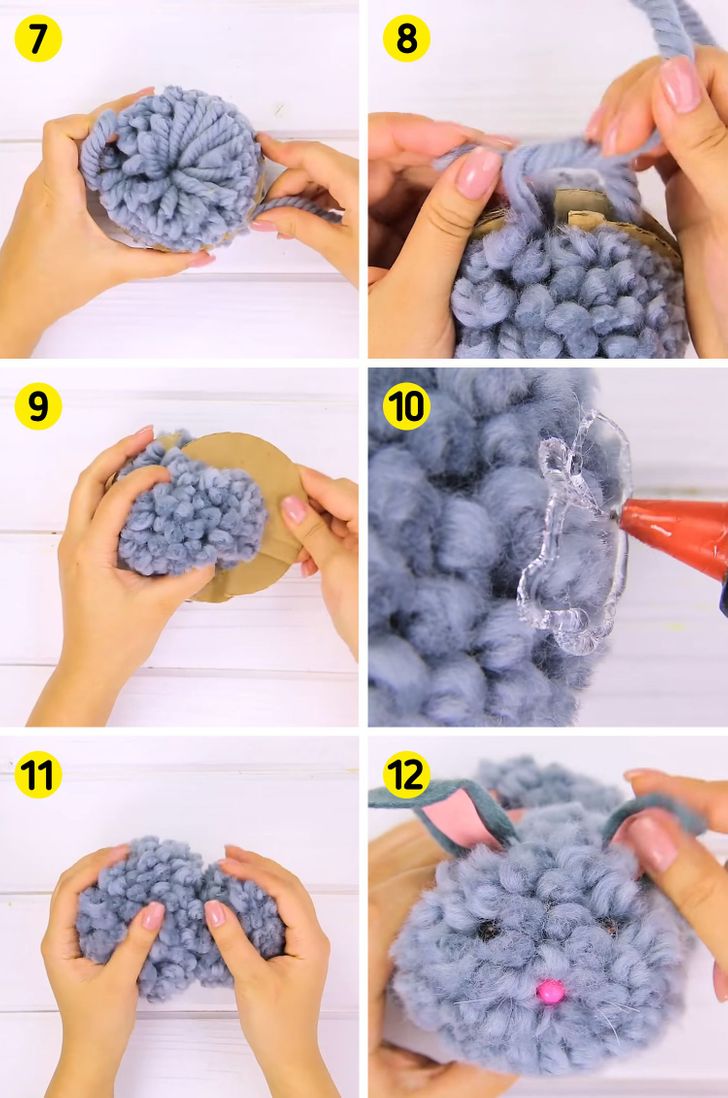
7.—8. Put a thread between the 2 circles and tie it.
9. Carefully take out the first and then the other circle.
10. Put some glue from a glue gun on the side of the pompom.
11. Glue a smaller pompom made the same way. You now have the body and the head of the future bunny.
12. Glue on the ears, that are made of felt and eco-leather. Also, add the nose, the eyes, and the whiskers. Then make a tail.
Have a great Easter!
