How to Cook Simple Christmas and New Year’s Desserts

Nice-looking desserts always complement any celebration table and you don’t need to spend a lot of time and energy to create them. Oftentimes, you can even use ready-made products as a base and let your imagination run wild.
5-Minute Crafts recommends that you try several simple recipes that will quickly evoke interest and love for the baker inside you.
Christmas trees from sugar cones and whipped cream
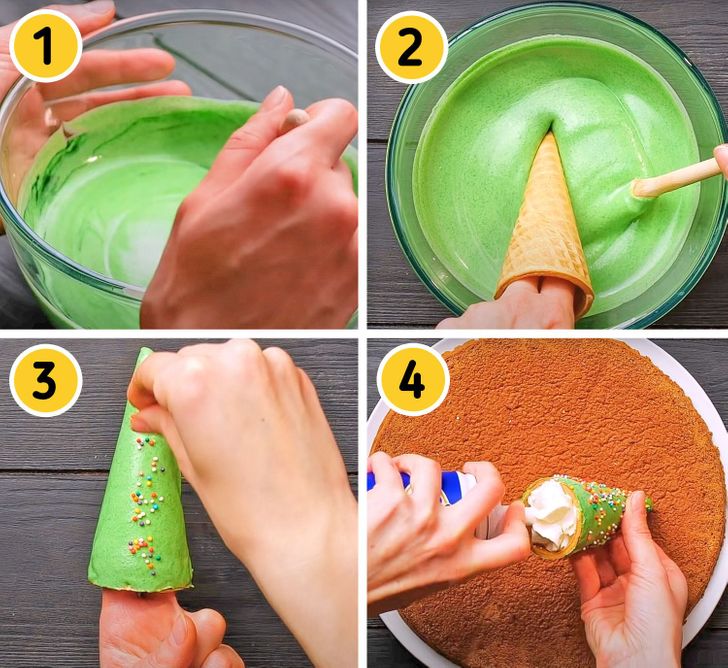
1. Melt white chocolate and add green food coloring to it.
2. Take an empty waffle cone and dip it into the chocolate.
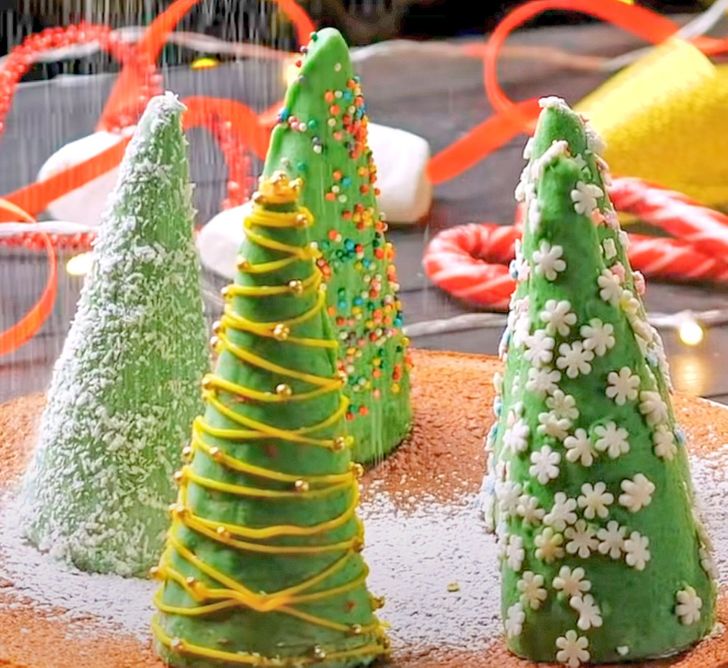
3. Decorate it with colored sugar and sprinkles. You can also use coconut flakes or glaze. Once it’s decorated, wait for it to dry.
4. Fill the inside of the cone with whipped cream.
You can serve ready-made trees on a plate and sprinkle them with powdered sugar, or decorate a birthday cake with them.
Santa Claus from muffins, cream, and coconut flakes
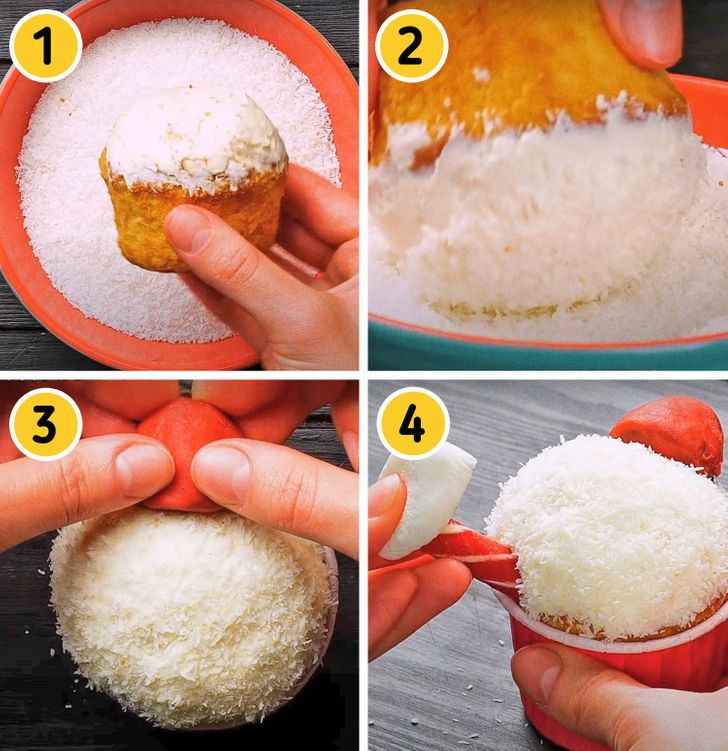
1. Decorate the ready-made muffins with buttercream frosting and dip the top in coconut flakes.
2. Rotate the muffin so that the flakes cover its top with an even and thick layer.
3. Make a hat out of red mastic and secure it on one side of the muffin.
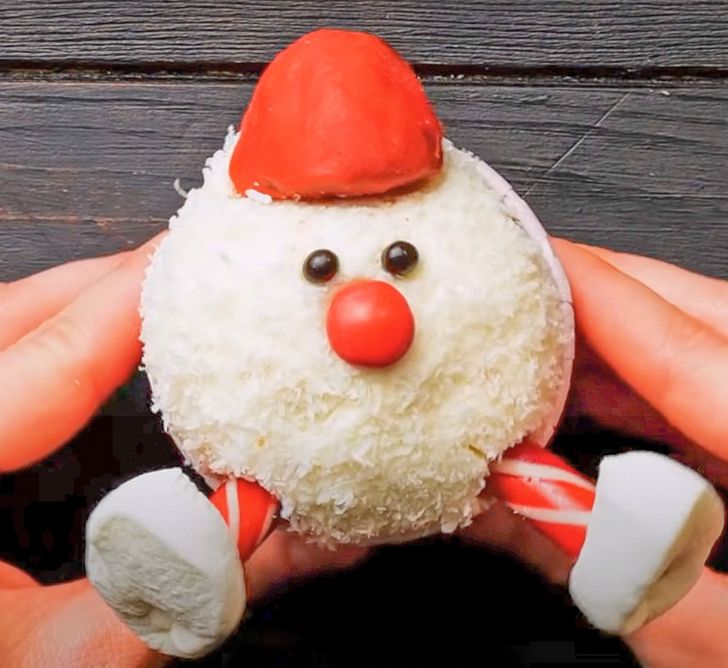
4. Make Santa’s legs from candy canes and attach them on the opposite side. Make white boots from mastic and attach them to the end of the canes.
Now make 3 balls: 2 small ones from black mastic that will be Santa’s eyes, and one big one from red mastic that will be Santa’s nose. Adjust the balls on the muffin.
Advice: In order to prevent the hat from falling off, you can strengthen the fixation by putting it on a toothpick and then attaching it to the muffin.
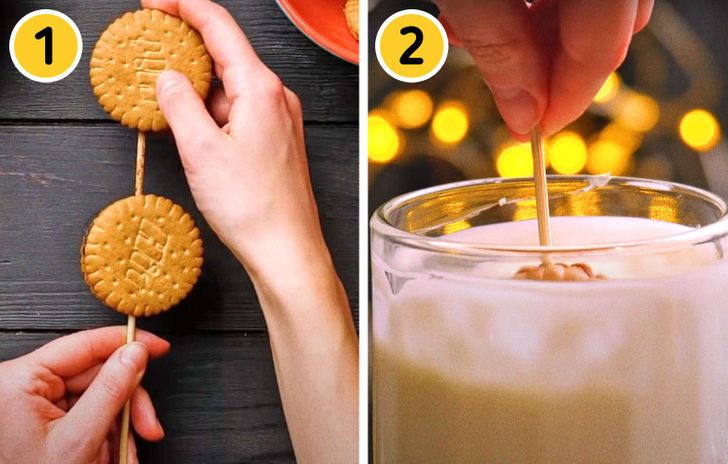
Snowmen from cookies and creamy glaze
1. Place 3 cookies with a creamy interlayer on a skewer — first put 2 large cookies, then one small. This will be the basis for the body of the future snowman.
2. By holding the skewer, dip the cookies located on it into the white glaze (store-bought glaze will work just fine in this instance). Let them dry.
3. Draw the buttons, eyes, and nose of the snowman with colored glaze or frosting.
4. When serving, place pieces of breadsticks by their sides — they will be the snowman’s arms.
Advice: It’s easy to draw the smaller details with sugar pencils.
Candy wreath
1. Wrap a candy with 2 sheets of red tissue paper on the bottom and secure them with a rubber band that way it’s shown in the video above. You’ll get a flower. Make 20-25 of these flowers (the final number should depend on the size of the wreath base).
2. Take a wreath base. You can cut it out of carton paper or get a Styrofoam billet. Secure the flowers on it with the help of glue.
3. Attach a golden bow. It’s ready to go!
This wreath can be used to decorate a table, it can be hung over the front door, or it can be used as a sweet gift.
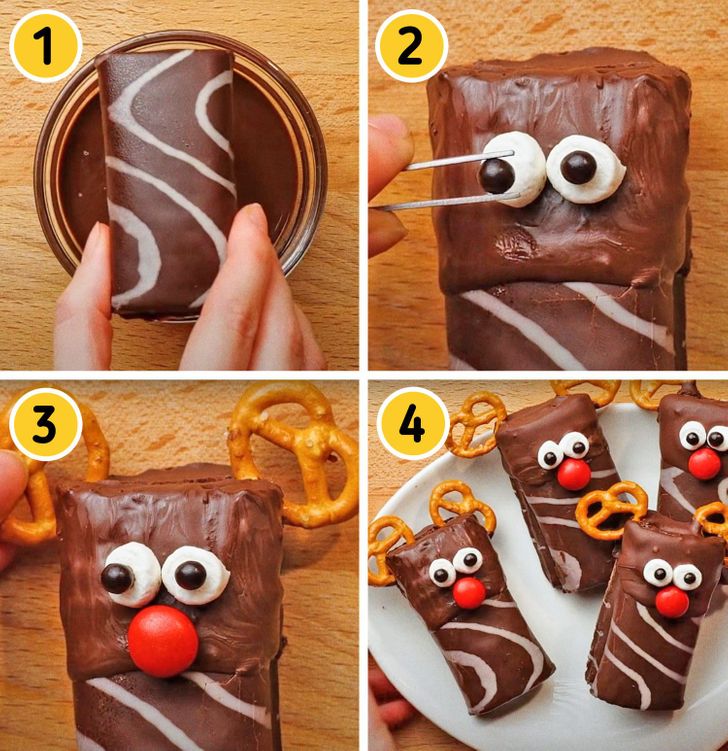
Reindeer made from chocolate rolls and salted pretzels
1. Take a chocolate roll and dip one of its ends into melted chocolate.
2. Attach 2 mini marshmallows to it while the chocolate is sticky. With the help of tweezers, place 2 balls of dark mastic on the marshmallows to make the eyes.
3. Make a bigger ball from red mastic and place it under the eyes so that you get a nose. On the top, secure salted pretzels instead of horns.
4. Let the chocolate dry and place the reindeer on a plate.
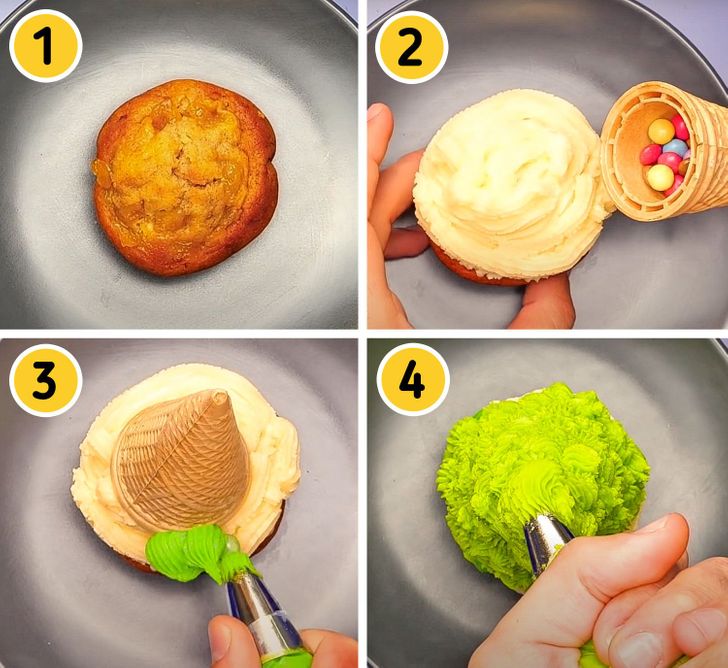
Christmas trees with butter cream and candy
1. Take a muffin and decorate the top with buttercream.
2. Pour colored candies into an empty waffle cone and secure it to the muffin with the top of the cone facing up.
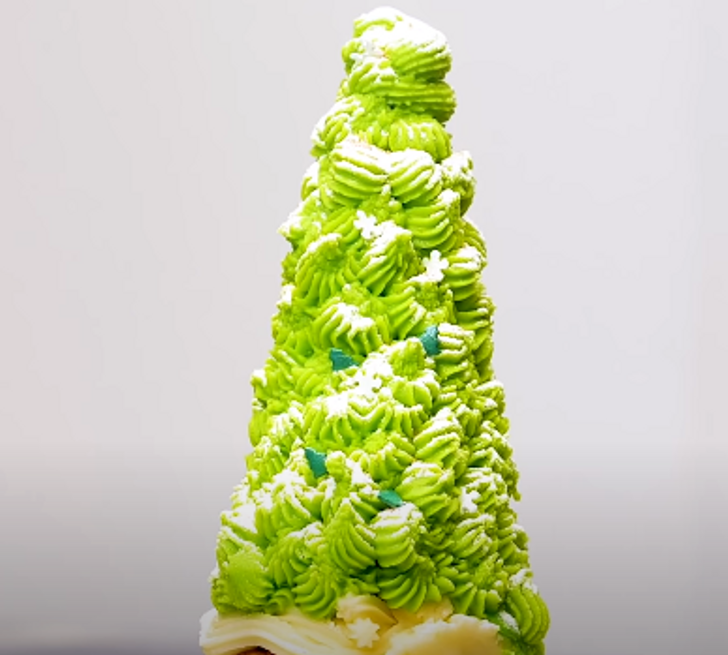
3. Add green dye to your buttercream and apply it to the cone using a pastry bag and a nozzle used for making meringues.
4. Move from bottom to top in a spiral. Make sure your tree is textured.
With the help of a fine sieve, gently sprinkle the icing sugar over the Christmas tree to simulate snow before serving.
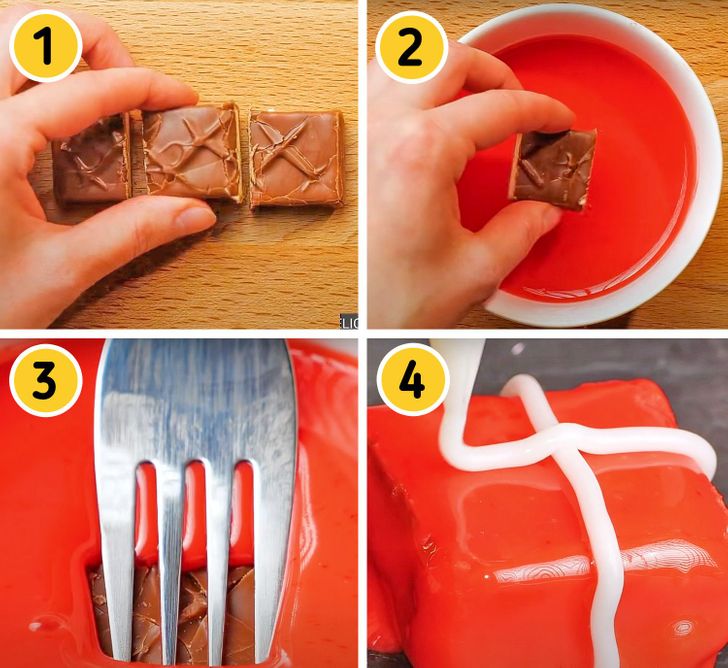
Glazed New Year’s presents
1. Cut a chocolate bar into equal small cubes.
2. Dip each of them in a red glaze (again, store bought glaze is fine to use here).
3. Put each cube on the bottom with the help of a fork. Then get it back with the help of the same fork. Place them on a plate.
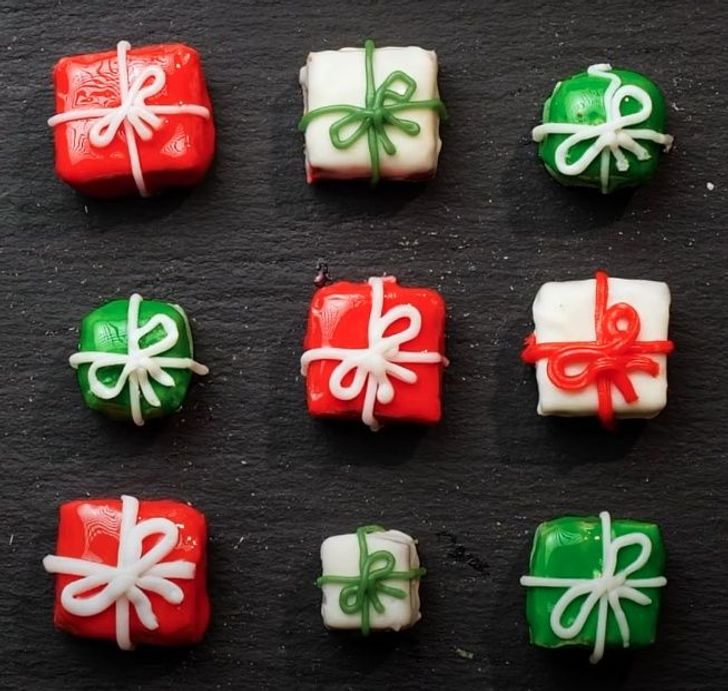
4. Draw ribbons and bows with the help of frosting so that the cube starts to look like a small present. Try using different colored frosting.
Advice: Place the candies in the fridge for a little while before serving.
Cookies from colored dough
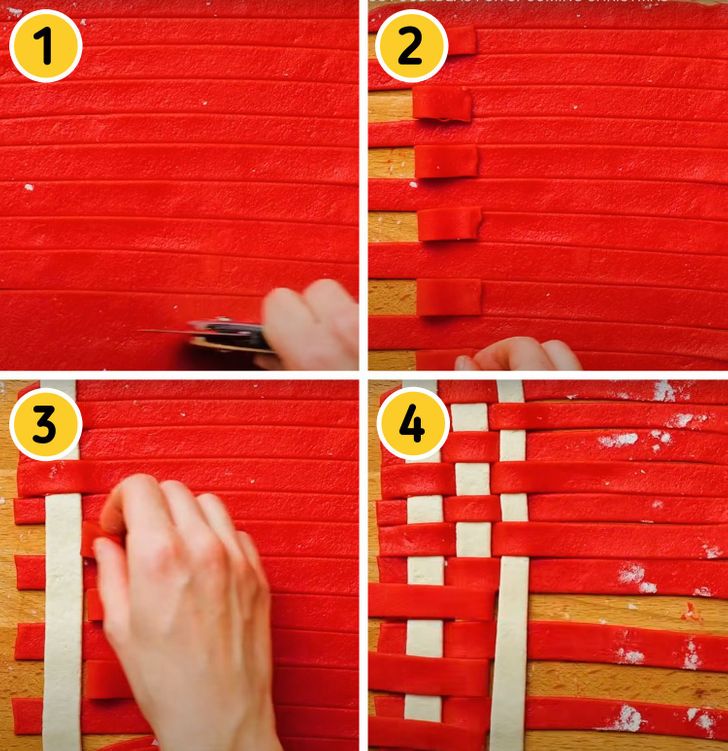
1. Make 2 types of dough for cookies: an ordinary one and a red one (add food coloring while mixing liquid ingredients). Roll out the red dough and cut it into equal strips.
2. Fold back a part of strips from left to right, as shown in the photo above.
3. Cut the white dough into strips. Take one strip and put it on the left edge of the red dough and then cover it with the red strips that were folded back previously.
4. Repeat this until all strips are braided with each other.
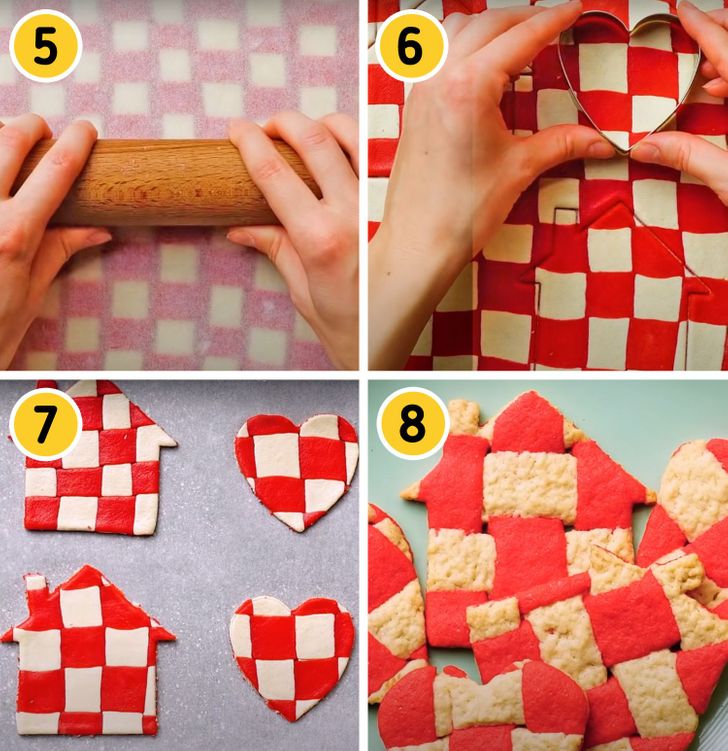
5. Place the baking parchment on top and roll the dough through it with a rolling pin, so that it becomes homogeneous but retains the pattern at the same time.
6. Cut out cookies with the help of cookie cutters. Remove them with the help of a spatula.
7. Place the cookies on the parchment. Keep in mind that cookies tend to get slightly bigger as they bake, that’s why you shouldn’t place them too close to each other.
8. Put them to bake in the oven until they are ready.
