How to Make Clothes for Dolls
You don’t have to spend a fortune on clothes for your doll to make it look stylish. Just grab a pair of scissors, socks, balloons, and a couple of other items you’re likely to have at home and start making your own doll clothing line with step-by-step instructions from 5-Minute Crafts.
1. Elegant midi dress
Preparation:
- You’ll need a pair of scissors and a sock (preferably with lace).
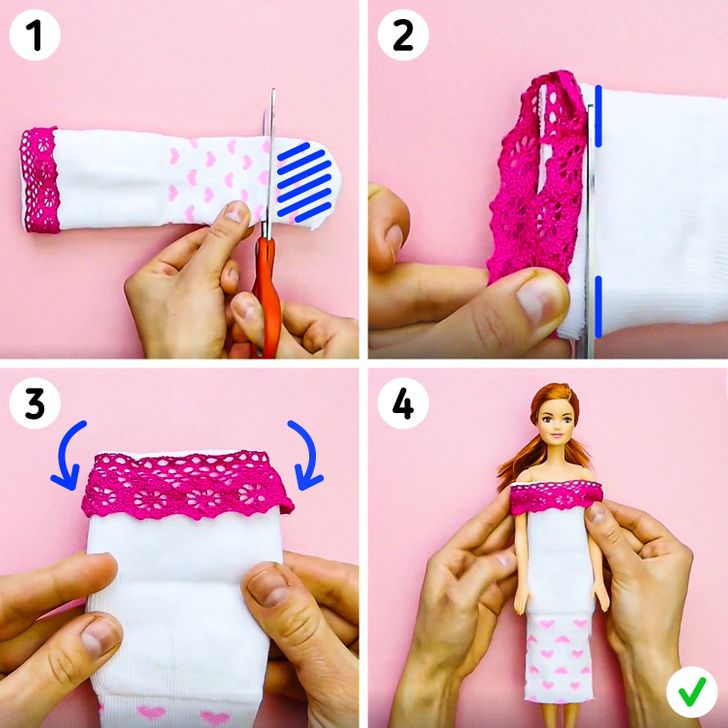
How to do it:
1. Take a sock and cut off its toe part.
2. Make small cuts for the doll’s arms below the cuff, on both sides of the sock.
3. Fold down the lace on the cuff of the sock.
4. The dress is ready! Put it on the doll and enjoy the results.
2. Blue swimsuit
Preparation:
- You’ll need a balloon and a pair of scissors.
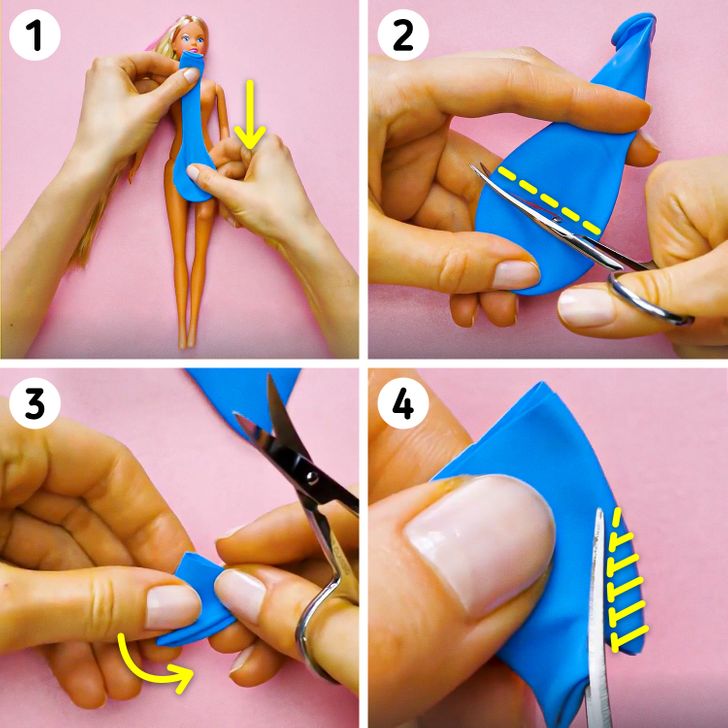
How to do it:
1. Take a balloon and stretch it out a bit with your hands.
2. Cut off the lower part of the balloon.
3. Fold the lower part.
4. Cut off a small semi-circle from the side.
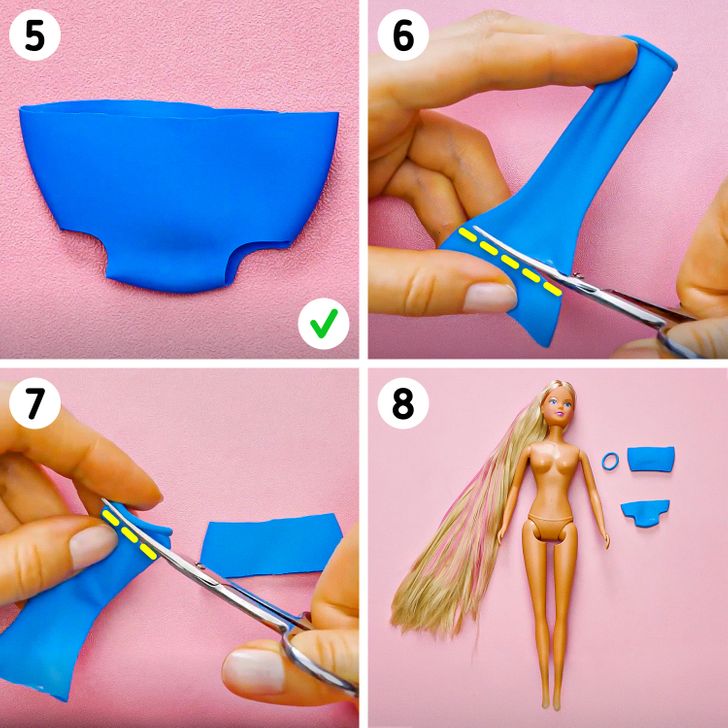
5. The swim bottoms are ready!
6. Take the rest of the balloon and cut off the middle part.
7. Cut off the lip of the balloon.
8. At this point, you should have 3 remaining elements for the swimsuit.
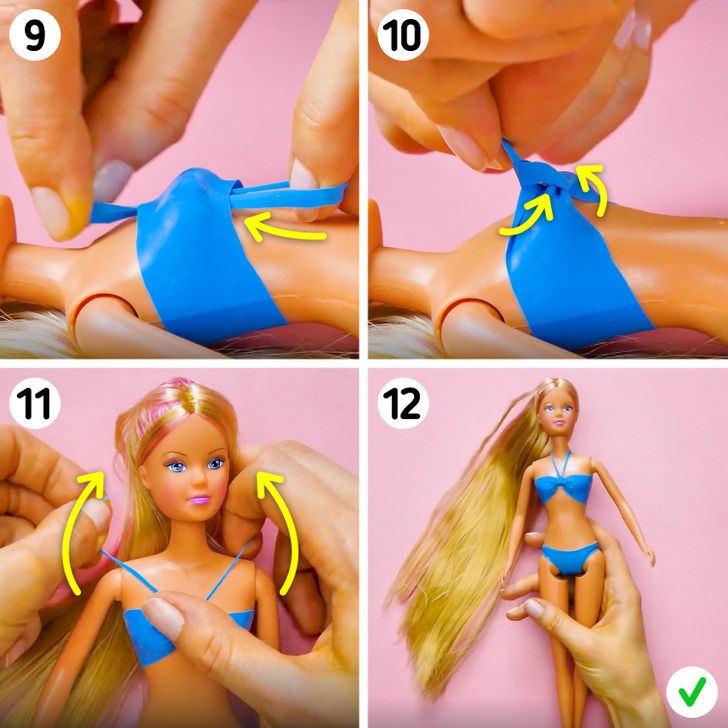
9. Put the middle part of the balloon on the doll, so it looks like a top. Pull the lip of the balloon under it.
10. Pull one end of the lip through the other end to form a tight knot.
11. Put the remaining end of the lip over the doll’s neck.
12. Your doll’s swimsuit is ready!
3. Romantic nightgown
Preparation:
- You’ll need a latex glove and a pair of scissors.
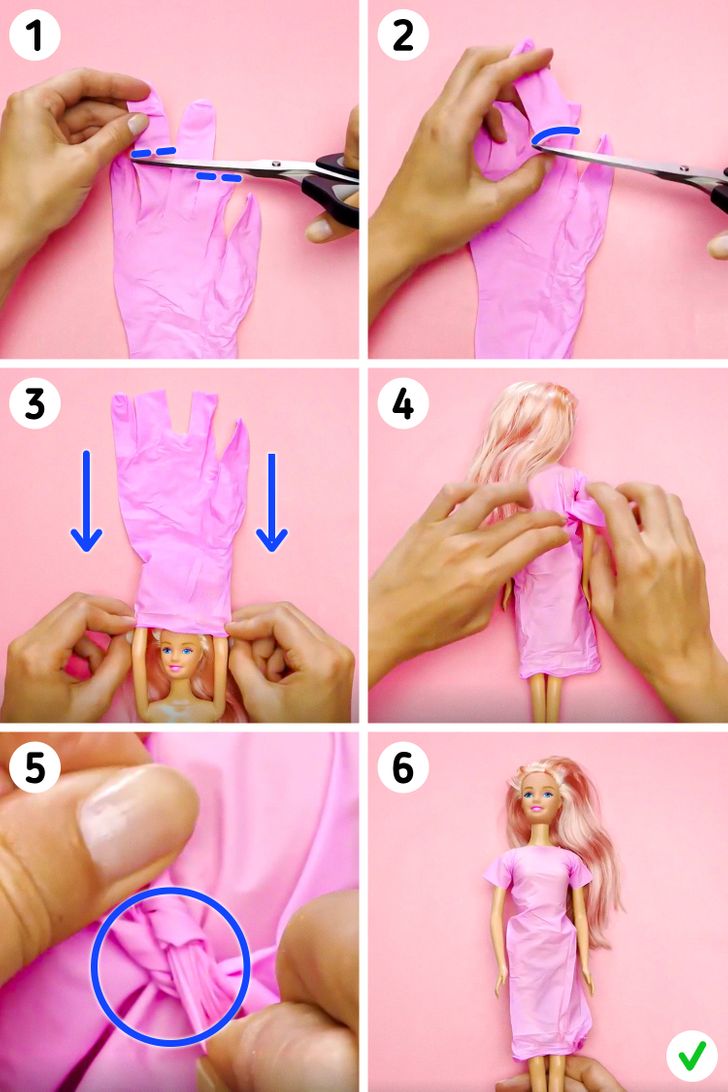
How to do it:
1. Take a latex glove and cut off half of the ring and the index fingers.
2. Cut off the middle finger completely.
3. Put the glove on the doll. Its hands should go through the holes in the ring and the index fingers and the head — through where the middle finger was.
4. Turn the doll over.
5. Tie the remaining latex fingers together to secure the outfit and accentuate the doll’s waist.
6. The nightgown is ready!
4. Convenient shopping bag
Preparation:
- You’ll need a small plastic bottle, any sharp tool to make holes in it, a stationery knife, and a ribbon.
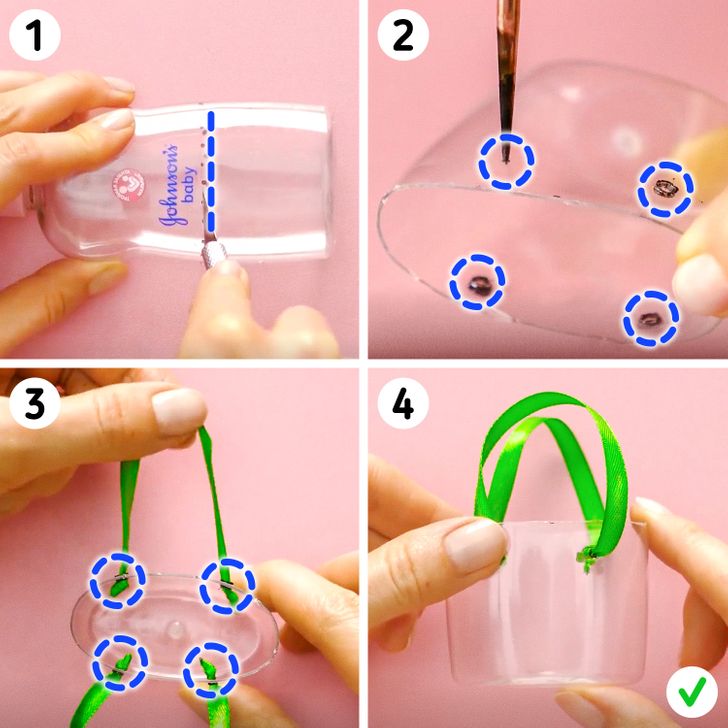
How to do it:
1. Take a plastic bottle and remove its lower part with an X-Acto knife. The size of the lower part depends on the size of the bag you’d like to make.
2. Make 2 holes on each side of the lower plastic part of the bottle. The holes should be located at the top.
3. Pull a ribbon through the 2 holes to make bag handles. Don’t forget to secure the ribbons with small knots on the ends.
4. The shopping bag is ready!
5. Luxurious hair band
Preparation:
- You’ll need a ring from a plastic bottle, glue, a pair of scissors, crystals, and other items you’d like to use for decoration.
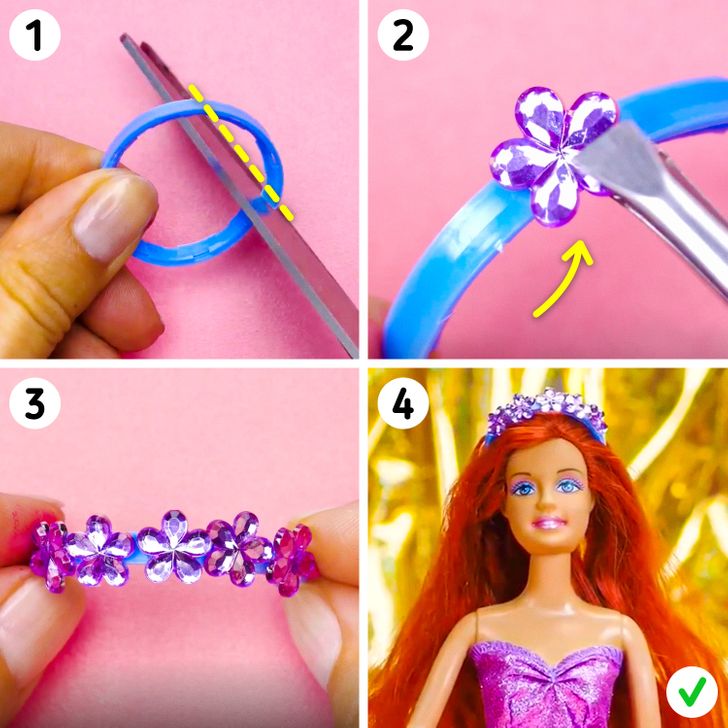
How to do it:
1. Take a ring from a plastic bottle and cut off about 1/3 of it.
2. Apply glue to the outer side of the ring and glue a crystal on it.
3. Keep gluing crystals until the ring is fully covered with them.
4. The hair band is ready!
6. Colorful summer dress
Preparation:
- You’ll need a square piece of colorful fabric, some lace, a ribbon, glue, and a pair of scissors.
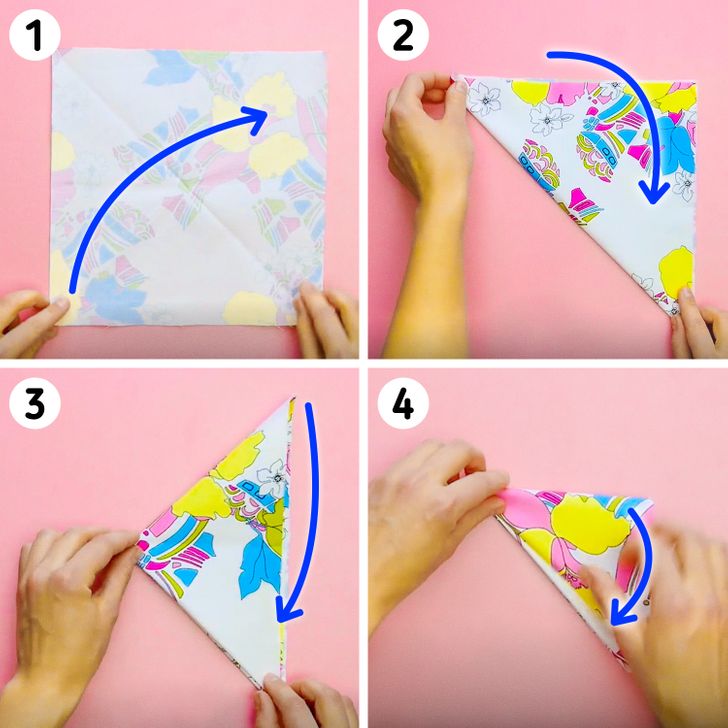
How to do it:
1. Take the fabric and fold it so the diagonal corners meet to make a triangle.
2. Fold the triangle so the lower corners meet.
3. Fold the triangle the same way again.
4. Repeat one more time so your fabric looks like a cone.
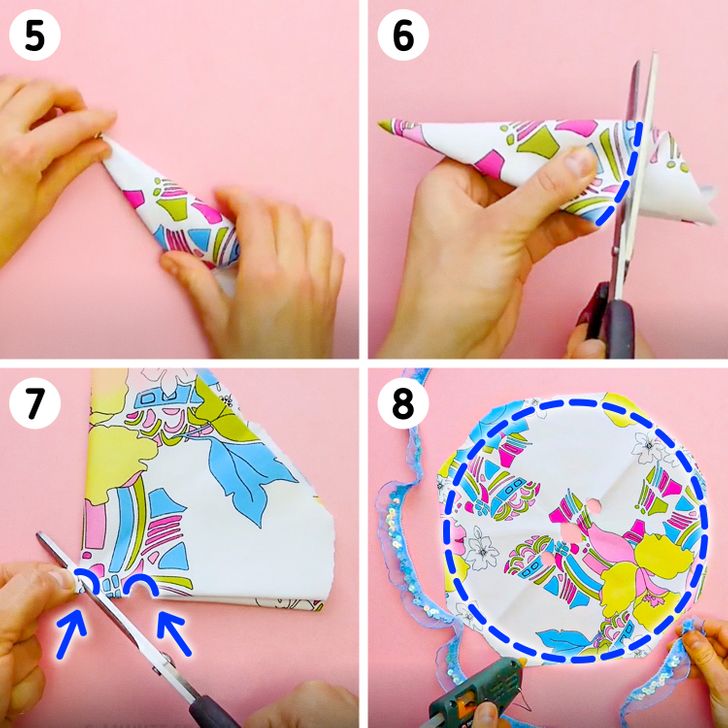
5. Make sure that the fabric is folded neatly.
6. Take the scissors and cut off the edges, making the rim rounded.
7. Unfold the fabric 2 times and cut off small semi-circles at the bottom.
8. Unfold the fabric completely and glue lace to the rim.
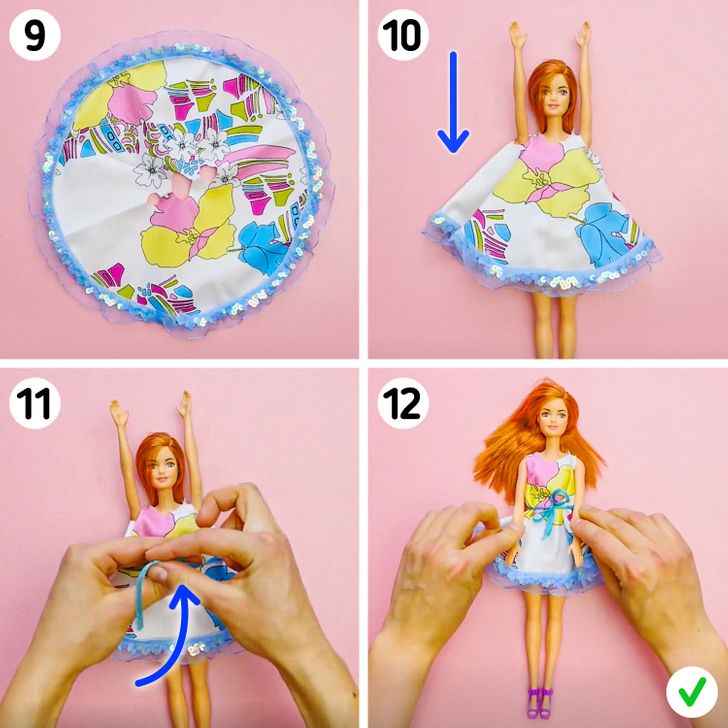
9. Let the glue dry.
10. Put the dress on the doll.
11. Use a ribbon as a belt to accentuate the waist.
12. The dress is ready!
7. Sporty leggings
Preparation:
- You’ll need a latex glove and a pair of scissors.
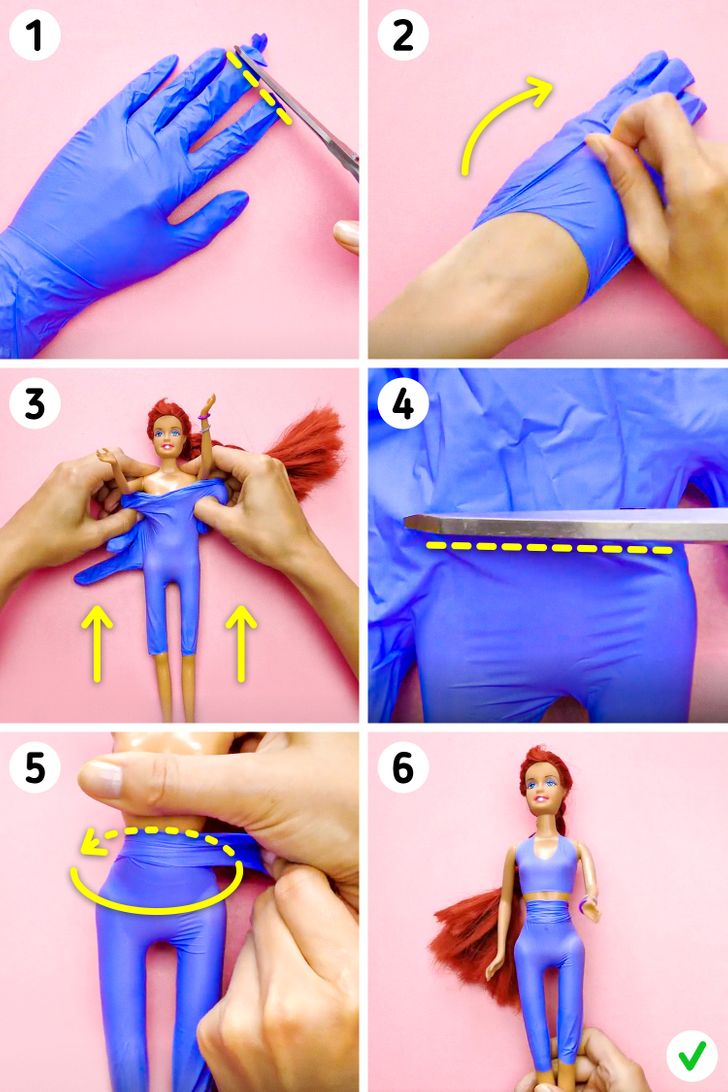
How to do it:
1. Put on a glove on your hand and cut off the tips of the index and middle fingers. Please, be very careful when cutting off these parts of the glove.
2. Take the glove off so it’s turned inside out.
3. Put the glove on the doll. Its legs should go through the holes in the index and middle fingers.
4. Cut off the upper part of the glove at about the waist level of the doll. Don’t cut off the pinky finger of the glove.
5. Wrap the pinky finger around the doll’s waist and secure it behind its back by tucking it into the leggings at the waist level.
6. The sporty leggings are ready!