How to Solve the Rubik’s Cube
There are several ways of solving a standard 3×3 Rubik’s Cube. The most popular method is probably the method from Jessica Fridrich, that many speedcubers use when they set records. But it’s too hard for beginners. It’s better to try methods that are more simple. Don’t be afraid of algorithms and descriptions: they only look confusing at the beginning. If you take a closer look, you will see how simple things really are.
5-Minute Crafts has described every step of solving a 3×3 Rubik’s Cube in detail, so that anyone can do it.
The basics of the structure of the Rubik’s Cube
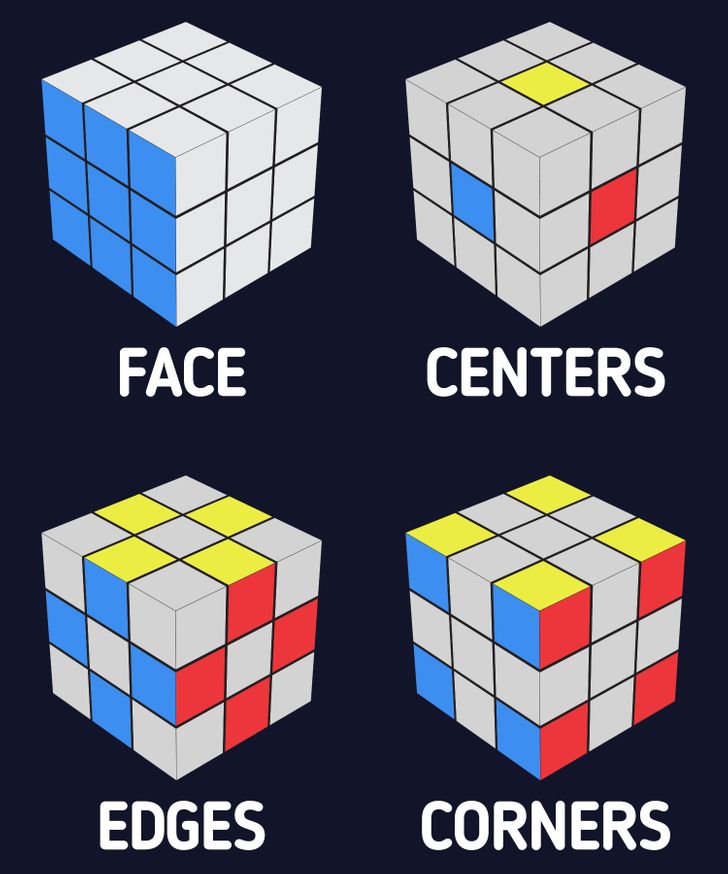
The main parts of the Rubik’s Cube that we should be familiar with:
- Face. There are 6 of them: white, yellow, red, blue, green, orange.
- Centers. They never move. They are always opposite to each other: white — yellow, red — orange, blue — green. The color of the center determines the color of the side.
- Edges. They have 2 colors. They are in the centers of the edges of the cube itself.
- Corners. They have 3 colors. They are the tops of the cube.
Preparation
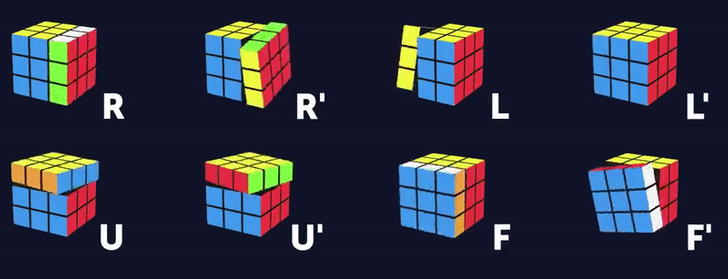
In order to solve the puzzle, we need small formulas to make the algorithm more simple. The faces are marked with the letters:
-
R (Right)
-
L (Left)
-
U (Up)
-
F (Front)
If you see a letter in the description of the moves, it means that this face needs to be turned 90° clockwise. Sometimes, there is a number before the letter — it shows the number of necessary turns. Also, there may be an apostrophe near the letter. It means that the face needs to be turned counterclockwise.
Step 1: Making the “flower” and the white cross
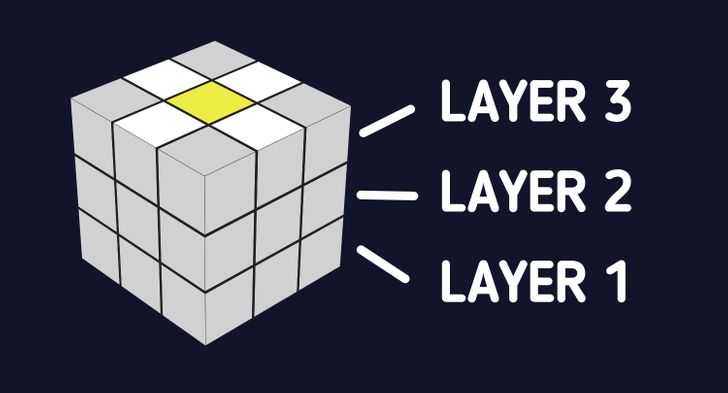
1. First, we need to make the white “flower” with the yellow center on the top face. Find the yellow center on the cube. Turn the cube so that the center faces up. Then, find the edges with the white color. Move them to the white center making a cross.
To make things easier, you can put the edges on the second layer and move them up. Make sure that by doing this, you’re not removing a white piece that’s already there. You can turn it to make room for a new white piece.
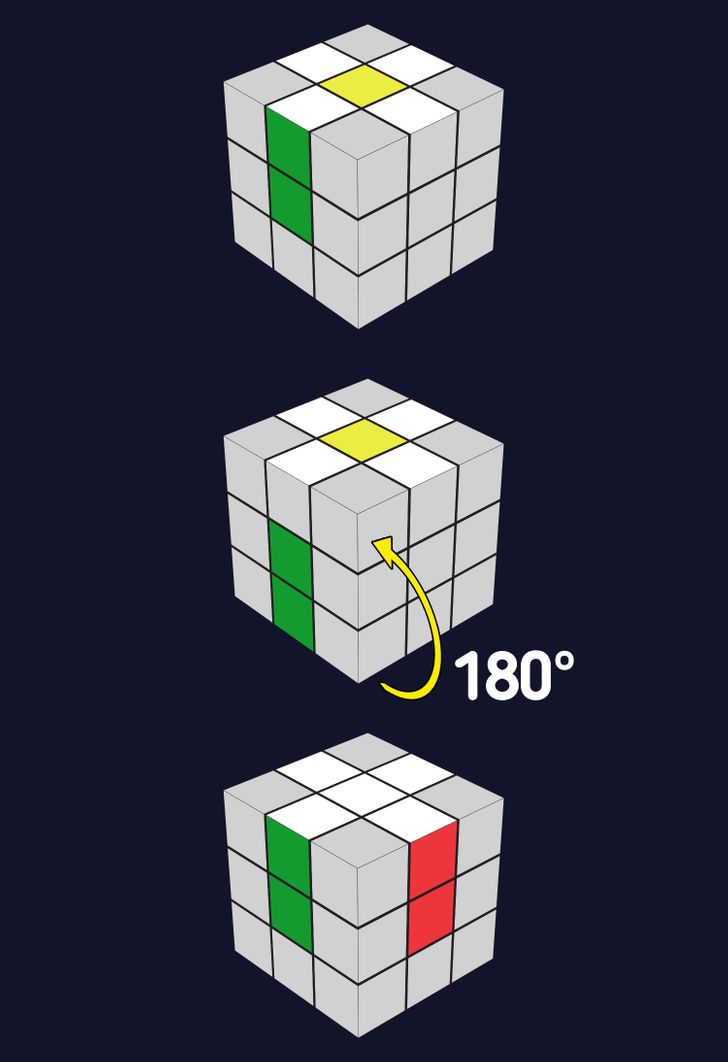
2. When you make the “flower,” turn the upper face until the edge color is the same as the color of the center of the front face. Then, turn the front side twice. The white should be below. Do the same with every edge of the flower. So, you will have a white cross on the lower face.
Step 2: Making the first layer
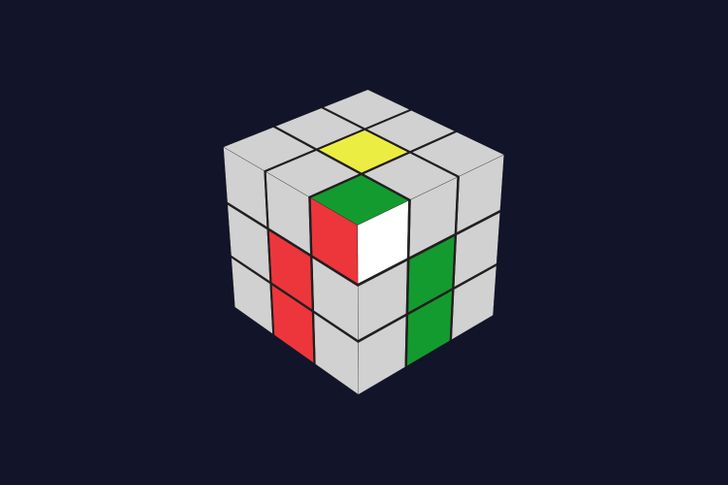
1. Now, let’s make the corners of the white side. Place the white cross below. Find a corner with the white color on the upper layer (it doesn’t matter which side of the face it’s on). Look at the other colors of the corner and turn the layer so that the colors are the same as the centers of the faces. For example, if the corner (aside from the white) is red-green, it needs to be between the red and the green centers.
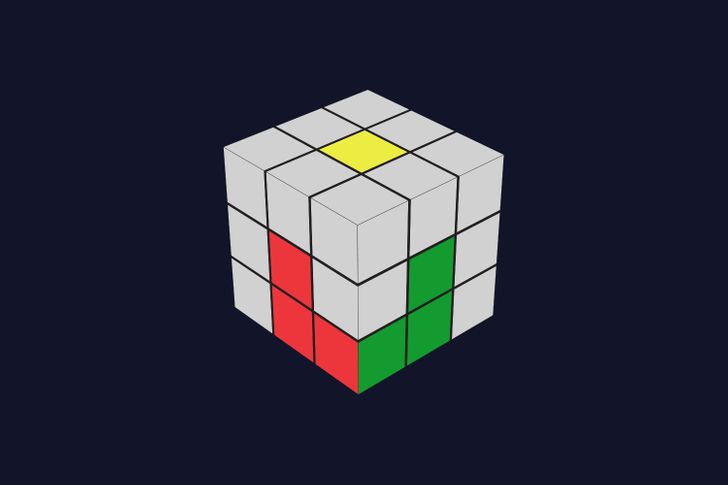
2. Then, use the R U R’ U’ algorithm. Repeat it until the white color is in its place on the lower face.
When the white piece is in the lower corner, but not on the right face, move it up following the same algorithm. Then put the corner between the edges with the same centers and repeat the algorithm.
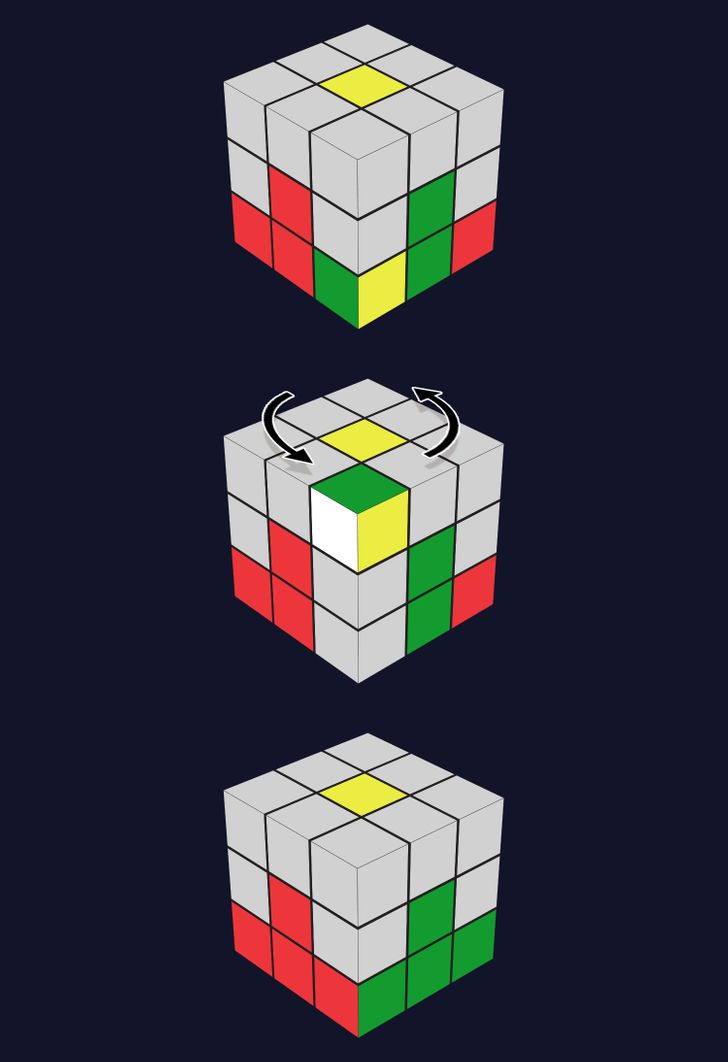
3. If you’re lucky, you have the first layer done. If there are minor differences in the colors, it’s okay — it’s easy to fix. Move the wrong lower corner up by using the formula you’ve already used. Turn the upper face until the colors of the corner are the same as the colors of the centers, and repeat the algorithm. Do it with every lower corner that is not in its spot. You’ve completed the first layer.
Step 3: Making the second layer
On the upper layer, find an edge without yellow pieces. Match it with the center of any face, so that the colors are the same. Look at the color of the edge from the top and decide on which side (relative to the front face) it needs to go.
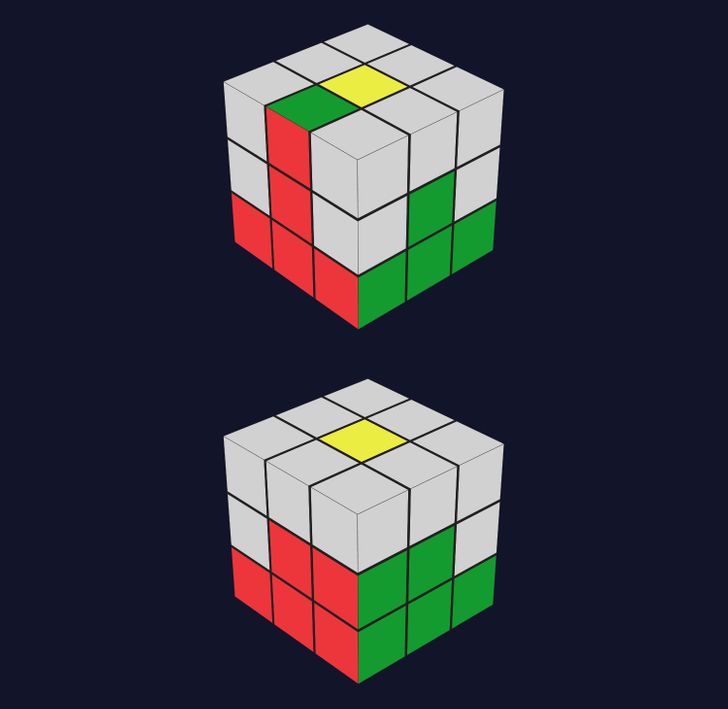
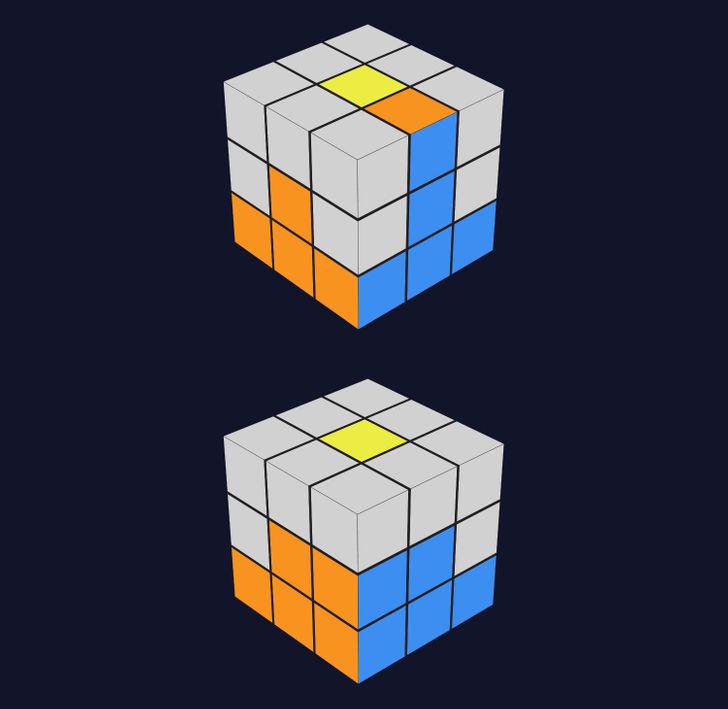
1. If the edge goes right. Turn the upper layer in the opposite direction of where the edge should be. Do the R U R’ U’ moves. Then, move the entire cube clockwise by one face. Do the L’ U’ L U move.
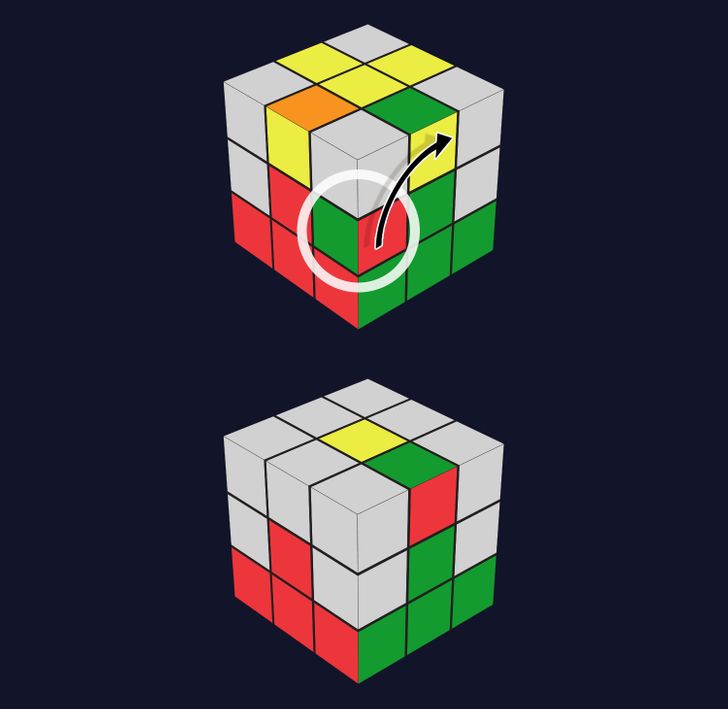
2. If the edge goes left. Move the upper layer one time in the opposite direction of where the edge should be. Do the L’ U’ L U. Turn the cube counterclockwise. Do the R U R’ U’.
3. If on the top, all the edges have yellow pieces. Just follow one of the first plans to move the edges of the other colors and then use the method depending on where the edge goes — left or right.
You’ve completed 2 layers, just a little bit left to go.
Step 4: Making the yellow cross on the upper face
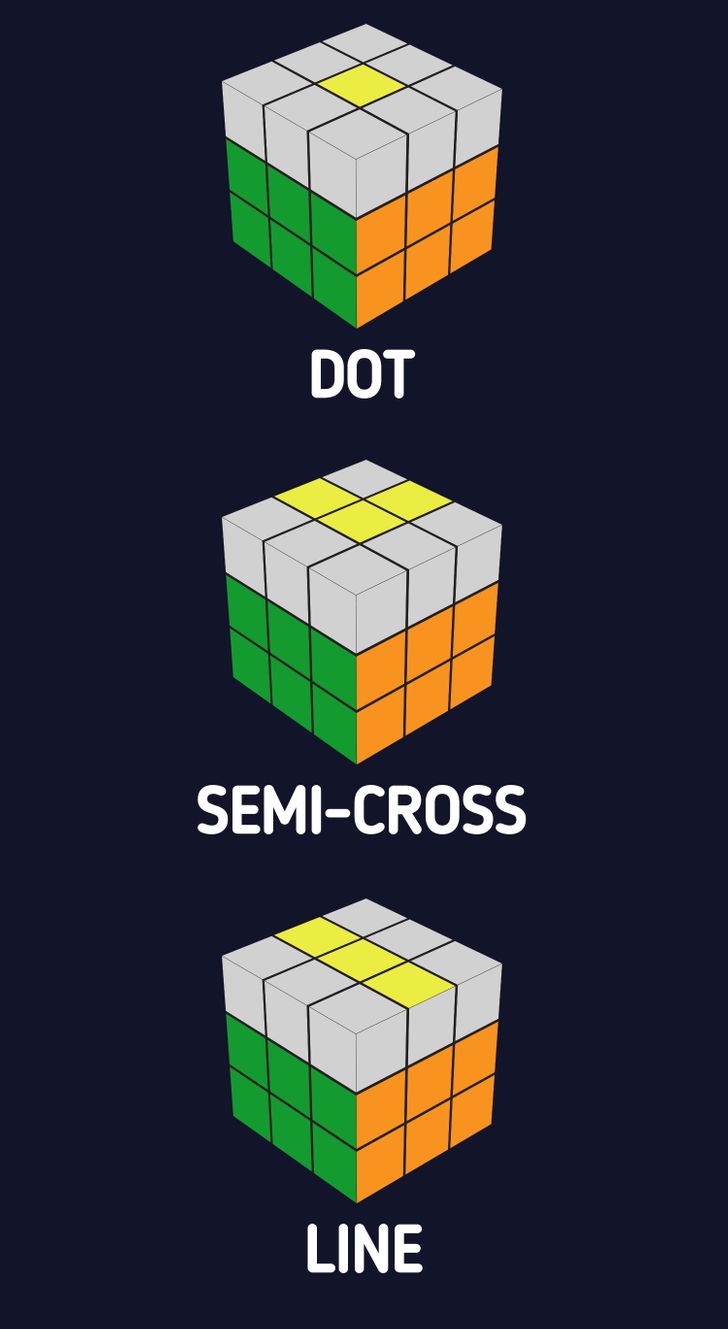
The yellow cross is made in the following way: dot — semi-cross (9 o’clock) — line (3 same-colored pieces in line) — cross. The cross may already be completed after all the previous moves. If it is, just skip this step. If not, it’s easy to do fast.
1. If you already have the line. Turn the cube so that the line on the upper face is horizontal. And it doesn’t matter if there are other yellow elements nearby, all that matters is that you have 3 red pieces in line. Do the F R U R’ U’ F’ formula. You should have a cross now.
2. If you have a semi-cross. Turn the cube so that the cross points at 9 o’clock. Then follow the F 2(R U R’ U’) F’ formula. So, it should be done twice before you turn the front face counterclockwise.
3. If you only have a dot. Combine 2 previous algorithms. First, do the F 2(R U R’ U’) F’. You will get the line, but don’t forget to place it horizontally. Then, continue with the F R U R’ U’ F’. You should have a cross now.
Step 5: Making the corners of the upper layer
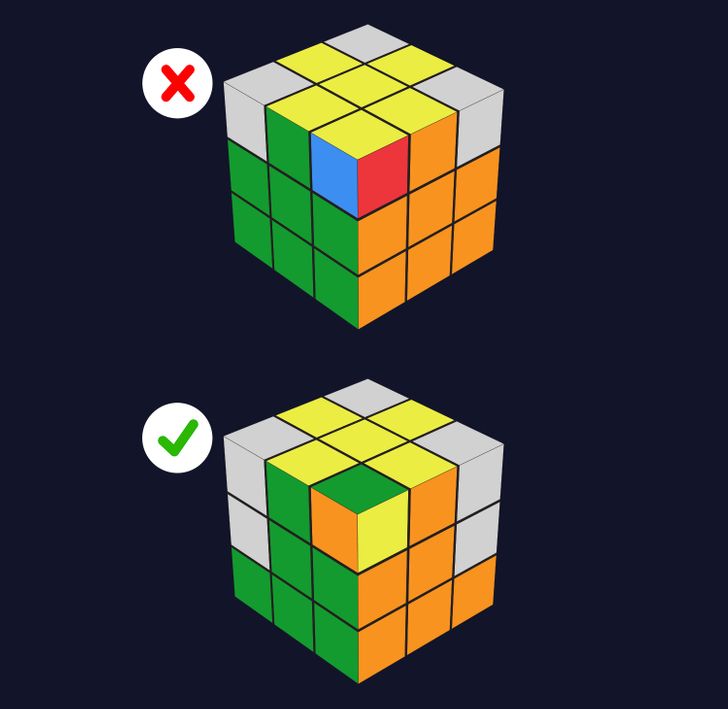
The corners are in the right positions when they are between the corresponding centers. So, if the corner is yellow-orange-green, it should be between the yellow, orange, and green faces. And it doesn’t matter where the sides of the corner piece are facing. Now, you just need to set them according to the color. There could be 2 situations:
1. Only the 2 nearby corners are set right. In this case, Move them to the left palm and follow the 3(R U R’ U’) + turn the cube clockwise by one face + 3(L’ U’ L U).
2. If only the diagonal corners are right. Start with the algorithm of the first step and then move the upper layer so that 2 corners match on one side. Move them to the left palm. Repeat the algorithm.
Step 6: Making the yellow face
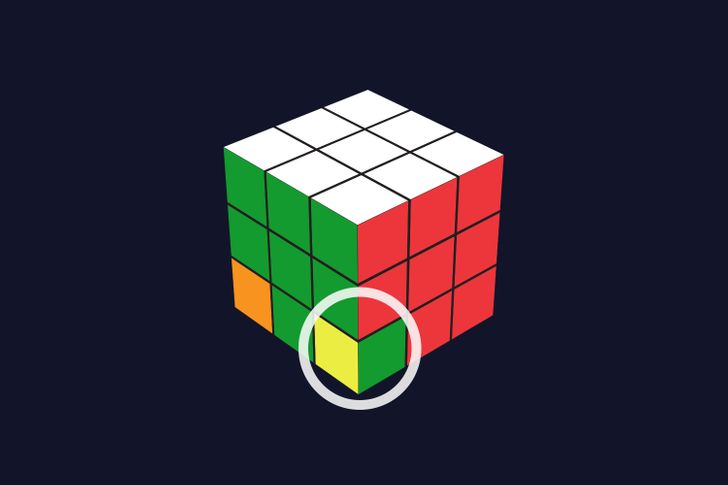
Turn the cube so that the yellow cross is on the lower face. Watch the corner that is on the right lower part. Move the piece with the yellow side there, that’s not on its face below.
1. To move the corners in their places and not ruin the rest, repeat the R U R’ U’ until the corner is in the right position.
2. Stop where the corner is in its place. It’s okay if the rest breaks now. To the spot where the “wrong” corner was, move the other one with the yellow face by moving the lower layer clockwise. Repeat for all the corners until the entire edge below is complete.
Step 7: The final moves
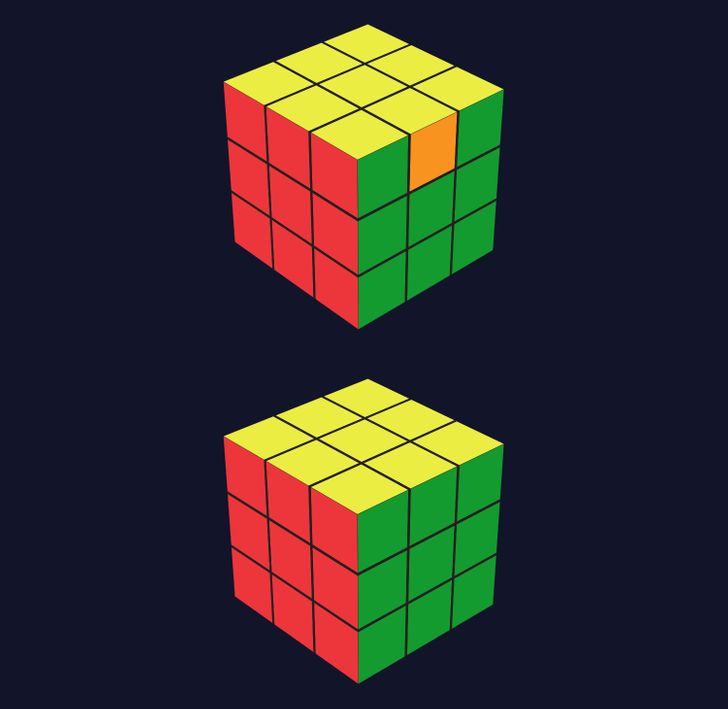
By now, your cube should be all done aside from the edges of the upper layer. Now is the time to finish it.
1. If one side is completely done. Move the cube so that the completed part faces you. Then, follow the R U R’ U’ + L’ U’ L U + 5(R U R’ U’) + 5(L’ U’ L U).
2. If all the edges are in the wrong spots. Continue with the same algorithm from the first step. You’ll have one side completed. Turn the cube to make the completed part face you and repeat the algorithm again.
Congratulations, you’ve solved the Rubik’s Cube!
