10 Types of Braids You Can Try
If you have long hair, this is the perfect opportunity to play around and create an original style with it. One of the things you can do is make braids. The best is that there are almost countless variations of braids that you can try every day and achieve new looks for different occasions. 5-Minute Crafts wants to show you 10 of our favorite braid styles you can recreate at home.
1.
What to do:
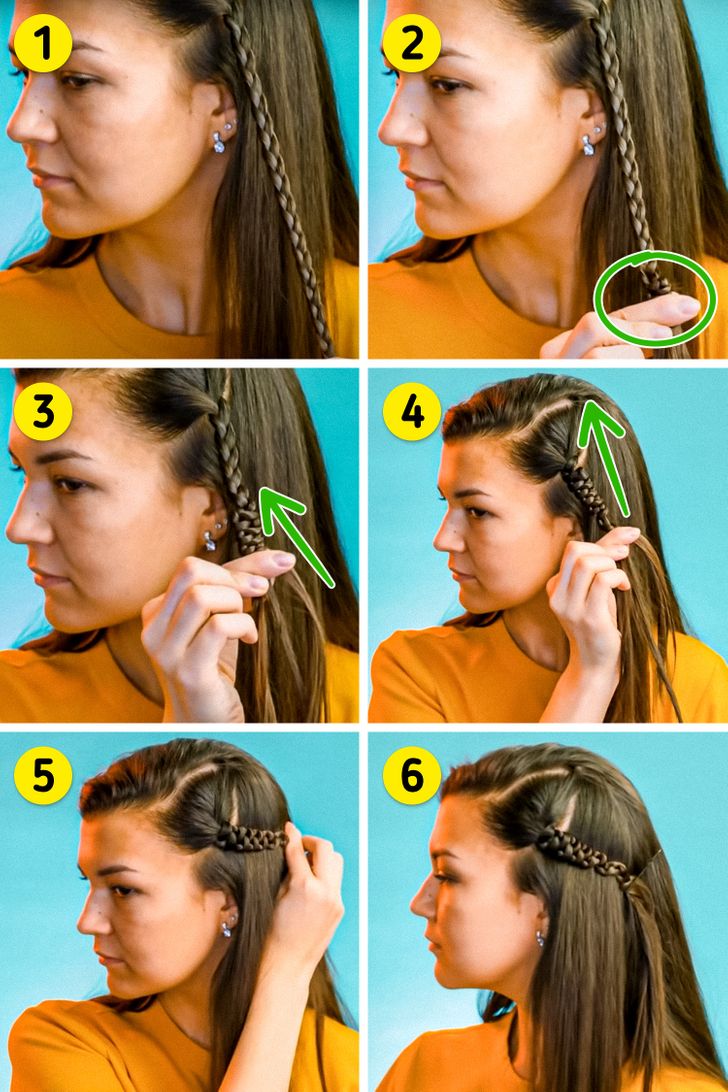
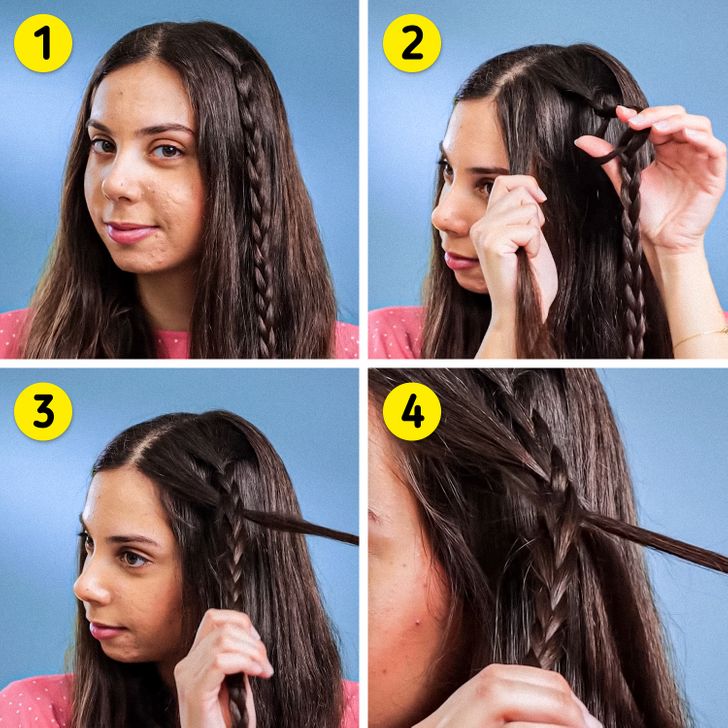
Step 1: Make a thin braid at the side of your head.
Step 2: Pinch the end of the braid with your fingers.
Step 3: Start pushing the braid up by moving your fingers.
Step 4: Keep pushing the braid up like it’s shown in picture 4.
Step 5: Position the braid around your head.
Step 6: Secure the end of the braid with a pin.
2.
What to do:
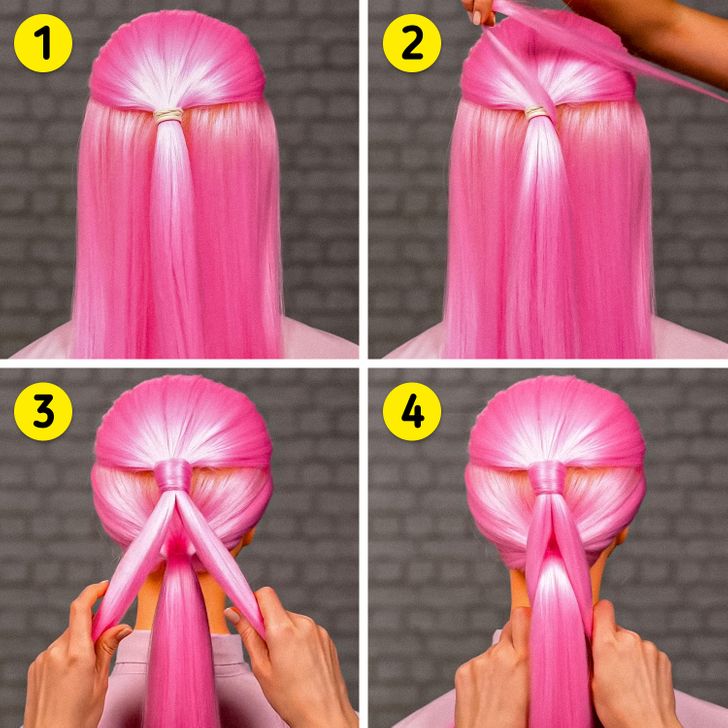
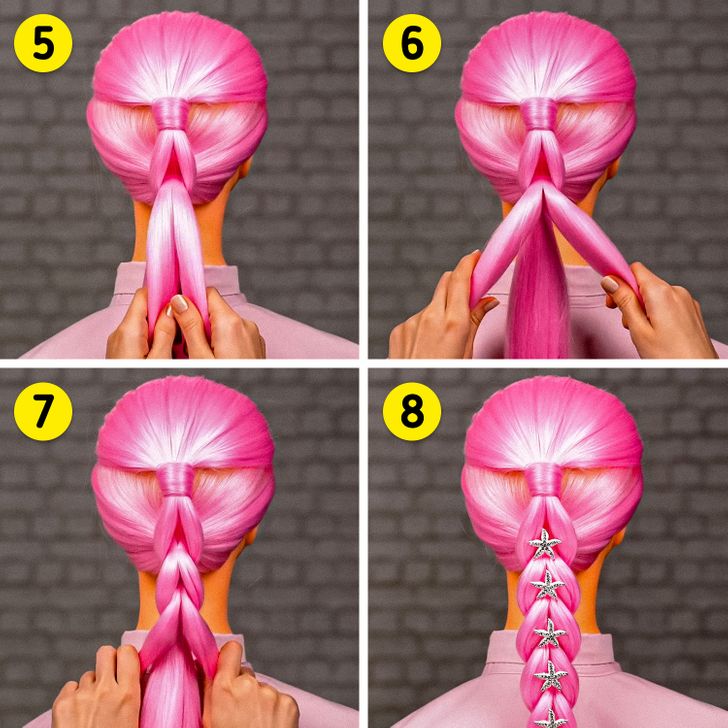
Step 1: Select a part of your hair and tie it into a ponytail like shown in picture 1.
Step 2: Pick a thin lock from under your ponytail and wrap it around the hair tie to hide it. Secure with a pin.
Step 3: Take the second part of your hair and tie it with a second hair tie. Take the hair from the first ponytail and slip the end into 2 sections.
Step 4: Position the ends from both sides of the second ponytail, like it’s shown in picture 4. Secure the end with a small hair tie.
Step 5: Next take the ends of the hair from the second ponytail and split them into 2 sections.
Step 6: Position the ends from both sides of the first ponytail like it’s shown in picture 6. Secure the end with a small hair tie.
Step 7: Keep repeating steps 3, 4, and 5 moving down.
Step 8: Secure the ends of the hair with a hair tie. You can also add hair ornaments.
3.
What to do:
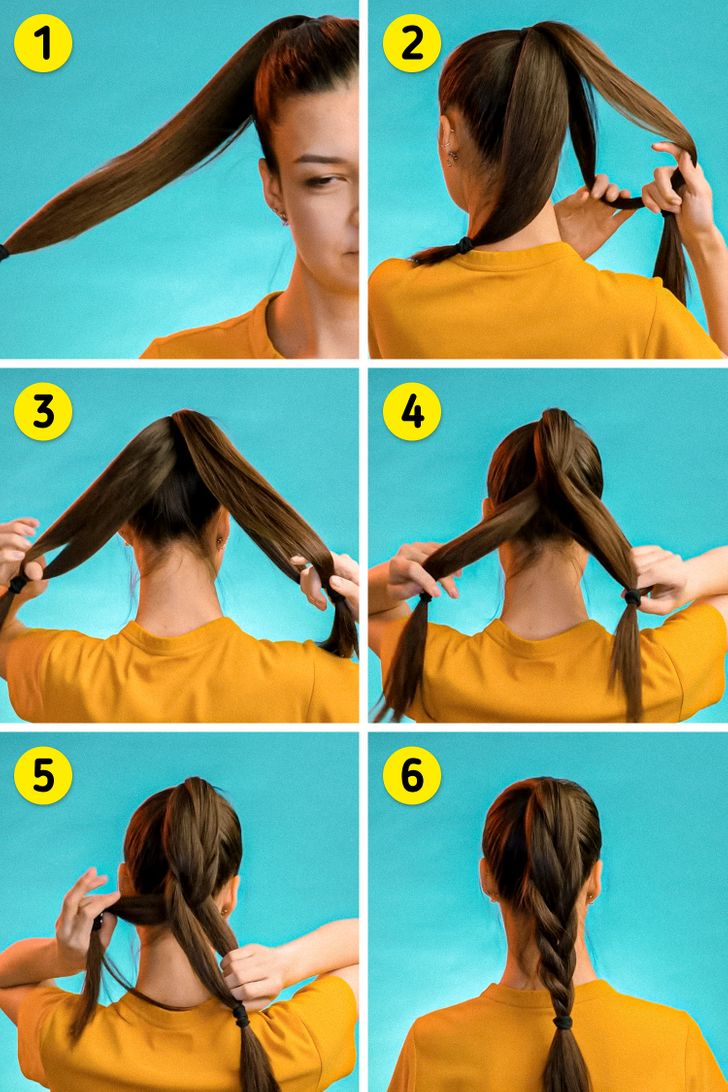
Step 1: Put your hair into a high ponytail.
Step 2: Split your hair into 2 locks and tie them at the end. Take one lock and split it in the middle to create a “hole.”
Step 3: Take the second lock and use your finger to split it in the middle to create a “hole.”
Step 4: Thread one lock into another like it’s shown in picture 4.
Step 5: Keep doing it by alternating the locks.
Step 6: The result should look like it’s shown in picture 6.
4.
What to do:
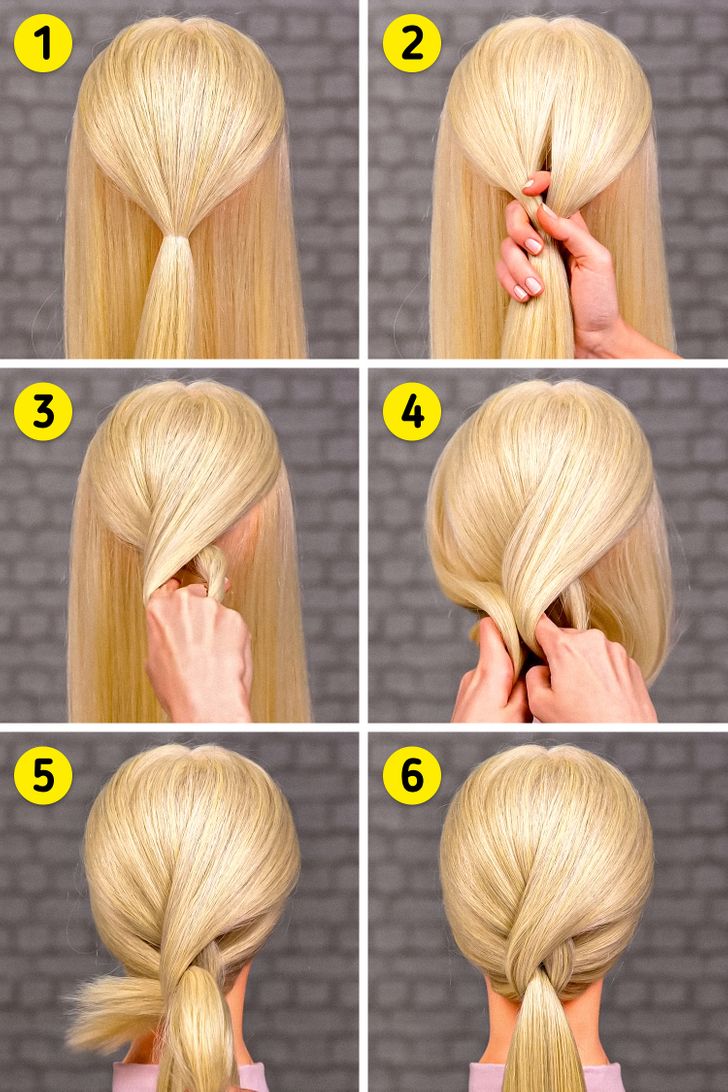
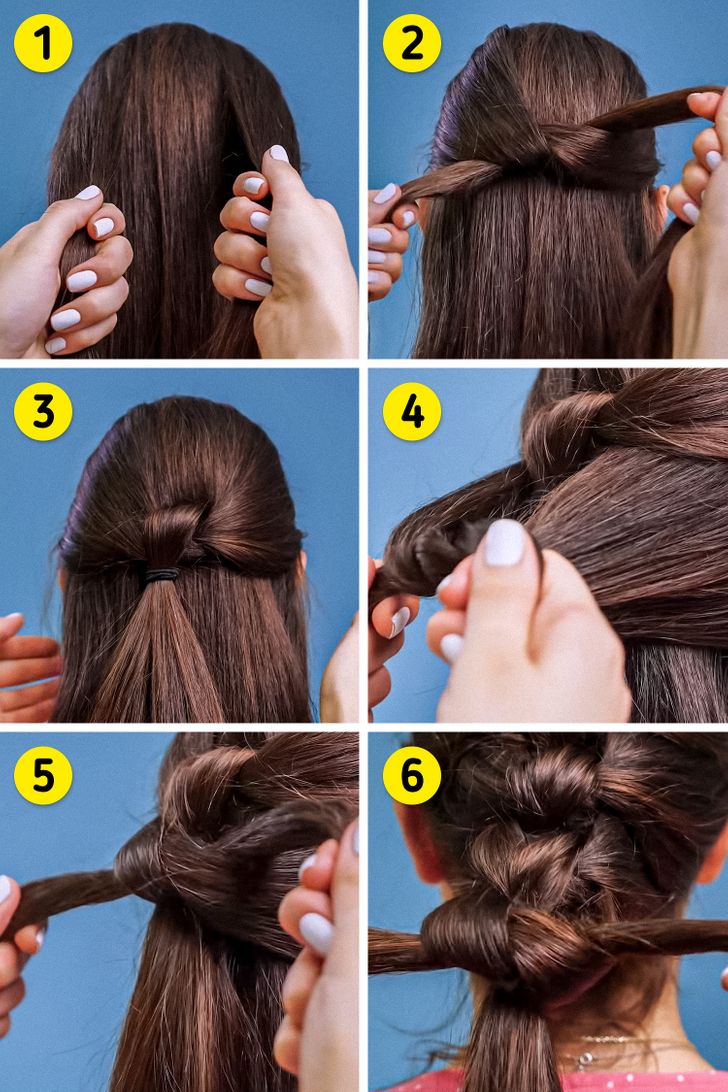
Step 1: Select a part of your hair and tie it into a ponytail like it’s shown in picture 1.
Step 2: With a help of your fingers, create a hole in the upper part of your ponytail.
Step 3: Place 2 fingers in the hole and twist the hair like it’s shown in picture 3.
Step 4: Take hair from the lower part of your head (the hair that was not tied into a ponytail).
Step 5: Pull it through the twisted hole in the ponytail.
Step 6: The end result should look like it’s shown in picture 6.
5.
What to do:
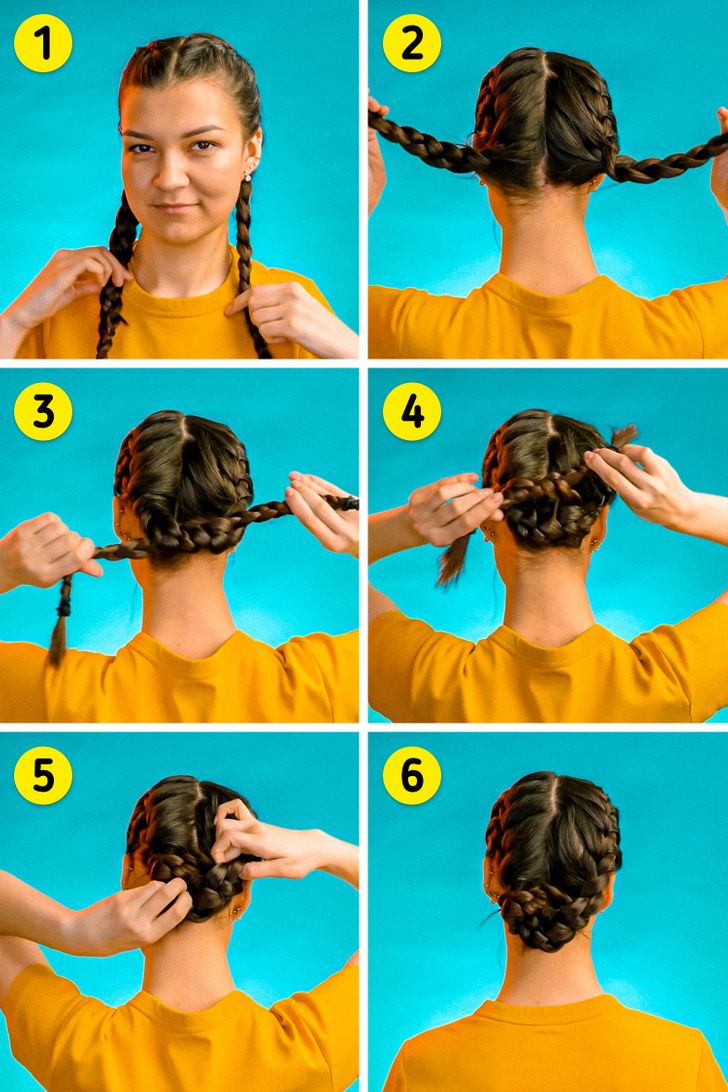
Step 1: Make 2 Dutch braids on the sides of your head.
Step 2: Hold each braid with your hands respectively.
Step 3: Tie the braids like it’s shown in picture 3.
Step 4: Tie the ends of the braids one more time.
Step 5: Hide the ends of the braids underneath.
Step 6: Secure everything with pins.
6.
What to do:
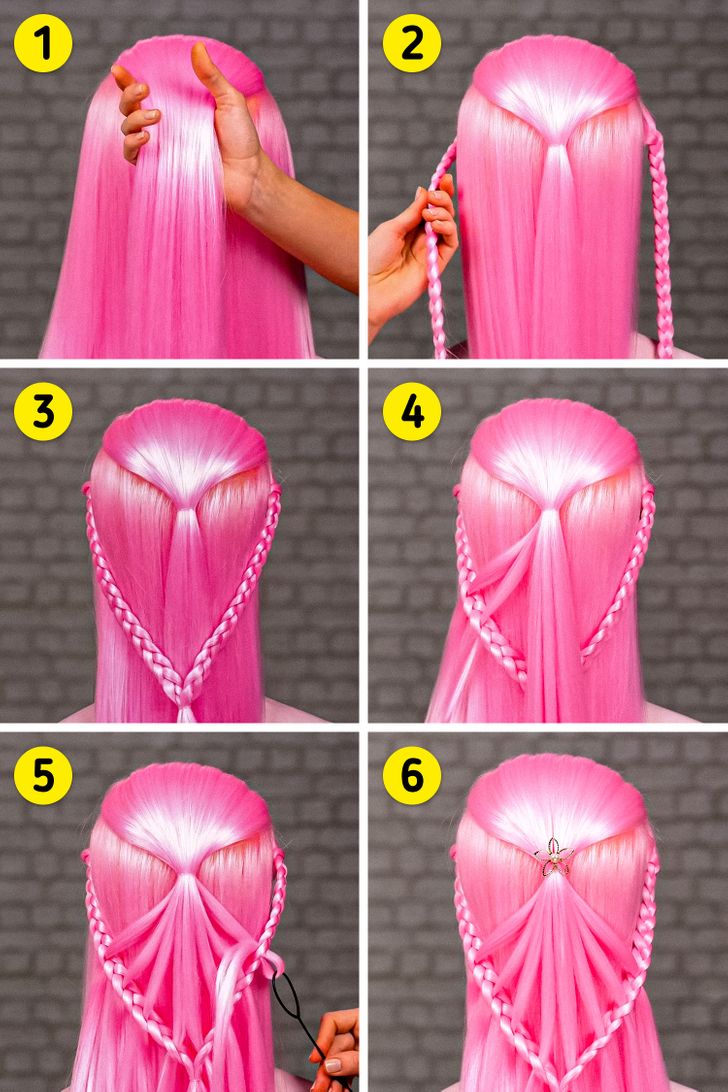
Step 1: Select a part of your hair like it’s shown in picture 1.
Step 2: Tie it into a ponytail. Make 2 thin braids on both sides of your head.
Step 3: Secure the ends of the braids with a rubber band like it’s shown in picture 3.
Step 4: Pick a thin lock of hair from the end of your ponytail and pull them through the braids like it’s shown in picture 4.
Step 5: Use can use a plastic loop tool to help you with pulling.
Step 6: The end result should look like it’s shown in picture 6. You can also add hair ornaments.
7.
What to do:
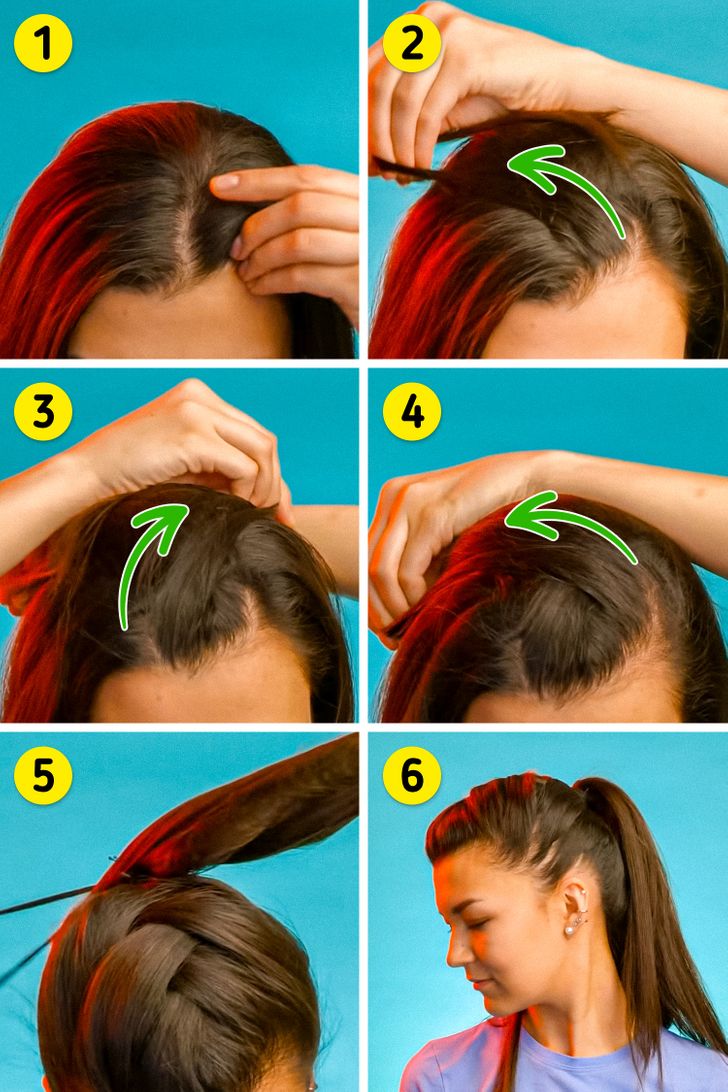
Step 1: Find the beginning of the natural part in your hair and select a lock of hair there.
Step 2: Position the selected lock of hair at the opposite side of your head like it’s shown in picture 2.
Step 3: Find a lock of hair on the opposite side and do the same thing with it.
Step 4: Select the next lock of hair and position it at the opposite side of your head like it’s shown in picture 4.
Step 5: Keep braiding your hair until you reach the back of your head.
Step 6: Secure your hair with a scrunchie to create a ponytail.
8.
What to do:
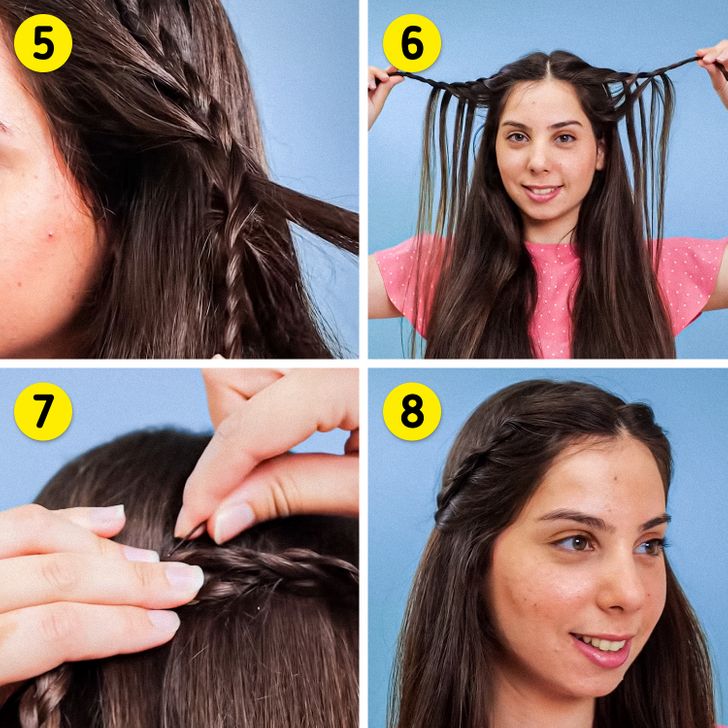
Step 1: Make a thin, loose braid on the side of your head.
Step 2: With the help of your fingers, make a small hole in the top part of your braid like it’s shown in picture 2.
Step 3: Take a lock of hair near the natural part of your hair and pull it through the hole in your braid.
Step 4: Take your braid, and with the help of your fingers, make a second hole in it, a bit lower than the first one. Select a lock of hair under the lock that you picked near the natural part in your hair. Pull this lock through the second hole in your braid.
Step 5: Keep doing the same with the other locks of hair. Repeat on the other side of your head.
Step 6: the end result should look like it’s shown in picture 6.
Step 7: With a pin, secure the ends of the braids at the back of your head.
Step 8: The end result should look like it’s shown in picture 8.
9.
What to do:
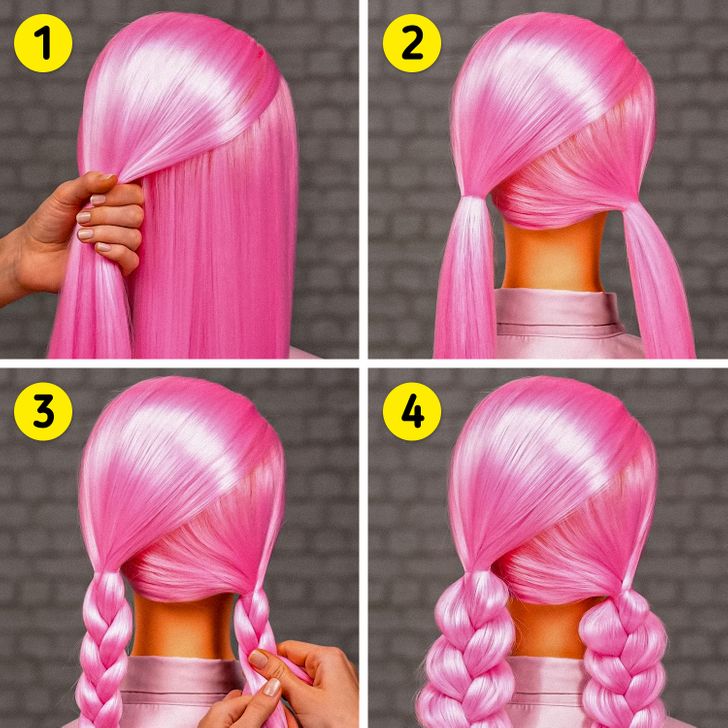
Step 1: Select a part of your hair like it’s shown in picture 1.
Step 2: Make 2 side ponytails like it’s shown in picture 2.
Step 3: Make 2 braids like it’s shown in picture 3.
Step 4: Fluff the braids out.
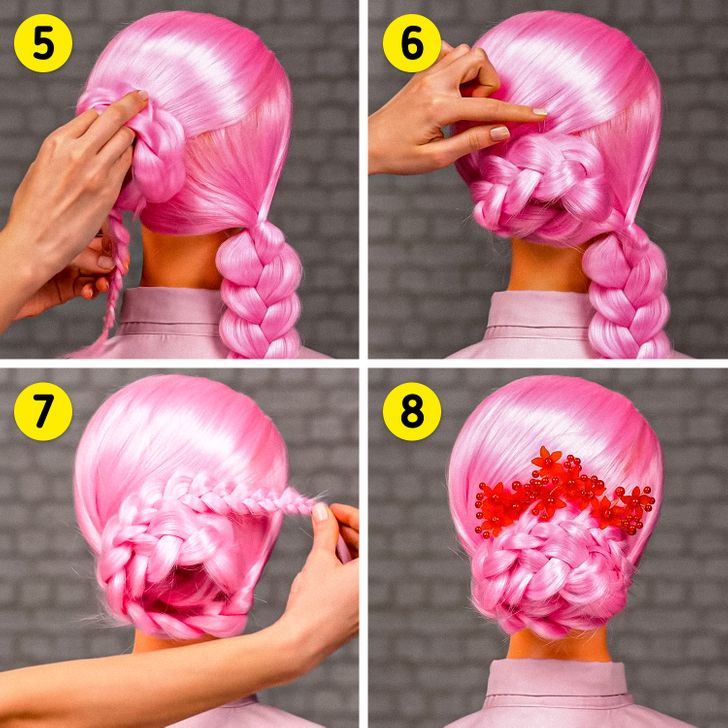
Step 5: Wrap a braid around itself like it’s shown in picture 5.
Step 6: Secure its end with a pin.
Step 7: Take the second braid and wrap it around the first braid.
Step 8: Secure everything with pins. You can also add hair ornaments.
10.
What to do:
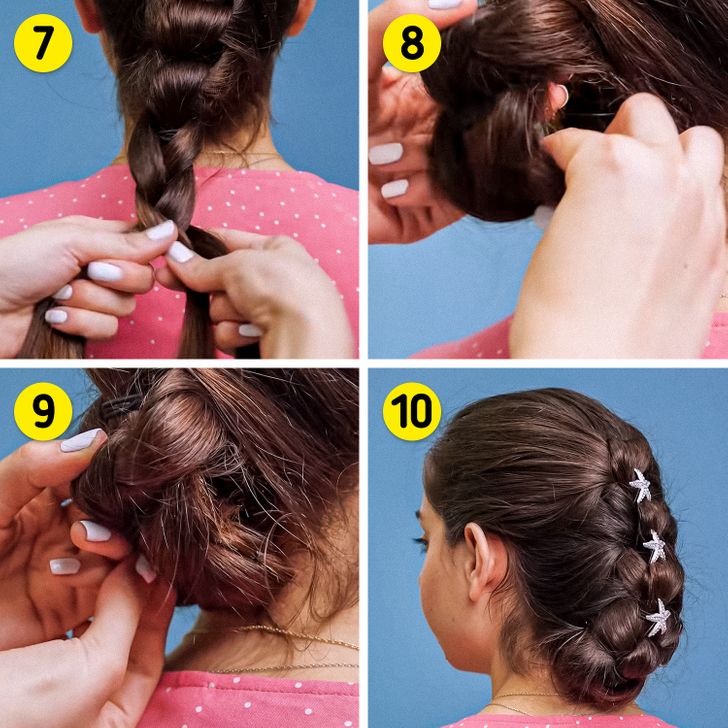
Step 1: From both sides of your head, select 2 locks of hair.
Step 2: Tie the locks together.
Step 3: Secure the end with a hair tie like it’s shown in picture 3.
Step 4: Underneath the first 2 locks of hair, select 2 more from both sides of your head.
Step 5: Tie them together.
Step 6: Move down by selecting new hair locks and tying them together.
Step 7: When you reach the back of your head, make a classic braid with the remainder of your hair.
Step 8: Secure the ends with a hair tie. Then start rolling the hair up like it’s shown in photo 6.
Step 9: Roll until you reach the back of the head. Secure everything with pins.
Step 10: The final result should look like it’s shown in picture 10. You can also add hair ornaments.
