Hair Buns: Types and Instructions
There’s nothing worse than having to go out somewhere and not knowing what to do with your hair. The way we style it can completely change your look. If you’re having another one of those bad hair days with no idea what to do with your hair, we’ve prepared the perfect solution that can spice up your appearance.
Materials that are needed for this hairdo
- Hair ties
- Bobby pins
- Hair spray
- Long hair band
- Pencil
- Decorative clips
- Claw clip
Butterfly for long hair
- This hairstyle can be done in less than a minute and saves a lot of time if you are in a hurry to go out. It’s most practical on freshly washed hair or hair that has not been washed for a day. For dirty hair, dry shampoo is recommended before performing the steps.
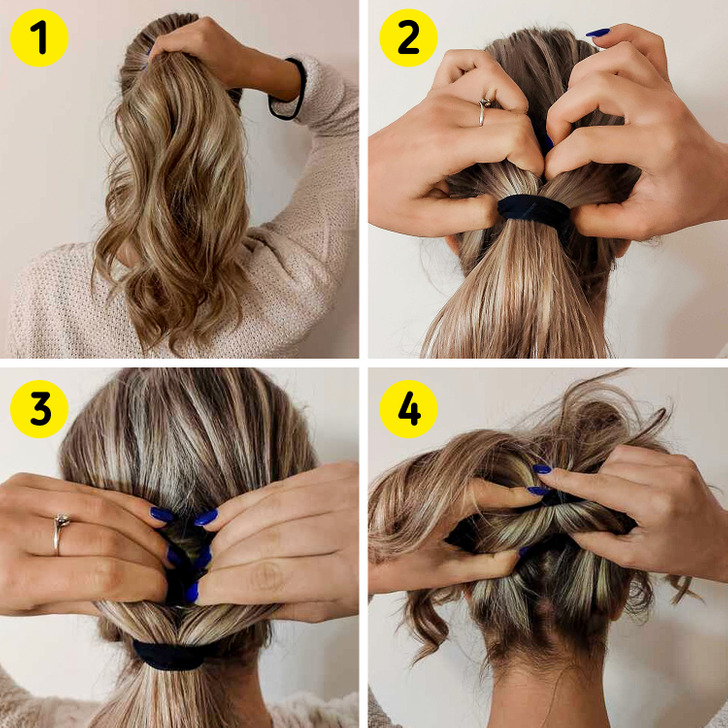
Step 1: Gather your hair higher on your head and secure it in a ponytail.
Step 2: Loosen the elastic band and pull it down. Place your fingers in the middle of the loosened ponytail and separate it into 2 parts.
Step 3: Hold the separate sections of hair with each hand to form an opening.
Step 4: While holding the separated strands with your thumbs, use your index fingers to push the hair inward to pull out the other side.
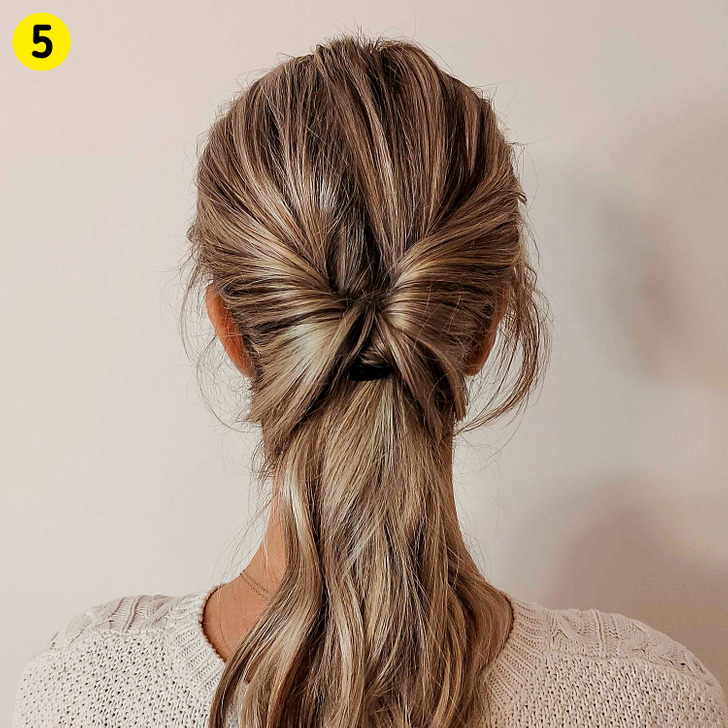
Step 5: Pull the hair down with one hand and push the hair tie up with the other to secure the hairstyle.
Easy bun
- This is classic, easy and fast. Say goodbye to boring ponytails. This style only takes a few seconds and it always makes a great impression.
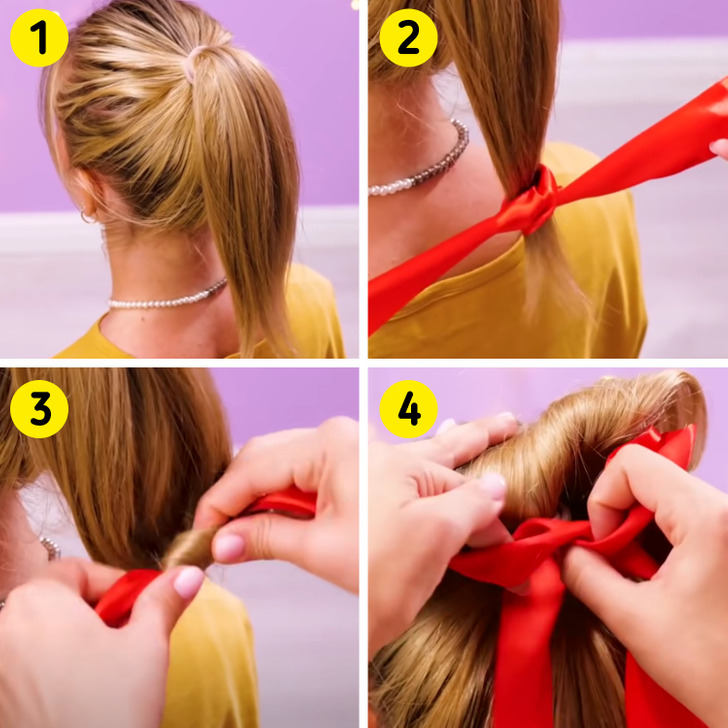
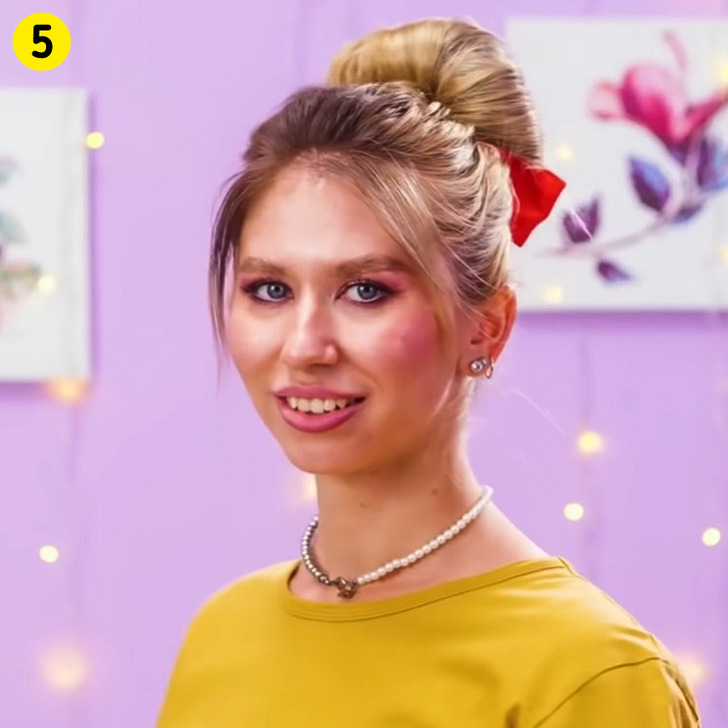
Step 1: Comb your hair and tie it in a bun, but make sure that no part is left untucked.
Step 2: Take a long hair band and secure it at the end.
Step 3: Start rolling the hair in the bow, moving upward until you reach the clip.
Step 4: Wrap the hair around the clip and tie the hair band into a bow.
Step 5: If necessary, take some hair pins and secure the bun in place. Arrange your bangs how you’d like and it’s ready!
Long curly bun
- A casual messy bun can turn a bad day into a wonderful one. It saves time and energy when we’re in a hurry.
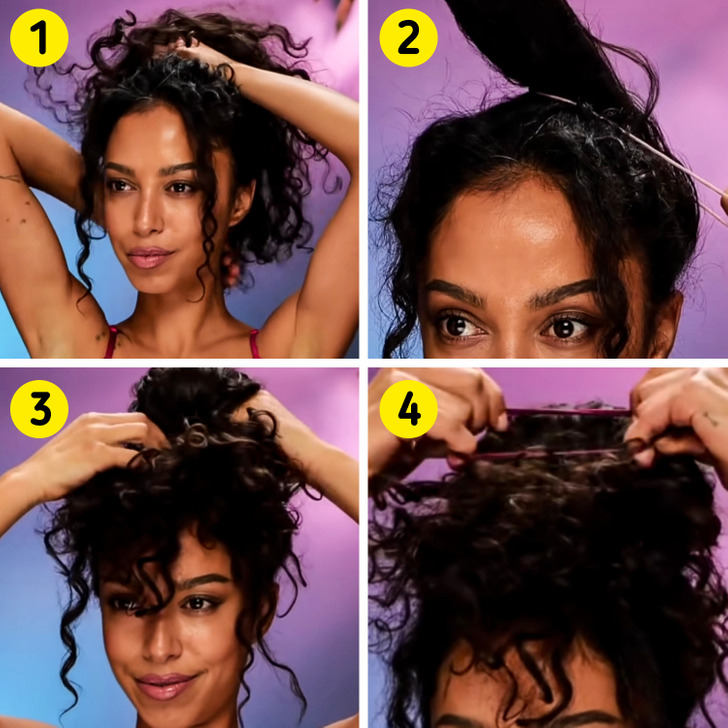
Step 1: Gather all the hair as high as you can, leaving 2 strands at the front.
Step 2: Tie it with a tight rubber band so that it doesn’t come out too fast.
Step 3: Gather the tail into a loop, not leaving too much space in between.
Step 4: Place a thicker hair tie over the loop, making a big bun.
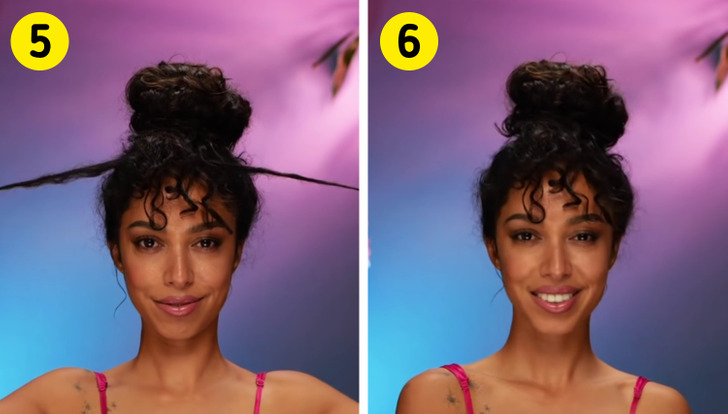
Step 5: Twist the 2 strands you left earlier into swirls and twist until you reach the end. Fasten them with bobby pins so they don’t fall off.
Step 6: Trim the ends to make bangs out of them and add fashion accessories if you think there is a need. You can use hair bands, a scarf, or barrettes as a spicy final touch, or simply leave it as it is.
Braided bun
- It takes a little more time and energy, but it’s beautifully unusual yet super cool when we want to look a little different, as it can really spice up the moment. Definitely an Instagram-worthy look!
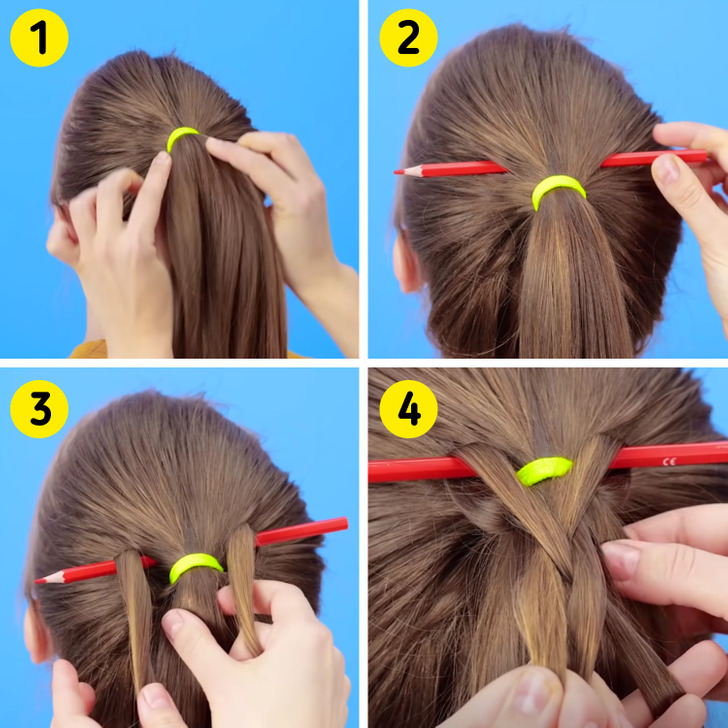
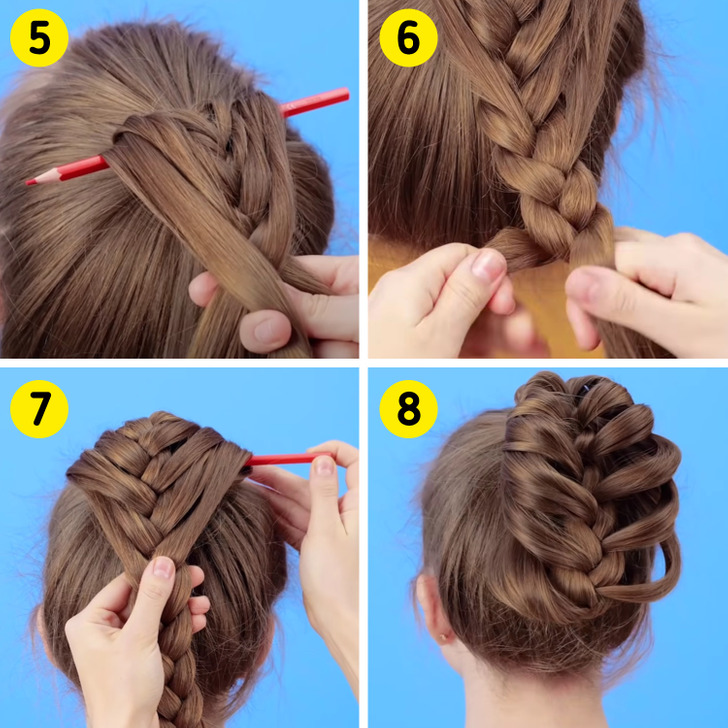
Step 1: Tie the hair high on the head, tightening the clip enough so that it doesn’t come loose.
Step 2: Insert a large pencil above the ponytail and set it horizontally.
Step 3: Separate 2 thin strands from the ponytail and carefully flip them over the pencil.
Step 4: Start making a braid by connecting the hair from the middle and the strands above the pencil.
Step 5: As you braid, gather more strands and flip them over the pencil again and again. Make sure that you take hair from both sides of the hair.
Step 6: Keep braiding until you get to the bottom. Once you reach it, finish the braid with an elastic rubber band.
Step 7: Slowly take the pencil out so you don’t mess up the hairstyle.
Step 8: Tuck the tail on the inside and secure it.
Classic everyday bun
- This is a simple and elegant bun for days when you’re too lazy to wash your hair but have an important meeting or want to complete your look with cute hair.
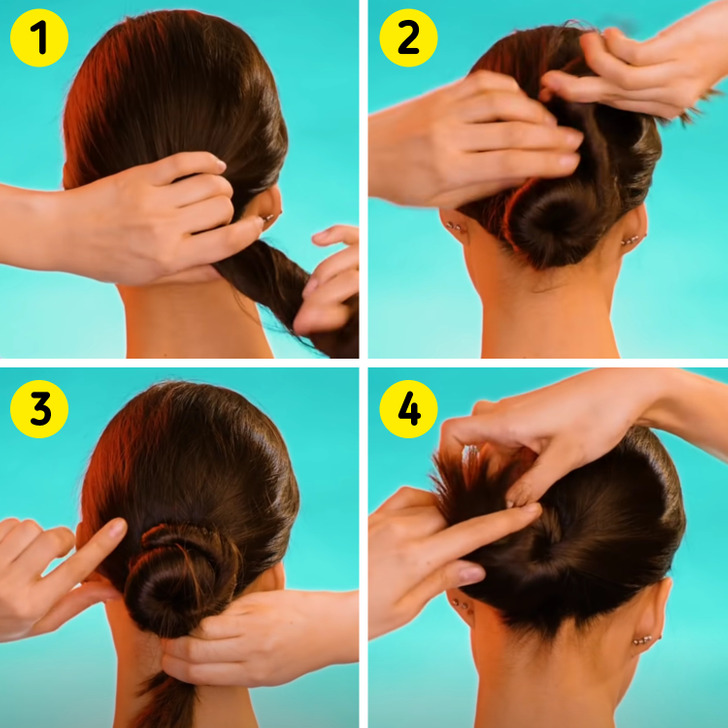
Step 1: Comb your hair and gather it with both hands. Carefully twist it into a bundle without leaving anything behind.
Step 2: Roll the bundle into a bun, but pay attention to make sure you tighten it enough.
Step 3: Hold the hair by the end and decide which side of the hair you will put it through. Smooth your hair before carrying out the next step.
Step 4: Make a small hole to thread the bun inside. Push it with all your strength so that all the hair gets inside.
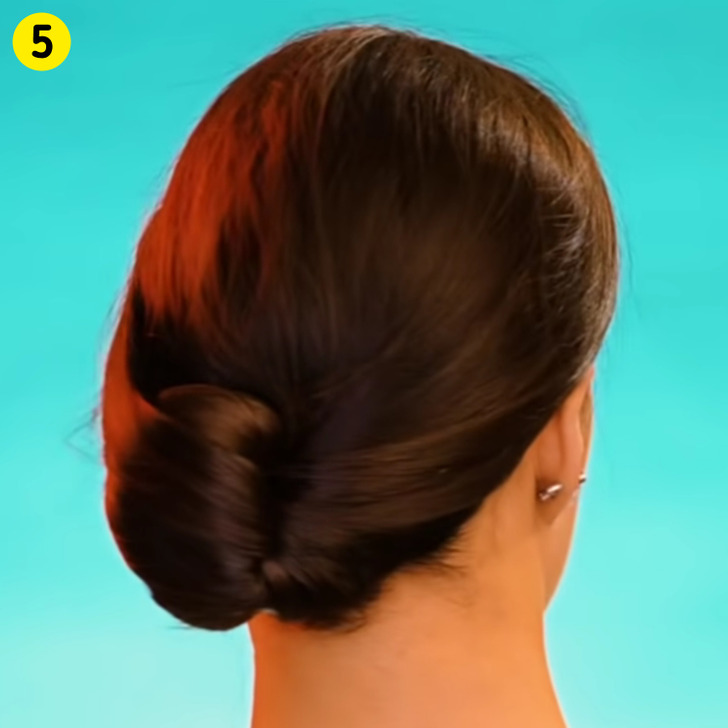
Step 5: Make sure that all the hair is pushed inside. If necessary, you can add bobby pins to keep it stable or put a claw clip over all the hair to make it secure and fit with hairspray.
Flower bun
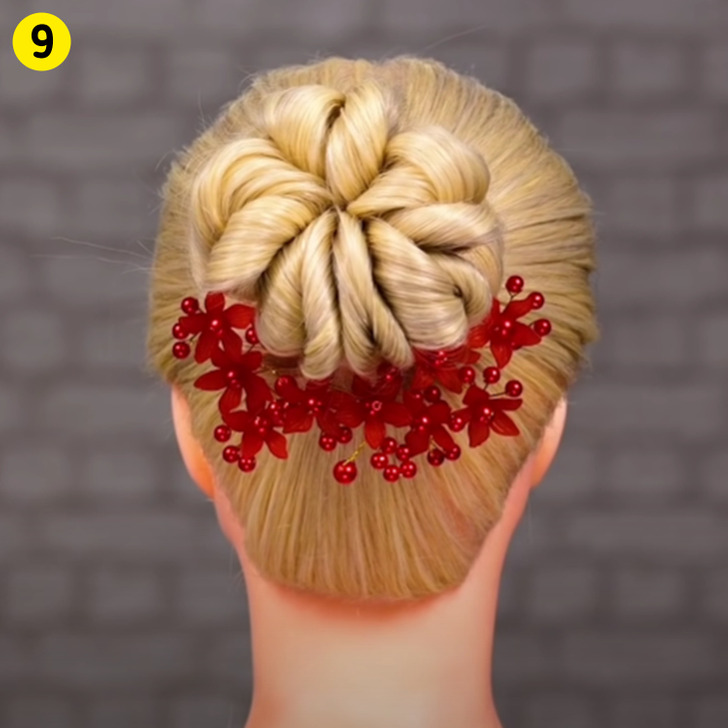
- This is unique and easy for a night out or a casual dinner to spice up your look. It’s simple and easy to make.
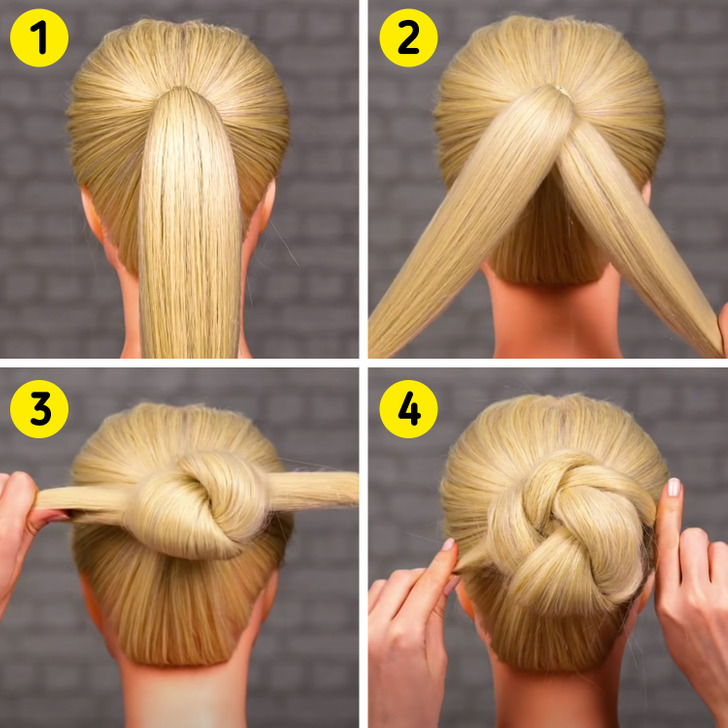
Step 1: First, brush your hair. Starting with clean hair is crucial to avoid tangles or knots later on. Tie your hair into a high, sleek ponytail.
Step 2: Divide your hair into 2 equal sections and hold each one with your designated hands.
Step 3: Tie a knot using both parts. Pinch as much as you can to leave more hair available.
Step 4: Repeat the knotting as long as you have hair available, but be sure to line up the knots correctly so they don’t all pile up.
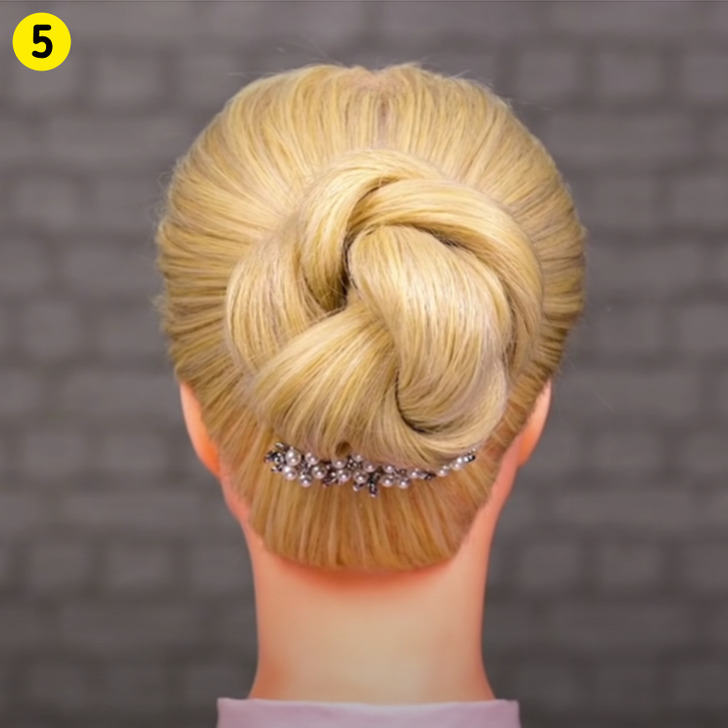
Step 5: Smooth the hair and fasten the ends of the hair with bobby pins that you will insert inside the bun without them being visible from the side, or tie the rest with a clamp of a similar color to the hair. Add some decorative barrettes underneath and spritz your hair with hairspray.
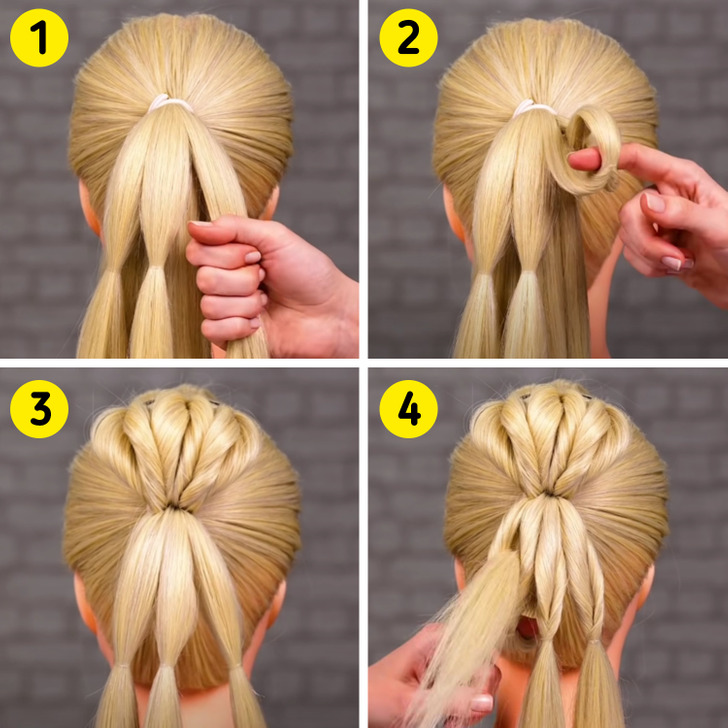
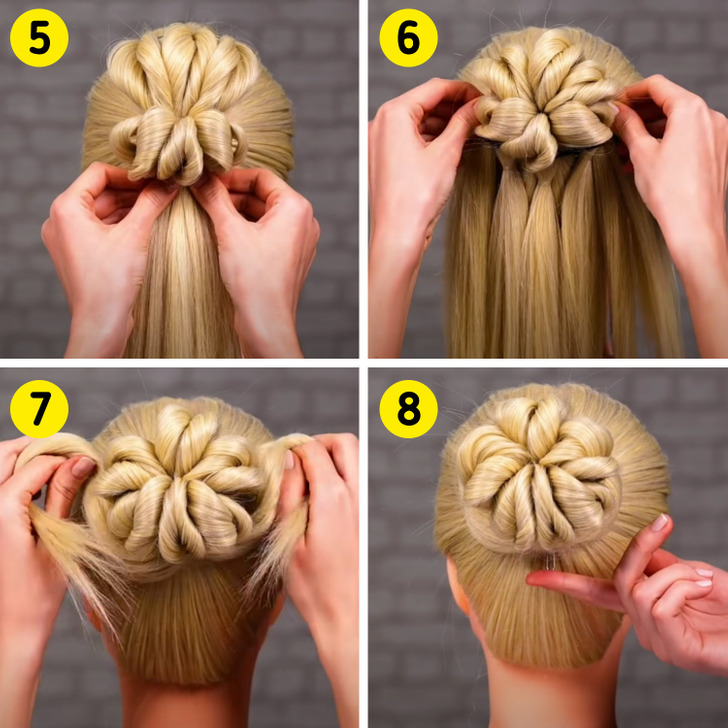
Feather bun
- This might be considered a trendy young look that works well for both a trip to the mall or a night out with friends.
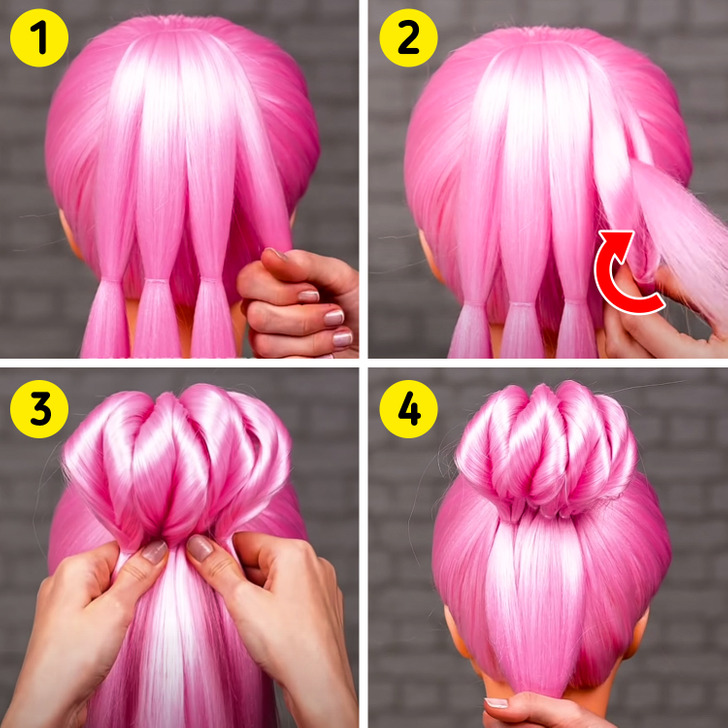
Step 1: Tie your hair into a high bun and divide it into 4 equal strands. Tie each strand of hair halfway up using a small hair tie.
Step 2: Take one strand and divide it into 2 parts. Loosen where the hair clip sits. Hold the sections with your thumbs, and with your index fingers from below, turn the hair to the inside of the opening already made with your fingers. Tighten the clamp and repeat the procedure with the other strands.
Step 3: Using bobby pins, secure the strands where they end, which will form the primitive bun.
Step 4: Tie the rest of the hair with a hair tie near the end.
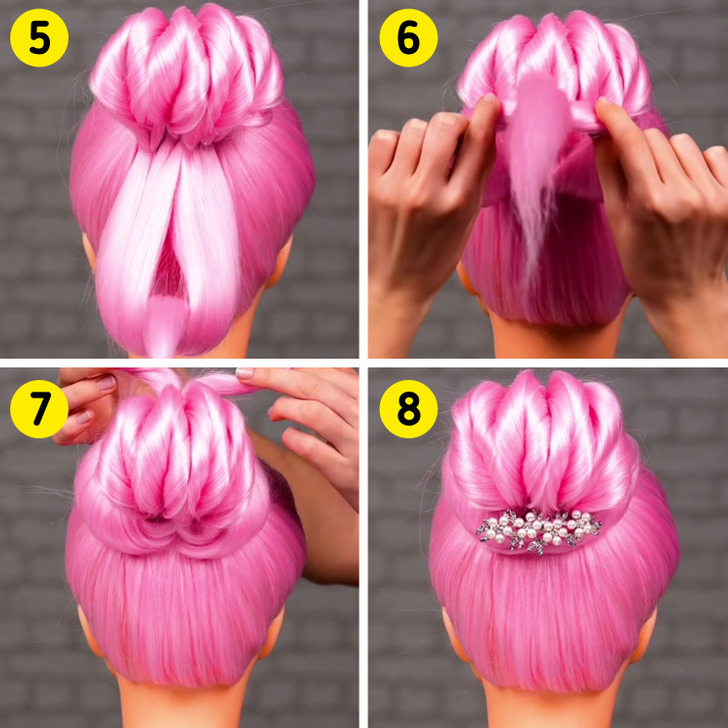
Step 5: Make a bigger opening with your fingers and flip the hair as you did before.
Step 6: Now transfer all the remaining hair to the bun that was previously secured.
Step 7: Separate the ends and pin them to the inside of the bun.
Step 8: Add fashion accessories to the hairstyle.
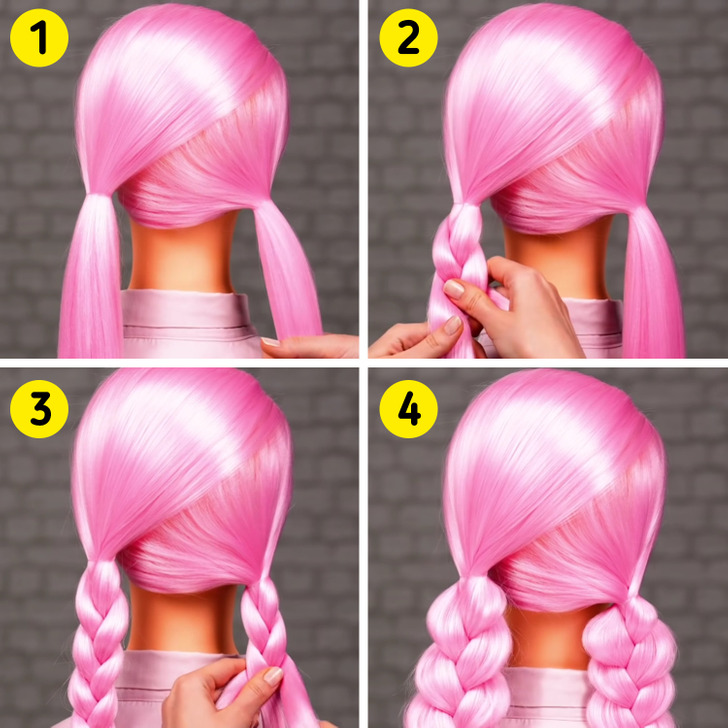
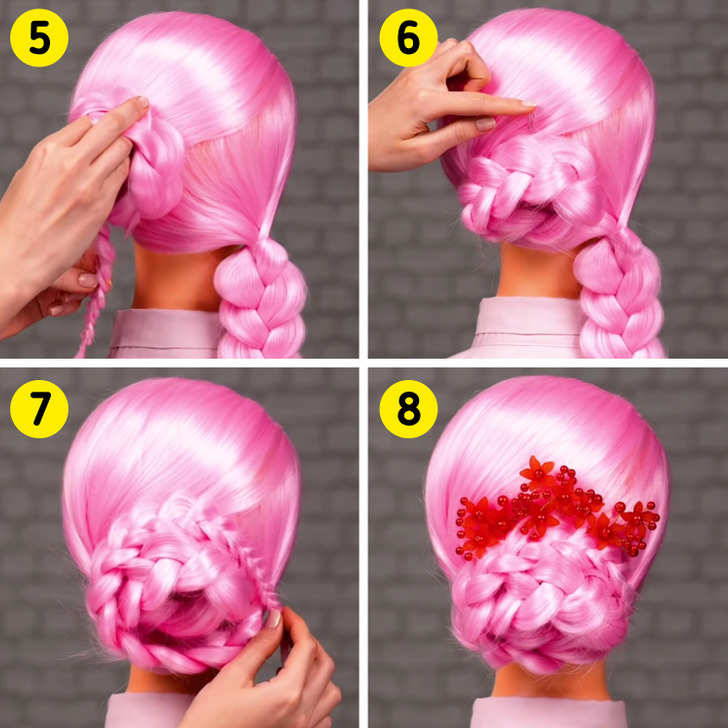
Braided double buns
- From everyday events to special celebrations, your hair really knows how to influence an overall look.
Step 1: Split the hair into 2 sections and tie them in low ponytails.
Step 2: Start braiding the section on the left side.
Step 3: Once you’re done, move to braid the section on the right.
Step 4: Spread both braids out as far as you can so that they are equal on both sides when you open them.
Step 5: Twist the left braid into a glamorous bun by gently rotating it around the hair tie.
Step 6: Secure the ends with a bobby pin to keep them from unraveling.
Step 7: Repeat the same with the right braid, but this time, don’t twist it around the base of the ponytail, but around the other twisted braid.
Step 8: Spice up the final look with some pretty, large hairpins.
Waterfall bun
- The best part about this hairstyle is that it’s extremely cheap and easy for anyone to pull off at home. It’s definitely easy on your budget and will save you a trip to the hairdresser if something unplanned comes up.
Step 1: Pin the hair at the top of the head and smooth out the ponytail. Finely divide it into 2 equal parts and separate 3 strands from the first part, which you will fasten in a handful below the base of the tail.
Step 2: Make a hole in the strand and flip the hair inside out using your index fingers. Repeat the step with the remaining 2 loops.
Step 3: Turn the 3 finished strands over to the upper side of the hair and fasten them with bobby pins. Divide the rest of the hair into 3 new strands that will be tied in the same place as the previous ones.
Step 4: Again, make holes in the middle of the strands and turn the rest of the strand inside out. Do the same to the rest of the strands.
Step 5: Raise the strands to the height where the elastics are and push bobby pins into them to make sure they sit in one place.
Step 6: Cover the gaps in the bun by pinning the sections together. Place a thicker hair tie to secure it in place. You can fix the hair with hairspray in this step.
Step 7: Divide the hanging part of the hair into 2 sections and twist them around the bun to give it more volume.
Step 8: Secure the whole hairstyle with very small hair pins that aren’t too visible to the naked eye but that serve a great function.
Step 9: Choose a barrette that will suit the occasion and add it to the underside.
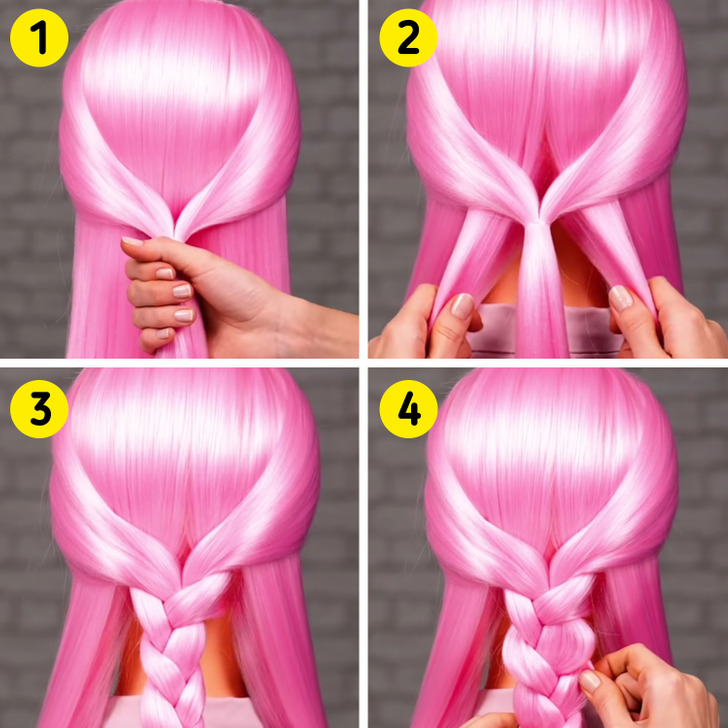
Elegant braided hairstylе
- This is a gentle hairstyle that doesn’t require you to waste any money or time. With 2 pairs of extra hands thanks to the help of a friend, you’ll be ready to go on that special date!
Step 1: Take 2 small strands of hair from the left and right sides and hold them together using an elastic band.
Step 2: Divide 2 smaller strands that are closest to the ponytail, leaving more hair for later, and start braiding.
Step 3: Braid all the hair and tie it in a thin elastic band.
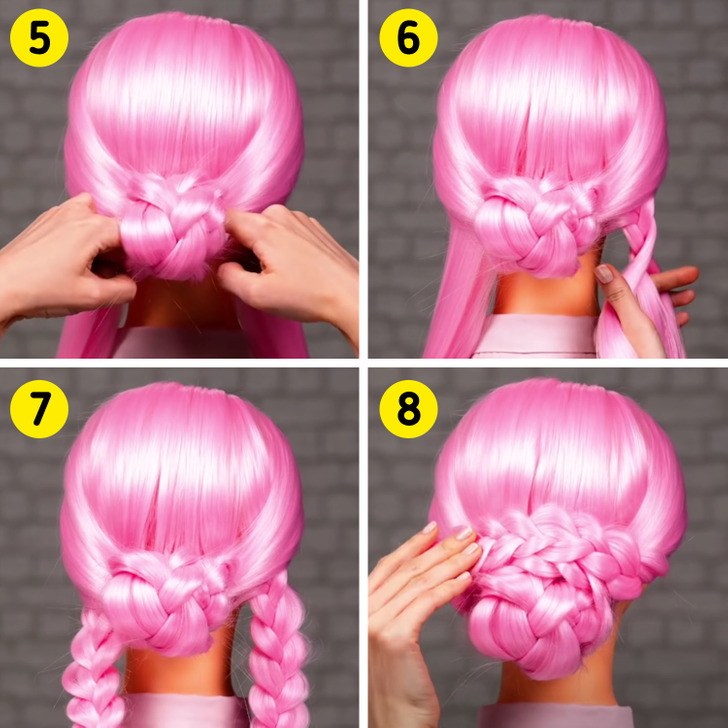
Step 4: Pull strands of the braid slowly and evenly to spread it out, but don’t break it, starting from the middle and working toward the ends.
Step 5: Grab the braid by the end and start rotating it upward, making a roll. Don’t leave any space in between and fasten it to the base with bobby pins.
Step 6: On the 2 parts that are on both sides, weave 2 small braids.
Step 7: Stretch the braids one at a time, but make sure they are equal on both sides.
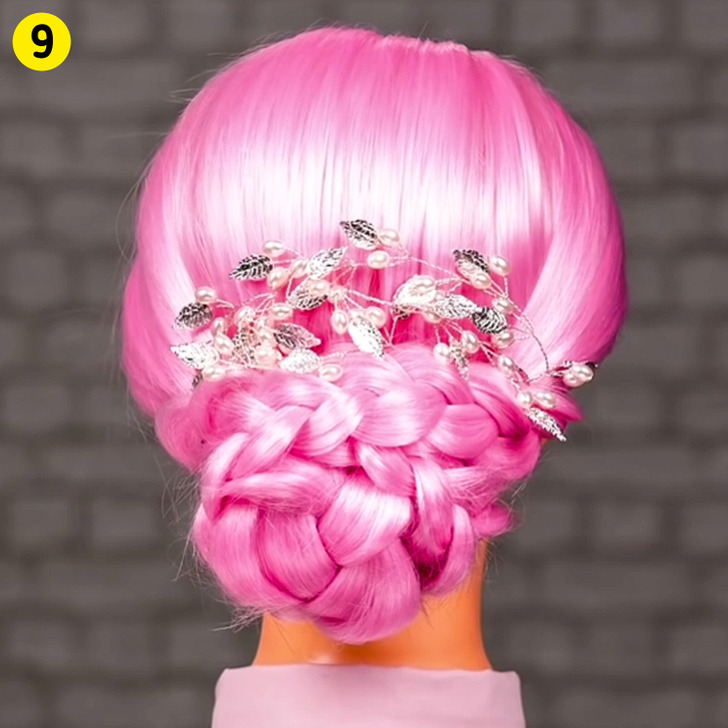
Step 8: Take the left braid and start twisting it into the bun in the middle. After you’re done, fasten it so it doesn’t move. Do the same with the other braid, twist it without leaving an empty space. Fasten it with bobby pins.
Step 9: Choose a softer hair pin, as this hairstyle has a very delicate look, and place it over the bun.
A colorful bun
- Easy, colorful, cool hair that can turn any bad Monday into an extra good one.
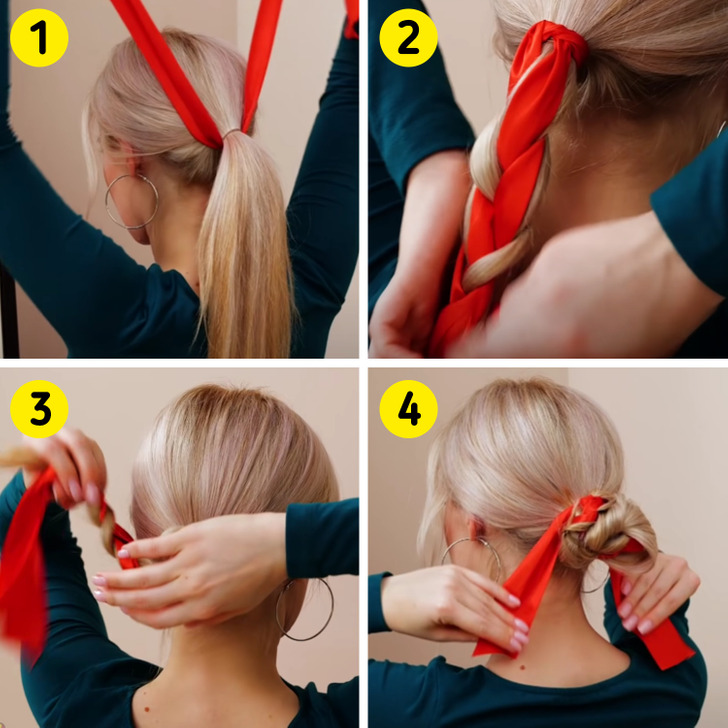
Step 1: Comb your hair and arrange it in a high ponytail. Smooth it out so that there are no stray hairs. Take a larger scarf and tie it around the ponytail right in the middle.
Step 2: Start braiding your hair. Divide it into 2 parts and use the scarf as the central part.
Step 3: Using an elastic rubber band, tie it off when you’re done and start twisting the braid into a bun, twisting it around the main axis or where the rubber band stays.
Step 4: Take the 2 ends of the scarf that are left and tie the hair. If the ends are too long, you can first twist them and then tie them, or they can hang.
What hairstyle always saves your bad hair days? Share some pictures in the comments.
