How to Get a Salon-Like Manicure at Home
Getting a manicure at the salon may be relaxing but it’s also a time and money-consuming experience. 5-Minute Crafts will teach you a couple of nail design techniques you can repeat at home without needing tons of additional equipment.
1. Multicolored holographic nail design
Preparation:
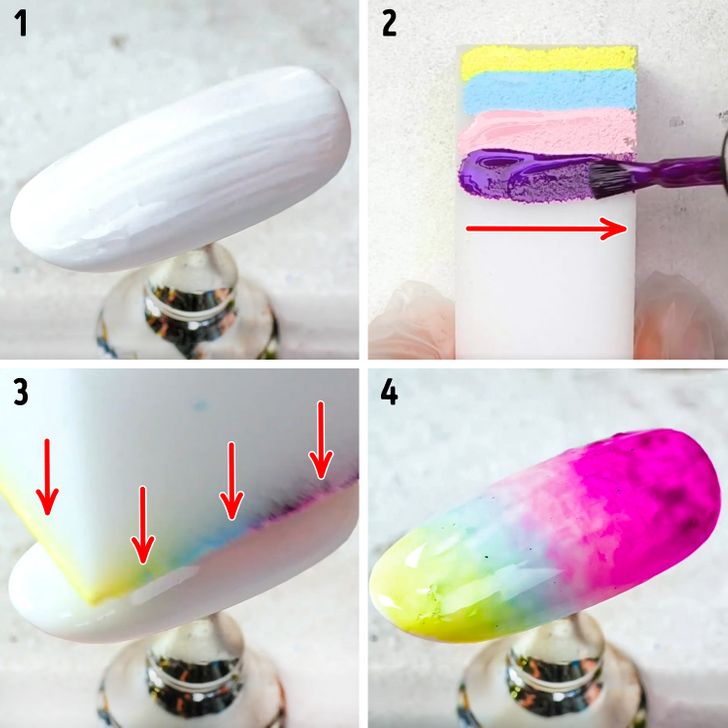
- You’ll need a sponge, an eyeshadow makeup sponge, any kind of soft brush, and holographic nail powder.
How to do it:
1. Cover your nails with white nail polish and let it dry.
2. Take a sponge and draw stripes of different colors on it. The stripes should be close to each other.
3. Gently dab the sponge on your nail.
4. Remove excess nail polish from around your nail and apply a top coat. Don’t let it completely dry!
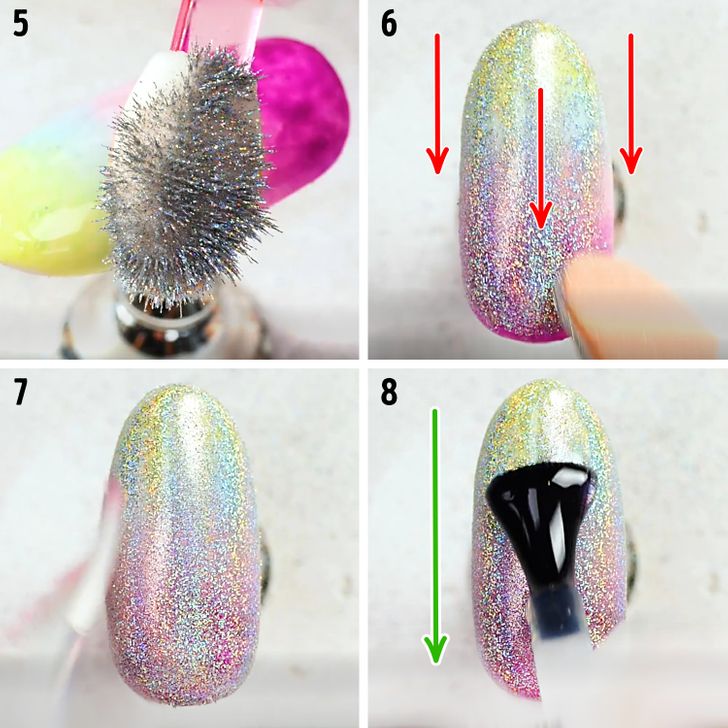
5. Apply some holographic nail powder to an eyeshadow makeup sponge.
6. Apply it to the nails moving from the top to the bottom of the nail and dabbing it into the nail to get a richer color if necessary.
7. Remove any excess powder with a soft brush.
8. Cover your nail with a top coat of nail polish.
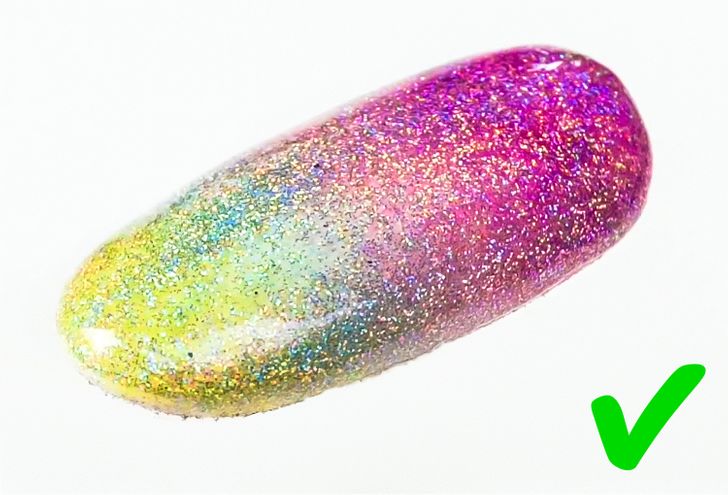
9. Your nail design is ready!
2. Striped nail design
Preparation:
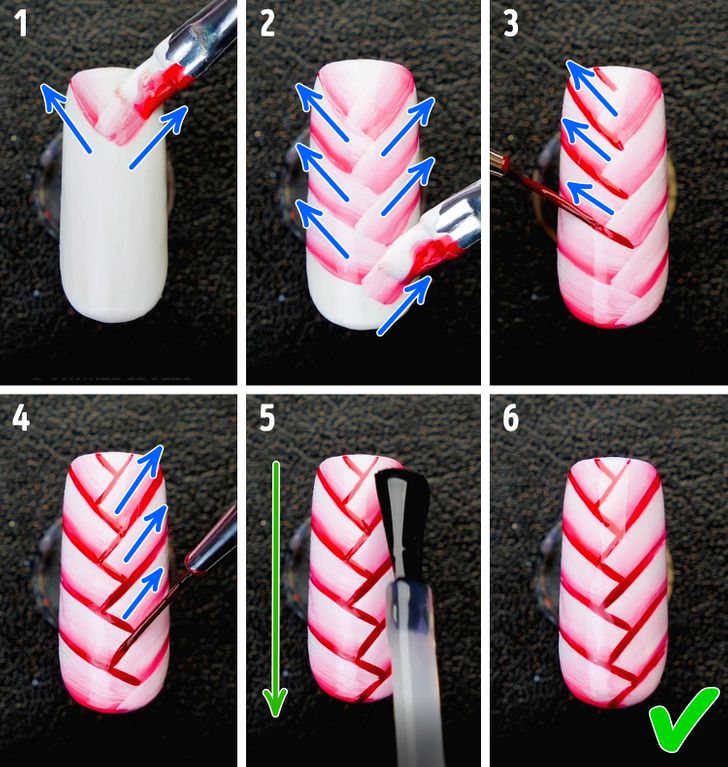
- You’ll need a flat brush and a thin brush.
- To get the gradient effect on the thick stripes, first, draw lines on a palette (you can use a plastic plate, for example) with white and pink-hued nail polish close to each other. Then slightly mix the colors and dip the brush into the mix so that half of the brush is covered with the white nail polish and the other half, with a pinkish color.
How to do it:
1. Apply white nail polish and let it dry. Take a flat brush, dip it into the white-pink mix, and draw strokes starting from the middle of the nail and moving to the side.
2. Cover the nail with stripes moving from the top to the bottom. Let them dry.
3. Take a thin brush and dip it into some pink nail polish. Draw thin lines along the pinkish lines of the thick strokes. Start with the left side of the nail as not to wipe the stripes you’ve already drawn.
4. Draw thin stripes on the right side.
5. Cover your nail with a top coat of nail polish.
6. Your nail design is ready!
3. Abstract flower nail design
Preparation:
- Take a deep bowl and fill it with water.
- You’ll need a toothpick.
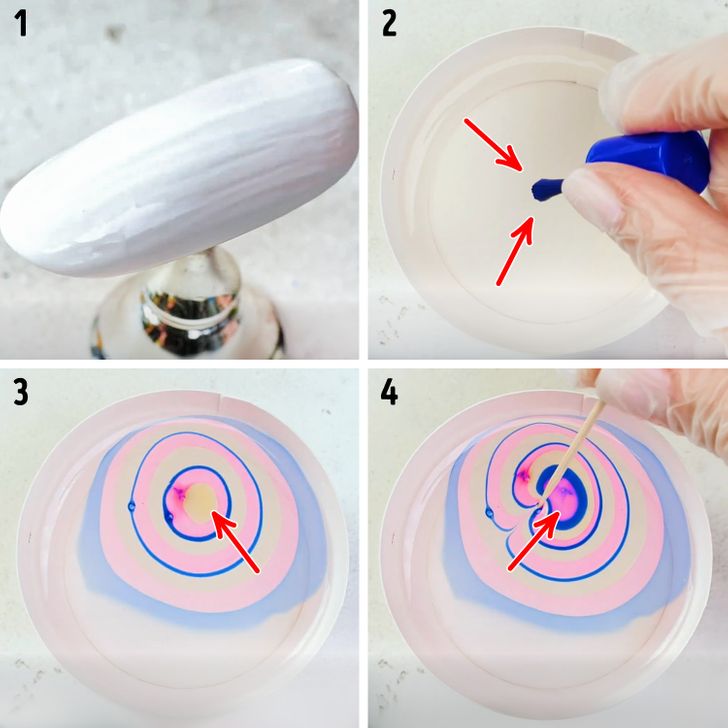
How to do it:
1. Cover your nails with white nail polish and let it dry.
2. Dip a brush into blue nail polish and let a drop from the brush fall into the water.
3. Take some pink and yellow nail polish and drop a bit of them into the water as well. Make sure that every new drop goes to the center of the circle that already has formed in the water.
4. Take a toothpick and move the nail polish from the sides to the center of the circle to form “petals” of the flower. Start at about the fourth inner circle.
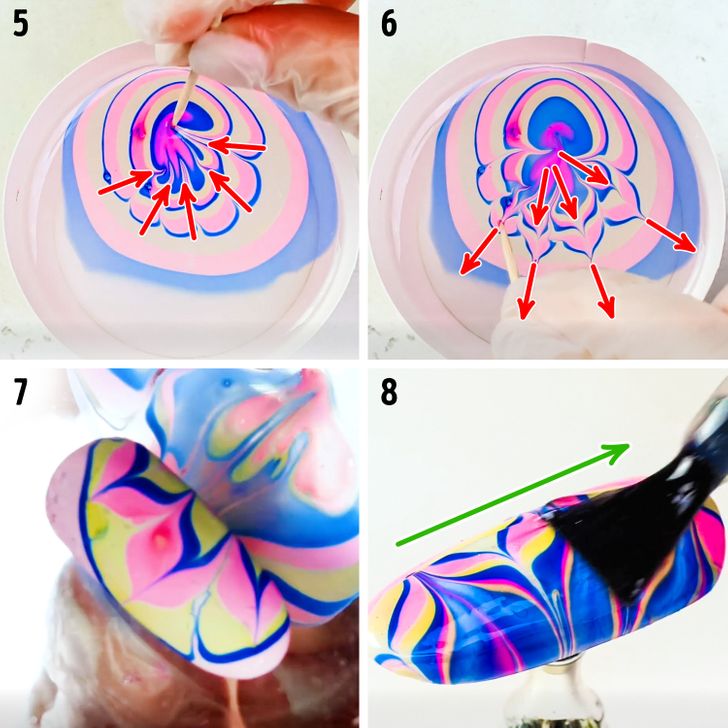
5. Keep on forming petals until you transform half of the circle.
6. Move the nail polish to the outer side of the main circle to form the tips of the petals. You can start with any inner circle.
7. Dip your nail into the water so that the part with the drawing stays on it.
8. Take your nail out of the water, remove any excess nail polish from around your nail, and cover your nail with a top coat of nail polish.
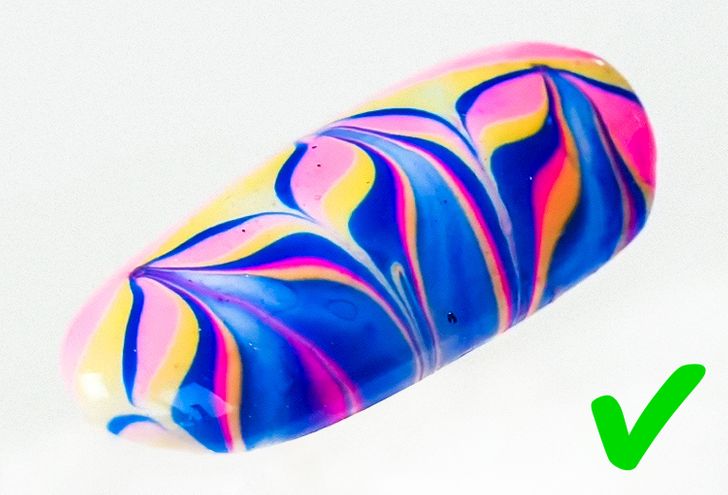
9. Your nail design is ready!
4. Blue wave nail design
Preparation:
- You’ll need an eyeshadow makeup sponge, a thin brush, any soft brush, and holographic nail powder of different colors.
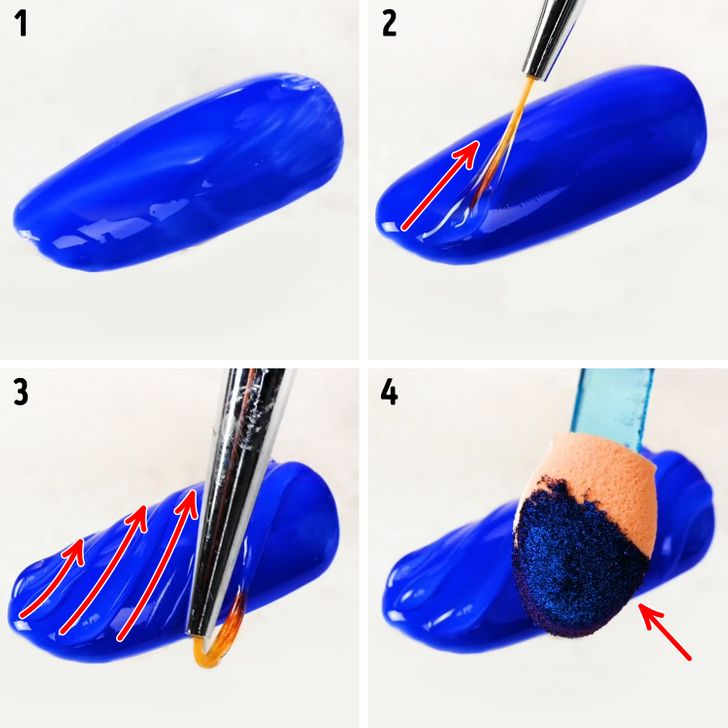
How to do it:
1. Cover your nails with blue nail polish and let it dry.
2. Dip a thin brush into a transparent base nail polish and draw a visible line across your nail. Make sure that the line is thick enough.
3. Keep on drawing lines along your nail until it’s covered with them.
4. Apply some holographic nail powder to an eyeshadow makeup sponge.
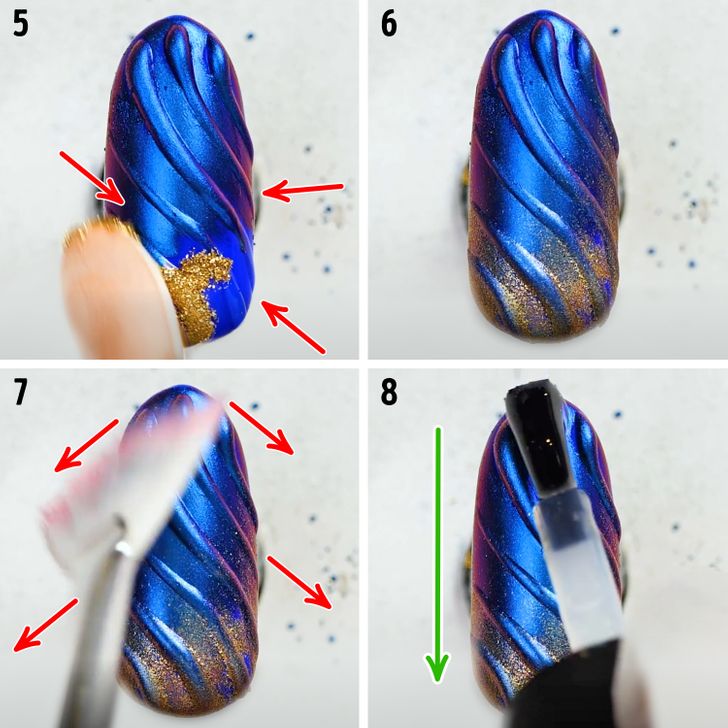
5. Gently dab holographic nail powder onto the nail.
6. Use holographic powders of different colors to create a gradient and achieve a 3-dimensional visual effect.
7. Remove the excess powder with a soft brush.
8. Cover your nail with a top coat of nail polish.
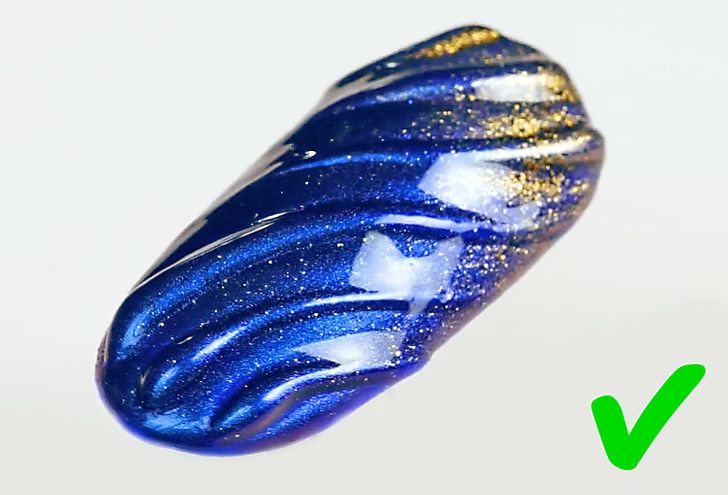
9. Your nail design is ready!
5. Marble nail design
Preparation:
- You’ll need a thin brush.
How to do it:
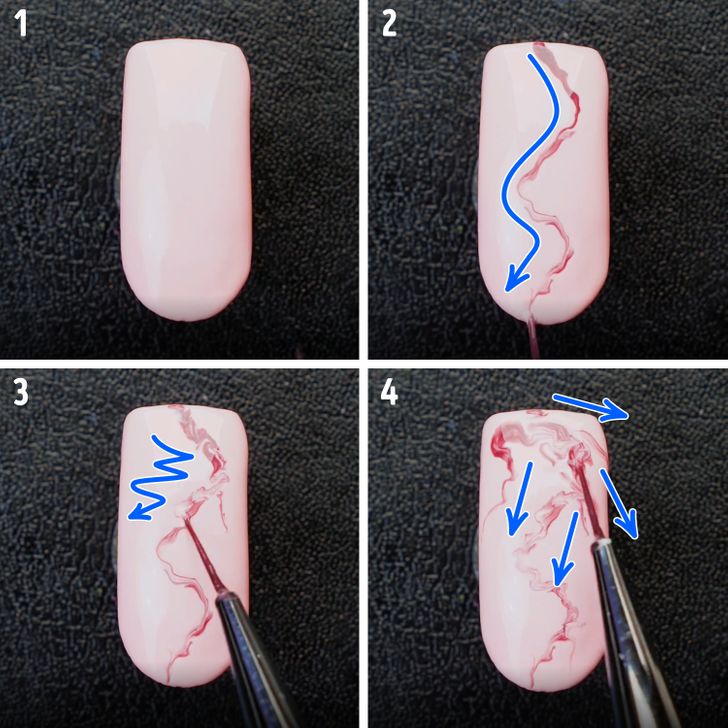
1. Cover your nails with light pink nail polish and let it dry.
2. Take a thin brush and dip it into a lighter-hued pink nail polish and draw a wavy line from the top to the bottom of the nail.
3. Gently blur the line.
4. Draw more lines on the nail and blur them as well. The lines should go in different directions to create a marble effect. When you’re done, cover the nail with a top coat of nail polish.
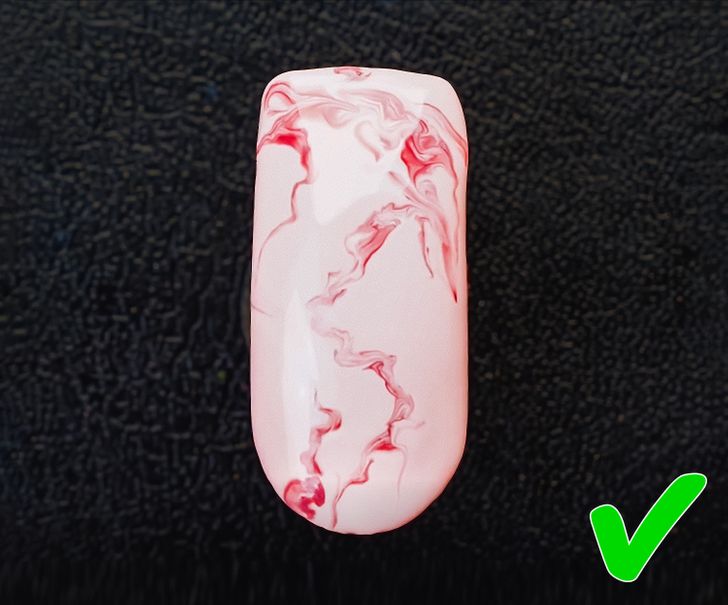
5. Your nail design is ready!
6. Thin twigs nail design
Preparation:
- You’ll need a special tool or a brush with a rounded end to draw dots on your nails.
- You’ll need a toothpick or a thick needle.
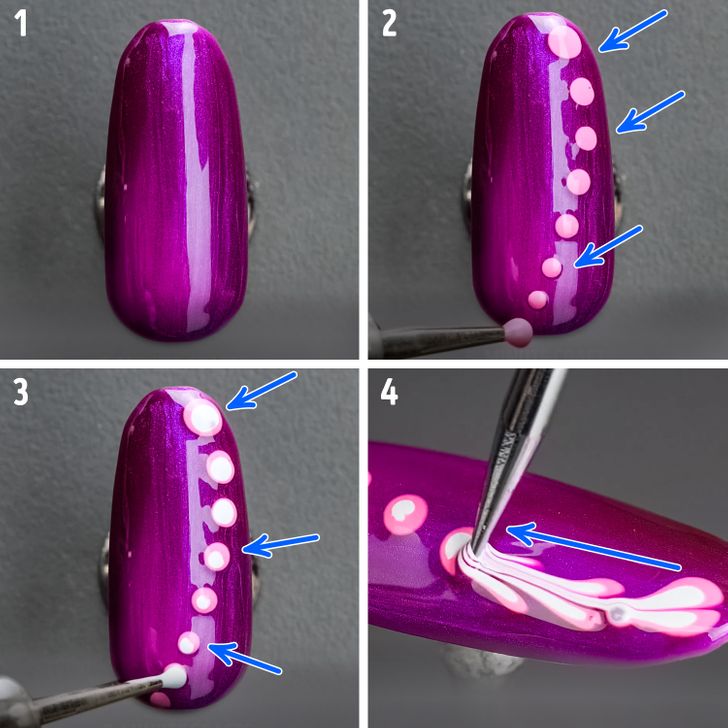
How to do it:
1. Color your nails with purple nail polish and let it dry.
2. Draw pink dots on the nail using a special tool or just the tip of a brush.
3. Draw smaller white dots in the center of the pink dots.
4. Take a toothpick or a needle and move it from the top of the nail to the bottom to blur the dots and mix the colors up a bit. The result should remind you of a twig.
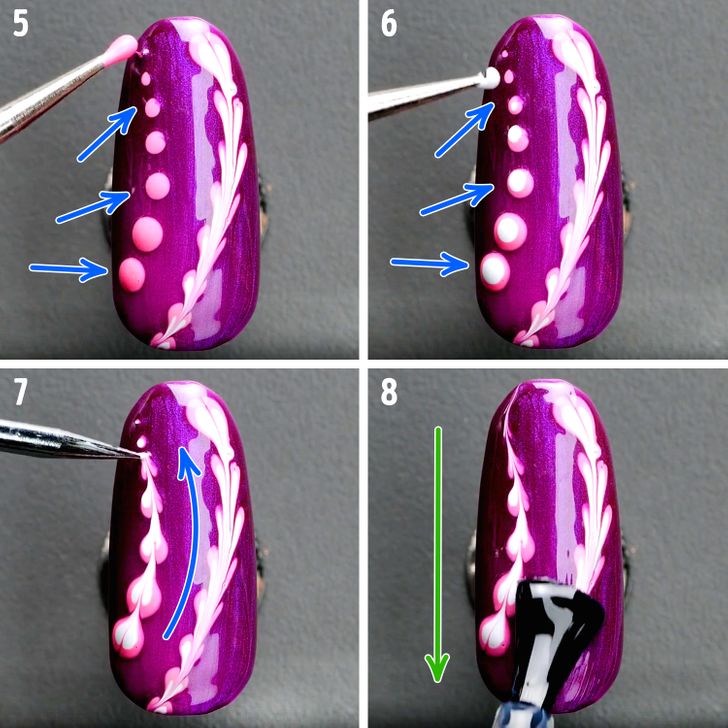
5. Draw smaller pink dots on the nail next to the first row of dots.
6. Draw smaller white dots in the middle of these pink dots.
7. Take a toothpick or a needle and move it from the bottom of the nail to the top to blur the dots and mix them up a bit. Again, the result should remind you of a twig.
8. Cover the nail with a top coat of nail polish.
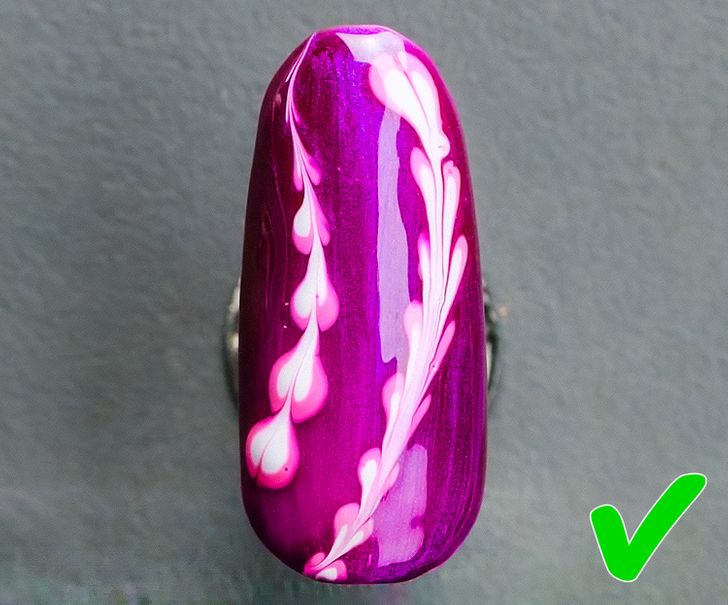
9. Your nail design is ready!
7. Emerald stone nail design
Preparation:
- You’ll need a thin needle.
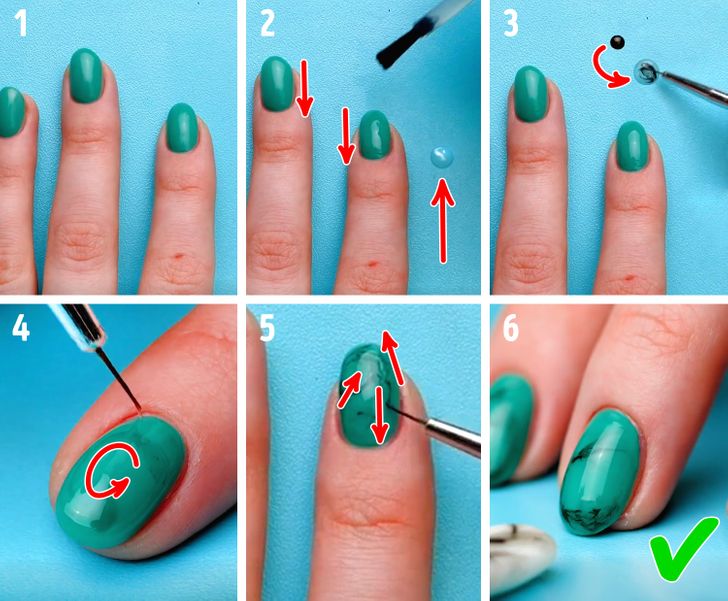
How to do it:
1. Cover your nails with emerald green nail polish and let it dry.
2. Take a top coat of nail polish, apply it to your nails, and drop a bit of it onto the surface near your hand (you can use a palette). Don’t let it dry!
3. Drop a bit of black nail polish near it and add a bit of the black color to the transparent top coat drop with a needle.
4. Draw thin lines on your nails with the needle.
5. Keep drawing until you get the color intensity you want and your nails remind you of stones. Let the nails dry.
6. Your nail design is ready!
Preparation:
- You’ll need a Band-Aid and tweezers.
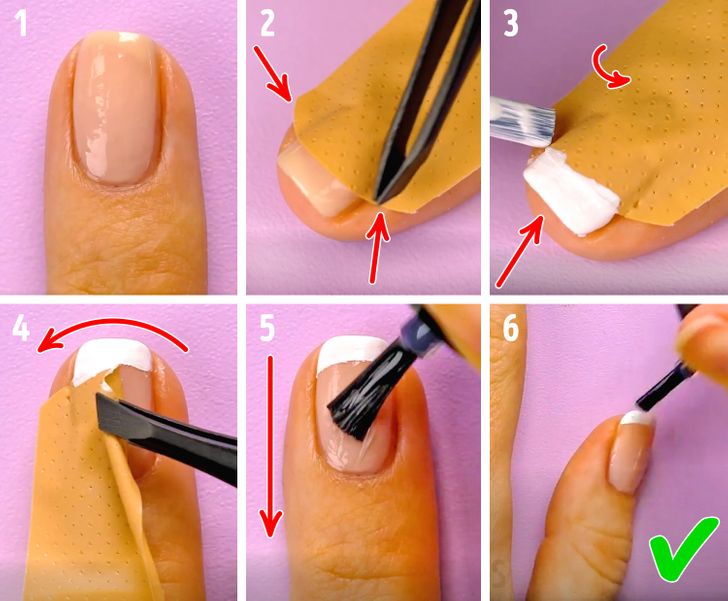
How to do it:
1. Cover your nails with a nude nail polish shade and let it dry.
2. Take a Band-Aid and tightly apply it to your nail. Use tweezers to make sure the Band-Aid is tightly secured at the sides of your nail.
3. Take white nail polish and cover the tip of your nail with it.
4. Gently remove the Band-Aid with tweezers.
5. Apply a top coat of nail polish.
6. Repeat the process on the other nails and your nail design is ready!
Tip: You can use any colors to make your French manicure look more interesting.
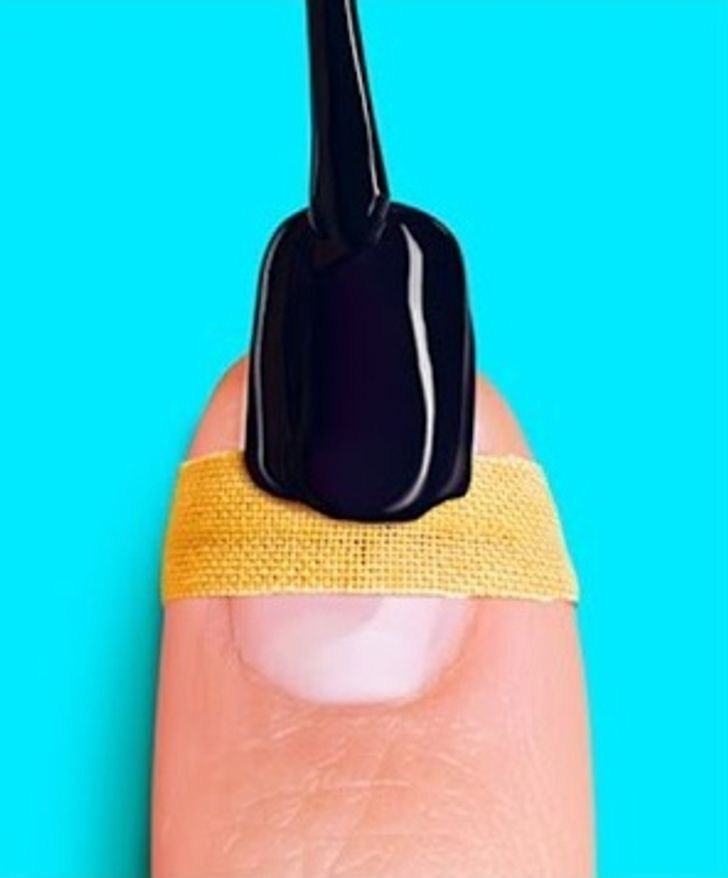
- Use any bright colors you want and position the Band-Aid as low or as high as you wish in order to get a unique look.