How to Decorate Your Home With Everyday Objects
We often throw away everyday objects once they’ve served their purpose, like plastic water bottles, old t-shirts, or disposable spoons. But they can actually be recycled instead. So, 5-Minute Crafts is suggesting some nifty ways you can use these commonplace things as home decor items. Read below to find out more.
Things you’ll need:
- Glow sticks
- A jar
- A pair of scissors
- Glitter
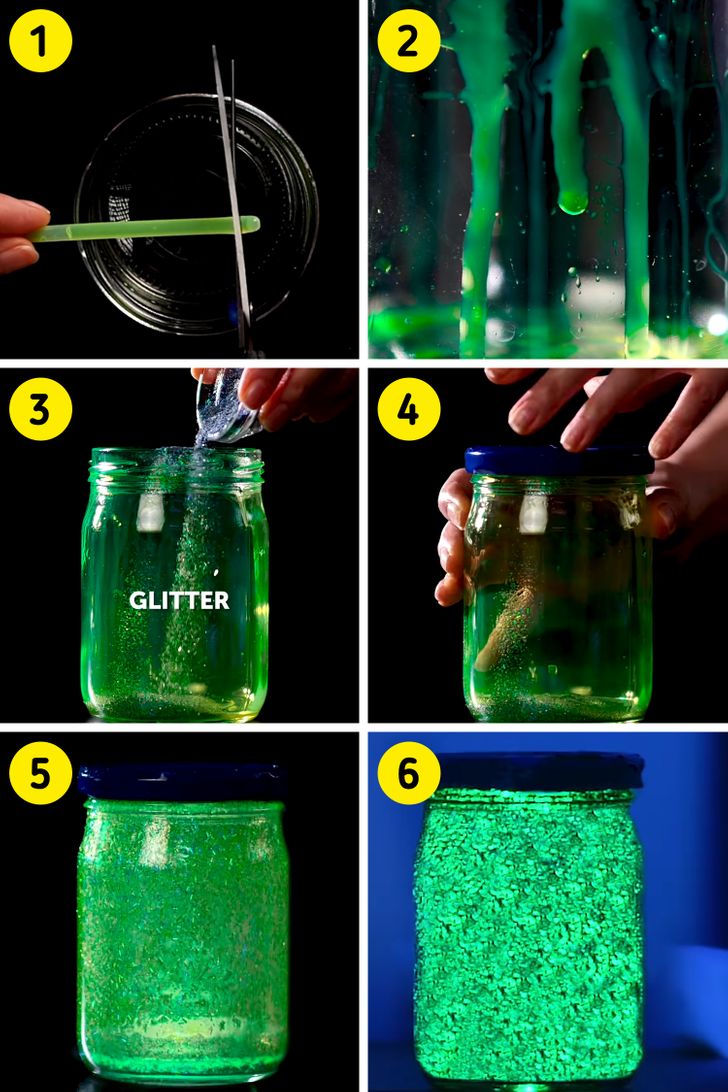
- Cut the tip of a glow stick.
- Pour its content into a jar. Rotate it well so the liquid covers the jar from all sides from the inside.
- Handle the liquid from the glow stick with caution. You do not want your skin or eyes to contact the fluid.
- Add some glitter to it.
- Then close the lid and shake it well.
- Your glow jar is ready.
- To use it as a nightlight, expose the jar to sunlight for a while so that it’ll glow at night.
- You can also use glowsticks in different colors in one jar to create a bedazzling effect.
Things you’ll need:
- The metallic lid of a jar
- A photograph
- A permanent marker
- A pair of scissors
- Cardboard
- Paper glue
- Hot glue
- A small magnet
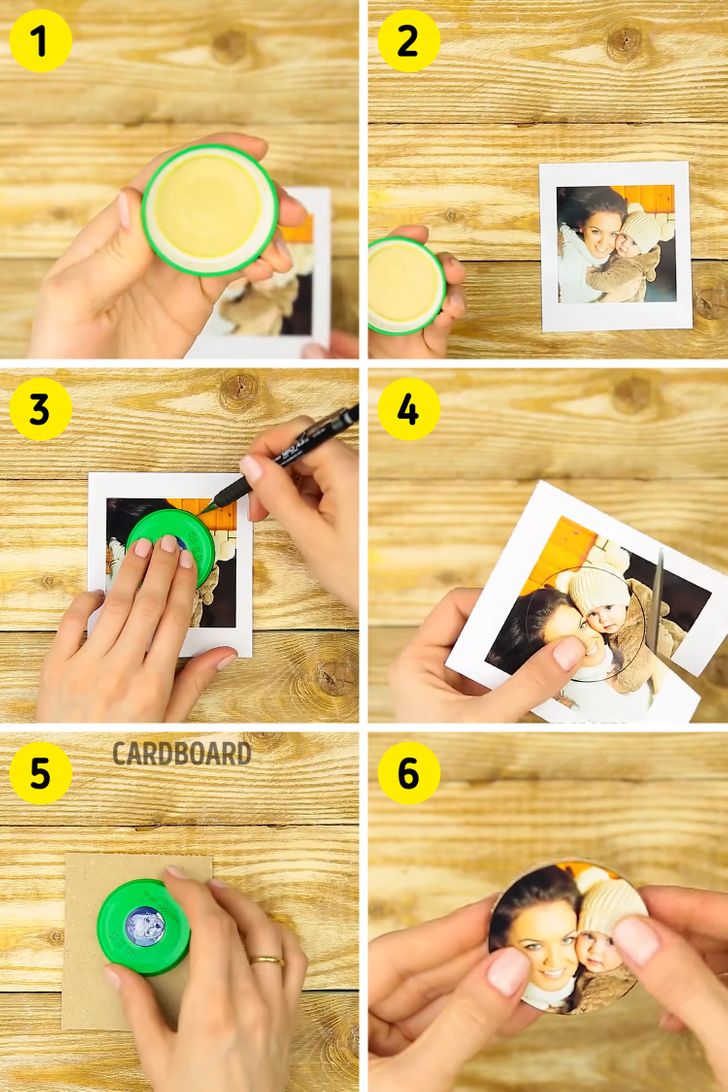
- Take the metallic lid of the jar. Make sure that the lid is a bit larger than the subject of the photograph.
- Now take your photograph that you want to convert into a fridge magnet. Make sure the subject is smaller than the jar lid.
- Place the lid on the subject of the photograph and draw a circle around it with a permanent marker.
- Cut out the photograph.
- Now place the jar lid on a piece of cardboard. And repeat steps 3 and 4.
- Paste the photograph and cardboard together with paper glue.
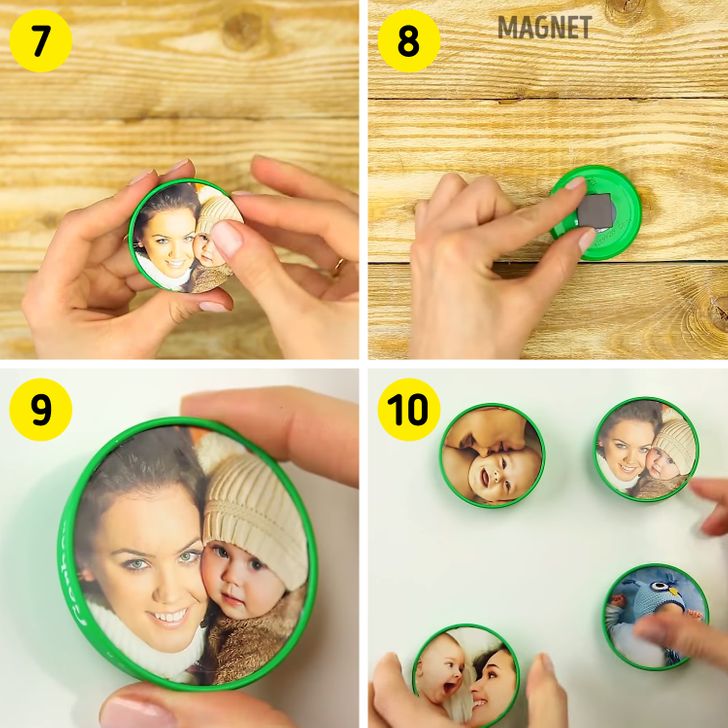
- Now paste the cardboard photograph on the backside of the lid.
- Paste the magnet piece on the front side of the lid with hot glue.
- Put it up on your fridge.
- Your fridge magnet is ready.
3. Snow bulb
Things you’ll need:
- An empty light bulb
- Hot glue
- Tiny decorative elements like cherries, pine cones, glitter, etc.
- Glycerol
- Water
- A shiny marble
- A Coca-Cola metallic lid
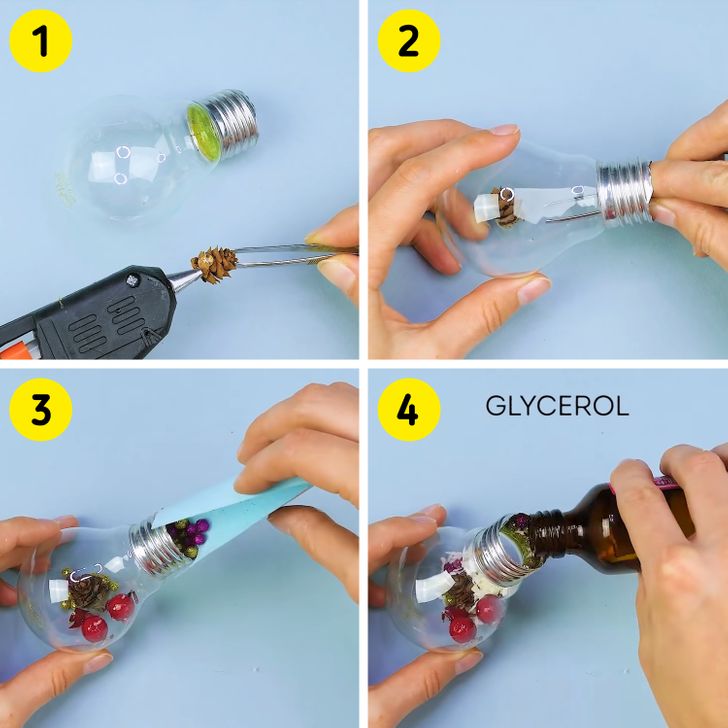
- Apply some hot glue to the tiny pine cone.
- Place it inside the bulb as shown.
- Be careful to not touch the wet superglue.
- Now add other decorative items inside the bulb.
- Pour a little glycerol to create a thick watery effect for later.
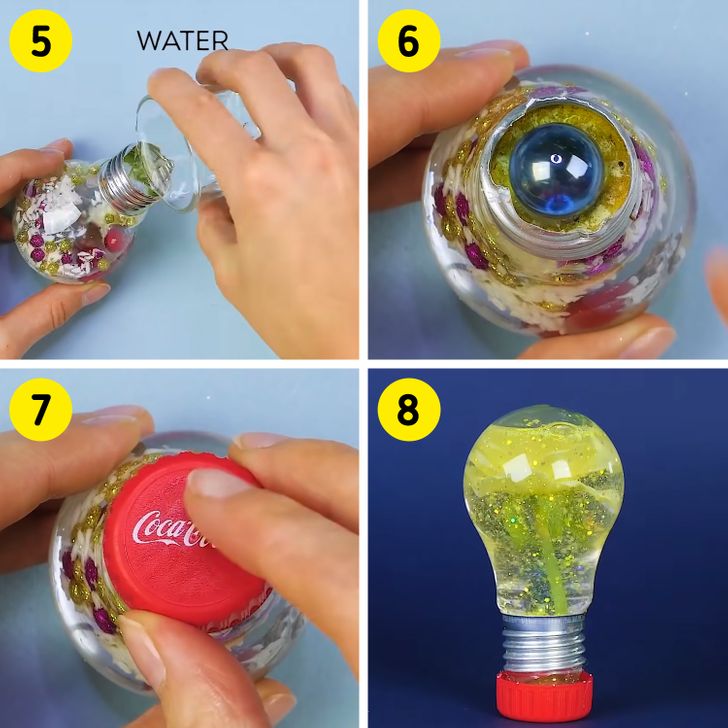
- Add a little water inside the bulb.
- Once the bulb is filled, put a small marble in the hole.
- Close the bulb shut with the Coca-Cola metallic lid.
- Shake the bulb and turn it over. Your snowbulb is ready.
Things you’ll need:
- A few plastic water bottles
- Duct tape
- Cardboard
- Hot glue
- Foam sheets
- Linen or any choice of cloth
- A heavy-duty staple gun
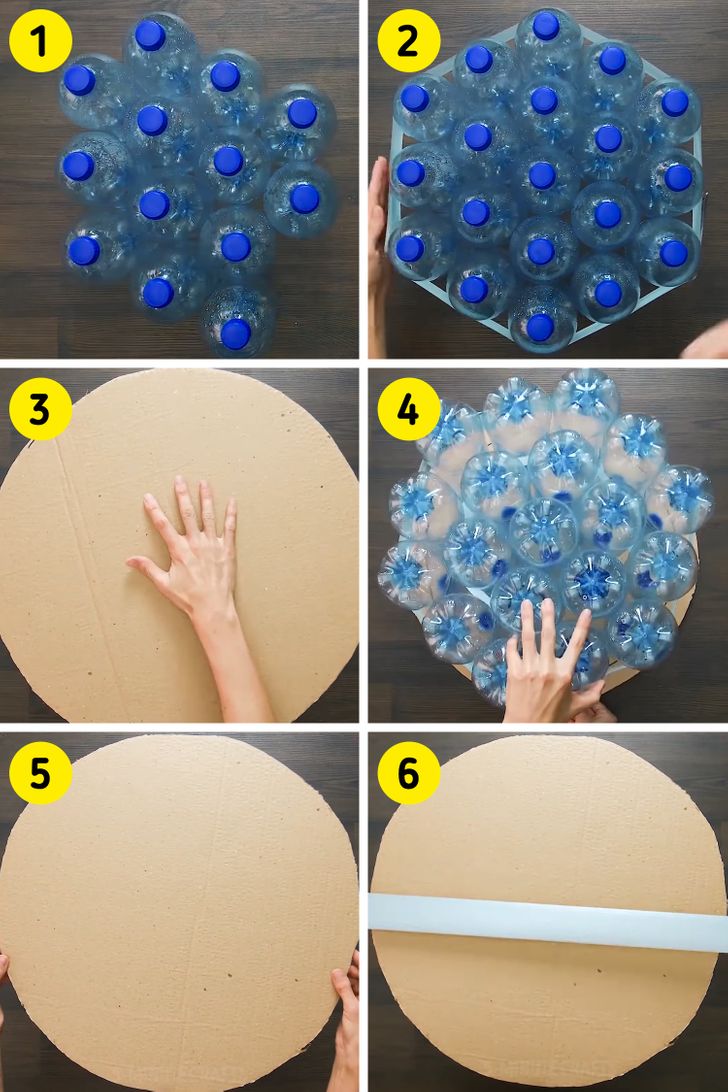
- Arrange a few bottles in a hexagonal way, as shown.
- Tape them together from the edges.
- Now cut a cardboard sheet into a circle and place it on the floor. Ensure that the size of the circular cardboard is slightly bigger than the diameter of the accumulated bottles.
- Turn the bottles upside down, keeping the cardboard on the floor. The bottom part of the bottles should be on the top.
- Cut one more piece of cardboard (like in step 3) and place it on top of the bottles.
- Now begin taping around the construction, securing the cardboard and the bottles.
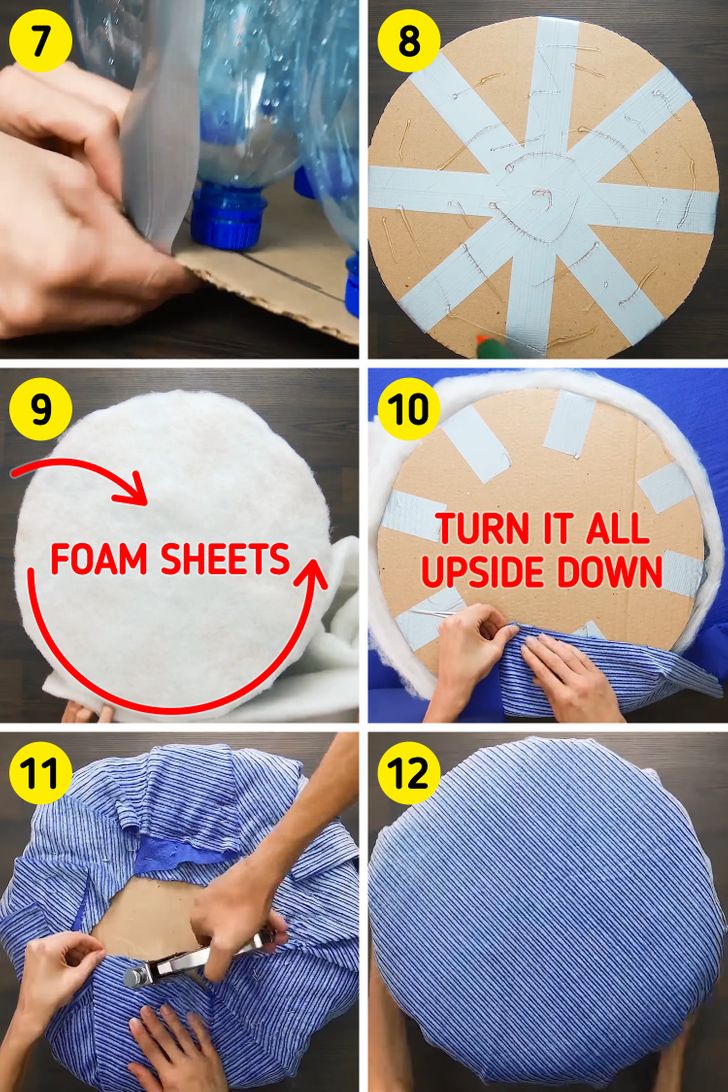
- Then keep taping from one side of the cardboard, all the way down to the other piece of cardboard, keeping the bottles in place too.
- Secure the bottles and the cardboard firmly from all sides, as shown in the image above. Put some superglue on this surface.
- Now cut foam sheets to the size of the cardboard and stick them with hot glue on one side of the cardboard. This will be the seat of the ottoman. Cover the bottles from the outside with a foam sheet as well.
- The circular foam should not be created for the bottom cardboard piece.
- Take linen or any cloth of your choice and begin stapling it from the bare cardboard piece on the opposite side. Refer to the image above.
- Cover the ottoman entirely with the cloth, making sure to do it neatly.
- Your ottoman is ready.
Things you’ll need:
- Fairy lights
- Colorful straws
- A pair of scissors
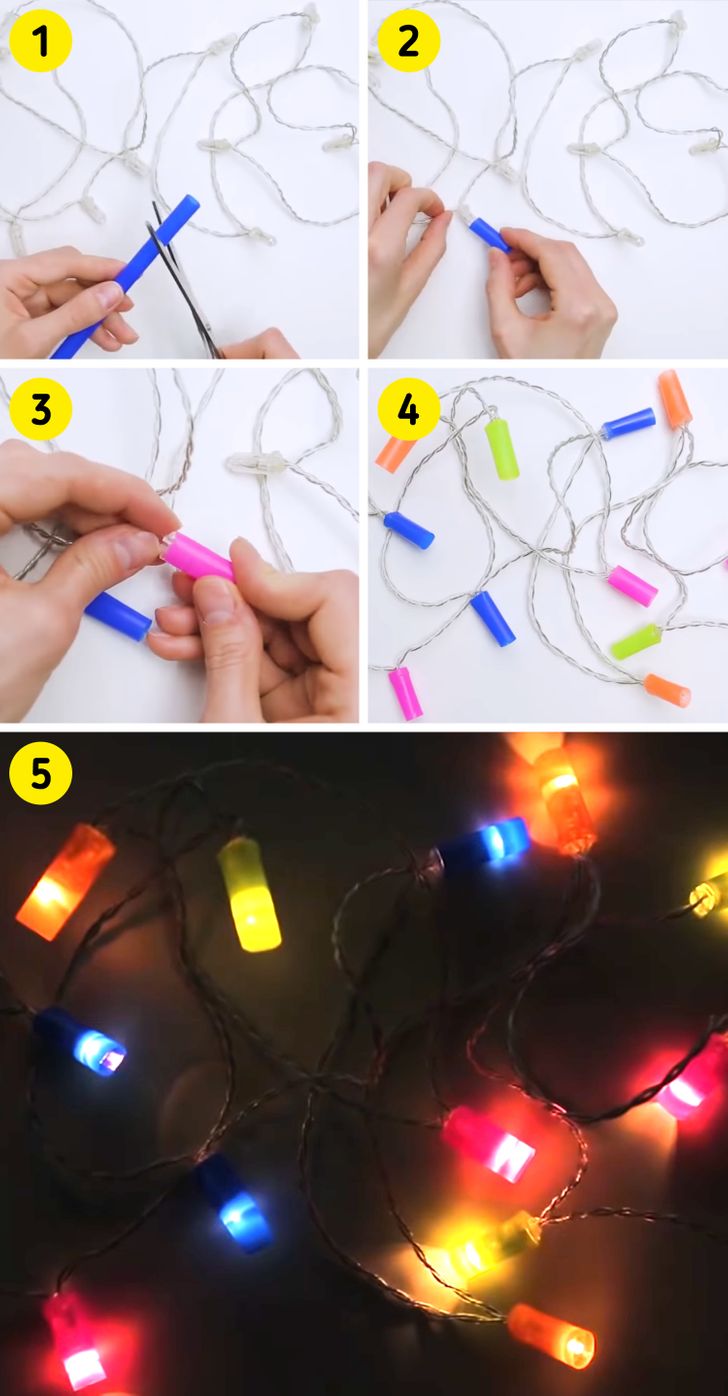
- Cut a colorful plastic straw into pieces, as shown.
- Place the straw pieces onto each fairy light.
- Then grab some straws in different colors.
- And repeat step 2 with each color.
- Hang the lights where you’d like them to be and turn them on. Your colorful fairy lights are ready.
Things you’ll need:
- An old t-shirt
- A pillow
- A pair of scissors
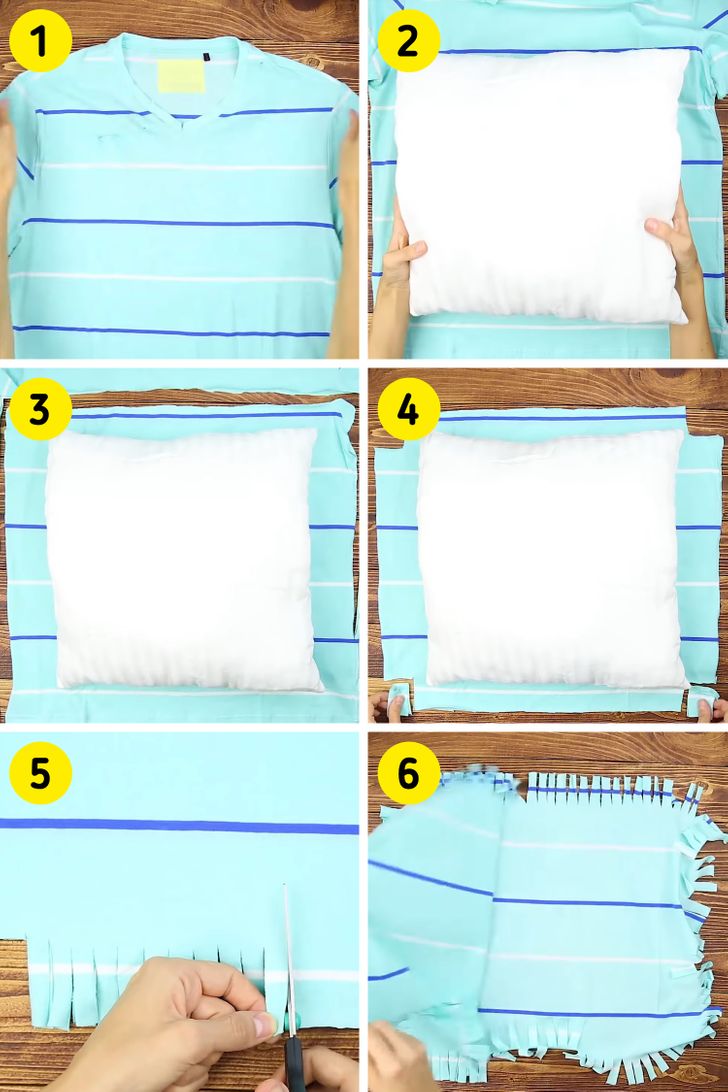
- Take an old t-shirt. Spread it out evenly.
- Put the pillow on it to get the right size.
- Now cut out the edges of the t-shirt, as shown.
- Cut out small squares from the edges of the t-shirt, as shown in the image.
- Now cut out small slits on the remaining edges.
- Remove the first layer of the t-shirt.
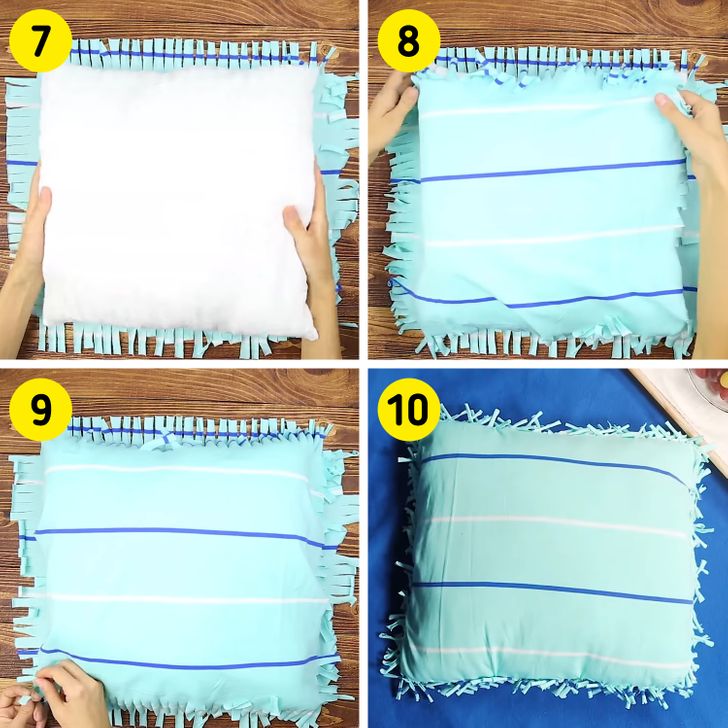
- Place the pillow on the second layer of the t-shirt.
- Place the first layer of the t-shirt over the pillow. Make sure both of the layers are aligned properly.
- Now tie a knot with a slit from the first layer of the t-shirt with the corresponding slit from the second layer. Keep tying the knots on all 4 sides of the pillow.
- Your cushion cover is ready.
Things you’ll need:
- Disposable spoons
- Hot glue
- A pair of scissors
- A glass jar
- Spray paint
- String lights
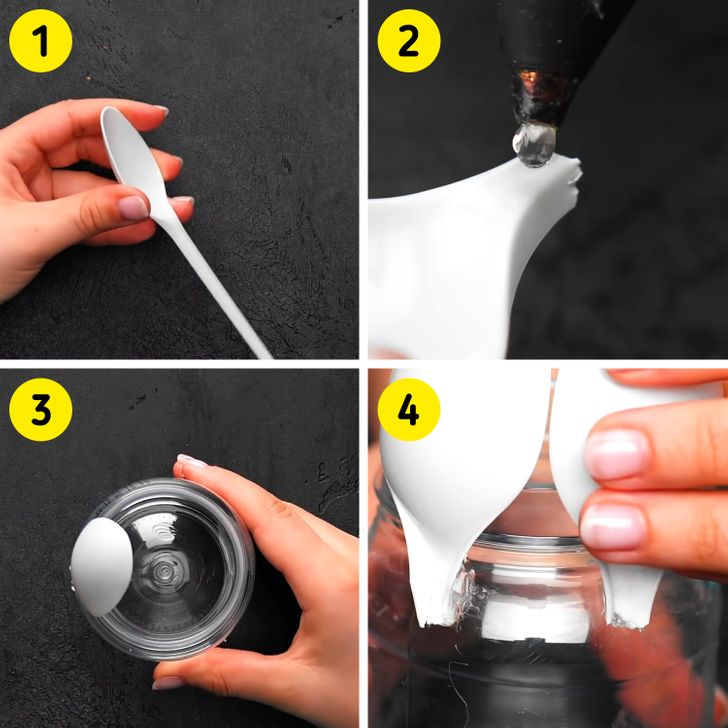
- Take a disposable spoon.
- Cut off the stick part of the spoon and put some hot glue somewhere near the concave part of the spoon. Refer to the image above.
- Stick it on the jar as shown.
- Repeat this with other spoons and continue sticking them to the jar.
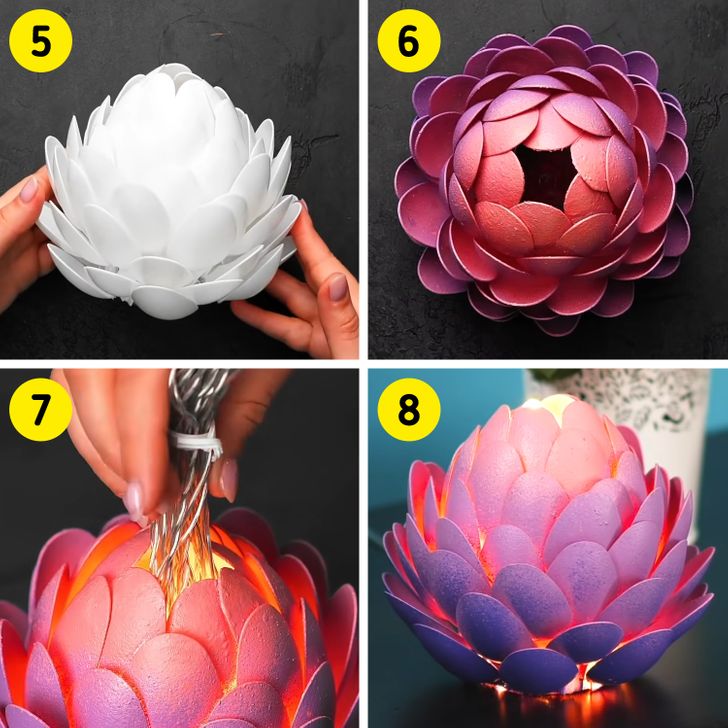
- When the entire jar is covered with spoons, it will look like a blooming lotus.
- Now spray paint it with the color of your choice.
- Add string lights inside the jar.
- Turn the lights on. Your lamp is ready.
Things you’ll need:
- Glitter
- Glue
- An inflated balloon
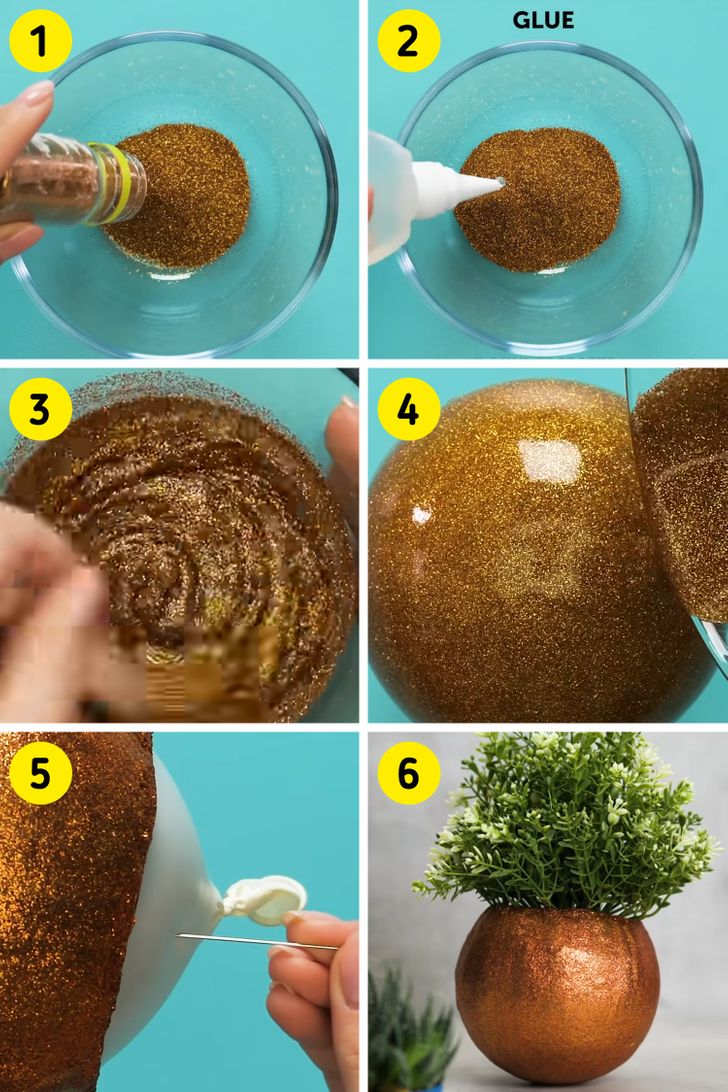
- Empty the glitter into a mixing bowl.
- Add some glue to it.
- Mix it well.
- Pour the glitter-glue paste on an inflated balloon. Make sure the glitter covers the balloon completely.
- The balloon must be kept inside a glass or a narrow bowl to keep it stable when pouring the glitter-glue paste on it.
- Let it dry for 24 hours and then pop the balloon.
- Your glittery flower pot is ready.
Things you’ll need:
- Melted wax
- An old crayon
- A crayon in a shade lighter than the one chosen above
- Milkshake glass
- Candle wick
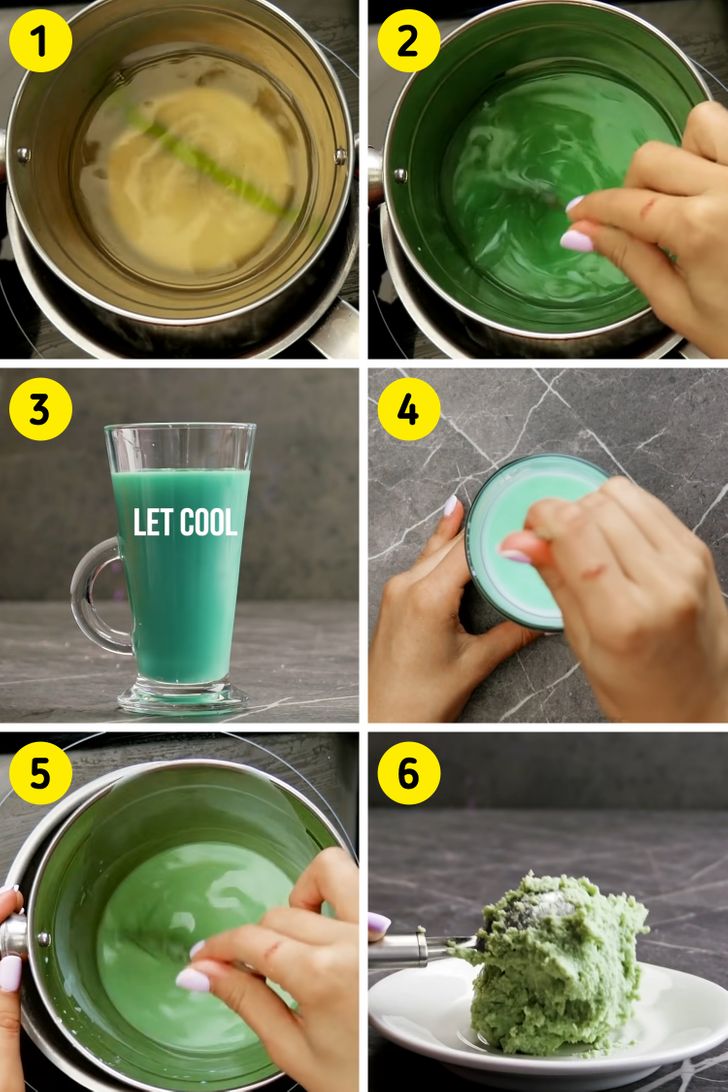
- Add an old crayon to the melted wax.
- Stir it well to bring out the color.
- Now pour this colored wax into a milkshake glass. Leave some wax for later. Let the wax in the glass cool down until it solidifies.
- Create a hole in the middle with a thin wooden stick.
- Now add a lighter shade of crayon to another batch of melted wax. Leave it for 5 minutes to cool it down.
- Then mix the solid wax in a way that the surface looks uneven as shown in the image above.
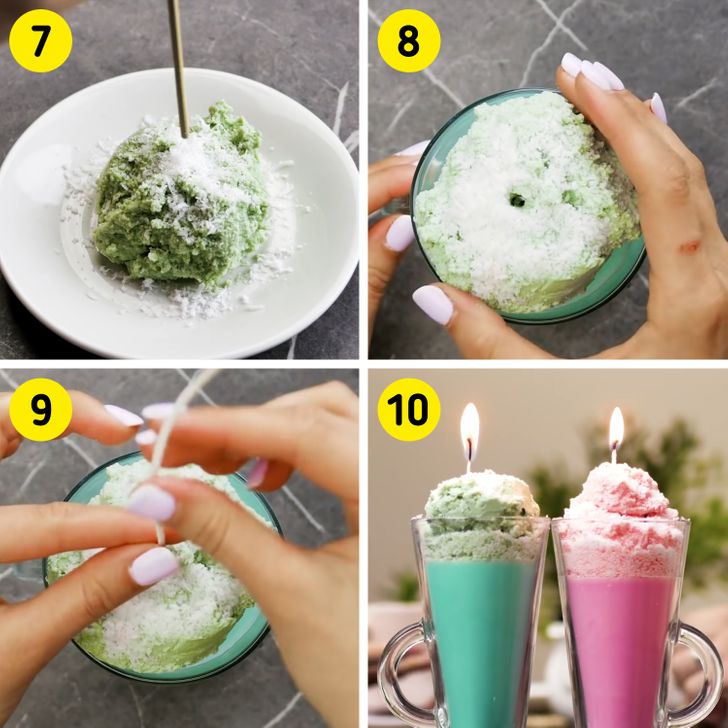
- Shred some white-colored wax over this batch of solidified wax. Create a hole in the middle with a thin wooden stick.
- Place this solidified wax on top of the wax in the glass.
- Insert a long wick through both the holes.
- Your milkshake candle is ready.
Share This Article