How to Hold a Chef’s Knife and Position Your Guide Hand
Holding your knife properly is the only way you can cut and slice with ease and, at the same time, use the tool safely. We at 5-Minute Crafts found out how professionals do it and have a guide here for you along with a few more additional tips that will make you feel like a real chef. However, please still be extremely careful while using a knife.
1. The anatomy of a knife
No matter the quality of the knife you have, most of them have similar parts and each one has its own purpose. Knowing these parts will also help you understand how to better hold a knife.
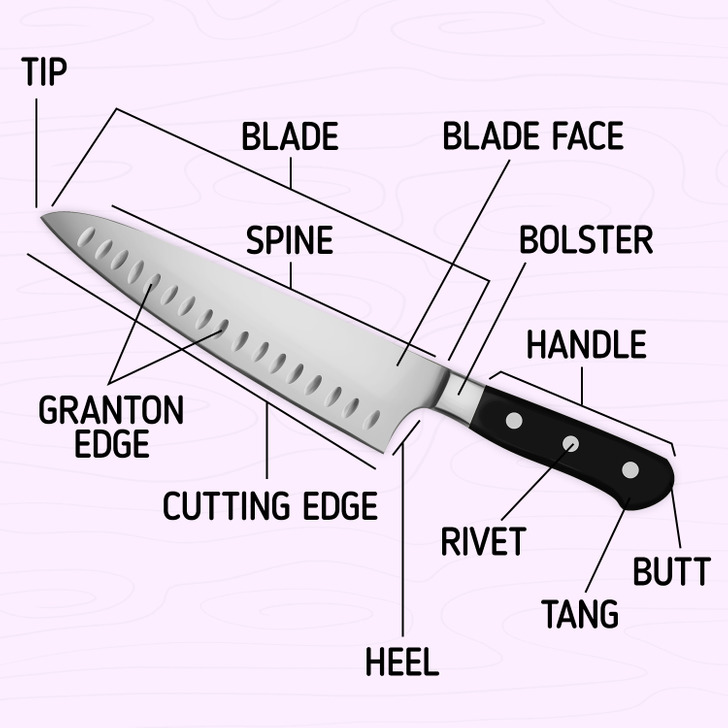
- Blade: It’s the main part of the knife, and on it, you can find the spine, blade face, cutting edge, and tip. These are the things needed to smash, slice, chop, and cut ingredients.
- Tip: This is the sharp and pointed end that is used to pierce or score ingredients. It’s also used for delicate slicing and cuts.
- Cutting edge: This one runs from the blade tip and way back to the heel or the back of the blade. As the main part, it’s used mostly for slicing, chopping, and cutting. The cutting edge is thickest at the heel, and as it goes down to the tip, it becomes thinner and thinner.
- Granton edge: Not every knife has this feature, but it does enhance the blade’s ability to slice. This is because the dips create air pockets when we cut and prevent the ingredients from sticking to the blade. This makes chopping and slicing easier.
- Blade face: It’s the blade’s widest part and is most often used to crush and smash ingredients like nuts, seeds, spices, and garlic cloves. Plus, it’s used for gathering ingredients on the cutting board and also shoveling them inside a container.
- Spine: This is on the opposite side of the cutting end, and it’s the thickest part. It’s used for cracking or crushing tougher ingredients, like bones, lemongrass, and thick stalks.
- Heel: It’s found at the back of the blade and includes the thickest part of it. It’s used for cutting through tougher ingredients, like winter squash.
- Handle: This is the part where we hold the knife, and it extends from the bolster to the butt.
- Bolster: This part is usually found on forged knives and it joins the blade to the tang. It adds weight to the knife, which is great for balance. There are different types of bolsters. Some start from the handle toward the back of the cutting edge. The bolster helps by keeping the hand from slipping onto the blade when used.
- Tang: This is the metal that extends from the bolster and inside the handle itself. And depending on the brand, it could be a full tang that extends all the way to the butt of the knife; a partial tang, which extends partially or halfway; and some don’t even have a tang, which usually means it’s a low-quality knife.
- Rivet: This is the metal circle on the handle that secures the tang and handle together.
- Butt: It’s the back end of the knife.
2. How to hold a knife
Holding the knife properly will give you a chance to work with it longer without fatigue. But it’s all about how you hold the knife. One of the best ways to do it is the chef’s way because it will give you more control over the knife to use it at different angles and for different types of cutting, slicing, etc.
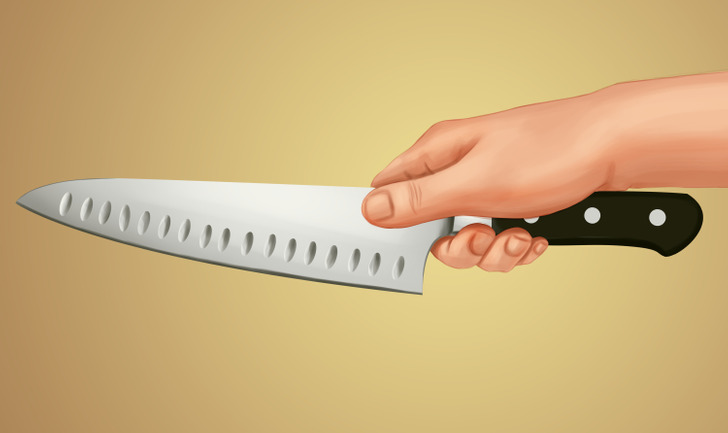
Holding your knife as professionals do:
- To have the best control over your knife, make sure to use your dominant hand.
- Loop your pinky finger, ring finger, and middle finger around the handle so that they are positioned behind the blade.
- Your fingers need to be close to each other so that you don’t see the handle between them.
- With your index finger and thumb, pinch the base of the blade.
- Press the thump against the side, where the blade and bolster (or handle) meet.
- Put the index finger on the opposite side of the blade so that your fingertip is near the heel, just above the sharp cutting edge.
- Now squeeze the blade with your fingers for a firm grip.
Tip: If the knife doesn’t feel comfortable when holding it and you need to twist your fingers in an awkward position, it means the knife is not for you. So try different knives until you find the one most suitable for you.
3. How to cut with a knife
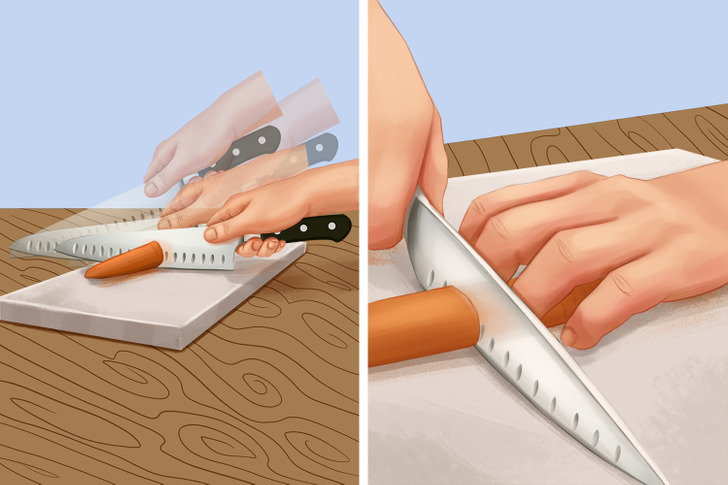
Aside from properly holding your knife, there are 2 more factors that will give you an easy cutting technique.
- Motion: Always keep the edge of the blade on the cutting board and use a circular motion.
- The guide hand (the claw grip): This is your other hand, with which you’ll hold the ingredients. The fingers should be rolled back so that the hand doesn’t spread out. As you cut, bring your hand backward, and as you do it, you’ll develop a rhythm.
4. 2 more ways to hold a knife
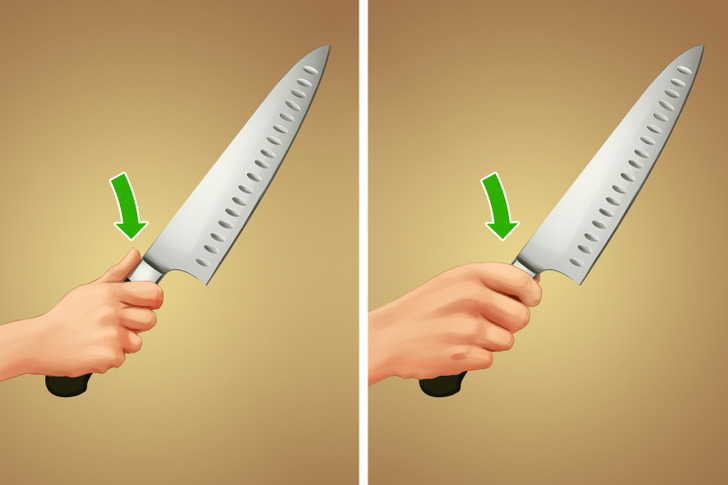
5. How not to hold a knife
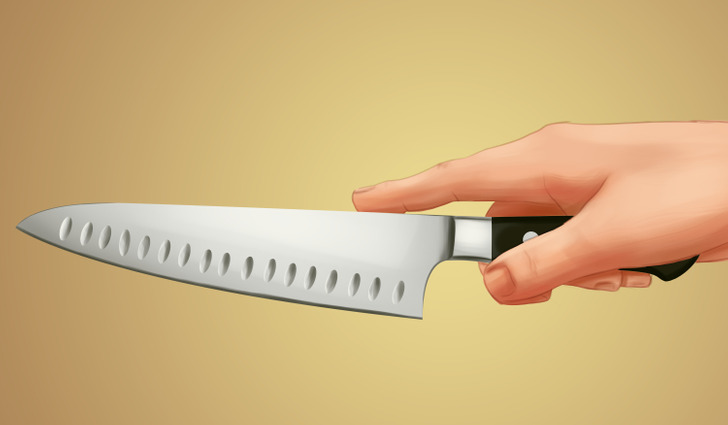
Gripping the handle and putting your index finger on the spine of the blade won’t give you stability and there’s a chance of your knife slipping. Plus, the strength of your arm will end up stressing your hand. At first, you might not feel the pressure and it won’t hurt. But as you do it for a longer period of time, you will notice wrist and hand fatigue.
6. Carrying the knife around
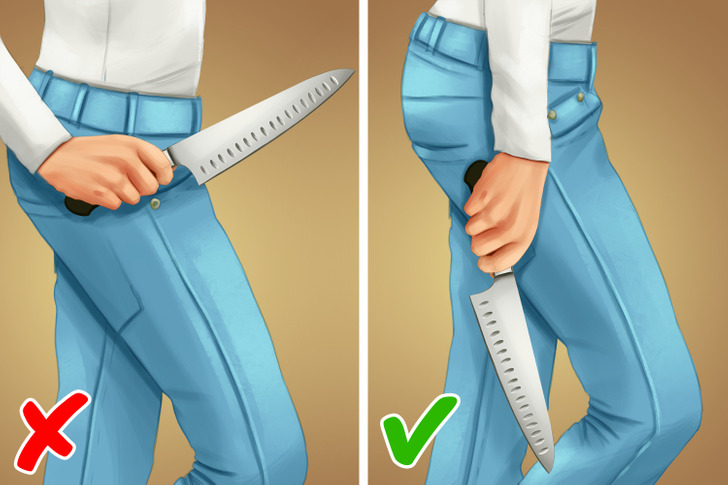
When you are moving around your kitchen and are carrying your knife, you must be very careful. To do it safely, you should:
- Firmly grip the knife by the handle.
- Hold the knife by the side of your body with the tip pointing down at the ground.
❗️In case you drop the knife, don’t try to catch it! Instead, move away and make way for the knife to fall on the ground. If you try to catch it, there’s a chance you’ll hit the blade and hurt yourself.