How to Tie Knots
Despite appearing seemingly simple, making knots is somewhat of a science that can prove useful to each of us. This skill can be especially handy for fishermen, hunters, tourists, and climbers.
5-Minute Crafts is going to get you familiar with several types of knots, all of which can be used in everyday life.
Square knot
The square knot, which is also referred to as the reef knot or the Hercules knot, is quite a simple and strong knot. It was used by mariners 4,000 years ago, and an experienced sailor can untie it with one hand only. Today, this knot is used in tourism, medicine, and macrame weaving.
Specifics:
- It can be tied quickly and easily.
- It can unbind when wet.
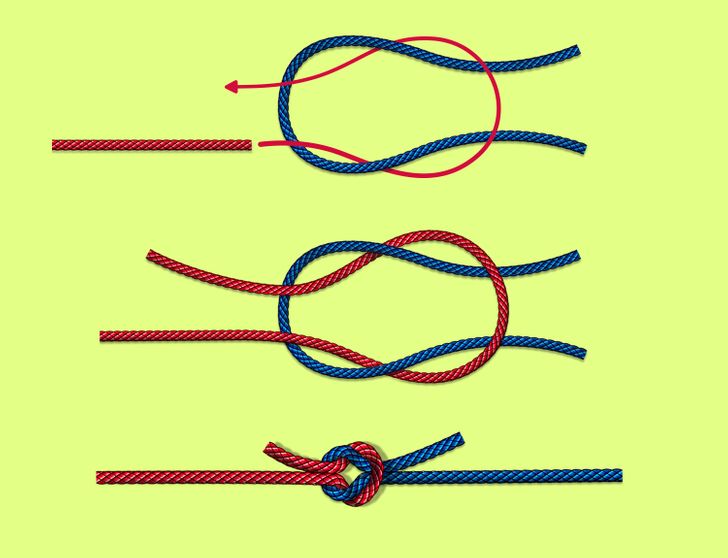
How to tie it:
1. Take 2 ropes.
2. Make a loop from the right rope.
3. Let the left rope through the right one the way it’s shown in the picture. You should get a symmetrical binding with 2 loops.
4. Spread the ropes out at the knot and pull the ends of the loops in different directions. If you have done everything correctly, the short knots of the ropes will be opposite each other and parallel to the long ends.
An important note: In order to get a strong square knot, it should be made with ropes of equal thickness.
Overhand loop
It’s an easy-to-make knot, which forms a fixed loop on a rope.
Specifics:
- It can be made quickly and easily.
- It can be made either at the end of the rope or at its middle.
- It becomes tighter when the rope is pulled.

How to tie it:
1. Fold the rope in half and form a loop.
2. Make a regular knot.
3. Tighten the knot.
Figure 8 loop
Knots made with this method are not only strong but beautiful as well. That’s the reason why they are used not only by climbers, fishermen, and speleologists but for decorative purposes too.
Specifics:
- This loop can be made with one rope end, either in the middle or at the end.
- It’s easy and quick to bind, and it forms a non-slippery loop.
- It doesn’t jam tight with heavy loads, nor does it fall apart.
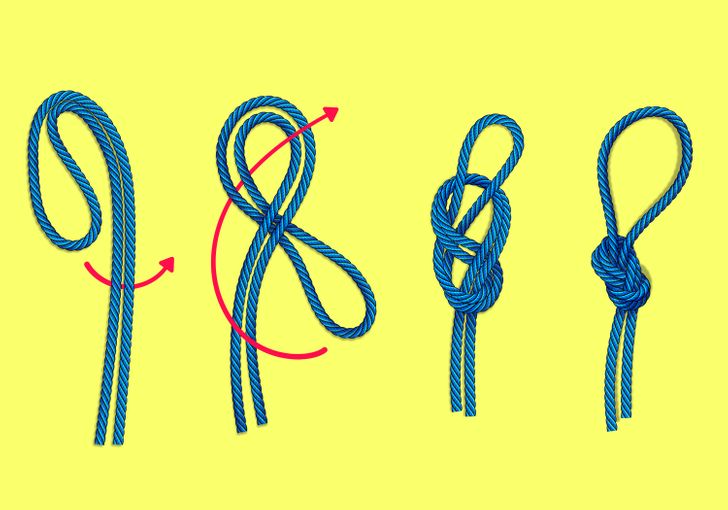
How to tie it:
1. Make a loop out of a rope.
2. Fold the loop in half and wrap it around the main rope (first put the end of the loop behind the main rope, then in front).
3. Let the ends of the rope through the loop that you got when you were making the figure 8.
4. Tighten the knot.
Bowline knot
The bowline is also called the king of knots for its simplicity and importance. It forms a non-tightening loop at the end of the rope, which can be used for various purposes in tourism, shipping, and rescue operations.
Specifics:
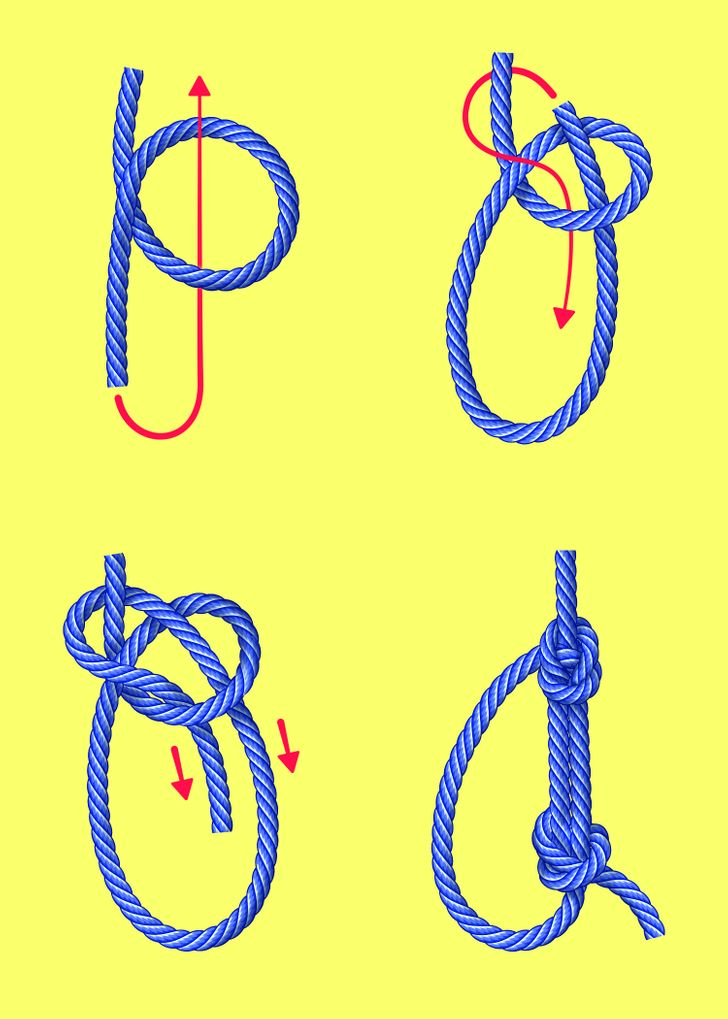
How to tie it:
1. Make a loop out of a rope.
2. Let one of the rope’s ends through the loop.
3. Wrap the undercarriage of the rope around the other end and loop it back into the original loop.
4. Tighten the knot that you’ve made.
Life hack: It’s easy to remember how to make the bowline knot with the help of associations. Imagine the initial loop is a rabbit hole, the undercarriage of the rope is a rabbit, and the other end is a tree. Now try to remember the phrase, “Up through the rabbit hole, round the big tree; down through the rabbit hole and off goes he.” The rope will repeat the rabbit’s movements and you’ll quickly remember how to make this knot.
Grapevine knot
The grapevine knot, also referred to as the double fisherman’s knot, is often used in climbing and alpinism for binding ropes of equal thickness and for securing a line while fishing.
Specifics:
- It is considered to be one of the best binding knots.
- It’s strong and reliable.
- It can help regulate the length of the rope. This knot can be used not only in climbing but also in everyday life. For example, you can change the length of your necklace or beads by making the grapevine knot without breaking or untying the strand.
- It jams tight when exposed to loads, and it’s hard to untie it afterward.
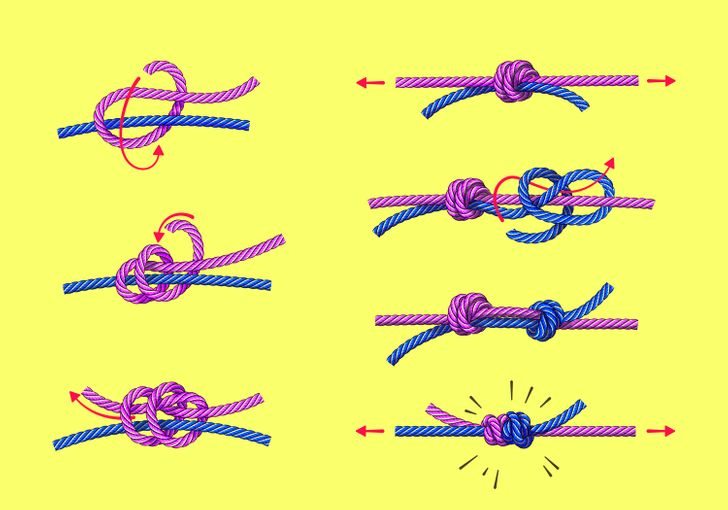
How to tie it:
1. Take 2 ropes of equal length. Place them parallel to each other. Make a loop from the free end of one of the ropes around the second rope.
2. Make another loop in the same direction, moving from the end to the base of the rope. Don’t hurry, otherwise, you might overtwist the ropes.
3. Let the end of the rope you’ve just used for wrapping through the loops that you’ve made.
4. Tighten the knot.
5. Repeat the same steps with the second rope. Eventually, you should get the same knot.
6. Tighten the knots together by pulling the different ends of the ropes.
Offset overhand bend
The offset overhand bend is one of the most ancient knots known today. It can bind 2 ropes and is used in everyday life (when binding threads while knitting, for example), in shipping, and in mountaineering.
Specifics:
- It binds quickly and easily.
- It easily overcomes obstacles and doesn’t get stuck.
- It can easily untie, which is why it’s important to leave the ends of the ropes long while tying it.
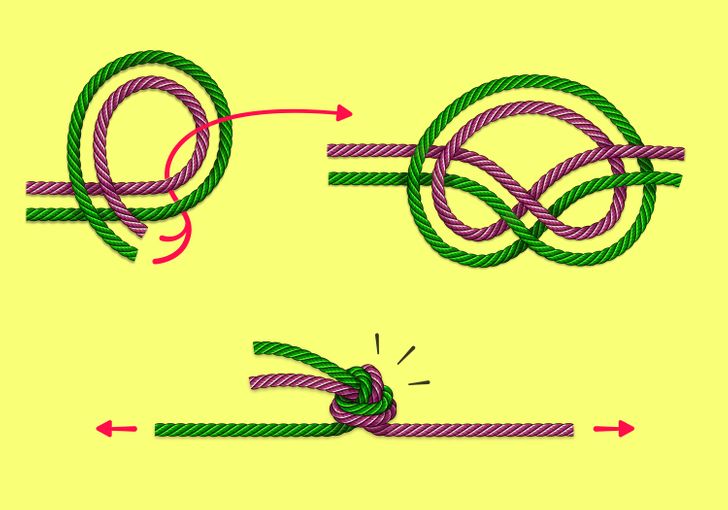
How to tie it:
1. Place 2 ropes parallel to each other. Make a loop with their help.
2. Let the free ends of both ropes through the loop.
3. First, tighten the knot by pulling the ends of the ropes in different directions. Then tighten the knot by pulling each of the ropes in opposite directions.
Fisherman’s bend or anchor bend
The anchor bend is widely used in shipping and fishing and is usually used for tying the anchor rope to the anchor.
Specifics:
- It is strong and reliable and unbinds quite easily after being exposed to moderate loads.
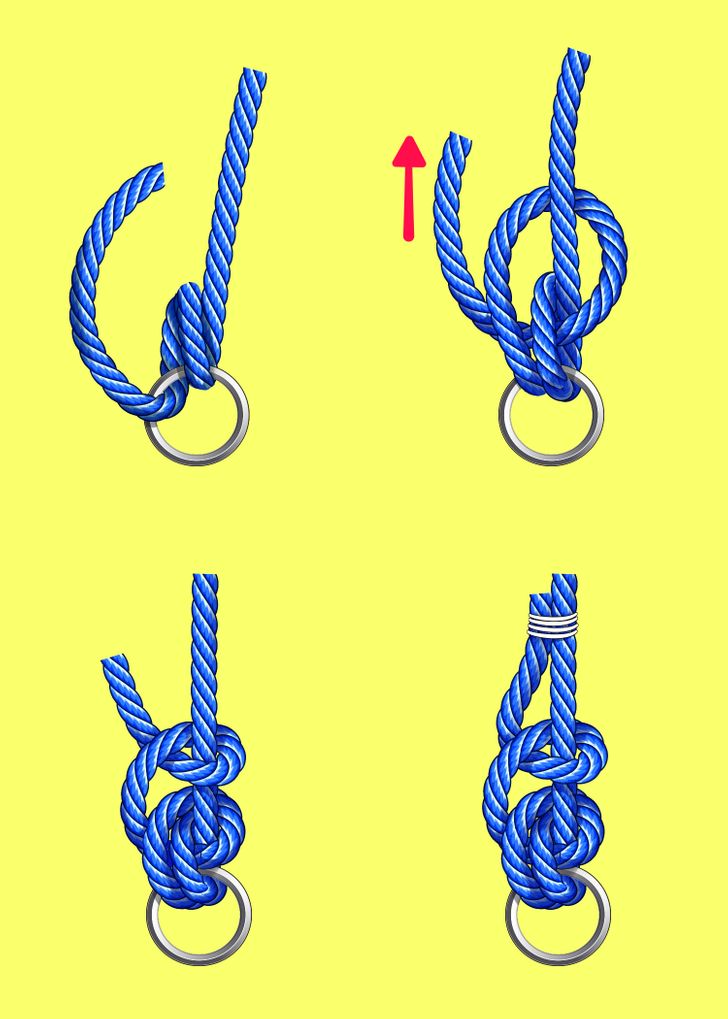
How to tie it:
1. Wrap one end of a rope twice around another rope or object.
2. Let the working end of the rope through the loops that you get after you finish the second wrap. Tighten slightly.
3. Use the working end of the rope to go around its other end above the resulting knot, and let the end through the resulting loop.
4. Tighten it.
Water knot
The water knot is also called the tape knot because it’s one of those knots that can be used for binding tape, ribbons, or leather belts.
Specifics:
- It’s not strong.
- Since this knot can weaken when exposed to an obstacle, it’s better to secure it with another (backup) knot.
- It tightens strongly when exposed to loads, and it’s hard to untie it afterward.
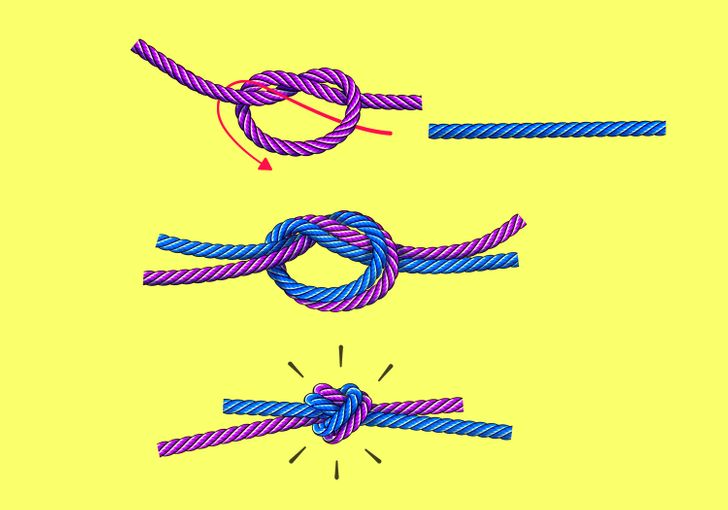
How to tie it:
1. Make a typical knot on one rope, but don’t tighten it.
2. Repeat a simple knot with the other rope, moving from the opposite side toward the first rope.
3. Tighten the knot that you get by pulling the ropes in different directions.