How to Read Sheet Music
Learning how to read sheet music requires a lot of patience and self-discipline. It’s almost like learning a new language. That being said, it’s very useful if you want to learn how to play an instrument properly. 5-Minute Crafts put together a tutorial to help you learn music notation, step-by-step. We recommend you take your time with each step before moving onto the next.
- Having a keyboard at home will make things easier because keyboards are very visual.
- A metronome will also come in handy to practice with.
A. Learning the basics
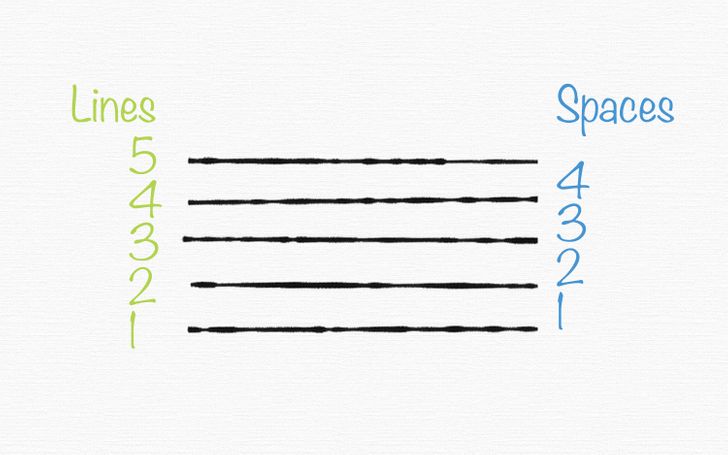
1. The staff
2. Clefs
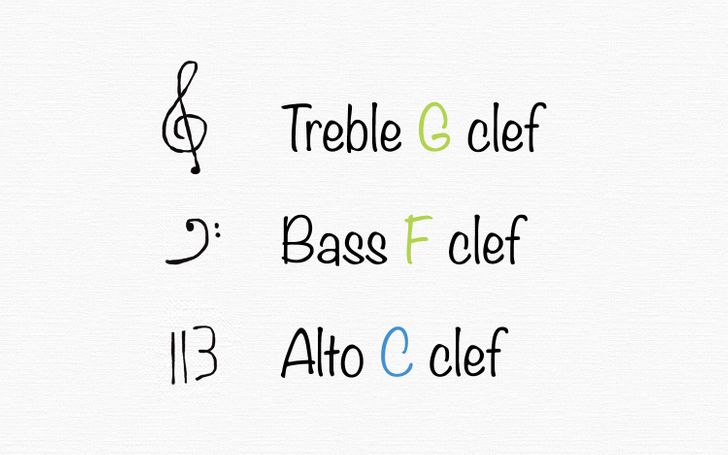
Clefs are signs that you can find at the beginning of a line of music to show how high or low the notes should be. There are 3 types of clefs: treble (G-clefs), bass (F-clefs) and alto (C-clefs). However, most instruments use treble and bass clefs only, so those are the ones you should familiarize yourself with at the beginning.
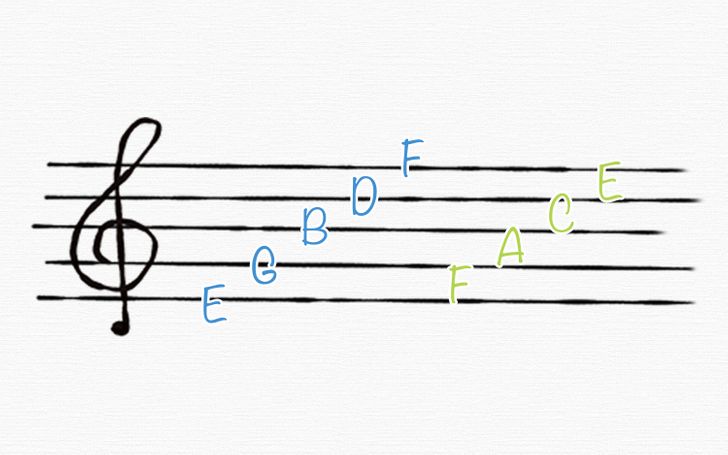
Every clef has its own particular set of notes that will be displayed in a particular order in the staff. For example, the treble clef is used for higher notes on the keyboard, and it’s called the G-clef because its inner swoop encircles the “G” line on the staff.
- Tip: A common trick to remember which note is which in treble clef involves using word cues. For lines that hold G, B, D, and F notes, the cue would be: “Every Good Boy Does Fine” and for spaces, which consist of F, A, C, and E notes, it would be the word, “FACE.”
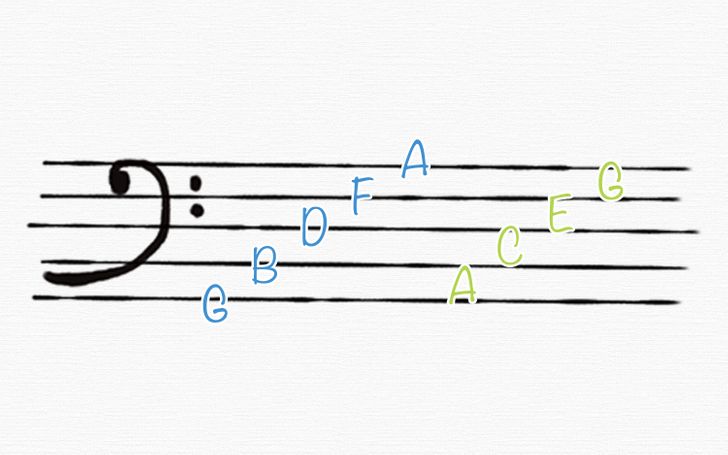
The bass clef, as its name suggests, is used for lower notes on the keyboard. In this case, the line between the 2 bass clef dots is an “F” note, hence the name, F-clef.
- Tip: The word cues here are “Good Boys Do Fine Always” for lines containing G, B, D, F, and A notes, and “All Cows Eat Grass” for the spaces containing A, C, E, and G notes.
Notice how the note sequence moves in alphabetical order up the staff in both clefs.
3. Notes
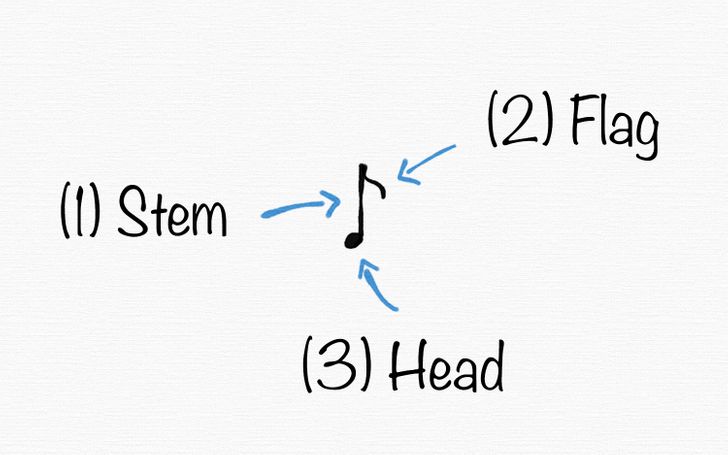
Notes in the staff give 2 important pieces of information: pitch and duration. Pitch is determined by the position of the note head in the staff, which as we saw previously, also depends on the clef chosen. On the other hand, the duration is determined by the presence or absence of the following.
- Stems (1): These are the thin lines that extend either up or down from the note head. It’s written to the right of the note head if it’s pointing upward, and from the left, if it’s pointing downward. The direction of the line doesn’t affect how you play the note. Any notes at or above the middle line on the staff point down, and the rest point up.
- Flags (2): These are curvy marks written to the right of the note stem that shorten the note’s duration. You can add one or more, which will further shorten the duration of the said note.
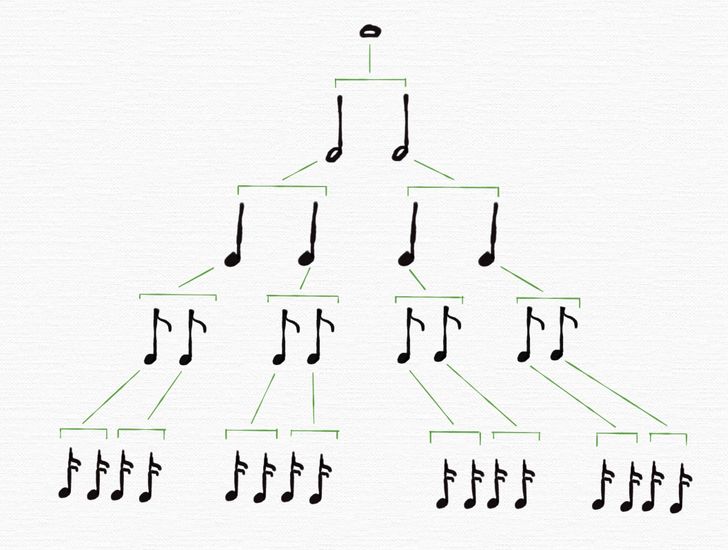
Noteheads (3) also play a role in determining the duration of a note because they indicate the initial value of any given note. If it’s open (white), it means it’s a “whole note.” To divide that note in 2, you’ll add a stem, making it shorter in relation to a whole note. You now have 2 “half notes.” Then, if you want to divide those even further, you can turn them into filled notes (black) with stems and you’ll obtain 4 “quarter notes.” Add a flag to further divide them into 8, making “eighth notes,” 2 flags for “sixteenth notes,” etc.
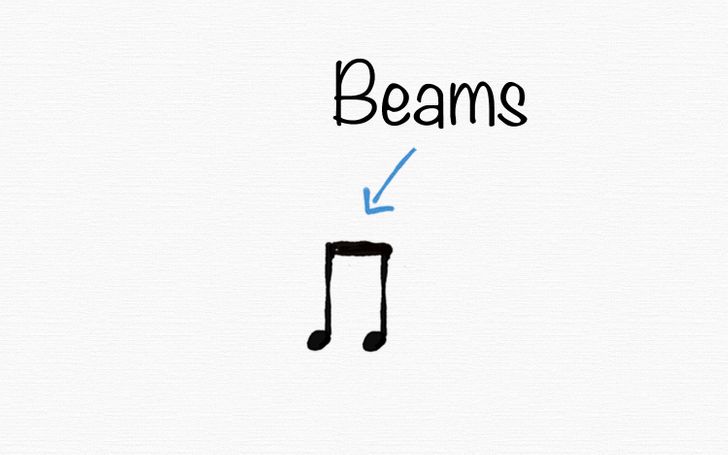
- Note: When you start writing eighth and sixteenth notes, you’ll have to use beams. They basically do the same thing as flags, but make it easier to read the music because they keep the notation less cluttered by grouping notes in sets. Eighths are grouped in sets of 2, sixteenths in sets of 4, etc.
4. Dots and ties
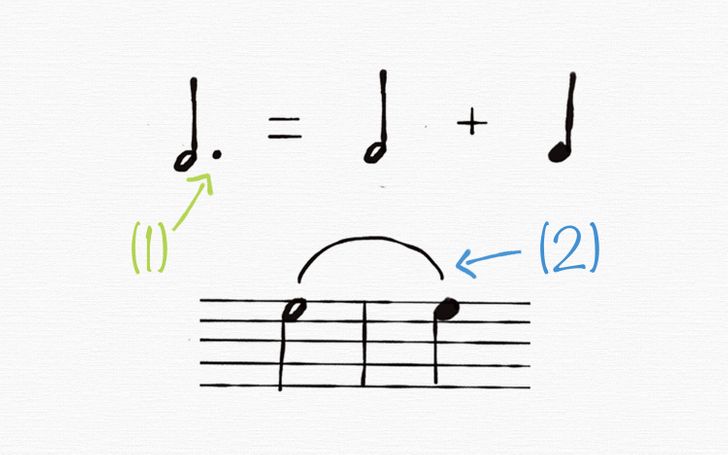
If you want to extend the duration of a particular note, you can use 2 different symbols:
- (1) Dot: This adds another half to that note’s duration. It’s always written on the right side of the note you want to extend.
- (2) Tie: This allows you to add the value of the 2 notes tied together. They are commonly used to signify held notes that cross measures or bars (more on measures and bars on section B).
5. Rests
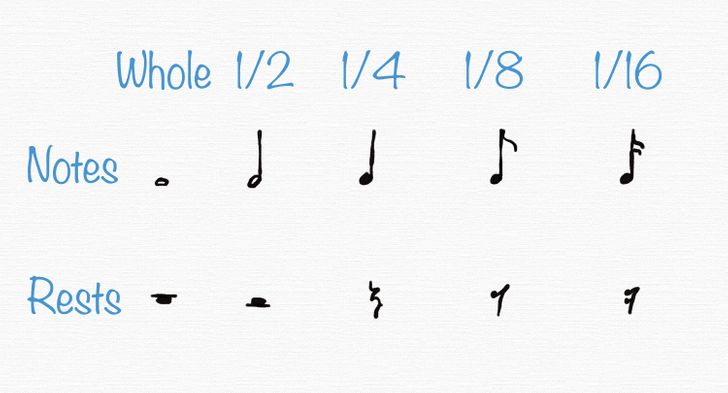
Both notes and silences are noted in sheet music. Much like notes, rests have half, quarter, eighth, and sixteenth values. Whenever a note isn’t taking up each beat (see section B), a rest should be written to compute the duration of that silent moment.
B. Taking a closer look at beats and rhythm
1. Beat and meter
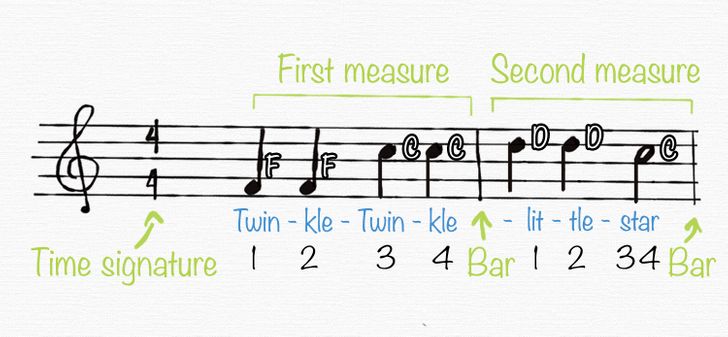
When listening to a song that you like, you tap your foot along with it, right? Most of the time, that’s what we call the beat of the song. It’s a regular emphasis or a place in the music where such an emphasis is expected to be heard. In sheet music, beats are expressed using a meter, also known as the time signature of a song. A time signature is expressed in fraction-like numbers that you can find at the beginning of the sheet, right after the clef.
Let’s make a quick analogy before moving on. When writing sentences, you use words divided by spaces. Those words are made with letters, which are the smallest units in writing. The smallest units in music are notes. When putting them together, you obtain measures. Each measure is divided by bars, which are simply vertical lines. A time signature will tell you how many “letters” you can use per word and how long your “word” will be.
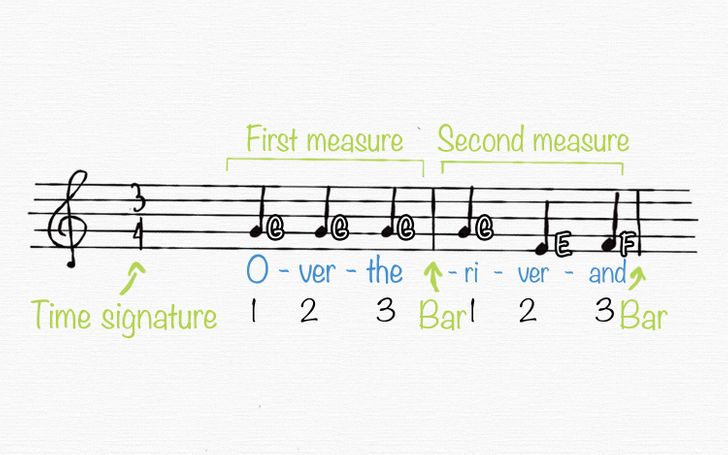
- The top number of the fraction tells you how many beats will fit into a measure. To use our analogy, it would be as if they told you how many letters each word can have.
- The bottom number gives you the note value for a single beat. This would be the duration of each letter you’d use to write your word.
2. Tempo
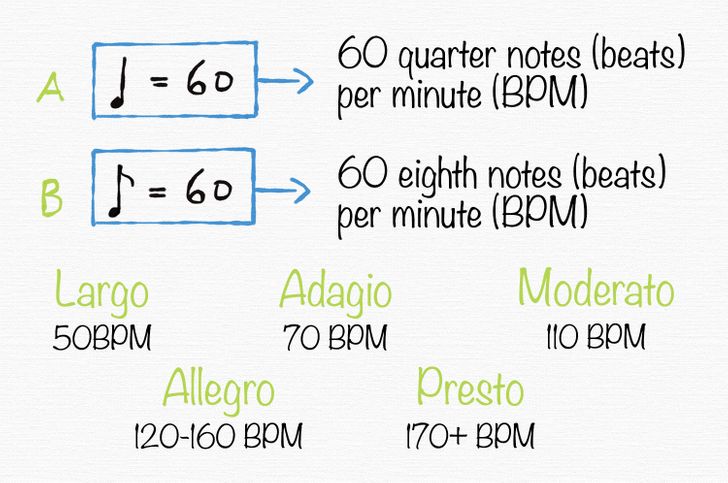
At the top of each piece of sheet music, you’ll find something called a tempo. That’s the measure that tells you how fast or slow a piece is intended to be played. It can be expressed in beats per minute (BPM) or by using Italian words that refer to common known tempos.
- Example A: If you have a quarter note, which is 60, that means that you’ll be playing 60 quarters in the duration of a minute. That would be a “largo.”
Tempo can be expressed with different notes.
- Example B: If you have an eighth note at 60, it would mean you’d have to play 60 eighth notes in a minute.
C. Playing melodies to learn scales
For this part, we’ll be using a keyboard. If you don’t have one, that’s okay. But keyboards are very visual, and that makes it simpler to explain what scales are. Keep in mind that every note corresponds to a specific key on the keyboard. Left keys are lower in pitch than right keys.
1. Scales and intervals
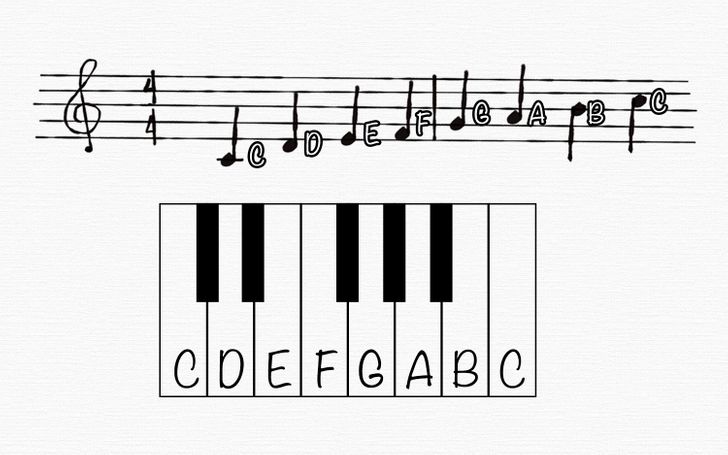
Scales are sequences of 8 consecutive notes. The amount by which one note is higher or lower than the other is called an interval.
- Examples: The interval from the first note of your scale to the last one is called an “octave” because there are 8 notes. For example, an octave would be the interval that goes from any given C to the next C on your keyboard. That’s also known as the C major scale. On the other hand, in that same scale, the interval between the first C and G is a fifth because G is the fifth note in the scale.
Now, the C major scale is the scale where every note corresponds with a white key on your keyboard, starting on a C note. Our example starts on the middle C of the keyboard, which in the treble clef, is found on the first ledger line (those are the extra lines added to the staff).
- Note: Middle C is referred to as C4 because it’s the fourth octave of C scales on a keyboard. C4 is written with a ledger line above the top line of the bass staff or below the bottom line of the treble staff, like in our example. In other words, both notations correspond to the same key on the keyboard.
2. Tones and semitones
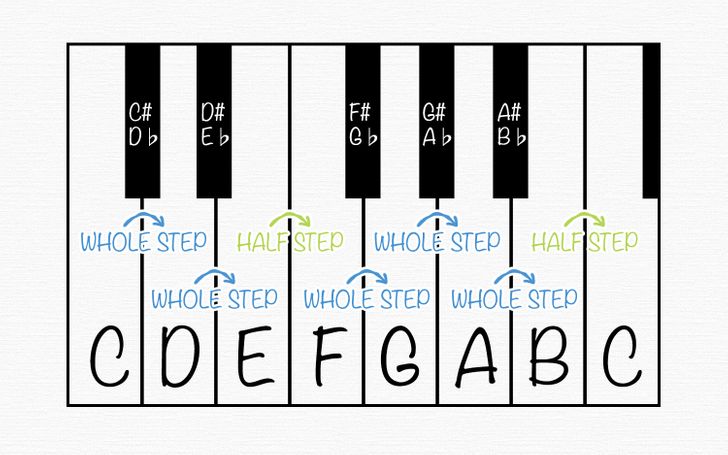
There are many different types of scales. We previously spoke about C major, but we could just as easily have chosen C minor or D major as examples instead. Each type of scale has its own pattern of intervals, and intervals are measured in whole tones and semitones.
For example, major scales always follow this pattern of intervals: whole tone — whole tone — semitone — whole tone — whole tone — whole tone — semitone.
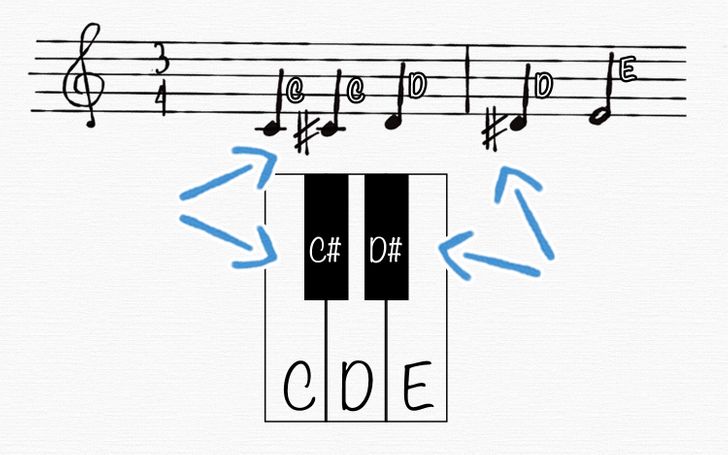
Let’s look closely at what these are:
- Whole tones: That’s the interval between 2 adjacent staff notes. For example, from notes C to D, there’s a whole tone. That’s pretty much the case for all white keys of your keyboard except E to F and B to C, which are semitones. A whole tone contains 2 semitones.
- Semitones: These are the smallest musical intervals in Western music notation. It would be, for example, the distance from note C to C#, which is the black key on the right of C. Black keys on the keyboard are all a semitone away from the previous key/note and are referred to as sharp or flat notes (see the next paragraph for more information). White keys corresponding to E and F, as well as B and C, are only a semitone away from each other. That’s why there’s no black key between them.
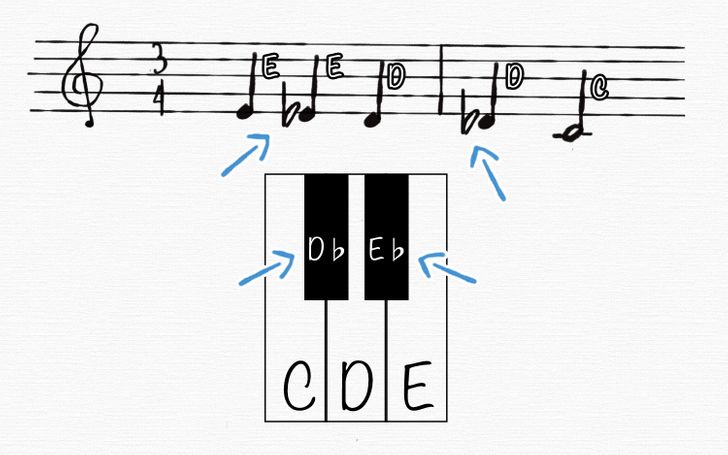
In the staff, sharp notes are preceded by the symbol, “#.” That means that the note following the “#” is a semitone higher than what it would be normally. On the other hand, the symbol, “♭” is used to note flat notes and means that the note following it is a semitone lower than what it would be normally. Compare the 2 images above. These are 2 ways of writing exactly the same notes. That’s because C# and D♭, and D# and E♭are the same notes.
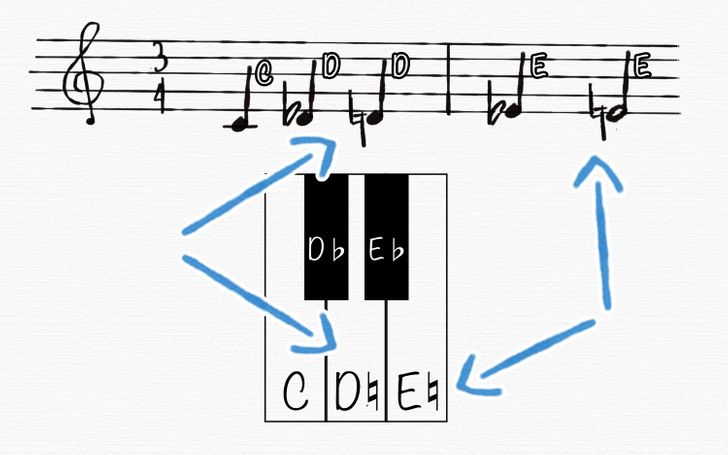
When a note is sharp (♯) or flat (♭), that property extends throughout the measure. If you want to use the “normal” note after that, you can cancel sharps and flats by using the natural symbol, “♮.” The natural symbol precedes the note that they affect.
3. Key signatures
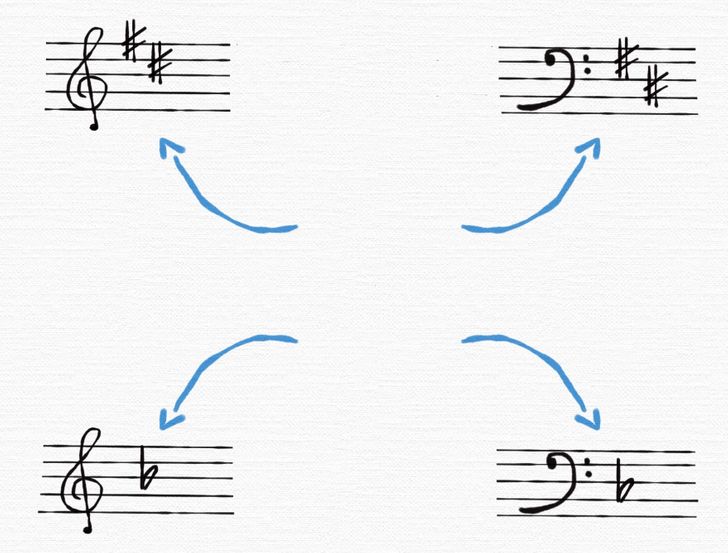
Finally, a key signature is a set of sharp (♯) and flat (♭) symbols placed together immediately after the clef at the beginning of a line of musical notation. It designates notes that are to be played higher or lower, generally throughout the whole piece. That way, if you know you’re using a scale that has a lot of ♯, for example, you can simply write it once at the beginning of the piece and that’s it. The rest of the notes falling on that line or space will be read as sharp or flat.