How to Learn to Play the Guitar
Many people want to learn to play the guitar. Of course, we all know it’s quite a hard thing to do and that it requires constant training and a serious approach. Nevertheless, if your soul is longing for music, you can learn the basics of playing the guitar pretty fast. The main thing is to understand the fundamentals and practice them.
5-Minute Crafts offers you the chance to get familiar with the basics of playing the guitar. This should be enough to help you play your first song.
How to learn to play the guitar
There are 3 possible approaches to this process:
-
Professional: studying at school or with a tutor, learning solfeggio, and various performance techniques, deep immersion in the subject. This type of learning will take several years.
-
By self-study textbook: that’s a popular method that helps you to learn the basics, learn the main chords, and learn to perform simple arrangements of your favorite songs. The time and results of classes will depend solely on your diligence.
-
With the help of new technologies: smartphone applications and games on PlayStations that help to turn the educational process into a pleasant way to spend time. Everything here also depends on your diligence. This method can easily be called amateur, but it’s very motivating.
The construction of the guitar
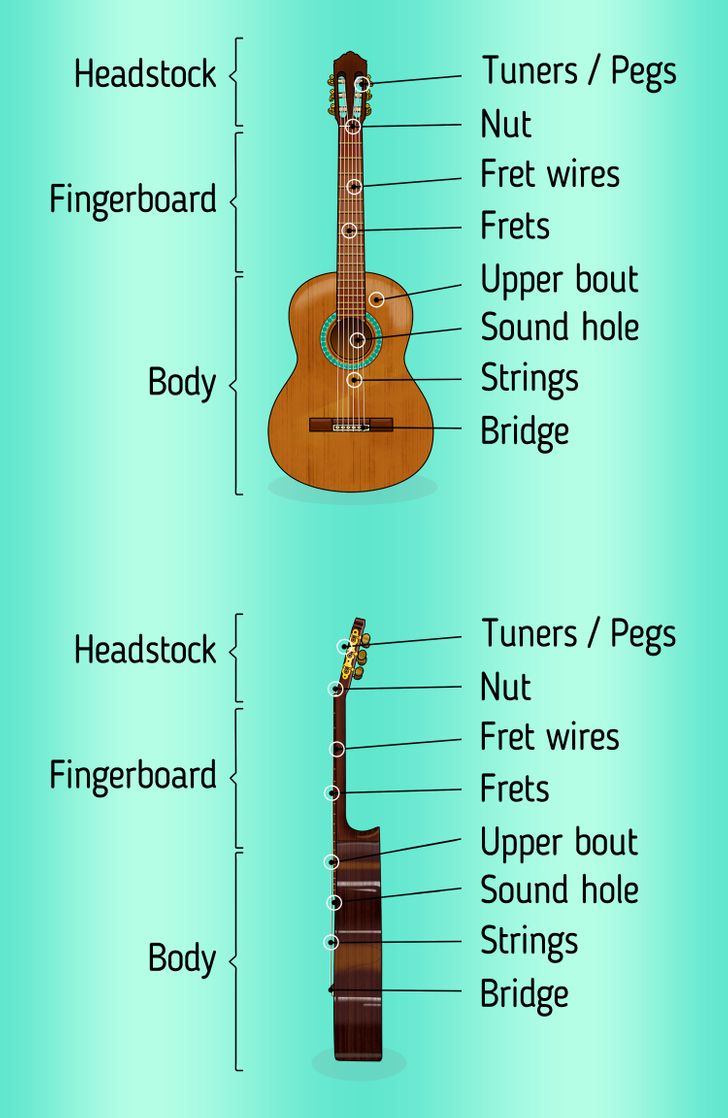
In order to learn to play the guitar, you need to learn its parts:
-
The body — the front and back of the guitar body
-
Body sides — the side part of the body that connects the front and the back parts
-
The bridge is located on the front part of the body and serves as a fastening part for strings.
-
The fretboard or the fingerboard is the upper narrow part of the guitar.
-
Frets are the distance between fret wires on the fretboard.
-
Frets wires are metal strips located at a different distance, they represent the pitch.
-
The headstock is the most upper part of the guitar.
-
Tuners or pegs are a mechanism located on the headstock that help to tune the strings.
-
Strings are pulled from tuners to the bridge. There are guitars with 4, 6, 7, 12 strings. The most widespread variant is a 6-string guitar.
-
The sound hole is a hole in the body opposite to which the player’s hand is placed.
How to tune a 6-string guitar
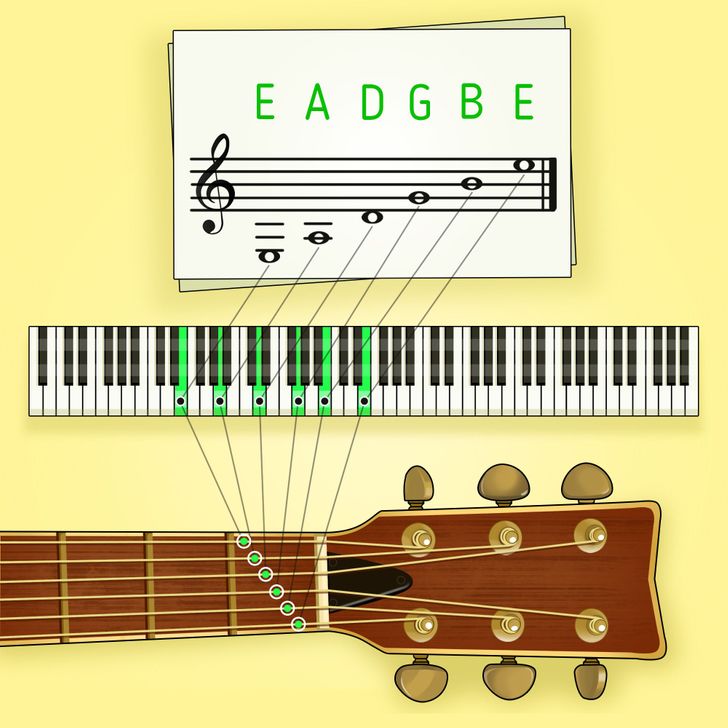
Tuning a guitar means adjusting pegs so that the strings sound a certain way.
- the 1st string is the thinnest and it corresponds to the note E
-
the 2nd string — B
-
the 3rd string — G
-
the 4th string — D
-
the 5th string — A
-
the 6th string — E
Methods of tuning a guitar:
-
With the help of a piano. Play all the notes on the piano and tune the tuning pegs so that the strings sound identical to those notes.
-
With the help of an electric tuner. Strum the string and the tuner will show you how far the sound is from the necessary pitch. Stretch or loosen the string as recommended by the tuner. A tuner can be in the form of a separate gadget, a smartphone application, or an online helper.
-
With the help of a tuning fork. A tuning fork is a small object that emits one reference sound of a certain pitch. Most often it’s A of the 1st octave (frequency 440 Hz). It’s the first string pressed on the 5th fret on the guitar. Tune the 1st string using the tuning fork and take it as a reference when tuning other strings.
-
By the 1st string. In order to tune the guitar by the 1st string, you need to use the following method:
-
Press the 2nd string at the 5th fret. Tune it so that its sound matches the open (i.e. not holding down the string on any frets with your left hand) 1st string.
-
Press the 3rd string at the 4th fret. Tune it so that it sounds like the open 2nd string.
-
Press the 4th string at the 5th fret. It should sound like the open 3rd string.
-
Press the 5th string at the 5th fret, tune it by the open 4th string.
-
Press the 6th string at the 5th fret and tune it by the open 5th string.
How to hold the guitar
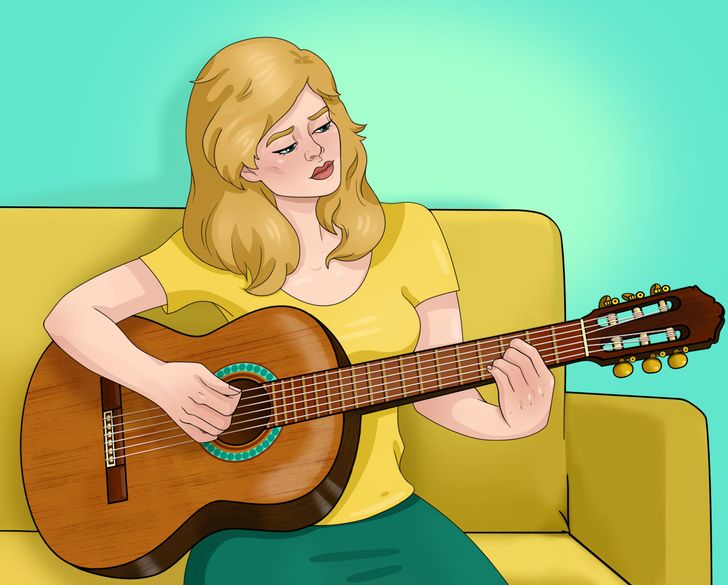
Before starting to play, learn how to hold the guitar correctly:
-
Sit down so that you feel comfortable. Place the guitar on your right leg. Classical guitar players place the instrument on their left leg and use a special holder. However, comfort is the main condition while self-learning.
-
Hold the fingerboard with your left hand.
-
Place your fingers perpendicular to the strings. Strings should be pressed with finger pads, it is better to cut your nails short.
-
The left elbow should be able to move freely.
-
The right arm should be hugging the guitar from above. Strings should be strummed in the area of the sound hole.
Basic chord tabs for beginners
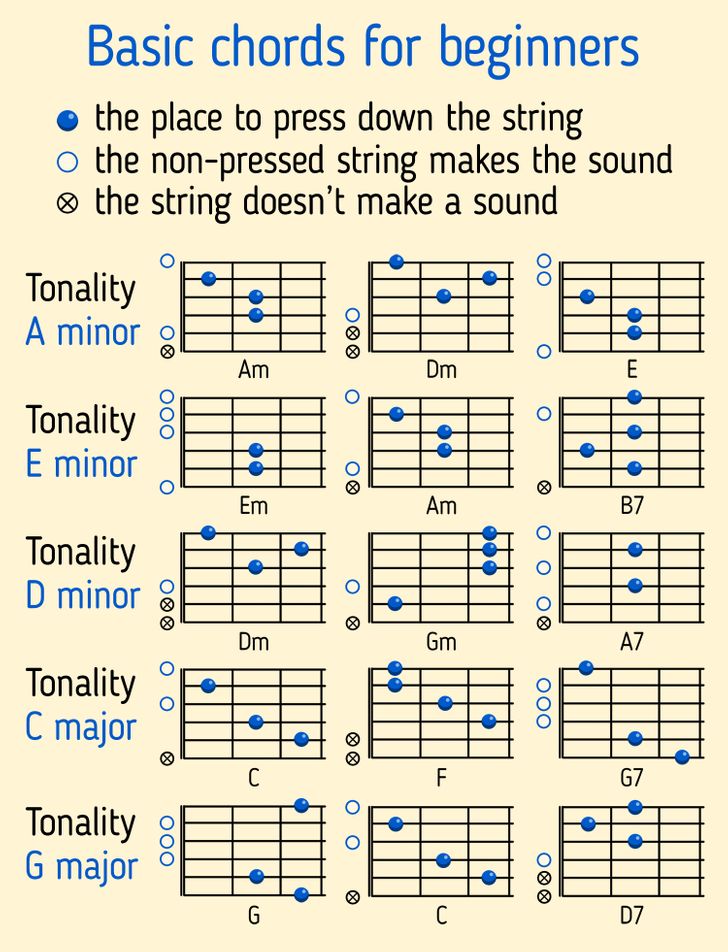
You don’t need to learn the whole staff (a set of lines and spaces that represent different musical pitches) to master the basics of playing the guitar. You can use the tabs instead. Tabs are a schematic depiction of frets and strings that need to be pressed to get nicely-sounding chords. The circle indicates strings that stay open, crosses indicate strings that don’t make any sounds. Try to play the simplest chords for beginners by holding the chords with your left hand and strumming the strings with your right hand against the sound hole:
- Am — press down the 1st fret, 2nd string; 2nd fret, 3rd and 4th strings. The rest of the strings stay open.
-
Dm — press down the 1st fret, 1st string; 2nd fret, 3rd string; 3rd fret, 2nd string.
-
E — press down the 1st fret, 3rd string; 2nd fret, 4th and 5th strings.
-
Em — press down the 2nd fret, 4th and 5th strings.
-
B7 — press down the1st fret, 4th string; 2nd fret, 1st, 3rd, and 5th strings.
-
Gm — press down the 1st fret, 5th string; 3rd fret, 1st, 2nd, and 3rd strings.
-
А7 — press down the 2nd fret, 2nd and 4th strings.
-
C — press down the 1st fret, 2nd string; 2nd fret, 4th string; 3rd fret, 5th string.
-
F — press down the 1st fret, 1st and 2nd strings; 2nd fret, 3rd string; 3rd fret, 4th string.
-
G7 — press down the 1st fret, 1st string; 2nd fret, 5th string; 3rd fret, 6th string.
-
G — press down the 2nd fret, 5th string; 3rd fret, 1st and 6th strings.
-
D7 — press down the 1st fret, 2nd string; 2nd fret, 1st and 3rd strings.
Chords of each tonality harmonize with each other.
What the right hand does
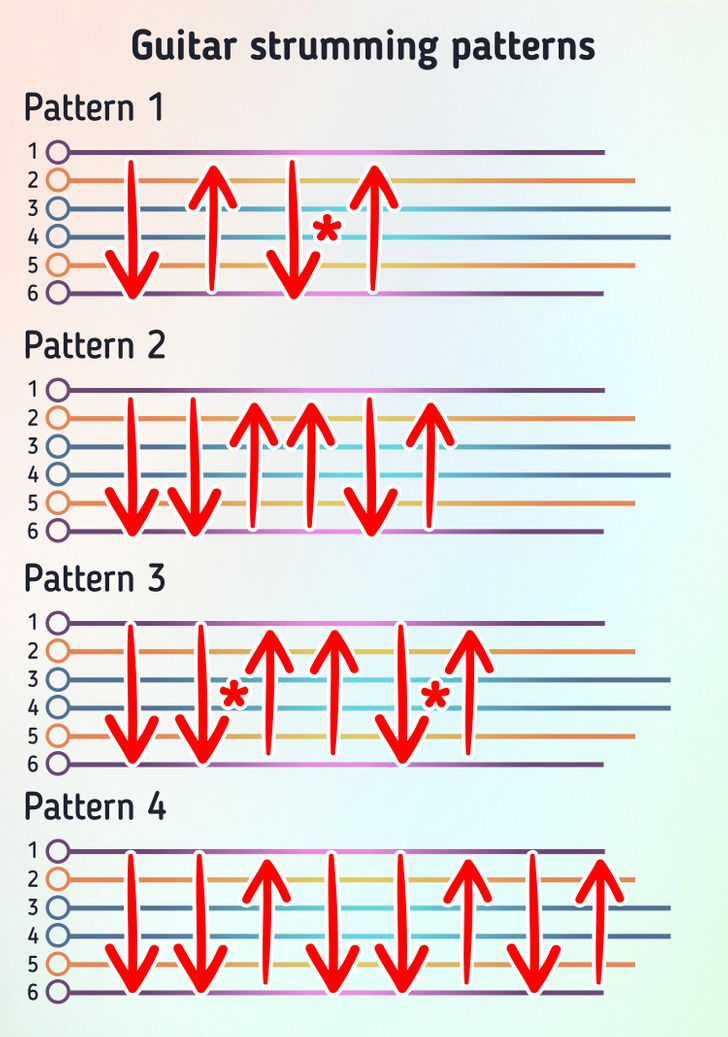
While the left hand is playing chords, the right one is strumming the strings. There are 2 main methods for how you can do this.
1. Strumming is one of the most popular methods of playing the guitar, where the fingers of the right hand, with a sweeping action, brush over several or all of the strings at once. There are several strumming techniques where the thumb strums strings when the hand moves down, while the index finger strums strings when the hand is moving up:
-
Pattern 1 — downstroke, upstroke, downstroke with damping or muting (when the palm touches all strings stopping the sound for a moment), upstroke.
-
Pattern 2 — downstroke, downstroke, upstroke, upstroke, downstroke, upstroke.
-
Pattern 3 — downstroke, downstroke with muting, upstroke, upstroke, downstroke with muting, upstroke.
-
Pattern 4 — downstroke, downstroke, upstroke, downstroke, downstroke, upstroke, downstroke, upstroke. You can also add pauses and mutes to this pattern but the basic scheme stays the same.
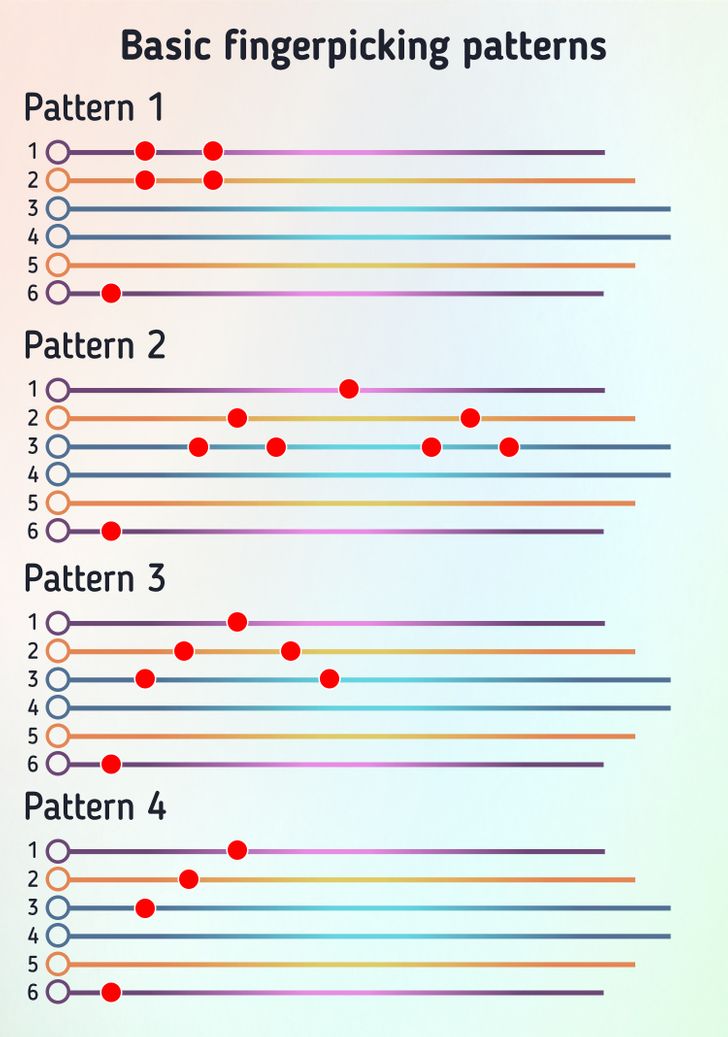
2. Fingerpicking is another widespread method of playing the guitar where the strings are consequently plucked and played one after another with different fingers of the right hand. There are several rules:
-
Fingers are called the following way: index finger — the 1st, middle finger — the 2nd, ring finger — the 3rd. The following indications are applied:
p — thumb
i — index finger
m — middle finger
a — ring finger
c — little finger
In a simplified version fingers can be indicated the following way:
P — thumb
1 — index finger
2 — middle finger
3 — ring finger
-
The 3rd finger picks the 1st string, which is the thinnest, the 2nd finger picks the 2nd string, the 1st finger picks the 3rd string, the thumb picks bass strings.
-
When fingerpicking, one should play the bass string that is the lowest pressed down string in the chord.
-
Bass strings should be played on by down moves, the rest should be played on by up plucks.
-
Learn the main schemes of fingerpicking:
-
Pattern 1: P-(21)-(21) — strings indicated in the parenthesis are played simultaneously.
-
Pattern 2: P-3-2-3-1-3-2-3.
-
Pattern 3: P-3-2-1-2-3.
-
Pattern 4: P-3-2-1.
The song Old MacDonald Had a Farm
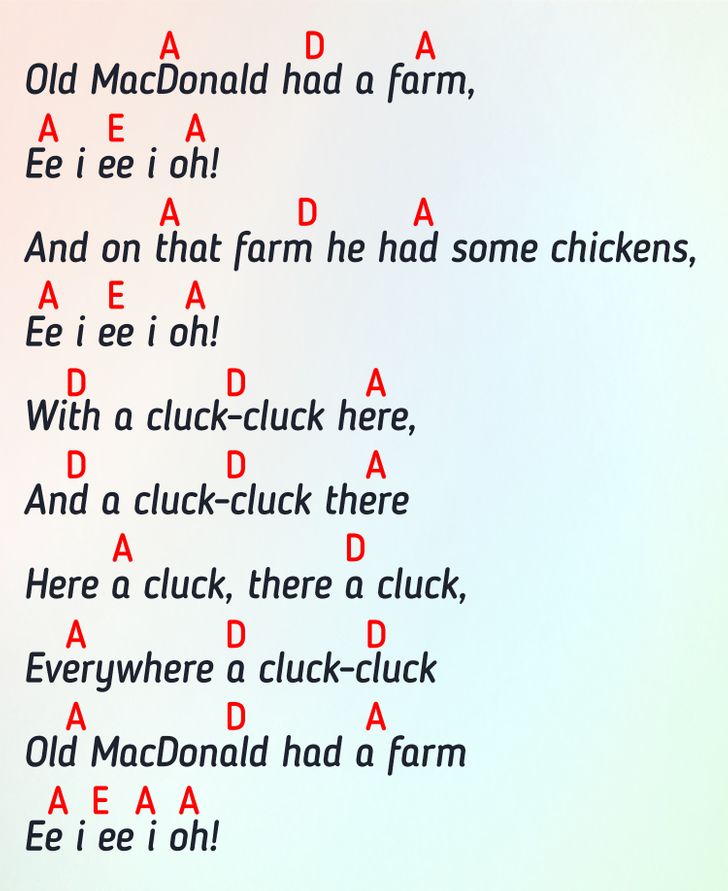
To check your knowledge in practice try playing a simple kids’ song known to everyone. You can find the chords in the picture above.
Try using fingerpicking to play this song. The guitar will give you accompaniment, the tune should be sung by you.
What to do next
If, after going through your first lesson on how to play the guitar, you’d like to continue the learning process:
-
Try to get the instrument in your hands at least once a day;
-
Try to play new chords;
-
Learn how to use a plectrum;
-
Learn what fingerpicks can be played with the right hand;
-
Learn your favorite songs and make sure to demonstrate your new skill to your loved ones.